简介
对 Intel Image Classification 的场景图像进行多分类。
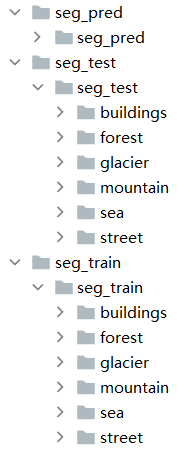
数据集是世界各地自然景观的图像,包含约 25000 张大小为 150x150 的图像,共6个类别。训练集、测试集、验证集有约14000、3000、7000张图像。
{'mountain': 0, 'street': 1, 'glacier': 2, 'buildings': 3, 'sea': 4, 'forest': 5}
| 类名 | 标签 | 翻译 |
|---|---|---|
| mountain | 0 | 山脉 |
| street | 1 | 街道 |
| glacier | 2 | 冰川 |
| buildings | 3 | 建筑 |
| sea | 4 | 海洋 |
| forest | 5 | 森林 |
安装
pip install tensorflow-gpu==2.3.0
pip install scikit-learn
pip install seaborn
登录后下载 Intel Image Classification 数据集并解压,已上传百度网盘(pkdk)

导包
import os
import json
import time

import numpy as np
import pandas as pd
import seaborn as sn
import matplotlib.pyplot as plt
from sklearn import decomposition
from sklearn.utils import shuffle
from sklearn.metrics import confusion_matrix
import tensorflow as tf
from tensorflow.keras.models import Model
from tensorflow.keras.applications.vgg16 import VGG16
from tensorflow.python.keras.preprocessing.image import load_img, img_to_array
from tensorflow.keras.layers import Input, Dense, Conv2D, MaxPooling2D, Flatten
加载数据
target_size = (150, 150)  # 图像大小
datasets = ['seg_train/seg_train', 'seg_test/seg_test']  # 训练集和测试集路径
class_names = list(os.listdir(datasets[0]))  # 文件夹名作为类名
json.dump(class_names, open('class_names.json', mode='w'))  # 保存分类信息
class_names_label = {class_name: i for i, class_name in enumerate(class_names)}  # 类名对应的标签
nb_classes = len(class_names)  # 类别数
print(class_names_label)
# {'buildings': 0, 'street': 1, 'glacier': 2, 'mountain': 3, 'sea': 4, 'forest': 5}
def load_data():
    """加载训练集和测试集"""
    output = []
    for dataset in datasets:  # 加载训练集和测试集
        images = []
        labels = []
        for folder in os.listdir(dataset):  # 加载不同类别文件夹
            label = class_names_label[folder]  # 取标签,如0/1/2/3/4/5
            folder = os.path.join(dataset, folder)
            print('加载{}'.format(folder))
            for file in os.listdir(folder):  # 加载图像文件为numpy数组
                path = os.path.join(folder, file)
                image = load_img(path, target_size=target_size)
                image = img_to_array(image)
                images.append(image)
                labels.append(label)
        images = np.array(images, dtype='float32')
        labels = np.array(labels, dtype='int32')
        output.append((images, labels))
    return output


(train_images, train_labels), (test_images, test_labels) = load_data()  # 加载训练集和测试集
train_images, train_labels = shuffle(train_images, train_labels, random_state=25)  # 打乱顺序
print('加载完毕')
# 加载seg_train/seg_train/buildings
# 加载seg_train/seg_train/street
# 加载seg_train/seg_train/glacier
# 加载seg_train/seg_train/mountain
# 加载seg_train/seg_train/sea
# 加载seg_train/seg_train/forest
# 加载seg_test/seg_test/buildings
# 加载seg_test/seg_test/street
# 加载seg_test/seg_test/glacier
# 加载seg_test/seg_test/mountain
# 加载seg_test/seg_test/sea
# 加载seg_test/seg_test/forest
# 加载完毕
浏览数据
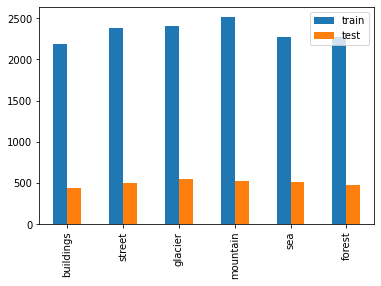
- 有多少训练和测试样本?
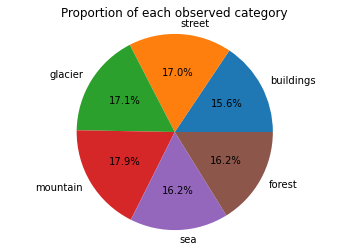
- 每个类别的比例是多少?
n_train = train_labels.shape[0]
n_test = test_labels.shape[0]
print ('训练集样本数 {}'.format(n_train))
print ('测试集样本数 {}'.format(n_test))
# 训练集样本数 14034
# 测试集样本数 3000
_, train_counts = np.unique(train_labels, return_counts=True)  # 查找数组中唯一的元素,返回统计数
_, test_counts = np.unique(test_labels, return_counts=True)
pd.DataFrame({'train': train_counts, 'test': test_counts}, index=class_names).plot.bar()  # 训练集和测试集的样本数柱状图
plt.show()
plt.pie(train_counts, explode=(0, 0, 0, 0, 0, 0), labels=class_names, autopct='%1.1f%%')  # 饼图
plt.axis('equal')
plt.title('Proportion of each observed category')  # 每个类别的比例
plt.show()
数据预处理,将像素值缩放到 [0, 1]
train_images = train_images / 255.0  # 数据预处理
test_images = test_images / 255.0
可视化数据,随机显示
def display_random_image(class_names, images, labels):
    """随机显示图像及标签"""
    index = np.random.randint(images.shape[0])  # 从样本中随机挑一张
    plt.figure()  # 新建一张图
    plt.imshow(images[index])  # 显示图像
    plt.xticks([])  # 去掉x轴
    plt.yticks([])  # 去掉y轴
    plt.grid(False)  # 去掉坐标
    plt.title('Image {} : '.format(index) + class_names[labels[index]])  # 显示编号和标签
    plt.show()
display_random_image(class_names, train_images, train_labels)

可视化数据,批量显示
def display_examples(class_names, images, labels, title='Some examples of images of the dataset'):
    """显示25张图像"""
    fig = plt.figure(figsize=(10, 10))
    fig.suptitle(title, fontsize=16)
    for i in range(25):
        plt.subplot(5, 5, i + 1)
        plt.xticks([])
        plt.yticks([])
        plt.grid(False)
        plt.imshow(images[i])
        plt.xlabel(class_names[labels[i]])
    plt.show()
display_examples(class_names, train_images, train_labels)

创建简单模型
步骤:
- 构建模型
- 编译模型
- 训练模型
- 在测试集上进行评估
- 误差分析
激活函数:
- relu:返回 max(x, 0)
- softmax:返回每个类的概率值
优化器:
- adam = RMSProp + Momentum
- RMSProp = 过去梯度的平方的指数加权平均值
- Momentum = 根据过去的梯度来更新梯度
损失函数:
- sparse_categorical_crossentropy:稀疏分类交叉熵,用于多分类任务
input_shape = target_size + (3,)  # 如(150, 150, 3)
model = tf.keras.Sequential([
    tf.keras.layers.Conv2D(32, (3, 3), activation='relu', input_shape=input_shape),  # 从图像中提取特征
    tf.keras.layers.MaxPooling2D(2, 2),  # 图像大小减半
    tf.keras.layers.Conv2D(32, (3, 3), activation='relu'),
    tf.keras.layers.MaxPooling2D(2, 2),
    tf.keras.layers.Flatten(),  # 将图像二维数组转换为一维数组
    tf.keras.layers.Dense(128, activation='relu'),
    tf.keras.layers.Dense(nb_classes, activation='softmax')  # 输出,每个类的不同概率
])
model.compile(optimizer='adam', loss='sparse_categorical_crossentropy', metrics=['accuracy'])
history = model.fit(train_images, train_labels, batch_size=128, epochs=20, validation_split=0.2)  # 训练模型
# Epoch 1/20
# 88/88 [==============================] - 4s 43ms/step - loss: 1.2078 - accuracy: 0.5433 - val_loss: 0.9001 - val_accuracy: 0.6491
# Epoch 2/20
# 88/88 [==============================] - 3s 33ms/step - loss: 0.7960 - accuracy: 0.7045 - val_loss: 0.7221 - val_accuracy: 0.7371
# Epoch 3/20
# 88/88 [==============================] - 4s 42ms/step - loss: 0.5921 - accuracy: 0.7892 - val_loss: 0.6555 - val_accuracy: 0.7574
# Epoch 4/20
# 88/88 [==============================] - 3s 35ms/step - loss: 0.4356 - accuracy: 0.8508 - val_loss: 0.6143 - val_accuracy: 0.7741
# Epoch 5/20
# 88/88 [==============================] - 3s 34ms/step - loss: 0.3243 - accuracy: 0.8909 - val_loss: 0.6864 - val_accuracy: 0.7610
# Epoch 6/20
# 88/88 [==============================] - 3s 40ms/step - loss: 0.2388 - accuracy: 0.9261 - val_loss: 0.8215 - val_accuracy: 0.7406
# Epoch 7/20
# 88/88 [==============================] - 3s 34ms/step - loss: 0.1661 - accuracy: 0.9474 - val_loss: 0.7373 - val_accuracy: 0.7763
# Epoch 8/20
# 88/88 [==============================] - 3s 34ms/step - loss: 0.1023 - accuracy: 0.9736 - val_loss: 0.8104 - val_accuracy: 0.7684
# Epoch 9/20
# 88/88 [==============================] - 4s 41ms/step - loss: 0.0648 - accuracy: 0.9859 - val_loss: 0.8171 - val_accuracy: 0.7841
# Epoch 10/20
# 88/88 [==============================] - 3s 35ms/step - loss: 0.0461 - accuracy: 0.9914 - val_loss: 0.9363 - val_accuracy: 0.7663
# Epoch 11/20
# 88/88 [==============================] - 3s 34ms/step - loss: 0.0302 - accuracy: 0.9951 - val_loss: 0.9444 - val_accuracy: 0.7813
# Epoch 12/20
# 88/88 [==============================] - 3s 34ms/step - loss: 0.0207 - accuracy: 0.9976 - val_loss: 0.9879 - val_accuracy: 0.7781
# Epoch 13/20
# 88/88 [==============================] - 4s 42ms/step - loss: 0.0207 - accuracy: 0.9975 - val_loss: 1.0050 - val_accuracy: 0.7741
# Epoch 14/20
# 88/88 [==============================] - 3s 34ms/step - loss: 0.0167 - accuracy: 0.9976 - val_loss: 1.0497 - val_accuracy: 0.7756
# Epoch 15/20
# 88/88 [==============================] - 3s 35ms/step - loss: 0.0137 - accuracy: 0.9991 - val_loss: 1.0313 - val_accuracy: 0.7852
# Epoch 16/20
# 88/88 [==============================] - 4s 43ms/step - loss: 0.0106 - accuracy: 0.9993 - val_loss: 1.0671 - val_accuracy: 0.7813
# Epoch 17/20
# 88/88 [==============================] - 3s 34ms/step - loss: 0.0248 - accuracy: 0.9953 - val_loss: 1.2338 - val_accuracy: 0.7435
# Epoch 18/20
# 88/88 [==============================] - 3s 34ms/step - loss: 0.1945 - accuracy: 0.9433 - val_loss: 1.1578 - val_accuracy: 0.7406
# Epoch 19/20
# 88/88 [==============================] - 3s 34ms/step - loss: 0.0250 - accuracy: 0.9954 - val_loss: 1.0525 - val_accuracy: 0.7795
# Epoch 20/20
# 88/88 [==============================] - 3s 33ms/step - loss: 0.0082 - accuracy: 0.9994 - val_loss: 1.1038 - val_accuracy: 0.7798
def plot_accuracy_loss(history):
    """绘制准确率和损失的学习曲线"""
    plt.plot(history.history['accuracy'])
    plt.plot(history.history['val_accuracy'])
    plt.title('model accuracy')
    plt.ylabel('accuracy')
    plt.xlabel('epoch')
    plt.legend(['train', 'validation'], loc='upper left')
    plt.figure()
    plt.plot(history.history['loss'])
    plt.plot(history.history['val_loss'])
    plt.title('model loss')
    plt.ylabel('loss')
    plt.xlabel('epoch')
    plt.legend(['train', 'validation'], loc='upper left')
    plt.show()
plot_accuracy_loss(history)
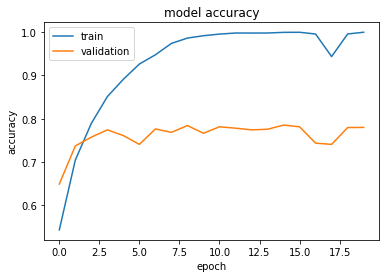
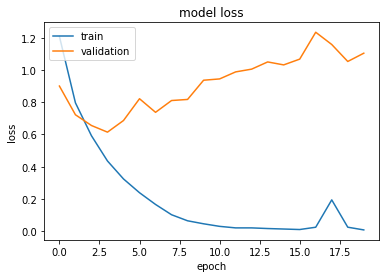
在测试集上的准确率仅有 77%,有一点欠拟合
test_loss, test_accuracy = model.evaluate(test_images, test_labels)  # 在测试集上评估
print('Test accuracy: {:.2f}% loss: {:.2f}'.format(test_accuracy * 100, test_loss))
# 94/94 [==============================] - 1s 5ms/step - loss: 1.1399 - accuracy: 0.7703
# Test accuracy: 77.03% loss: 1.14
随机显示预测结果
predictions = model.predict(test_images)  # 批量预测
pred_labels = np.argmax(predictions, axis=1)  # 可能性最大的标签
display_random_image(class_names, test_images, pred_labels)  # 随机显示图像及标签

误差分析
def print_mislabeled_images(class_names, test_images, test_labels, pred_labels):
    """显示25张预测错误的图像"""
    mislabeled_indices = np.where(test_labels != pred_labels)  # 找出真实值和预测值不同的索引
    mislabeled_images = test_images[mislabeled_indices]
    mislabeled_labels = pred_labels[mislabeled_indices]
    title = 'Some examples of mislabeled images by the classifier'
    display_examples(class_names, mislabeled_images, mislabeled_labels, title)
print_mislabeled_images(class_names, test_images, test_labels, pred_labels)

混淆矩阵
data = confusion_matrix(test_labels, pred_labels)  # 混淆矩阵
fig, ax = plt.subplots(figsize=(10, 6))
sn.set(font_scale=1.4)
sn.heatmap(
    data,
    annot=True,
    annot_kws={'size': 10},
    xticklabels=class_names,
    yticklabels=class_names,
)  # 热力图
ax.set_title('Confusion matrix')
plt.show()
sn.reset_orig()  # 重置样式
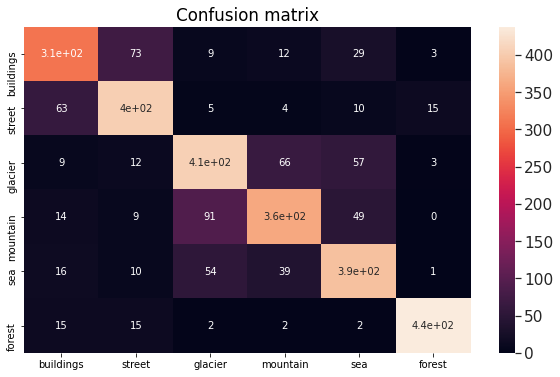
可以看出森林forest最容易区分,冰川glacier和山脉mountain很像,建筑building和街道street没区别
使用预训练模型进行特征提取
VGG16 预训练模型
model = VGG16(include_top=False, weights='imagenet')
train_features = model.predict(train_images)  # 训练集特征
test_features = model.predict(test_images)  # 测试集特征
使用 sklearn.decomposition.PCA() 进行主成分分析
n_train, x, y, z = train_features.shape  # 样本数、高度、宽度、通道数
pca = decomposition.PCA(n_components=2)  # 主成分分析,利用奇异值分解将数据投影到低维空间
X = train_features.reshape((n_train, x * y * z))
pca.fit(X)
C = pca.transform(X)
C1 = C[:, 0]
C2 = C[:, 1]
plt.figure(figsize=(10, 10))
for i, class_name in enumerate(class_names):
    plt.scatter(C1[train_labels == i][:1000], C2[train_labels == i][:1000], label=class_name, alpha=0.4)
plt.legend()
plt.title('PCA Projection')
plt.show()  # 森林forest最容易区分,冰川glacier和山脉mountain很像,建筑building和街道street没区别
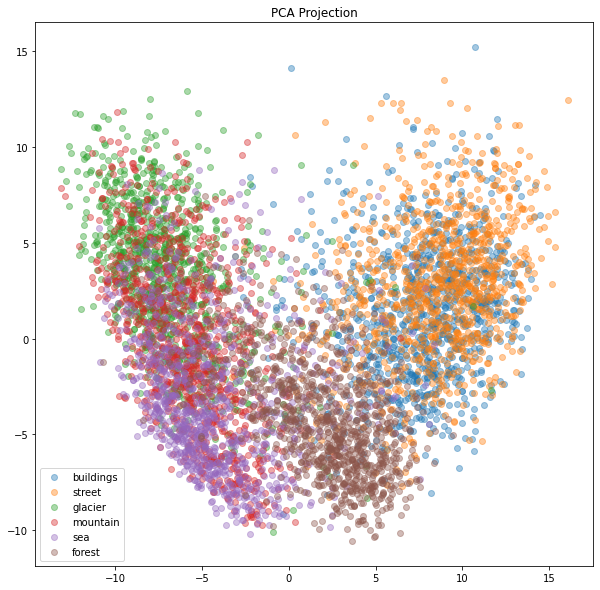
可以看出森林forest最容易区分,冰川glacier和山脉mountain很像,建筑building和街道street没区别
用预训练模型进行特征提取,再训练分类器
model2 = tf.keras.Sequential([
    tf.keras.layers.Flatten(input_shape=(x, y, z)),
    tf.keras.layers.Dense(50, activation='relu'),
    tf.keras.layers.Dense(6, activation='softmax')
])
model2.compile(optimizer='adam', loss='sparse_categorical_crossentropy', metrics=['accuracy'])
history2 = model2.fit(train_features, train_labels, batch_size=128, epochs=15, validation_split=0.2)
# Epoch 1/15
# 88/88 [==============================] - 1s 7ms/step - loss: 0.5098 - accuracy: 0.8105 - val_loss: 0.3759 - val_accuracy: 0.8557
# Epoch 2/15
# 88/88 [==============================] - 0s 5ms/step - loss: 0.2861 - accuracy: 0.8992 - val_loss: 0.3405 - val_accuracy: 0.8710
# Epoch 3/15
# 88/88 [==============================] - 0s 5ms/step - loss: 0.2339 - accuracy: 0.9176 - val_loss: 0.3483 - val_accuracy: 0.8685
# Epoch 4/15
# 88/88 [==============================] - 0s 5ms/step - loss: 0.1922 - accuracy: 0.9345 - val_loss: 0.3459 - val_accuracy: 0.8703
# Epoch 5/15
# 88/88 [==============================] - 0s 5ms/step - loss: 0.1549 - accuracy: 0.9482 - val_loss: 0.3550 - val_accuracy: 0.8739
# Epoch 6/15
# 88/88 [==============================] - 0s 5ms/step - loss: 0.1305 - accuracy: 0.9563 - val_loss: 0.3516 - val_accuracy: 0.8696
# Epoch 7/15
# 88/88 [==============================] - 0s 5ms/step - loss: 0.1081 - accuracy: 0.9673 - val_loss: 0.3715 - val_accuracy: 0.8764
# Epoch 8/15
# 88/88 [==============================] - 0s 5ms/step - loss: 0.0900 - accuracy: 0.9751 - val_loss: 0.3883 - val_accuracy: 0.8671
# Epoch 9/15
# 88/88 [==============================] - 0s 5ms/step - loss: 0.0754 - accuracy: 0.9810 - val_loss: 0.3970 - val_accuracy: 0.8710
# Epoch 10/15
# 88/88 [==============================] - 0s 5ms/step - loss: 0.0652 - accuracy: 0.9824 - val_loss: 0.4069 - val_accuracy: 0.8675
# Epoch 11/15
# 88/88 [==============================] - 0s 5ms/step - loss: 0.0547 - accuracy: 0.9884 - val_loss: 0.4148 - val_accuracy: 0.8714
# Epoch 12/15
# 88/88 [==============================] - 0s 5ms/step - loss: 0.0451 - accuracy: 0.9904 - val_loss: 0.4410 - val_accuracy: 0.8653
# Epoch 13/15
# 88/88 [==============================] - 0s 5ms/step - loss: 0.0396 - accuracy: 0.9917 - val_loss: 0.4407 - val_accuracy: 0.8725
# Epoch 14/15
# 88/88 [==============================] - 0s 5ms/step - loss: 0.0375 - accuracy: 0.9907 - val_loss: 0.4543 - val_accuracy: 0.8671
# Epoch 15/15
# 88/88 [==============================] - 0s 5ms/step - loss: 0.0306 - accuracy: 0.9940 - val_loss: 0.4677 - val_accuracy: 0.8664
plot_accuracy_loss(history2)
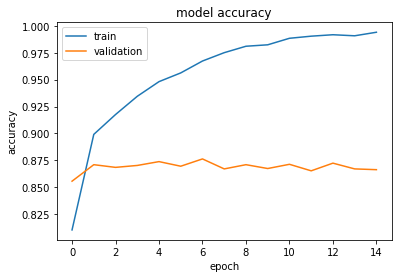

在测试集上的准确率达到 88%,有了很大的提升
test_loss, test_accuracy = model2.evaluate(test_features, test_labels)  # 在测试集上评估
print('Test accuracy: {:.2f}% loss: {:.2f}'.format(test_accuracy * 100, test_loss))
# 94/94 [==============================] - 0s 2ms/step - loss: 0.4350 - accuracy: 0.8827
# Test accuracy: 88.27% loss: 0.44
微调预训练模型
通过训练预训练模型的最高级的几层来学习高级特征
model = VGG16(weights='imagenet', include_top=False)
model = Model(inputs=model.inputs, outputs=model.layers[-5].output)  # 冻结最后四层,用训练好的网络进行特征提取
train_features = model.predict(train_images)
test_features = model.predict(test_images)
model2 = VGG16(weights='imagenet', include_top=False)
input_shape = model2.layers[-4].get_input_shape_at(0)
print(input_shape)
# (None, None, None, 512)
layer_input = Input(shape=(9, 9, 512))  # 输入层
x = layer_input
for layer in model2.layers[-4::1]:  # 组合最后四层
    x = layer(x)
x = Conv2D(64, (3, 3), activation='relu')(x)
x = MaxPooling2D(pool_size=(2, 2))(x)
x = Flatten()(x)
x = Dense(100, activation='relu')(x)
x = Dense(6, activation='softmax')(x)
new_model = Model(layer_input, x)
new_model.compile(optimizer='adam', loss='sparse_categorical_crossentropy', metrics=['accuracy'])
new_model.summary()  # 模型概况
# Model: "functional_3"
# _________________________________________________________________
# Layer (type)                 Output Shape              Param #
# =================================================================
# input_4 (InputLayer)         [(None, 9, 9, 512)]       0
# _________________________________________________________________
# block5_conv1 (Conv2D)        multiple                  2359808
# _________________________________________________________________
# block5_conv2 (Conv2D)        multiple                  2359808
# _________________________________________________________________
# block5_conv3 (Conv2D)        multiple                  2359808
# _________________________________________________________________
# block5_pool (MaxPooling2D)   multiple                  0
# _________________________________________________________________
# conv2d_2 (Conv2D)            (None, 2, 2, 64)          294976
# _________________________________________________________________
# max_pooling2d_2 (MaxPooling2 (None, 1, 1, 64)          0
# _________________________________________________________________
# flatten_2 (Flatten)          (None, 64)                0
# _________________________________________________________________
# dense_4 (Dense)              (None, 100)               6500
# _________________________________________________________________
# dense_5 (Dense)              (None, 6)                 606
# =================================================================
# Total params: 7,381,506
# Trainable params: 7,381,506
# Non-trainable params: 0
# _________________________________________________________________
history = new_model.fit(train_features, train_labels, batch_size=128, epochs=10, validation_split=0.2)
# Epoch 1/10
# 88/88 [==============================] - 3s 38ms/step - loss: 0.6527 - accuracy: 0.7483 - val_loss: 0.3799 - val_accuracy: 0.8657
# Epoch 2/10
# 88/88 [==============================] - 3s 30ms/step - loss: 0.3270 - accuracy: 0.8891 - val_loss: 0.3030 - val_accuracy: 0.8931
# Epoch 3/10
# 88/88 [==============================] - 3s 30ms/step - loss: 0.2435 - accuracy: 0.9172 - val_loss: 0.3331 - val_accuracy: 0.8888
# Epoch 4/10
# 88/88 [==============================] - 3s 30ms/step - loss: 0.2048 - accuracy: 0.9282 - val_loss: 0.3004 - val_accuracy: 0.8999
# Epoch 5/10
# 88/88 [==============================] - 3s 30ms/step - loss: 0.1659 - accuracy: 0.9442 - val_loss: 0.3428 - val_accuracy: 0.8906
# Epoch 6/10
# 88/88 [==============================] - 3s 32ms/step - loss: 0.1359 - accuracy: 0.9549 - val_loss: 0.3781 - val_accuracy: 0.8921
# Epoch 7/10
# 88/88 [==============================] - 3s 33ms/step - loss: 0.1223 - accuracy: 0.9588 - val_loss: 0.3126 - val_accuracy: 0.8956
# Epoch 8/10
# 88/88 [==============================] - 3s 32ms/step - loss: 0.0969 - accuracy: 0.9662 - val_loss: 0.3437 - val_accuracy: 0.8910
# Epoch 9/10
# 88/88 [==============================] - 3s 30ms/step - loss: 0.0924 - accuracy: 0.9686 - val_loss: 0.4055 - val_accuracy: 0.8953
# Epoch 10/10
# 88/88 [==============================] - 3s 30ms/step - loss: 0.0736 - accuracy: 0.9757 - val_loss: 0.3836 - val_accuracy: 0.8985
plot_accuracy_loss(history)

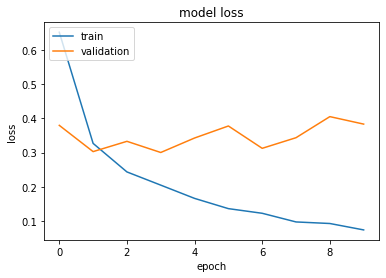
在测试集上的准确率达到 89%,与特征提取方法差不多
test_loss, test_accuracy = new_model.evaluate(test_features, test_labels)  # 在测试集上评估
print('Test accuracy: {:.2f}% loss: {:.2f}'.format(test_accuracy * 100, test_loss))
# 94/94 [==============================] - 1s 6ms/step - loss: 0.3420 - accuracy: 0.8963
# Test accuracy: 89.63% loss: 0.34
保存模型
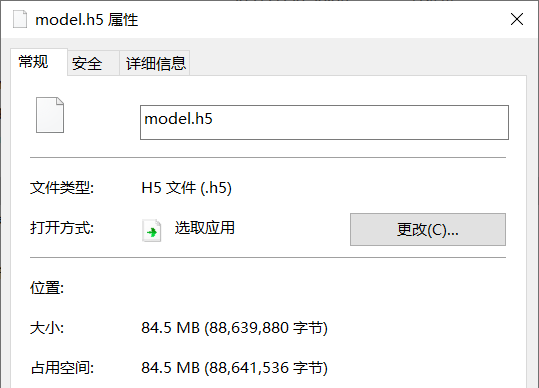
new_model.save('model.h5')
加载模型并预测
import os
import json
import time

import numpy as np
import matplotlib.pyplot as plt
import tensorflow as tf
from tensorflow.keras.models import Model
from tensorflow.keras.applications.vgg16 import VGG16
from tensorflow.python.keras.preprocessing.image import load_img, img_to_array

target_size = (150, 150)  # 图像大小
class_names = json.load(open('class_names.json'))  # 加载类名

model = VGG16(weights='imagenet', include_top=False)
model = Model(inputs=model.inputs, outputs=model.layers[-5].output)  # 冻结最后四层,用训练好的网络进行特征提取

start = time.clock()
trained_model = tf.keras.models.load_model('model.h5')  # 加载模型
print('Warming up took {:.2f}s'.format(time.clock() - start))

dataset = 'seg_pred/seg_pred'  # 未打标签的数据集
files = os.listdir(dataset)
while True:
    index = np.random.randint(len(files))
    file = files[index]
    path = os.path.join(dataset, file)
    x = load_img(path=path, target_size=target_size)
    plt.imshow(x)
    plt.show()
    x = img_to_array(x)
    x = np.expand_dims(x, axis=0)

    start = time.clock()
    features = model.predict(x)
    y = trained_model.predict(features)  # 预测
    print(x.shape, features.shape, y.shape)
    print('Prediction took {:.2f}s'.format(time.clock() - start))

    # 置信度
    for i in np.argsort(y[0])[::-1]:
        print('{}: {:.2f}%'.format(class_names[i], y[0][i] * 100), end=' ')
    print()

    q = input('回车继续,q退出')
    if q == 'q':
        break
# Warming up took 0.21s
# Prediction took 0.11s
# street: 100.00% forest: 0.00% sea: 0.00% mountain: 0.00% glacier: 0.00% buildings: 0.00%

汇总
1. 训练模型并保存
import os
import json

import numpy as np
import matplotlib.pyplot as plt
from sklearn.utils import shuffle
import tensorflow as tf
from tensorflow.keras.applications.vgg16 import VGG16
from tensorflow.python.keras.preprocessing.image import load_img, img_to_array


def load_data(datasets):
    """加载训练集和测试集"""
    output = []
    for dataset in datasets:  # 加载训练集和测试集
        images = []
        labels = []
        for folder in os.listdir(dataset):  # 加载不同类别文件夹
            label = class_names_label[folder]  # 取标签,如0/1/2/3/4/5
            folder = os.path.join(dataset, folder)
            for file in os.listdir(folder):  # 加载图像文件为numpy数组
                path = os.path.join(folder, file)
                image = load_img(path, target_size=target_size)
                image = img_to_array(image)
                images.append(image)
                labels.append(label)
        images = np.array(images, dtype='float32')
        labels = np.array(labels, dtype='int32')
        output.append((images, labels))
    return output


def plot_accuracy_loss(history):
    """绘制准确率和损失的学习曲线"""
    plt.plot(history.history['accuracy'])
    plt.plot(history.history['val_accuracy'])
    plt.title('model accuracy')
    plt.ylabel('accuracy')
    plt.xlabel('epoch')
    plt.legend(['train', 'validation'], loc='upper left')
    plt.figure()
    plt.plot(history.history['loss'])
    plt.plot(history.history['val_loss'])
    plt.title('model loss')
    plt.ylabel('loss')
    plt.xlabel('epoch')
    plt.legend(['train', 'validation'], loc='upper left')
    plt.show()


# 加载数据
target_size = (150, 150)  # 图像大小
datasets = ['seg_train/seg_train', 'seg_test/seg_test']  # 训练集和测试集路径
class_names = list(os.listdir(datasets[0]))  # 文件夹名作为类名
json.dump(class_names, open('class_names.json', mode='w'))  # 保存分类信息
class_names_label = {class_name: i for i, class_name in enumerate(class_names)}  # 类名对应的标签
nb_classes = len(class_names)  # 类别数
print(class_names_label)

print('加载图像中')
(train_images, train_labels), (test_images, test_labels) = load_data(datasets)  # 加载训练集和测试集
train_images, train_labels = shuffle(train_images, train_labels, random_state=25)  # 打乱顺序

train_images = train_images / 255.0  # 数据预处理
test_images = test_images / 255.0

# 使用预训练模型进行特征提取
model = VGG16(include_top=False, weights='imagenet')
train_features = model.predict(train_images)  # 训练集特征
test_features = model.predict(test_images)  # 测试集特征
n_train, x, y, z = train_features.shape  # 样本数、高度、宽度、通道数
model2 = tf.keras.Sequential([
    tf.keras.layers.Flatten(input_shape=(x, y, z)),
    tf.keras.layers.Dense(50, activation='relu'),
    tf.keras.layers.Dense(6, activation='softmax')
])
model2.compile(optimizer='adam', loss='sparse_categorical_crossentropy', metrics=['accuracy'])
history2 = model2.fit(train_features, train_labels, batch_size=128, epochs=15, validation_split=0.2)
test_loss, test_accuracy = model2.evaluate(test_features, test_labels)  # 在测试集上评估
print('Test accuracy: {:.2f}% loss: {:.2f}'.format(test_accuracy * 100, test_loss))
plot_accuracy_loss(history2)

# 保存模型
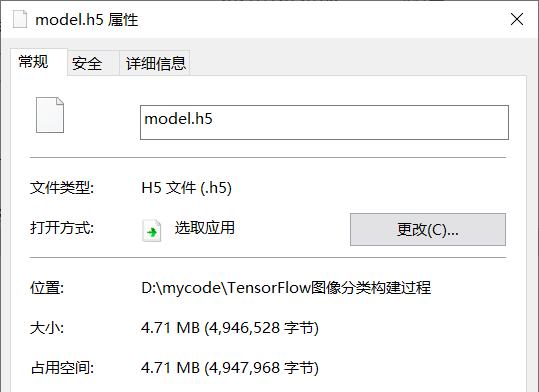
model2.save('model.h5')

# {'buildings': 0, 'street': 1, 'glacier': 2, 'mountain': 3, 'sea': 4, 'forest': 5}
# 加载图像中
# Epoch 1/15
# 88/88 [==============================] - 1s 6ms/step - loss: 0.5051 - accuracy: 0.8173 - val_loss: 0.3573 - val_accuracy: 0.8671
# Epoch 2/15
# 88/88 [==============================] - 0s 5ms/step - loss: 0.2971 - accuracy: 0.8921 - val_loss: 0.3554 - val_accuracy: 0.8643
# Epoch 3/15
# 88/88 [==============================] - 0s 5ms/step - loss: 0.2295 - accuracy: 0.9214 - val_loss: 0.3751 - val_accuracy: 0.8657
# Epoch 4/15
# 88/88 [==============================] - 0s 5ms/step - loss: 0.1822 - accuracy: 0.9376 - val_loss: 0.3419 - val_accuracy: 0.8717
# Epoch 5/15
# 88/88 [==============================] - 0s 5ms/step - loss: 0.1508 - accuracy: 0.9514 - val_loss: 0.3611 - val_accuracy: 0.8678
# Epoch 6/15
# 88/88 [==============================] - 0s 5ms/step - loss: 0.1285 - accuracy: 0.9597 - val_loss: 0.3569 - val_accuracy: 0.8746
# Epoch 7/15
# 88/88 [==============================] - 0s 5ms/step - loss: 0.1028 - accuracy: 0.9697 - val_loss: 0.3748 - val_accuracy: 0.8732
# Epoch 8/15
# 88/88 [==============================] - 0s 5ms/step - loss: 0.0895 - accuracy: 0.9760 - val_loss: 0.3908 - val_accuracy: 0.8678
# Epoch 9/15
# 88/88 [==============================] - 0s 5ms/step - loss: 0.0792 - accuracy: 0.9783 - val_loss: 0.4274 - val_accuracy: 0.8668
# Epoch 10/15
# 88/88 [==============================] - 0s 5ms/step - loss: 0.0666 - accuracy: 0.9808 - val_loss: 0.4138 - val_accuracy: 0.8696
# Epoch 11/15
# 88/88 [==============================] - 1s 6ms/step - loss: 0.0513 - accuracy: 0.9883 - val_loss: 0.4151 - val_accuracy: 0.8707
# Epoch 12/15
# 88/88 [==============================] - 0s 5ms/step - loss: 0.0479 - accuracy: 0.9885 - val_loss: 0.4234 - val_accuracy: 0.8735
# Epoch 13/15
# 88/88 [==============================] - 0s 5ms/step - loss: 0.0415 - accuracy: 0.9898 - val_loss: 0.4545 - val_accuracy: 0.8678
# Epoch 14/15
# 88/88 [==============================] - 0s 5ms/step - loss: 0.0387 - accuracy: 0.9906 - val_loss: 0.4555 - val_accuracy: 0.8703
# Epoch 15/15
# 88/88 [==============================] - 0s 5ms/step - loss: 0.0308 - accuracy: 0.9941 - val_loss: 0.4615 - val_accuracy: 0.8685
# 94/94 [==============================] - 0s 2ms/step - loss: 0.4346 - accuracy: 0.8800
# Test accuracy: 88.00% loss: 0.43
2. 加载模型并预测
import os
import json
import time

import numpy as np
import matplotlib.pyplot as plt
import tensorflow as tf
from tensorflow.keras.applications.vgg16 import VGG16
from tensorflow.python.keras.preprocessing.image import load_img, img_to_array

target_size = (150, 150)  # 图像大小
class_names = json.load(open('class_names.json'))  # 加载类名

model = VGG16(weights='imagenet', include_top=False)

start = time.clock()
trained_model = tf.keras.models.load_model('model.h5')  # 加载模型
print('Warming up took {:.2f}s'.format(time.clock() - start))

dataset = 'seg_pred/seg_pred'  # 未打标签的数据集
files = os.listdir(dataset)
while True:
    index = np.random.randint(len(files))
    file = files[index]
    path = os.path.join(dataset, file)
    x = load_img(path=path, target_size=target_size)
    plt.imshow(x)
    plt.show()
    x = img_to_array(x)
    x = np.expand_dims(x, axis=0)

    start = time.clock()
    features = model.predict(x)
    y = trained_model.predict(features)  # 预测
    print('Prediction took {:.2f}s'.format(time.clock() - start))

    # 置信度
    for i in np.argsort(y[0])[::-1]:
        print('{}: {:.2f}%'.format(class_names[i], y[0][i] * 100), end=' ')
    print()

    q = input('回车继续,q退出')
    if q == 'q':
        break
官方文档
- NumPy Documentation
- pandas Documentation
- seaborn Documentation
- Matplotlib Documentation
- scikit-learn Documentation
- TensorFlow Documentation
