作者:北京交通大学计算机学院 秦梓鑫
学号:21120390
写这篇文章的原因,是因为实验报告中不能大量粘贴代码。但很多坑的点不保存下来又很可惜,于是决定发到CSDN上。
内容仅供学习参考,如有错误之处请大家多多指正。版权所有,转载请注明出处。请勿用于任何形式的课程作业。
内容目录
实验原理
PyTorch基本操作实验
实验内容是创建张量、计算张量的转置和乘积以及跟踪张量的梯度属性在计算中的变化;此实验的主要目的是熟悉PyTorch框架中和Tensor相关的基本操作,并验证PyTorch的自动求导机制的正确性。
Logistic 回归实验
实验内容包括用两种方式实现Logistic回归算法:手动实现和借助torch.nn模块实现。算法实现后,需构造数据集对算法进行测试,以loss和accuracy为指标对结果进行分析。实验的目的是了解Logistic回归算法的原理和实现过程。
Logistic回归算法是一种用于处理二分类问题的线性模型,它的特点是:使用Logistic函数作为线性模型的激活函数,以解决连续的线性函数不适合进行分类的问题[1]。在Logistic回归中,对输入向量
x
∈
R
D
\textbf{x} \in \mathbb{R}^{D}
x∈RD,输出是标签y=1时的后验概率,定义为:
p
(
y
=
1
|
x
)
=
σ
(
w
t
x
)
=
1
1
+
e
x
p
(
?
w
t
x
)
?
∈
(
0
,
1
)
p\left(y=1\middle|\textbf{x}\right)=\sigma\left(\mathbf{w}^t\mathbf{x}\right)=\frac{1}{1+exp\left(-\textbf{w}^t\textbf{x}\right)}\ \in(0,1)
p(y=1∣x)=σ(wtx)=1+exp(?wtx)1??∈(0,1)
值得注意的是:
w
t
x
\textbf{w}^{t}\textbf{x}
wtx已经包含了偏置项
b
b
b,这里略去。特别地,对于二分类问题,对标签y=0时的概率估计也可以计算:
p
(
y
=
0
|
x
)
=
σ
(
w
t
x
)
=
e
x
p
(
?
w
t
x
)
1
+
e
x
p
(
?
w
t
x
)
?
∈
(
0
,
1
)
p\left(y=0\middle|\textbf{x}\right)=\sigma\left(\textbf{w}^t\textbf{x}\right)=\frac{exp\left(-\textbf{w}^t\textbf{x}\right)}{1+exp\left(-\textbf{w}^t\textbf{x}\right)}\ \in(0,1)
p(y=0∣x)=σ(wtx)=1+exp(?wtx)exp(?wtx)??∈(0,1)
训练时,Logistic回归使用交叉熵作为损失函数,对参数进行更新。
R
(
w
)
=
∑
i
n
?
y
l
o
g
(
y
^
)
?
(
1
?
y
)
l
o
g
(
1
?
y
^
)
R(\textbf{w})=\sum_{i}^{n}{-ylog\left(\hat{y}\right)-\left(1-y\right)log\left(1-\hat{y}\right)}
R(w)=i∑n??ylog(y^?)?(1?y)log(1?y^?)
其中,
y
∈
{
0
,
1
}
y\in\{0,1\}
y∈{0,1}是训练集样本的真实标签,
y
^
\hat{y}
y^?是由(1)和(2)计算的后验概率。
对单个样本计算出损失后,可使用梯度下降法或牛顿法进行优化求解。
Softmax回归实验
和Logistic回归相似,Softmax回归也是线性模型的一种。它用于求解多分类问题:给定样本
x
∈
R
D
\textbf{x}\in \mathbb{R}^D
x∈RD,寻找其与样本标签
y
∈
{
1
,
2
,
…
,
C
}
y\in\{1,2,\ldots,C\}
y∈{1,2,…,C}的映射。
首先,我们介绍Softmax函数。其定义如下:给定长度为K的向量
s
=
[
x
1
,
x
2
,
.
.
,
x
K
]
\textbf{s}=\left[x_1,x_2,..,x_K\right]
s=[x1?,x2?,..,xK?],对其中的元素
x
k
x_k
xk?,有
y
k
=
s
o
f
t
m
a
x
(
x
k
)
=
e
x
p
(
x
k
)
∑
i
=
1
K
e
x
p
(
x
i
)
y_k=softmax\left(x_k\right)=\frac{exp\left(x_k\right)}{\sum_{i=1}^{K}exp\left(x_i\right)}
yk?=softmax(xk?)=∑i=1K?exp(xi?)exp(xk?)?
函数的特性是:将序列
s
\textbf{s}
s映射为一个新的序列
y
=
[
y
1
,
y
2
,
…
,
y
K
]
\textbf{y}=\left[y1,y2,\ldots,y_K\right]
y=[y1,y2,…,yK?],满足:
?
k
,
y
k
∈
(
0
,
1
)
,
∑
k
=
1
K
y
k
=
1
\forall k,y_k\in\left(0,1\right),\sum_{k=1}^{K}{y_k=1}
?k,yk?∈(0,1),k=1∑K?yk?=1
在Torch中,可以通过loss=nn.LogSoftmax()函数直接计算Softmax值;由于定义中含有指数运算,可能会造成浮点误差,需要对数据进行预处理。
对于多分类问题,Softmax回归预测样本
x
\textbf{x}
x属于类别
c
c
c的条件概率为:
p
(
y
=
c
|
x
}
=
s
o
f
t
m
a
x
(
w
c
t
x
)
=
e
x
p
(
w
c
t
x
)
∑
c
′
=
1
C
e
x
p
(
w
c
′
t
x
)
p\left(y=c\middle|\textbf{x}\right\}=softmax\left(\textbf{w}_c^t\textbf{x}\right)=\frac{exp\left(\textbf{w}_c^t\textbf{x}\right)}{\sum_{c^\prime=1}^{C}exp\left(\textbf{w}_{c^\prime}^t\textbf{x}\right)}
p(y=c∣x}=softmax(wct?x)=∑c′=1C?exp(wc′t?x)exp(wct?x)?
为得到输出类别,需定义决策函数(计算loss时无用;输出accuracy时有用):
y
^
=
a
r
g
c
=
1
C
m
a
x
?
p
(
y
=
c
|
x
)
\hat{y}={arg}_{c=1}^Cmax\ p\left(y=c\middle| x\right)
y^?=argc=1C?max?p(y=c∣x)
训练时,Softmax回归采用针对多个类别的交叉熵函数作为损失,进行优化:
R
(
w
)
=
∑
i
n
∑
c
C
?
y
l
o
g
(
y
^
)
?
(
1
?
y
)
l
o
g
(
1
?
y
^
)
R\left(\textbf{w}\right)=\sum_{i}^{n}{\sum_{c}^{C}{-ylog\left(\hat{y}\right)-\left(1-y\right)}log\left(1-\hat{y}\right)}
R(w)=i∑n?c∑C??ylog(y^?)?(1?y)log(1?y^?)
其中,
y
^
∈
{
0
,
1
}
\hat{y}\in\{0,1\}
y^?∈{0,1}是训练集样本中:判断样本
x
\textbf x
x是否属于
c
c
c类的真实标签,
y
y
y是由(7)计算出的条件概率。损失函数计算出后,可通过反向传播算法计算损失函数对于参数
w
\textbf{w}
w的偏导数,从而利用梯度下降法进行优化。
实验环境和数据集
- 本实验在笔记本电脑上开展。笔记本的处理器型号为:Intel? Core? i7-10510U CPU @ 1.80GHz
2.30 GHz;RAM大小为16GB;系统环境为Windows 64位。程序运行环境是:Anaconda Shell, Python 3.8.10。 - 人工构造的二分类数据集包括100个二维空间内的点作为样本,分为两类。
- Fashion-MNIST是一个十分类的数据集,每个样本为一张28281的图片。其中,训练集60000张,测试集约10000张。
实验过程和代码
PyTorch基本操作实验
张量减法的实现
m = torch.tensor([1,2,3])
print('m=',m)
n = torch.tensor([[-1],[-1]])
print(m-n)
print(torch.sub(m,n))
print(m.sub(n))
从代码块我们可以看到,PyTorch中实现运算主要有三种方式:直接用运算符、使用torch模块中定义的sub函数、使用张量类中定义的运算方法(很重要,而不是把张量送到Math库中运算,会导致张量计算图无法传递)。三种方式运算时,m和n本身的值没有发生改变;但计算过程中,由于m和n属于不同的维度,且数据范围分别是1×3和2×1,是可广播的(broadcastable)。
可广播的判断方法是:从两个运算张量的数据维度的最后一项往前看,两者要么相等,要么是一。
因此,根据广播机制,m被扩充为了 [ [ 1 , 2 , 3 ] , [ 1 , 2 , 3 ] ] [[1,2,3],[1,2,3]] [[1,2,3],[1,2,3]];n被扩充为了 [ [ ? 1 , ? 1 , ? 1 ] , [ ? 1 , ? 1 , ? 1 ] ] [[-1,-1,-1],[-1,-1,-1]] [[?1,?1,?1],[?1,?1,?1]]。在此之后,两个扩充的向量进行了减法运算。
张量乘法的实现
p = torch.normal(mean=0,std=0.01,size=(3,2))
print('p=',p)

q = torch.normal(mean=0,std=0.01,size=(4,2))
print('q=',q)

q_trans=torch.transpose(q,0,1)
print('q_trans=',q_trans)

product = torch.mm(p,q_trans)
print(product)
生成正态分布的矩阵,并计算矩阵P和Q乘积的代码如上。
张量梯度的跟踪
首先,我们创建一个1×1的张量。注意requires_grad属性默认为False,需要手动设置为True。之后,我们依次计算:
y
1
=
x
2
,
y
2
=
x
3
,
y
3
=
y
1
+
y
2.
y1=x2, y2=x3, y3=y1+y2.
y1=x2,y2=x3,y3=y1+y2. 并调用反向传播函数计算
d
y
1
d
x
,
d
y
2
d
x
,
d
y
3
d
x
\frac{dy1}{dx},\frac{dy2}{dx},\frac{dy3}{dx}
dxdy1?,dxdy2?,dxdy3?的值。
这个过程中需要注意的是:
- 只有计算图中的叶子节点,才可以访问grad属性。
- 每次调用反向传播方法后,需要手动设置
retain_graph=True以保留之前的计算图;否则之前的计算图会废弃。 - 每次计算出梯度后,要使用
grad.zero_()方法清零梯度。否则每次计算得到的梯度会累加。在网络中,先用optimizer.zero()清零梯度,用loss.backward()回传梯度,最后通过optimizer.step()更新参数。
计算过程的代码如下:
x = torch.tensor(1.0,requires_grad=True)
y1 = torch.pow(x,2)
y1.backward(retain_graph=True)
print("dy1/dx:",x.grad)
x.grad.zero_()

y2 = torch.pow(x,3)
y2.backward(retain_graph=True)
print("dy2/dx:",x.grad)
x.grad.zero_()

y3 = y1 + y2
y3.backward(retain_graph=True)
print("dy3/dx:",x.grad)
x.grad.zero_()
Logistic 回归实验
从0实现 logistic 回归 (除了反向传播和交叉熵)
(1)数据集预处理和读取
数据集读取是通过迭代器(iterator)实现的。迭代器生成函数获取批量大小、输入的特征和标签,对标签的序号(index)进行随机打乱;每次在调用时,返回一批(batch)数据的特征向量矩阵和对应标签的列向量。
# feeding whole data set
# return vector instance: batchsize * 2 (represent x and y) and label (batchsize * 1)
def data_iter(batch_size, features, labels):
    num_examples = len(features)
    indices = list(range(num_examples))
    random.shuffle(indices) # 样本的读取顺序是随机的
    for i in range(0, num_examples, batch_size):
        j = torch.LongTensor(indices[i: min(i + batch_size, num_examples)]) # 最后一次可能不足一个batch
        yield features.index_select(0, j), labels.index_select(0, j)
(2)参数初始化
由于本数据集样本较少,线性模型的权重采用非标准的正态分布,增加数据的离散程度。
# parameter initialization
w = torch.tensor(np.random.normal(1,3,(2,1)),dtype=torch.float32)
w_init = w # the initial weights
b = torch.zeros(1,dtype=torch.float32)
w_init = b # initial bias
w.requires_grad_(requires_grad=True)
b.requires_grad_(requires_grad=True)
(3)定义模型、损失、优化
李宏毅老师在深度学习课上讲过:
把大象装进冰箱只需要三步。
First, define the model.
Then, define the loss.
Gradient Desent (inc optimizer, accuracy tester and iteration process) ~
模型
线性模型,激活函数为softmax函数:
def lin_reg(X,w,b):
    return torch.mm(X,w)+b
def softmax(X):
    X_exp = torch.exp(X)
    partition = X_exp + torch.ones(X.size())
    predict = 1 / partition
    return predict # 这里应用了广播机制
损失函数
对于每个batch的预测结果和真实标签,其二元交叉熵损失定义如下:
import math # never do this!
def entropy_loss(yhat, y):
    loss =  nn.BCELoss()
    total = loss(yhat.squeeze(), y)
    return torch.sum(total)/y.shape[0]
这里采用的是torch自带的 Binary Cross Entropy Loss。Torch中自带的计算函数具有更好的数值准确度。稍后我们会手动实现交叉熵函数。值得注意的是yhat是维度为
10
×
1
10 \times 1
10×1的张量,而y的维度是
10
10
10,两者不能直接计算。所以需要调squeeze函数对yhat进行挤压操作。
优化器、检验器和优化过程
采用随机梯度下降算法进行优化。优化方法如下:
# optimization
lr = 0.01
num_epochs = 10
batch_size = 2

def sgd(params, lr, batch_size):
    for param in params:
        param.data -= lr * param.grad / batch_size
检验部分写在前面的目的是,希望能在训练时实时输出Accuracy. 测试指标(metric)包括:在训练集上的accuracy和loss. 注意yhat是大小为10×1的张量,而y是大小为10的张量。不能直接比较运算。因此需要调用squeeze()方法进行归一化。
def evaluate_accuracy(batch_size,features,label):
    acc_sum, n = 0.0, 0
    for X, y in data_iter(batch_size,features,label):
        yhat = torch.round(softmax(lin_reg(X, w, b)))
        d = ( yhat.squeeze() == y).float().sum().item()
        acc_sum +=d
        n += y.shape[0]
    return acc_sum / n
训练过程
for epoch in range(num_epochs):
    for instance,label in data_iter(batch_size,x,y):
        predict = softmax(lin_reg(instance, w, b))
        l =  entropy_loss(predict,label)
        l.backward()
        sgd([w,b],lr,batch_size)
        w.grad.data.zero_()
        b.grad.data.zero_()
    #print(w)
    epoch_loss =  entropy_loss(softmax(lin_reg(instance,w,b)),label)
    print('epoch %d,loss %f' % (epoch+1,epoch_loss.mean().item()))
    epoch_acc = evaluate_accuracy(batch_size,x,y)
    print('acc %f' % epoch_acc)
用 torch.nn 实现 logistic 回归
(1)数据的读取和预处理
使用torch中的Data.TensorDataset定义数据集较为简便:
# Logistic Regression from Torch.nn
import torch.utils.data as Data
batch_size = 10
# from previous data generation
features, labels = x,y
dataset = Data.TensorDataset(features, labels)
# put dataset into DataLoader
data_iter = Data.DataLoader(dataset=dataset,batch_size=batch_size, shuffle=True, num_workers=0,)
(2)定义模型、损失、优化方法
模型
__init__中定义网络;forward中定义计算图
class LogisticNet(nn.Module):
    def __init__(self,d1,d2):
        super(self).__init__()
        self.linear = nn.Linear(d1,d2)
        self.sigmoid = nn.Sigmoid()

    def forward(self, x):
        y = self.linear(x)
        z = self.sigmoid(y)
        return z

net = LogisticNet(2,10)
损失
一行代码完成交叉熵损失。
loss = nn.CrossEntropyLoss()
优化
优化器:采用随机梯度下降
import torch.optim as optim
optimizer = optim.SGD(net.parameters(), lr=0.01)
(3)定义检验方法和优化过程
检验器:注意,这里需要使用arg max决策函数来输出label了(因为标签不是one-hot的形式)。
def evaluate_accuracy(data_iter, net):
    acc_sum, n = 0.0, 0
    for X, y in data_iter:
        acc_sum += (net(X).argmax(dim=1) == y).float().sum().item()
        n += y.shape[0]
    return acc_sum / n
优化过程
num_epochs = 30

for epoch in range(1, num_epochs + 1):
    for X, y in data_iter:
        output = net(X)
        l = loss(output, y.flatten().long())
        optimizer.zero_grad()  # 梯度清零,等价于net.zero_grad()
        l.backward()
        optimizer.step()
    acc = evaluate_accuracy(data_iter,net)
    print('epoch %d, loss: %f, acc: %f' % (epoch, l.item(),acc))
Softmax 回归实验
从0实现 softmax 回归 (除了反向传播)
(1)读取数据
import torch
import torchvision
import torchvision.transforms as transforms

mnist_train = torchvision.datasets.FashionMNIST(root='~/Datasets/FashionMNIST', train=True,
download=True, transform=transforms.ToTensor())
mnist_test = torchvision.datasets.FashionMNIST(root='~/Datasets/FashionMNIST', train=False,
download=True, transform=transforms.ToTensor())


num_workers = 0
train_iter = torch.utils.data.DataLoader(mnist_train, batch_size=batch_size, shuffle=True,
                                         num_workers=num_workers,drop_last= True)
test_iter = torch.utils.data.DataLoader(mnist_test, batch_size=batch_size, shuffle=False,
                                        num_workers=num_workers,drop_last=True)
(2)参数初始化
w = torch.tensor(np.random.normal(1,1,(784,10)),dtype=torch.float32)
b = torch.zeros(1,dtype=torch.float32)
w.requires_grad_(requires_grad=True)
b.requires_grad_(requires_grad=True)
(3)定义模型、损失和优化
模型 线性模型,因为直接计算softmax会产生浮点误差,所以没有在这里加激活函数。
def lin_reg(X,w,b):
    xsize = X.size()
    return torch.mm(X.reshape(-1,784),w)+b
损失 多元交叉熵损失,注意这里为了避免溢出,手动实现Softmax函数时有一个trick。
# loss
import numpy as np

def softmax(X):
    # 计算每行的最大值
    row_max = X.max(axis=1).values
    # 每行元素都需要减去对应的最大值,否则求exp(x)会溢出,导致inf情况;这个trick不影响softmax的结果
    row_max = row_max.reshape(-1, 1)
    X = X - row_max
    X_exp = torch.exp(X)
    partition = X_exp + torch.ones(X.size())
    predict = X_exp / partition
    return predict #这里应用了广播机制

def entropy_loss(yhat, y):
    loss = 0.0
    for i in range(0,batch_size):
        #print(y)
        y_softmax = softmax(yhat)
        index = y[i]
        loss -= y_softmax[i][index].log() #不能用Math.log
        #print(loss)
    return loss
优化
- 优化器
def sgd(params, lr, batch_size):
    for param in params:
        param.data -= lr * param.grad / batch_size # 注意这里更改param时用的param.data
- 检验器
def evaluate_accuracy(iter):
    acc_sum, n = 0.0, 0
    for X, y in iter:
        torch.reshape(X,(-1,784))
        y_out = softmax(lin_reg(X, w, b))
        value,index = y_out.max(axis=1)
        yhat = torch.tensor(index,dtype=int)
        d = ( yhat== y).sum().item()
        acc_sum +=d
        n += y.shape[0]
    return acc_sum / n
- 优化过程
# Hyperparameters
lr = 0.01
num_epochs = 20
batch_size = 256

for epoch in range(num_epochs):
    train_size = 0
    for data in train_iter:
        train_size +=1
        instance, label = data[0],data[1]
        predict = lin_reg(instance, w, b)
        l =  entropy_loss(predict,label)
        l.backward()
        sgd([w,b],lr,batch_size)
        w.grad.data.zero_()
        b.grad.data.zero_()
    print(train_size)

    #test accuracy
    epoch_loss = 0
    test_size = 0
    for data in test_iter:
        instance, label = data[0], data[1]
        epoch_loss +=  entropy_loss(lin_reg(instance,w,b),label)
        test_size += 1
    print(test_size)
    print('epoch %d,loss %f' % (epoch+1,(epoch_loss.item())/ test_size))
    epoch_acc = evaluate_accuracy(test_iter)
    epoch_acc2 = evaluate_accuracy(train_iter)
    print('acc %f on test set, %f on training set' % (epoch_acc,epoch_acc2))
利用torch.nn实现 softmax 回归
(1)定义超参数、读取数据
# Hyperparameters
lr = 0.01
batch_size = 3
num_workers = 0


# data
import torch
import torchvision
import torchvision.transforms as transforms

mnist_train = torchvision.datasets.FashionMNIST(root='~/Datasets/FashionMNIST', train=True,
download=True, transform=transforms.ToTensor())
mnist_test = torchvision.datasets.FashionMNIST(root='~/Datasets/FashionMNIST', train=False,
download=True, transform=transforms.ToTensor())

train_iter = torch.utils.data.DataLoader(mnist_train, batch_size=batch_size, shuffle=True,
                                         num_workers=num_workers,drop_last= True)
test_iter = torch.utils.data.DataLoader(mnist_test, batch_size=batch_size, shuffle=False,
                                        num_workers=num_workers,drop_last=True)
(2)定义模型、损失和优化方法
# Model
import torch
import torch.nn as nn

class SoftmaxReg(nn.Module):
    def __init__(self,n_feature):
        super().__init__()
        # define the transform dimensions
        self.linear = nn.Linear(n_feature,10)
    def forward(self,x):
        y = self.linear(x)
        return y

feature_length = 784

net = SoftmaxReg(feature_length)

# Loss
loss = torch.nn.NLLLoss()

#optimization
import torch.optim as optim
optimizer = optim.SGD(net.parameters(), lr=0.03)
(3)定义测试和优化过程
def evaluate_accuracy(iter):
    acc_sum, n = 0.0, 0
    for X, y in iter:
        X = torch.reshape(X, (-1,feature_length))
        m = nn.LogSoftmax(dim=1)
        y_out = m(net(X))
        value, index = y_out.max(axis=1)
        yhat = torch.tensor(index, dtype=int)
        d = (yhat == y).sum().item()
        acc_sum += d
        n += y.shape[0]
    return acc_sum / n


num_of_epochs = 20
for epoch in range (0, num_of_epochs):
    for instance, label in train_iter:
        normal_instance = torch.reshape(instance,(batch_size,-1))
        output = net(normal_instance)
        criteria = nn.NLLLoss() #调用loss函数必须分开定义;NLLloss可以直接映射到非onehot vector
        m = nn.LogSoftmax(dim=1) #使用Torch自带的Softmax函数,精度更高
        l = criteria(m(output),label)
        l.backward()
        optimizer.step()
        optimizer.zero_grad()
        #print('epoch %d, loss: %f' % (epoch, l.item()))
    epoch_loss = 0
    test_size = 0
    for data in test_iter:
        instance, label = data[0], data[1]
        criteria = nn.NLLLoss()
        m = nn.LogSoftmax(dim=1)
        epoch_loss += criteria(m(net(instance.reshape(-1,784))), label)
        test_size += 1
    print('epoch %d,loss %f' % (epoch+1,(epoch_loss.item())/ test_size))
    epoch_acc = evaluate_accuracy(test_iter)
    epoch_acc2 = evaluate_accuracy(train_iter)
    print('acc %f on test set, %f on training set' % (epoch_acc,epoch_acc2))
实验结果
PyTorch基本操作实验
1.张量减法的实现
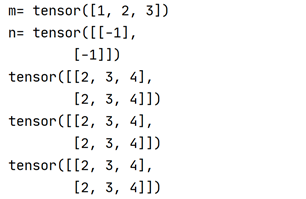
结果如上,可以验证:三种方式都可以实现张量减法,且都触发了PyTorch中的广播机制。实验结果与之前的计算结果一致。
2.张量乘法的实现
运行结果如下:
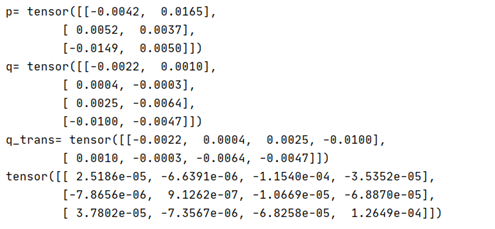
可以看到,向量
P
\textbf{P}
P和
Q
t
\textbf{Q}^\textbf{t}
Qt分别属于3×2和2×4的矩阵,可以进行乘法运算。
3.张量梯度的跟踪
根据公式(10)、(11)和(12),可以验证:
d
y
1
d
x
=
2
x
=
2
,
d
y
2
d
x
=
3
x
2
=
3
,
d
y
3
d
x
=
3
x
2
+
2
x
=
5.
\frac{dy1}{dx}=2x=2,\frac{dy2}{dx}=3x^2=3,\frac{dy3}{dx}=3x^2+2x=5.
dxdy1?=2x=2,dxdy2?=3x2=3,dxdy3?=3x2+2x=5.
实验结果如下:

可知,计算结果和理论推导一致。
Logistic回归实验
手动实现:由于数据集样本数较小,超参数的影响变化不明显。多次调试参数后,结果显示:学习率为0.01,num_epochs 设置为 10,batch_size 设置为 2时,可以在 测试集上观察到loss的下降和accuracy的上升。
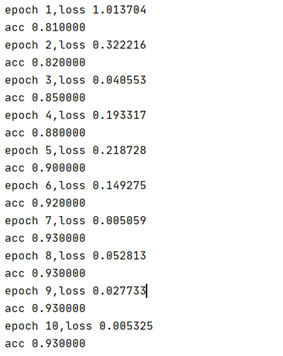
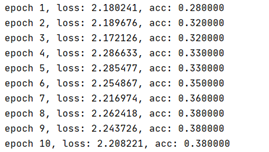
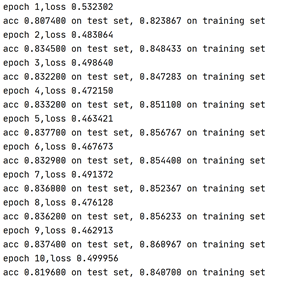
torch实现:结果显示:学习率为0.01,num_epochs 设置为 10,batch_size 设置为 10时,可观察到loss下降和accuracy上升。
Softmax回归实验
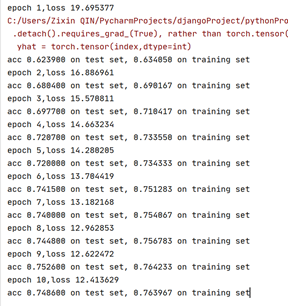
手动实现:学习率为0.01,num_epochs 设置为 5,batch_size 设置为 10时,可观察到loss下降,在训练集和测试集的accuracy呈上升趋势。
torch实现:学习率为0.01,num_epochs 设置为 10,batch_size 设置为 10时,可观察到loss下降,在训练集和测试集的accuracy呈上升趋势。
参考文献
[1] 邱锡鹏,神经网络与深度学习,机械工业出版社,https://nndl.github.io/, 2020.