blazeface网络 pytorch模型 转 ncnn模型并实测效果(vs2019 c++)
前言
blazeface是Google专为移动端GPU定制的人脸检测方案。作者将其贡献概括为: 专为轻量级检测定制的紧凑型特征提取网络,类MobielNe,发表在第三届 AR/VR 计算机视觉研讨会的会议记录中,2019 年 6 月 17 日,加利福尼亚州长滩。
能在移动 GPU 上的亚毫秒级神经人脸检测
准备阶段
https://github.com/hollance/BlazeFace-PyTorch
https://github.com/Tencent/ncnn
https://github.com/daquexian/onnx-simplifier
安装
ncnn
根据github上的提示安装即可
blazeface
git clone https://github.com/hollance/BlazeFace-PyTorch.git
安装pytorch、onnx、onnx-simplifier
安装基本环境(由于是基本操作,网上教程很多,不详细记录),这里需要注意的是onnx-simplifier需要optimizer的版本大于0.2.25,这里可以按照github上的提示来
pip3 install -U pip && pip3 install onnx-simplifier
还有就是如若python出现xxx包缺失,直接安装即可(不同情况下的安装情况不同)
pytorch转ncnn
pth 转 onnx
cd BlazeFace-PyTorch
进入你下载的blazeface文件夹下
这里主要是要用到
blazeface.py 以及 blazeface.pth两个文件
使用blazeface.py直接修改
复制其网络结构 即 class BlazeFace(nn.Module);及其相关类(这里需要注意,最好先运行下blazeface文件把缺失的包补齐)
然后再class BlazeFace(nn.Module)里加入转换函数
class BlazeFace(nn.Module):
······
    def load_weights(self, path):
······
    def pth2onnx(self, path): # 在load_weights和load_anchors之间添加,当然也可以随便在class里随意位置添加
		model = torch.load(model_path)
        self.load_state_dict(torch.load(path))
        x = torch.rand(1, 3, 128, 128, device='cpu')
        torch_out = torch.onnx._export(self, x, "blazeface.onnx", export_params=True, verbose=True)
        self.eval()
······
    def load_anchors(self, path):
······
# py文件最末尾
model_path = 'blazeface.pth'
bf = BlazeFace()
bf.pth2onnx(model_path)
然后修改py文件名为 pytorch2onnx.py
python3 pytorch2onnx.py

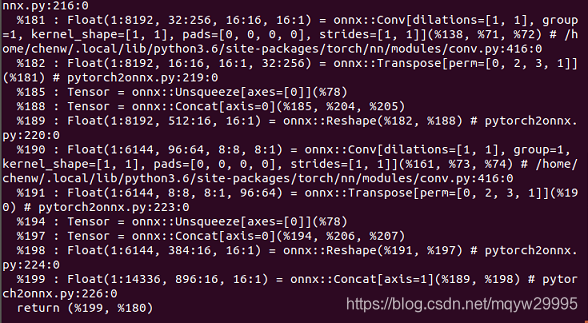
如果是这样就说明你转换成功(这里注意如果提示警告:您正在将模型导出到ONNX,但处于未指定“train”参数的训练模式。模型将默认为推断模式导出 可以忽略它)
简化onnx
这里需要使用 onnx simplifier去消去一些参数使得模型可以转换成bin,如果不进行这步会无法使用ncnn提供 的工具转换
(主要是简化一些冗余操作)
按照github上提示的直接使用
python3 -m onnxsim input_onnx_model output_onnx_model

如果结果是这样就说明转换成功
onnx转ncnn
把转换成功的onnx放到ncnn编译后的文件夹下
your_ncnn_path\ncnn\build\tools\onnx\onnx2ncnn.exe blazeface-sim.onnx blazeface.param blazeface.bin

如果转换成功就会生成.bin文件和param文件
至此成功把pth转ncnn模型
vs2019调用ncnn-blazeface
运行模型
首先创建工程,然后使用ncnn/examples/mobilenetssd.cpp进行修改(建议修改时先按官方教程把mobilenetssd运行一遍再进行修改)
这里有三个点
1、数据预处理是减均值127,归一化为除以127
2、输入层为"x.1" 输出层对应的两个是“180”和“199”(如果你没有修改输入输出层的名字)
3、输入预测图像大小为128*128,图片为bgr
    ······
    const float mean_vals[3] = {127.5f, 127.5f, 127.5f};
    const float norm_vals[3] = {1.0 / 127.5, 1.0 / 127.5, 1.0 / 127.5};
    ······
   	ex.input("x.1", in);
    ncnn::Mat out1;
    ex.extract("180", out1);
    ncnn::Mat out2;
    ex.extract("199", out2);
    ······
移植剩余内容
主要是对网络最后输出层进行解码
首先“180”对应的输出结果为置信值,而“199”的结果为预测框即点的位置,那么其实就是在out1上找到对应的置信值高的点,然后在out2中的对应位置提取预测位置信息。
其中预测位置信息需要通过anchors来进行转换,这里注意的是out1对应的值是特征值所以需要用sigmoid进行转换到0~1之间
    //--------------获取定位

    std::vector< std::vector< float > > det_list;
    for (size_t h = 0; h < out1.h; h++)
    {
        for (size_t w = 0; w < out1.w; w++)
        {
            if (sigmoid(out1[h * out1.w + w]) > 0.65) {
                std::vector<float> val;

                float x_center = out2[h * out2.w + 0] / x_scale * anchors[h][2] + anchors[h][0];
                float y_center = out2[h * out2.w + 1] / y_scale * anchors[h][3] + anchors[h][1];
                float bw = out2[h * out2.w + 2] / w_scale * anchors[h][2];
                float bh = out2[h * out2.w + 3] / h_scale * anchors[h][3];

                val.push_back(y_center - bh / 2.0);
                val.push_back(x_center - bw / 2.0);
                val.push_back(y_center + bh / 2.0);
                val.push_back(x_center + bw / 2.0);

                for (size_t k = 0; k < 6; k++)
                {
                    int offset = 4 + k * 2;
                    float keypoint_x = out2[h * out2.w + offset] / x_scale * anchors[h][2] + anchors[h][0];
                    float keypoint_y = out2[h * out2.w + offset + 1] / y_scale * anchors[h][3] + anchors[h][1];
                    val.push_back(keypoint_x);
                    val.push_back(keypoint_y);
                }
                val.push_back(sigmoid(out1[h * out1.w + w]));
                det_list.push_back(val);
            }

        }
    }
获取到相关的信息就需要进行blazenet提到的Related to the prediction quality
std::vector<std::vector<float>> sort(std::vector<std::vector<float>>& _list)
{
    std::vector<std::vector<float>> list(_list);
    int list_num = list.size();

    for (size_t i = 0; i < list_num; i++)
    {
        int val_num = list[i].size();
        float conf_max = list[i][val_num - 1];
        int index = i;
        for (size_t j = i + 1; j < list_num; j++)
        {
            val_num = list[j].size();
            float conf_val = list[j][val_num - 1];
            if (conf_val > conf_max) {
                conf_max = conf_val;
                index = j;
            }
        }
        if (index != i) {
            std::swap(list[i], list[index]);
        }
    }

    list.swap(_list);
    return _list;
}

float overlap_similarity(std::vector<float> r1, std::vector<float>r2)
{
    float xmin1 = r1[1];
    float ymin1 = r1[0];
    float xmax1 = r1[3];
    float ymax1 = r1[2];

    float w1 = xmax1 - xmin1;
    float h1 = ymax1 - ymin1;

    float xmin2 = r2[1];
    float ymin2 = r2[0];
    float xmax2 = r2[3];
    float ymax2 = r2[2];

    float w2 = xmax2 - xmin2;
    float h2 = ymax2 - ymin2;

    float overlapW = std::min(xmax1, xmax2) - std::max(xmin1, xmin2);
    float overlapH = std::min(ymax1, ymax2) - std::max(ymin1, ymin2);

    return (overlapW * overlapH) / ((w1 * h1) + (w2 * h2) - (overlapW * overlapH));

}

inline void op_divide(float& a, float b) { a = a / b; }
inline void op_ride(float &a, float b) { a = a * b; }
inline float op_add(float a, float b) { return a + b; }
std::vector<std::vector<float>> WeightedNonMaxSuppression(std::vector<std::vector<float>> _list)
{
    std::vector<std::vector<float>> res;
    std::vector<std::vector<float>> list(_list);
    int list_num = list.size();
    for (size_t i = 0; i < list_num; i++)
    {
        float conf = list[i][ list[i].size() - 1 ];
        if (conf < 0){ continue; }

        std::vector<std::vector<float>> temp_face;
        temp_face.push_back(_list[i]);
        for (size_t j = i + 1; j < list_num; j++)
        {
            if (list[j][list[j].size() - 1] < 0) { continue; }
            float iou_val = overlap_similarity(list[i], list[j]);
            if (iou_val > 0.3)
            {
                list[j][list[j].size() - 1] = -1;
                temp_face.push_back(_list[j]);
            }
        }

        if (temp_face.size() > 0)
        {
            for (size_t j = 0; j < temp_face.size(); j++)
                for (size_t k = 0; k < temp_face[j].size() - 1; k++)
                    op_ride(temp_face[j][k], temp_face[j][temp_face[j].size() - 1]);

            std::vector<float> temp_total_val(temp_face[0]);
            for (size_t j = 1; j < temp_face.size(); j++)
                std::transform(temp_face[j].begin(), temp_face[j].end(), temp_total_val.begin(), temp_total_val.begin(), op_add);

            for (size_t j = 0; j < temp_total_val.size() - 1; j++)
                op_divide(temp_total_val[j], temp_total_val[temp_total_val.size() - 1]);


            temp_total_val[temp_total_val.size() - 1] /= temp_face.size();
            res.push_back(temp_total_val);
        }
    }
    return res;
}
...
    sort(det_list);
    std::vector< std::vector< float > > res_face = WeightedNonMaxSuppression(det_list);
...
最后一步就是把比例值按比例转化为图片显示值。
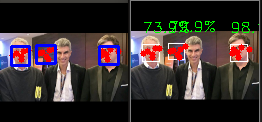
对比pytorch结果和ncnn结果

这里就完成了所有的移植
总结
这个工程的相关内容放到github上:
https://github.com/mqyw/blazeface_ncnn
