前言
??TensorFlow是一个面向所有开发人员的开源机器学习框架。 它用于实现机器学习和深度学习应用程序。为了开发和研究有关人工智能,Google团队创建了TensorFlow。 TensorFlow是使用Python编程语言设计的,因此它是一个易于理解的框架。
??Tensorflow Tensor的通道排序:[batch, height, width, channel]
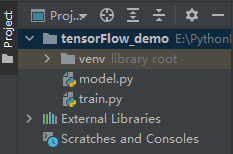
1.官方Demo的项目目录

2.模型
代码:
from tensorflow.keras.layers import Dense, Flatten, Conv2D
from tensorflow.keras import Model


class MyModel(Model):
    def __init__(self):
        super(MyModel, self).__init__()
        self.conv1 = Conv2D(32, 3, activation='relu') #卷积层:卷积核的个数为32,卷积核的大小为3*3,stride默认为1,激活函数为relu
        self.flatten = Flatten()
        self.d1 = Dense(128, activation='relu')#全连接层:结点个数为128
        self.d2 = Dense(10, activation='softmax')

    def call(self, x, **kwargs): #网络的正向传播过程
        x = self.conv1(x)      # input[batch, 28, 28, 1] output[batch, 26, 26, 32]
        x = self.flatten(x)    # output [batch, 21632]
        x = self.d1(x)         # output [batch, 128]
        return self.d2(x)      # output [batch, 10]
3.训练
from __future__ import absolute_import, division, print_function, unicode_literals

import tensorflow as tf
from model import MyModel


def main():
    mnist = tf.keras.datasets.mnist #一个手写数据集

    # download and load data
    (x_train, y_train), (x_test, y_test) = mnist.load_data()
    x_train, x_test = x_train / 255.0, x_test / 255.0

    # Add a channels dimension
    #载入的手写数据图片只有宽度+高度信息,故再添加一个深度信息
    x_train = x_train[..., tf.newaxis]
    x_test = x_test[..., tf.newaxis]

    # create data generator
    #载入数据的方式是将图像和它所对应的标签以一个元组的形式传入from_tensor_slices((x_train, y_train))
    train_ds = tf.data.Dataset.from_tensor_slices(
        (x_train, y_train)).shuffle(10000).batch(32)
    test_ds = tf.data.Dataset.from_tensor_slices((x_test, y_test)).batch(32)

    # create model
    model = MyModel()

    # define loss
    loss_object = tf.keras.losses.SparseCategoricalCrossentropy()
    # define optimizer
    optimizer = tf.keras.optimizers.Adam()

    # define train_loss and train_accuracy
    train_loss = tf.keras.metrics.Mean(name='train_loss')
    train_accuracy = tf.keras.metrics.SparseCategoricalAccuracy(name='train_accuracy')

    # define train_loss and train_accuracy
    test_loss = tf.keras.metrics.Mean(name='test_loss')
    test_accuracy = tf.keras.metrics.SparseCategoricalAccuracy(name='test_accuracy')

    # define train function including calculating loss, applying gradient and calculating accuracy
    @tf.function
    def train_step(images, labels):
        with tf.GradientTape() as tape:
            predictions = model(images)
            loss = loss_object(labels, predictions)
        gradients = tape.gradient(loss, model.trainable_variables)
        optimizer.apply_gradients(zip(gradients, model.trainable_variables))

        train_loss(loss)
        train_accuracy(labels, predictions)

    # define test function including calculating loss and calculating accuracy
    @tf.function
    def test_step(images, labels):
        predictions = model(images)
        t_loss = loss_object(labels, predictions)

        test_loss(t_loss)
        test_accuracy(labels, predictions)

    EPOCHS = 5

    for epoch in range(EPOCHS):
        train_loss.reset_states()        # clear history info
        train_accuracy.reset_states()    # clear history info
        test_loss.reset_states()         # clear history info
        test_accuracy.reset_states()     # clear history info

        for images, labels in train_ds:
            train_step(images, labels)

        for test_images, test_labels in test_ds:
            test_step(test_images, test_labels)

        template = 'Epoch {}, Loss: {}, Accuracy: {}, Test Loss: {}, Test Accuracy: {}'
        print(template.format(epoch + 1,
                              train_loss.result(),
                              train_accuracy.result() * 100,
                              test_loss.result(),
                              test_accuracy.result() * 100))


if __name__ == '__main__':
    main()
运行结果:
