目标检测任务下图像扩增经常使用imgaug库,笔者实现了基于imgaug库的VOC格式图像数据扩增,有兴趣小伙伴可以了解一下,代码位于:
https://github.com/ouening/OD_dataset_conversion_scripts/blob/master/voc_augument.py
本博文主要介绍另一个图像处理工具新秀——kornia,在去最新版本中已经新增了augmentation接口,可以很方便地进行图像数据扩增,包括常规类型、bbox类型、segment类型和keypoint类型。
1. bbox目标检测扩增
本文主要介绍bbox形式的扩增,参考官方例子:
主要用到的API为
AugmentationSequential(*args, data_keys=[<DataKey.INPUT: 0>], same_on_batch=None, return_transform=None, keepdim=None, random_apply=False)

Args:
    *args: a list of kornia augmentation modules.
    data_keys: the input type sequential for applying augmentations.
        Accepts "input", "mask", "bbox", "bbox_xyxy", "bbox_xywh", "keypoints".
    same_on_batch: apply the same transformation across the batch.
        If None, it will not overwrite the function-wise settings.
    return_transform: if ``True`` return the matrix describing the transformation
        applied to each. If None, it will not overwrite the function-wise settings.
    keepdim: whether to keep the output shape the same as input (True) or broadcast it
        to the batch form (False). If None, it will not overwrite the function-wise settings.
    random_apply: randomly select a sublist (order agnostic) of args to
        apply transformation.
        If int, a fixed number of transformations will be selected.
        If (a,), x number of transformations (a <= x <= len(args)) will be selected.
        If (a, b), x number of transformations (a <= x <= b) will be selected.
        If True, the whole list of args will be processed as a sequence in a random order.
        If False, the whole list of args will be processed as a sequence in original order.
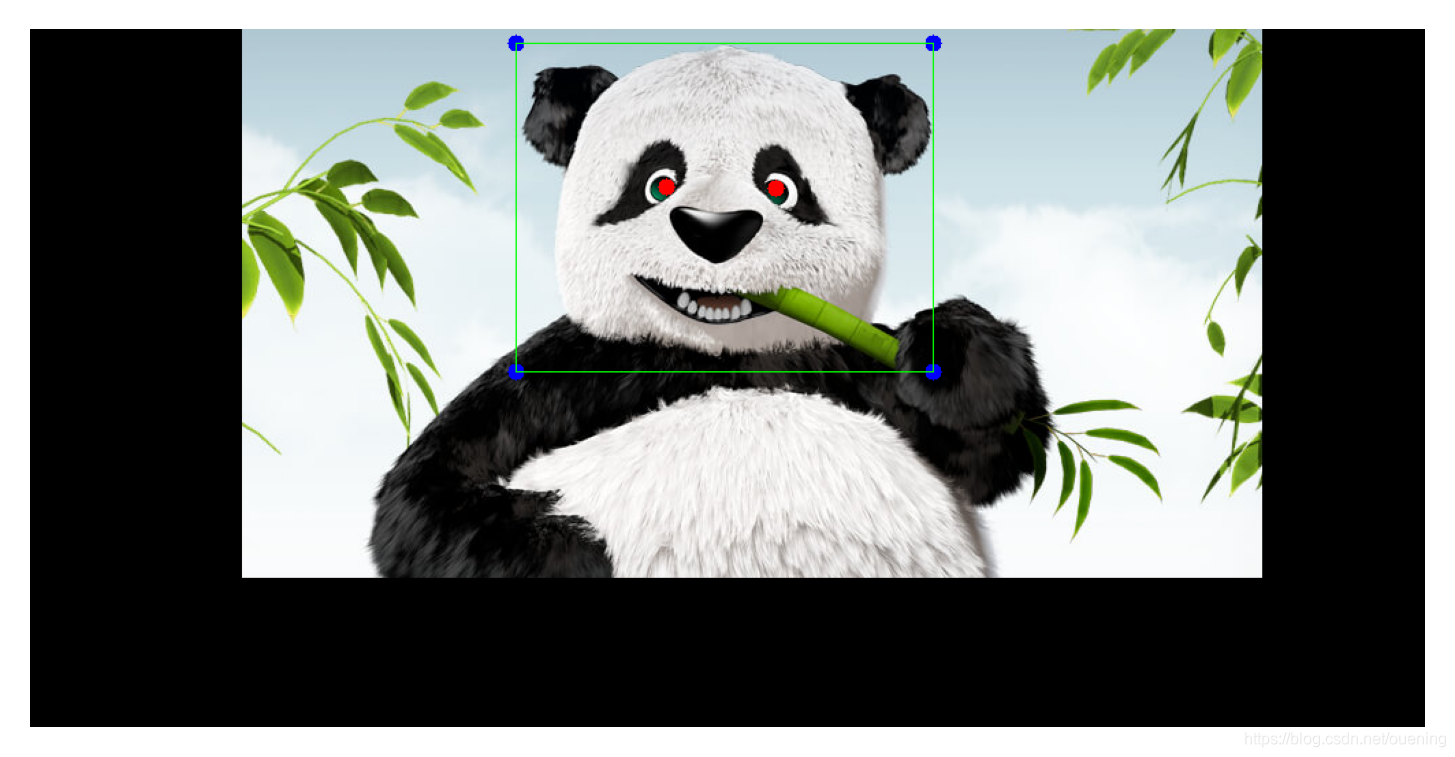
注意参数data_keys该参数指定输入数据的类型,允许类型有:"input", "mask", "bbox", "bbox_xyxy", "bbox_xywh", "keypoints", 官方教程使用了一个熊猫的例子,绘制了 bbox(头部位置), mask和 keypoint(眼睛位置)对应的代码为:
aug_list = AugmentationSequential(
    K.ColorJitter(0.1, 0.1, 0.1, 0.1, p=1.0),
    K.RandomAffine(360, [0.1, 0.1], [0.7, 1.2], [30., 50.], p=1.0),
    K.RandomPerspective(0.5, p=1.0),
    data_keys=["input", "bbox", "keypoints", "mask"],
    return_transform=False,
    same_on_batch=False,
)

bbox = torch.tensor([[[355,10],[660,10],[660,250],[355,250]]])
keypoints = torch.tensor([[[465, 115], [545, 116]]])
mask = bbox_to_mask(torch.tensor([[[155,0],[900,0],[900,400],[155,400]]]), w, h).float()
plt.imshow(mask.squeeze_().numpy()); plt.show()

img_out = plot_resulting_image(img_tensor, bbox, keypoints, mask)
plt.imshow(img_out); plt.axis('off'); plt.show()


图像扩增方仿射变affine和透视变换perspective,那么原来的bbox经过变换后势必会变形,如上图红框为bbox变形后的形状。这种bbox不适用于通常的2D目标检测(二维旋转目标检测可合适,笔并未研究过,不在讨论范围之内),因此要进行转换成如上图中绿色的bbox形式。在官方例子上进行简单修改,可以得目标检测的图像扩增数据(image-bbox pair)。
转换原理:

转换代码(核心内容写在函数plot_resulting_image里面):
#!/usr/bin/env python3
# -*- coding: utf-8 -*-
"""
Created on Sat Aug  7 21:22:19 2021
"""

# !wget https://tinypng.com/images/social/website.jpg -O panda.jpg

from matplotlib import pyplot as plt
import numpy as np
import torch
import cv2

from kornia import augmentation as K
from kornia.augmentation import AugmentationSequential
from kornia.geometry import bbox_to_mask
from kornia.utils import image_to_tensor, tensor_to_image
from torchvision.transforms import transforms

to_tensor = transforms.ToTensor()
to_pil = transforms.ToPILImage()

def plot_resulting_image(img, bbox, keypoints, mask):
    img = img * mask
    img_draw = cv2.polylines(np.array(to_pil(img)), bbox.numpy(), isClosed=True, color=(255, 0, 0))
    for k in keypoints[0]:
        img_draw = cv2.circle(img_draw, tuple(k.numpy()[:2]), radius=6, color=(255, 0, 0), thickness=-1)

    for point in bbox.squeeze().numpy():
        img_draw = cv2.circle(img_draw,point, radius=6, color=(0,0,255), thickness=-1)

    # find the corrected bbox
    bbox = bbox.squeeze().numpy()
    xmin, xmax = np.min(bbox[:,0]), np.max(bbox[:,0])
    ymin, ymax = np.min(bbox[:,1]), np.max(bbox[:,1])
    x1=x4=xmin
    x2=x3=xmax
    y1=y2=ymin
    y3=y4=ymax
    pts = np.array([[[x1,y1], [x2,y2], [x3,y3], [x4,y4]]]) # note: 3 dimention
    img_draw = cv2.polylines(img_draw, pts, isClosed=True, color=(0, 255, 0))
    return img_draw

img = cv2.imread("panda.jpg", cv2.IMREAD_COLOR)
img = cv2.cvtColor(img, cv2.COLOR_BGR2RGB)
h, w = img.shape[:2]

img_tensor = image_to_tensor(img).float() / 255.
plt.imshow(img); plt.axis('off'); plt.show()
#%%
aug_list = AugmentationSequential(
    K.ColorJitter(0.1, 0.1, 0.1, 0.1, p=1.0),
    K.RandomAffine(360, [0.1, 0.1], [0.7, 1.2], [30., 50.], p=1.0),
    K.RandomPerspective(0.5, p=1.0),
    data_keys=["input", "bbox", "keypoints", "mask"],
    return_transform=False,
    same_on_batch=False,
)

bbox = torch.tensor([[[355,10],[660,10],[660,250],[355,250]]])
keypoints = torch.tensor([[[465, 115], [545, 116]]])
mask = bbox_to_mask(torch.tensor([[[155,0],[900,0],[900,400],[155,400]]]), w, h).float()
plt.imshow(mask.squeeze_().numpy()); plt.show()

img_out = plot_resulting_image(img_tensor, bbox, keypoints, mask)
plt.imshow(img_out); plt.axis('off'); plt.show()

#%%
out_tensor = aug_list(img_tensor, bbox.float(), keypoints.float(), mask)
img_out = plot_resulting_image(
    out_tensor[0][0],
    out_tensor[1].int(),
    out_tensor[2].int(),
    out_tensor[3][0],
)
plt.imshow(img_out); plt.axis('off'); plt.show()
#%%
out_tensor_inv = aug_list.inverse(*out_tensor)
img_out = plot_resulting_image(
    out_tensor_inv[0][0],
    out_tensor_inv[1].int(),
    out_tensor_inv[2].int(),
    out_tensor_inv[3][0],
)
plt.imshow(img_out); plt.axis('off'); plt.show()
结果的话前面已经展示了,这里就不在放出。
2. 图像分割数据扩增
官方例子:
!wget http://www.zemris.fer.hr/~ssegvic/multiclod/images/causevic16semseg3.png
import matplotlib.pyplot as plt
import cv2
import numpy as np

import torch
import torch.nn as nn
import kornia as K

# 继承torch.nn.Module
class MyAugmentation(nn.Module):
  def __init__(self):
    super(MyAugmentation, self).__init__()
    # we define and cache our operators as class members
    self.k1 = K.augmentation.ColorJitter(0.15, 0.25, 0.25, 0.25)
    self.k2 = K.augmentation.RandomAffine([-45., 45.], [0., 0.15], [0.5, 1.5], [0., 0.15])
    self.k3 = K.augmentation.RandomPerspective(0.5, p=1.0)

  def forward(self, img: torch.Tensor, mask: torch.Tensor) -> torch.Tensor:
    # 1. apply color only in image
    # 2. apply geometric tranform
    img_out = self.k3(self.k2(self.k1(img)))

    # 3. infer geometry params to mask
    # TODO: this will change in future so that no need to infer params
    mask_out = self.k3(self.k2(mask, self.k2._params), self.k3._params)

    return img_out, mask_out

def load_data(data_path: str) -> torch.Tensor:
  data: np.ndarray = cv2.imread(data_path, cv2.IMREAD_COLOR)
  data_t: torch.Tensor = K.image_to_tensor(data, keepdim=False)
  data_t = K.bgr_to_rgb(data_t)
  data_t = K.normalize(data_t, torch.tensor([0.]), torch.tensor([255.]))
  img, labels = data_t[..., :571], data_t[..., 572:]
  return img, labels

# load data (B, C, H, W)
img, labels = load_data("causevic16semseg3.png")

# create augmentation instance
aug = MyAugmentation()

# apply the augmenation pipelone to our batch of data
img_aug, labels_aug = aug(img, labels)

# visualize
img_out = torch.cat([img, labels], dim=-1)
plt.imshow(K.tensor_to_image(img_out))
plt.axis('off')

# generate several samples
num_samples: int = 10

for img_id in range(num_samples):
  # generate data
  img_aug, labels_aug = aug(img, labels)
  img_out = torch.cat([img_aug, labels_aug], dim=-1)

  # save data
  plt.figure()
  plt.imshow(K.tensor_to_image(img_out))
  plt.axis('off')
  plt.savefig(f"img_{img_id}.png", bbox_inches='tight')


