虚拟环境安装参考:python三种虚拟环境安装方法和tensorflow1.12安装
资料准备:
1、环境要求tensorflow1.12.0
2、model扩展包,在讲部署的时候要用到,在下载地址:https://download.csdn.net/download/weixin_42727069/20816707?spm=1001.2014.3001.5501
3、cocoapi扩展包,下载地址
4、[VCForPython27.zip],下载地址
5、人脸数据,下载地址:官方下载
我的百度云盘下载地址:
链接:https://pan.baidu.com/s/1Xrr4l4rsJ3CRlRgeDV0a9A
提取码:hdo0
–来自百度网盘超级会员V2的分享
1、tensorflow 框架的models概要
首先说明一下为啥配置tensorflow models环境,这个环境中包含了很多现成的模型,可以很轻松的训练模型。
下面大概介绍一下其强大,包含了:
1.1、slim:训练模型
slim这个模块是在16年新推出的,其主要目的是来做所谓的“代码瘦身”。可参考:这里

1.2、object_detection:目标检测任务(faster_rcnn系列、SSD系列)

1.3、deeplab:语义分割任务

1.4、gan:生成对抗网络模型(C-GAN、Pix2Pix、S-GAN)

2、配置部署
好了,简单介绍完了,现在来讲解配置了。
首先在官网下在,链接:https://github.com/tensorflow/models
下载前要搞清楚自己的环境和models的适配情况,可以下载对应版本的,我选择的是tensorflow1.12 版本进行下载。

2.1部署research
也可以从这里下载
压缩包下载解压后
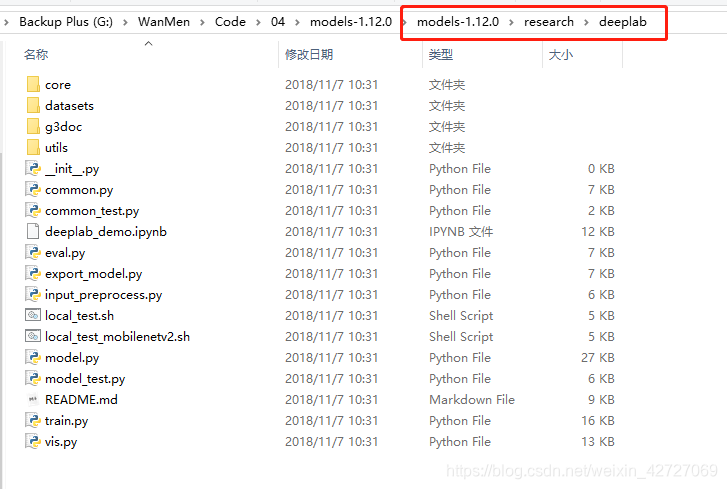
切换到“models-1.12.0\research”目录下,查看有setup.py文件

看到这个东西就放心了,然后在地址栏输入cmd进入控制台,如果要安装到虚拟环境则要激活python的虚拟环境,如果直接安装在现有环境则可以直接运行
python setup.py build
python setup.py install
部署异常:
然后一路向下,我部署过程中中断了两次,都是因为某个模块版本太低了安装失败,直接简单升级某个模块就行了,升级命令
pip install -U 模块名称
再跑python setup.py install就可以成功了
2.2部署slim
参考链接:成功解决from nets import inception_resnet_v2 ModuleNotFoundError: No module named ‘nets’
首先切换到research/slim文件夹,然后开始执行下面两条命令
python setup.py build
python setup.py install

异常:

提示error:could not create ‘build’:当文件已存在时,无法创建该文件
删除文件夹下BUILD文件,或者将该文件重新命名,即可梳理编译。我将该文件更改为BUILD_bak
然后如下图,顺利编译完成


2.3部署cocoapi
可以从github上下载cocoapi/PythonAPI模块,这个模块主要在训练后,验证的程序时候要用到
提前下载的资料
安装方法同理,切换到cocoapi/PythonAPI目录下
python setup.py build
python setup.py install

异常1处理:
在python setup.py build 之后出现一个skipping异常,使用
python setup.py build_ext --inplace

异常2:error:Micorsoft Visual C++ 9.0 is required.Get it from http://aka.ms/vpcpython27
解决方案从网上下载VCForPython27.zip:,解压安装即可解决(第一次没有解压安装还是版本不对,出现了异常,)。


3、简单使用(一)——使用公开的人脸数据集,进行人脸识别训练
流程:
数据集->转换到tfrecord格式->调用object_detection里面的模型进行训练->精度评价->预测
3.1数据集下载
数据集选用widerface,人脸数据,下载地址:这里

下载后四个文件,如下图解压:

3.2、数据集转换为VOC2012格式
在解压目录新建一个VOC2021文件夹,转换后的影像按照voc格式放入该文件夹;
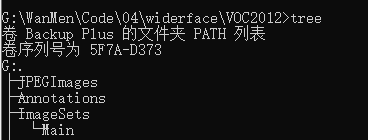
文件夹下格式:
Annotaions:标记,xml
ImageSets:文件列表
JPEGImages:图片


数据集转换为voc的脚本代码:
import os,cv2,sys,shutil,numpy

from xml.dom.minidom import Document
import os
def writexml(filename, saveimg, bboxes, xmlpath):
    doc = Document()

    annotation = doc.createElement('annotation')

    doc.appendChild(annotation)

    folder = doc.createElement('folder')

    folder_name = doc.createTextNode('VOC2012')
    folder.appendChild(folder_name)
    annotation.appendChild(folder)
    filenamenode = doc.createElement('filename')
    filename_name = doc.createTextNode(filename)
    filenamenode.appendChild(filename_name)
    annotation.appendChild(filenamenode)
    source = doc.createElement('source')
    annotation.appendChild(source)
    database = doc.createElement('database')
    database.appendChild(doc.createTextNode('wider face Database'))
    source.appendChild(database)
    annotation_s = doc.createElement('annotation')
    annotation_s.appendChild(doc.createTextNode('PASCAL VOC2007'))
    source.appendChild(annotation_s)
    image = doc.createElement('image')
    image.appendChild(doc.createTextNode('flickr'))
    source.appendChild(image)
    flickrid = doc.createElement('flickrid')
    flickrid.appendChild(doc.createTextNode('-1'))
    source.appendChild(flickrid)
    owner = doc.createElement('owner')
    annotation.appendChild(owner)
    flickrid_o = doc.createElement('flickrid')
    flickrid_o.appendChild(doc.createTextNode('MrWang'))
    owner.appendChild(flickrid_o)
    name_o = doc.createElement('name')
    name_o.appendChild(doc.createTextNode('MrWang'))
    owner.appendChild(name_o)

    size = doc.createElement('size')
    annotation.appendChild(size)

    width = doc.createElement('width')
    width.appendChild(doc.createTextNode(str(saveimg.shape[1])))
    height = doc.createElement('height')
    height.appendChild(doc.createTextNode(str(saveimg.shape[0])))
    depth = doc.createElement('depth')
    depth.appendChild(doc.createTextNode(str(saveimg.shape[2])))

    size.appendChild(width)

    size.appendChild(height)
    size.appendChild(depth)
    segmented = doc.createElement('segmented')
    segmented.appendChild(doc.createTextNode('0'))
    annotation.appendChild(segmented)
    for i in range(len(bboxes)):
        bbox = bboxes[i]
        objects = doc.createElement('object')
        annotation.appendChild(objects)
        object_name = doc.createElement('name')
        object_name.appendChild(doc.createTextNode('face'))
        objects.appendChild(object_name)
        pose = doc.createElement('pose')
        pose.appendChild(doc.createTextNode('Unspecified'))
        objects.appendChild(pose)
        truncated = doc.createElement('truncated')
        truncated.appendChild(doc.createTextNode('0'))
        objects.appendChild(truncated)
        difficult = doc.createElement('difficult')
        difficult.appendChild(doc.createTextNode('0'))
        objects.appendChild(difficult)
        bndbox = doc.createElement('bndbox')
        objects.appendChild(bndbox)
        xmin = doc.createElement('xmin')
        xmin.appendChild(doc.createTextNode(str(bbox[0])))
        bndbox.appendChild(xmin)
        ymin = doc.createElement('ymin')
        ymin.appendChild(doc.createTextNode(str(bbox[1])))
        bndbox.appendChild(ymin)
        xmax = doc.createElement('xmax')
        xmax.appendChild(doc.createTextNode(str(bbox[0] + bbox[2])))
        bndbox.appendChild(xmax)
        ymax = doc.createElement('ymax')
        ymax.appendChild(doc.createTextNode(str(bbox[1] + bbox[3])))
        bndbox.appendChild(ymax)
    f = open(xmlpath, "w+")
    f.write(doc.toprettyxml(indent=''))
    f.close()

def MyCreatePath(Path):
    os.makedirs(Path)#可以建多层目录
    # os.mkdir(Path)#只能建单级文件夹
    return

taskType = "train"#转换生成训练集数据设置为"train",转换生成验证集数据设置为"val"
rootdir = "G:\\WanMen\\Code\\04\\widerface\\VOC2012"#需要设定转换VOC的根目录
out_ImageDir = "{}\\JPEGImages".format(rootdir)#图像输出文件夹,相对Rootdir
out_XmlDir = "{}\\Annotations".format(rootdir)#标签xml输出文件夹,相对Rootdir
out_NameTxtDir = "{}\\ImageSets\\Main".format(rootdir)#训练数据文件名,验证数据名称的输出文件夹,相对Rootdir
MyCreatePath(rootdir)
MyCreatePath(out_ImageDir)
MyCreatePath(out_XmlDir)
MyCreatePath(out_NameTxtDir)

##这里可以是test也可以是val
if(taskType=="train"):
    fwrite = open("{}\\train.txt".format(out_NameTxtDir), "w")
elif(taskType=="val"):
    fwrite = open("{}\\val.txt".format(out_NameTxtDir), "w")

gtfile =""
if(taskType=="train"):
    gtfile = "G:\\WanMen\\Code\\04\\widerface\\wider_face_split\\wider_face_split\\wider_face_train_bbx_gt.txt" #生成训练数据集
elif(taskType=="val"):
    gtfile = "G:\\WanMen\\Code\\04\\widerface\\wider_face_split\\wider_face_split\\wider_face_val_bbx_gt.txt"#生成验证数据集

im_folder=""
if(taskType=="train"):
    im_folder = "G:\\WanMen\\Code\\04\\widerface\\WIDER_train\\WIDER_train\\images"
elif(taskType=="val"):
    im_folder = "G:\\WanMen\\Code\\04\\widerface\\WIDER_val\\WIDER_val\\images"


with open(gtfile, "r") as gt:
    count = 0
    while(True):
        gt_con = gt.readline()[:-1]
        if gt_con is None or gt_con == "":
            break
        im_path = im_folder + "/" + gt_con;
        #print(im_path)
        im_data = cv2.imread(im_path)
        if im_data is None:
            continue

        ##需要注意的一点是,图片直接经过resize之后,会存在更多的长宽比例,所以我们直接加pad
        sc = max(im_data.shape)
        im_data_tmp = numpy.zeros([sc, sc, 3], dtype=numpy.uint8)
        off_w = (sc - im_data.shape[1]) // 2
        off_h = (sc - im_data.shape[0]) // 2

        ##对图片进行周围填充,填充为正方形
        im_data_tmp[off_h:im_data.shape[0]+off_h, off_w:im_data.shape[1]+off_w, ...] = im_data
        im_data = im_data_tmp
        #
        # cv2.imshow("1", im_data)
        # cv2.waitKey(0)
        numbox = int(gt.readline())
        #numbox = 0
        bboxes = []
        for i in range(numbox):
            line = gt.readline()
            infos = line.split(" ")
            #x y w h ---
            #去掉最后一个(\n)
            for j in range(infos.__len__() - 1):
                infos[j] = int(infos[j])

            ##注意这里加入了数据清洗
            ##保留resize到640×640 尺寸在8×8以上的人脸
            if infos[2] * 80 < im_data.shape[1] or infos[3] * 80 < im_data.shape[0]:
                continue

            bbox = (infos[0] + off_w, infos[1] + off_h, infos[2], infos[3])
            # cv2.rectangle(im_data, (int(infos[0]) + off_w, int(infos[1]) + off_h),
            #               (int(infos[0]) + off_w + int(infos[2]), int(infos[1]) + off_h + int(infos[3])),
            #               color=(0, 0, 255), thickness=1)
            bboxes.append(bbox)

        # cv2.imshow("1", im_data)
        # cv2.waitKey(0)

        filename = gt_con.replace("/", "_")
        fwrite.write(filename.split(".")[0] + "\n")

        # cv2.imwrite("{}\\JPEGImages\\{}".format(rootdir, filename), im_data)
        cv2.imwrite("{}\\{}".format(out_ImageDir, filename), im_data)

        # xmlpath = "{}\\Annotations\\{}.xml".format(rootdir, filename.split(".")[0])
        xmlpath = "{}\\{}.xml".format(out_XmlDir, filename.split(".")[0])


        writexml(filename, im_data, bboxes, xmlpath)
        count = count + 1
        if count%50 == 0:
            print(count)

fwrite.close()
注意修改如下地方:(要把taskType设置为train和val分别都跑一次,把训练集和验证集的数据都转换出来)

3.3、把pascal数据转换tfrecord格式

把标签类别文件face_label_map.pbtxt文件(路径如上的modles文件夹中),拷贝到自定义待转换VOC2012\train\data文件夹下,然后开始格式转换
切换到modles目录下的research目录,激活虚拟python环境,运行下面命令,把pascal voc数据转换为tfrecord数据

说明:如果没有进行本文上面 第二步的配置部署,下面代码运行会出现各种错误
# pascal => tfrecord
python object_detection\dataset_tools\create_pascal_tf_record.py --label_map_path=G:\WanMen\Code\04\widerface\VOC2012\train\data\face_label_map.pbtxt --data_dir=G:\WanMen\Code\04\widerface\ --year=VOC2012 --set=train --output_path=G:\WanMen\Code\04\widerface\VOC2012\train\data\train.record

python object_detection\dataset_tools\create_pascal_tf_record.py --label_map_path=G:\WanMen\Code\04\widerface\VOC2012\train\data\face_label_map.pbtxt --data_dir=G:\WanMen\Code\04\widerface\ --year=VOC2012 --set=val --output_path=G:\WanMen\Code\04\widerface\VOC2012\train\data\val.record
转换后的数据

3.3、模型训练配置文件修改
切换到modles训练的config文件夹,路径如下./research/object_detection/samples/configs,这个文件夹下面的config应该都可以跑
下面我们选用“ssd_resnet50_v1_fpn_shared_box_predictor_640x640_coco14_sync.config”文件进行训练


把config文件拷贝到VOC2012/train/modle文件夹,然后用notepad++打开文件,修改里面相关的配置参数

config文件中要修改的地方:
1、修改num_classes,分类类别,要与制作数据集用到的pbtxt文件中的类别一致,改为1


输入的训练数据和验证数据修改后:

3.3、模型训练
切换到modles目录下的research目录,激活虚拟python环境,运行下面命令,开始训练
python object_detection\legacy\train.py --pipeline_config_path=G:\WanMen\Code\04\widerface\VOC2012\train\modle\ssd_resnet50_v1_fpn_shared_box_predictor_640x640_coco14_sync.config --train_dir=G:\WanMen\Code\04\widerface\VOC2012\train\modle\train --num_train_steps=2600 --logtostderr
如果出现异常,可部署slim的setup,或者参考下面链接:
参考链接:成功解决from nets import inception_resnet_v2 ModuleNotFoundError: No module named ‘nets’
训练如下图:

可视化
3.3、tensorboard可视化监控
运行代码
tensorboard --logdir=G:\WanMen\Code\04\widerface\VOC2012\train\modle\train --host=127.0.0.1 --port 6006

复制网址既可以查看模型损失函数的下降图和网络结构等信息。

3.4、模型验证
切换到modles目录下的research目录,激活虚拟python环境,运行下面命令,开始验证
python object_detection\legacy\eval.py --pipeline_config_path=G:\WanMen\Code\04\widerface\VOC2012\train\modle\ssd_resnet50_v1_fpn_shared_box_predictor_640x640_coco14_sync.config --checkpoint_dir=G:\WanMen\Code\04\widerface\VOC2012\train\modle\train --eval_dir=G:\WanMen\Code\04\widerface\VOC2012\train\modle\eval --logtostderr
初次运行出现异常,按照本文上面的2.3部署cocoapi,异常消除
运行效果如下图:


3.5、导出pb模型
使用下面命令进行导出模型:
注意:–trained_checkpoint_prefix参数为checkpoints文件首行的路径(最新的模型)
# 导出pb
python object_detection\export_inference_graph.py --input_type=image_tensor --pipeline_config_path=G:\WanMen\Code\04\widerface\VOC2012\train\modle\ssd_resnet50_v1_fpn_shared_box_predictor_640x640_coco14_sync.config  --trained_checkpoint_prefix=G:\WanMen\Code\04\widerface\VOC2012\train\modle\train\model.ckpt-79 --output_directory=G:\WanMen\Code\04\widerface\VOC2012\train\modle\output


导出后检查导出pb文件是否成功;

3.6、使用pb模型进行预测
代码:
注意:
1、修改PATH_TO_FROZEN_GRAPH变量:pb的路径为实际路径
2、修改PATH_TO_LABELS:标签文件,实际标签位置
3、修改待检测影像路径为实际路径
from object_detection.utils import ops as utils_ops
import os
import numpy as np
os.environ['TF_CPP_MIN_LOG_LEVEL'] = '2'
os.environ["CUDA_DEVICE_ORDER"] = "PCI_BUS_ID"
os.environ["CUDA_VISIBLE_DEVICES"] = "1"
import cv2
#from gevent import monkey
#monkey.patch_all()
import tensorflow as tf

PATH_TO_FROZEN_GRAPH = "G:\\WanMen\\Code\\04\\widerface\\VOC2012\\train\\modle\\output\\frozen_inference_graph.pb"
PATH_TO_LABELS = "G:\\WanMen\\Code\\04\\widerface\\VOC2012\\train\\data\\face_label_map.pbtxt"
IMAGE_SIZE = (640, 640)

im_data = cv2.imread("G:\\WanMen\\Code\\04\\widerface\\VOC2012\\JPEGImages\\0--Parade_0_Parade_marchingband_1_1048.jpg")

image_np = cv2.resize(im_data, IMAGE_SIZE)

with tf.Session() as detection_sess:
    od_graph_def = tf.GraphDef()
    with tf.gfile.GFile(PATH_TO_FROZEN_GRAPH, 'rb') as fid:
        serialized_graph = fid.read()
        od_graph_def.ParseFromString(serialized_graph)
        tf.import_graph_def(od_graph_def, name='')
        ops = tf.get_default_graph().get_operations()
        all_tensor_names = {output.name for op in ops for output in op.outputs}
        tensor_dict = {}
        for key in [
            'num_detections', 'detection_boxes', 'detection_scores',
            'detection_classes', 'detection_masks'
        ]:
            tensor_name = key + ':0'
            if tensor_name in all_tensor_names:
                tensor_dict[key] = tf.get_default_graph().get_tensor_by_name(
                    tensor_name)
        if 'detection_masks' in tensor_dict:
            # The following processing is only for single image
            detection_boxes = tf.squeeze(tensor_dict['detection_boxes'], [0])
            detection_masks = tf.squeeze(tensor_dict['detection_masks'], [0])
            # Reframe is required to translate mask from box coordinates to image coordinates and fit the image size.
            real_num_detection = tf.cast(tensor_dict['num_detections'][0], tf.int32)
            detection_boxes = tf.slice(detection_boxes, [0, 0], [real_num_detection, -1])
            detection_masks = tf.slice(detection_masks, [0, 0, 0], [real_num_detection, -1, -1])
            detection_masks_reframed = utils_ops.reframe_box_masks_to_image_masks(
                detection_masks, detection_boxes, IMAGE_SIZE[0], IMAGE_SIZE[1])
            detection_masks_reframed = tf.cast(
                tf.greater(detection_masks_reframed, 0.5), tf.uint8)
            # Follow the convention by adding back the batch dimension
            tensor_dict['detection_masks'] = tf.expand_dims(
                detection_masks_reframed, 0)
        image_tensor = tf.get_default_graph().get_tensor_by_name('image_tensor:0')

        output_dict = detection_sess.run(tensor_dict,
                               feed_dict={image_tensor: np.expand_dims(image_np, 0)})

# all outputs are float32 numpy arrays, so convert types as appropriate
output_dict['num_detections'] = int(output_dict['num_detections'][0])
output_dict['detection_classes'] = output_dict[
    'detection_classes'][0].astype(np.uint8)
output_dict['detection_boxes'] = output_dict['detection_boxes'][0]
output_dict['detection_scores'] = output_dict['detection_scores'][0]
if 'detection_masks' in output_dict:
    output_dict['detection_masks'] = output_dict['detection_masks'][0]

# print(output_dict['detection_boxes'], output_dict['detection_classes'], output_dict['detection_scores'])
for i in range(len(output_dict['detection_scores'])):
    if output_dict['detection_scores'][i] > 0.3:
        bbox = output_dict['detection_boxes'][i]
        cate = output_dict['detection_classes'][i]
        y1 = int(IMAGE_SIZE[0] * bbox[0])
        x1 = int(IMAGE_SIZE[1] * bbox[1])
        y2 = int(IMAGE_SIZE[0] * (bbox[2]))
        x2 = int(IMAGE_SIZE[1] * (bbox[3]))
        #print(output_dict['detection_scores'][i], x1, y1, x2, y2)
        cv2.rectangle(image_np, (x1, y1), (x2, y2), (0, 255, 0), 2)
cv2.imshow("im", image_np)
cv2.waitKey(0)

预测结果:由于我笔记本上只训练了79次,所以效果不太好,实际工程使用中,至少训练上万次

展示一下,这是训练25000次后的模型预测效果:

至此,简单的用tensorflow框架虚拟环境进行目标检测任务完成了。
