深度学习(7)TensorFlow基础操作三: 索引与切片
一. 基础索引
Indexing
- Basic indexing
- [idx][idx][idx]
- Same with Numpy
- [idx, idx, …]
- start : end
- start : end : step
- …
1. Basic indexing

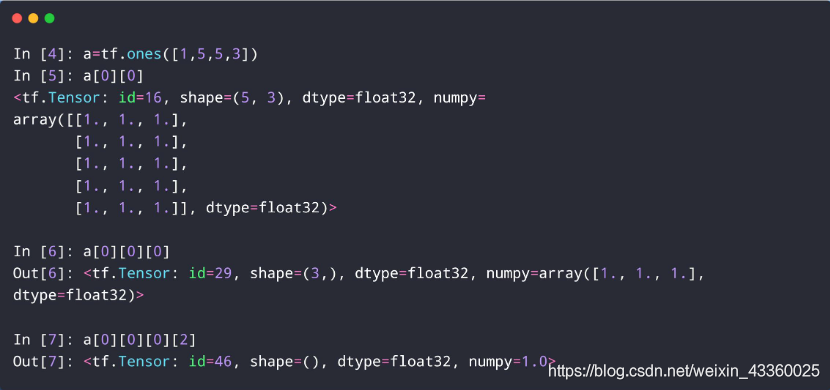
(1) a = tf.ones([1, 5, 5, 3]): 创建一个元素值全为1的4维Tensor,可以这样理解: 共有1个任务,每个任务重有5个矩阵,每个矩阵的维度为5行3列;
(2) a[0][0]: 取出a中第1个任务中的第1个矩阵,即:
(
1
1
1
1
1
1
1
1
1
1
1
1
1
1
1
)
\begin{pmatrix}1&1&1\\1&1&1\\1&1&1\\1&1&1\\1&1&1 \end{pmatrix}
???????11111?11111?11111????????
所以,这个a[0][0]的shape=(5, 3);
(3) a[0][0][0]: 取出a中第1个任务中的第1个矩阵中的第1行,即:
[
1
1
1
]
\begin{bmatrix}1&1&1 \end{bmatrix}
[1?1?1?]
所以,这个a[0][0][0]的shape=(3,);
(4) a[0][0][0][2]: 取出a中第1个任务中的第1个矩阵中的第1行中的第3个元素,即:
1
1
1
所以,这个a[0][0][0][2]的shape=();
- 缺点: 读取不灵活。
2. Numpy-style indexing

(1) a = tf.random.normal([4, 28, 28, 3]): 创建一个4维Tensor,可以这样理解: 一个batch里共有4张图片,每张图片为28×28,图片为彩色图片,所以通道数为3;
(2) a[1].shape: 这个batch中的第2张照片的shape为[28, 28, 3];
(3) a[1, 2].shape: 这个batch中的第2张照片的第3行有3个RGB的数值,其shape为[28, 3];
(4) a[1, 2, 3].shape: 这个batch中的第2张照片的第3行第4列有1个RGB数值,其shape为[3];
(5) a[1, 2, 3, 2].shape: 这个batch中的第2张照片的第3行第4列RGB数值中的B通道,也就是蓝色,其shape为[];
3. start : end

(1) a = tf.range(10): 创建一个0~9的Tensor;
(2) a[x: y]: 取出a中从x开始到y(不包括y)的所有元素;
(3) a[-1:]: 取出a中从倒数第1个元素到最后1个元素,就是最后一个元素它自己,即[9];
(4) a[-2:]: 取出a中从倒数第2个元素到最后1个元素,即[8, 9];
(5) a[:2]: 取出a中从第1个元素到第3个元素(不包括第3个元素),即[0, 1];
(6) a[:-1]: 取出a中从第1个元素到倒数第1个元素(不包括最后1个元素),即[0, 1, 2, 3, 4, 5, 6, 7, 8];
4. 切片索引(1)Indexing by “ : ”

(1) a[0, : , : , :].shape: 取出第1张照片中的所有数据,就是[28, 28, 3];
(2) a[0, : , : , :].shape: 取出第1张照片中的所有数据,就是[28, 28, 3];
(3) a[0, 1, : , :].shape: 取出第1张照片中的第2行的所有数据,就是[28, 3];
(4) a[: , : , : , 0].shape: 取出R(红色)通道的所有4张照片中的数据,就是[4, 28, 28];
(5) a[: , : , : , 2].shape: 取出B(蓝色)通道的所有4张照片中的数据,就是[4, 28, 28];
(6) a[: , 0, : , :].shape: 取出所有照片中的第2行的所有数据,就是[4, 28, 3];
5. 切片索引(2)Indexing by “ : : ”
- start🔚step
- ::step

(1) a[0:2, : , : , :]: 第1到第3张(不包括第三张)图片的所有数据shape为[2, 28, 28, 3];
(2) a[: , 0:28:2 , 0:28:2 , :]: 所有4张图片取第1行到第27行(不包括第27行)隔位取数,其shape为[4, 14, 14, 3];
(3) a[: , :14 , :14 , :]: 所有4张图片取第1行到第14行(不包括第14行),其shape为[4, 14, 14, 3];
(4) a[: , 14: , 14: , :]: 所有4张图片取第14行到最后1行(不包括最后1行),其shape为[4, 14, 14, 3];
(5) a[: , : : 2 , : : 2 , :]: 所有4张图片取第1行到最后1行,隔位取数,其shape为[4, 14, 14, 3];
6. 切片索引(3)Indexing by “ : : -1”

(1) a[: : -1]: 取出a中从倒数第1个元素到第1个元素,即[3, 2, 1, 0];
(2) a[: : -2]: 取出a中从倒数第1个元素到第1个元素,隔位取数,即[3, 1];
(3) a[2 : : -2]: 取出a中从第3个元素到第1个元素,隔位取数,即[2, 0];
7. 切片索引(4)Indexing by “ … ”

(1) a[0, …]: 作用与a[0, : , : , : , :]一样,其shape为[4, 28, 28, 3];
(2) a[…, 0]: 作用与a[: , : , : , : ,0]一样,其shape为[2, 4, 28, 28];
(3) a[0, … ,2]: 作用与a[0 , : , : , : ,2]一样,其shape为[4, 28, 28];
(4) a[1, 0, … , 0]: 作用与a[1 , 0 , : , : ,0]一样,其shape为[28, 28];
二. 选择性索引
Selective Indexing
- tf.gather
- tf.gather_nd
- tf.boolean_mask
1. tf.gather
- data: [classes, students, subjects]
- [4, 35, 8]

- [4, 35, 8]
设一共有4个班级,每个班级有35个学生,每个学生需要学习8门课程;

(1) tf.gather(a, axis=0, indices=[2, 3]): 其中a为数据源; axis=0代表我们要取第1个维度,也就是班级; indices=[2, 3]代表我们要取的班级为第3个班级和第4个班级; 所以其shape就为[2, 35, 8],这个索引和之前的a[2 : 4]的效果是一样的;
(2) tf.gather(a, axis=0, indices=[2, 1, 3, 0]): indices=[2, 1, 3, 0]表示我们收集数据的顺序,先收集第3个班级,再收集第2个班级,再收集第4个班级,最后收集第1个班级,所以shape=[4, 35, 8],虽然shape相同,但是收集数据的顺序改变了,这也能看出tf.gather()的功能面更广;
(3) tf.gather(a, axis=1, indices=[2, 3, 7, 9, 16]): 收集a数据集中每个班级中的第3,第4,第8,第10和第17名同学的数据,其shape=[4, 5, 8];
(4) tf.gather(a, axis=2, indices=[2, 3, 7]): 收集a数据集中每个班级每名同学的第3,第4和第7门课程的数据,其shape=[4, 35, 3];
2. tf.gather_nd
- data: [classes, students, subjects]
- 如果需要采样多个学生和他们的几门课程应该怎么办呢?
- aa = tf.gather(a, axis, [several students])
- aaa = tf.gather(aa, axis, [several students])
很显然,如果数据过多的话,这样就太麻烦了;
tf.gather_nd:
- [class1_student1, class2_student2, class3_student3, class4_student4]
-
→
\to
→ [4, 8](共有4个学生,每个学生有8门课程)

(1) tf.gather_nd(a, [0]): 这里的[0]可以理解为[[0], [], []],指定了班级为第1个班级,所以其shape=[35, 8];
(2) tf.gather_nd(a, [0, 1]): 这里的[0, 1]可以理解为[[0], [1], []],指定了班级为第1个班级的第2个学生,所以其shape=[8];
(3) tf.gather_nd(a, [0, 1, 2]): 这里的[0, 1, 2]可以理解为[[0], [1], [2]],指定了班级为第1个班级的第2个学生的第3门课程,所以其shape=[];
- 理解: 把最内层的[]看成是一个联合索引的坐标,例如[0]理解为a[0],所以其shape=[35, 8]; [0, 1]理解为a[0, 1],其shape=[8]; [0, 1, 2]理解为a[0, 1, 2],其shape=[];
(4) tf.gather_nd(a, [[0, 1, 2]]): 由上面的理解可知,这里的[0, 1, 2]是一个标量(Scalar),[[0, 1, 2]]就为[[Scalar]],所以其shape=[1];

(5) tf.gather_nd(a, [[0, 0], [1, 1]]): 其中[0, 0]表示取第1个班级的第1个学生的数据的8维Vector(向量); [1, 1]表示取第2个班级的第2个学生的数据的8维Vector; 就是2个8维的Vector拼接在一起,所以其shape=[2, 8];
(6) tf.gather_nd(a, [[0, 0], [1, 1], [2, 2]]): 其中[0, 0]表示取第1个班级的第1个学生的数据的8维Vector(向量); [1, 1]表示取第2个班级的第2个学生的数据的8维Vector; [2, 2]表示取第3个班级的第3个学生的数据的8维Vector; 就是3个8维的Vector拼接在一起,所以其shape=[3, 8];
(7) tf.gather_nd(a, [[0, 0, 0], [1, 1, 1], [2, 2, 2]]): 其中[0, 0, 0]表示取第1个班级的第1个学生的第1门课程的数据的Scalar(标量); [1, 1, 1]表示取第2个班级的第2个学生的第2门课程的数据的Scalar; [2, 2, 2]表示取第3个班级的第3个学生的第3门课程的数据的Scalar; 就是3个Scalar拼接在一起,所以其shape=[3];
(8) tf.gather_nd(a, [[[0, 0, 0], [1, 1, 1], [2, 2, 2]]]): 其中[0, 0, 0]表示取第1个班级的第1个学生的第1门课程的数据的Scalar(标量); [1, 1, 1]表示取第2个班级的第2个学生的第2门课程的数据的Scalar; [2, 2, 2]表示取第3个班级的第3个学生的第3门课程的数据的Scalar; 就是[[[Scalar], [Scalar], [Scalar]]],就是1行3列,所以其shape=[1, 3],例如以上3名同学的成绩分别为98,42,100,那么这组数据就为[[98, 42, 100]],是一个1行3列的数据;
- tf.gather_nd建议的格式:
- [[0], [1], …]
- [[0, 0], [1, 1], …]
- [[0, 0, 0], [1, 1, 1], …]
- 注: 不建议3层括号。
3. tf.boolean_mask

(1) tf.boolean_mask(a, mask=[True, True, False, False]): 表示4张图片取第1张和第2张图片的数据,所以shape=[2, 28, 28, 3];
(2) tf.boolean_mask(a, mask=[True, True, False], axis=3): 指定了axis=3代表从通道数取值,取四张图片的R(红色)和G(绿色)通道的数据,所以shape=[4, 28, 28, 2];
- 注: mask中的元素个数必须要对应所取维度(axis)中的元素个数;
(3) tf.boolean_mask(a, mask=[[True, False, False], [False, True, True]]): 首先理解mask=[[a], [b]],a和b分别对应a=tf.ones([2, 3, 4])中的2和3所对应的维度,也就是说mask可以理解为对应如下的矩阵:
(
T
r
u
e
F
a
l
s
e
F
a
l
s
e
F
a
l
s
e
T
r
u
e
T
r
u
e
)
\begin{pmatrix}True&False&False\\False&True&True \end{pmatrix}
(TrueFalse?FalseTrue?FalseTrue?)
从矩阵中可以看到,共有3个值为“True”的元素,也就是共有3个4维的[1],所以shape=[3, 4]。
参考文献:
[1] 龙良曲:《深度学习与TensorFlow2入门实战》
[2] http://www.duesudue.it/eng/dettaglio_servizi.html?ID=3
