系列文章目录
第一章 计算图的实现文章目录
前言
很多初学者学习tensorflow的时候对各个函数和变量不能够很好的理解,本系列就能通过简单的仿照tensorflow实现一些深度学习基本功能帮助大家理解tensorflow内在工作原理。一、实现计算图
目前绝大部分神经网络框架都会涉及到计算图的概念,理由也很简单,让使用者使用高级编程语言(如python)构建自己的计算逻辑,形成计算图。这里首先来编写一个计算图,在编写之前,先理解计算图的结构。
a
b
a x b
ab + c
c
如图、将两个数据节点a、b输入乘法节点,然后将相乘后的结果又输入下一个加法节点。在数据和操作比较少的时候计算图看不出什么优势,但在设计复杂神经网络结构的时候,使用计算图会让整个网络结构清晰很多
二、实现过程
1.图代码
首先创建名为NeuralNetwork的项目,然后创建一个TensorPy的包
mkdir NeuralNetwork
cd NeuralNetwork
touch TensorPy.py
代码如下:
class Graph:
    """
    计算图
    """

    def __init__(self) -> None:
        self.operations = []  # 操作节点
        self.placeholders = []  # 占位符节点
        self.variables = []  # 变量节点

    def as_default(self):
        """
        默认计算出图
        """
        global _default_graph
        _default_graph = self
2.定义操作节点
Operation是操作类,他有两个操作变量,定义了compute方法,该方法交由继承Operation类的子类实现具体逻辑。
代码如下:
class Operation:
    """
    操作
    """

    def __init__(self, input_nodes: list = None) -> None:
        self.output = []
        self.inputs = []
        self.input_nodes = input_nodes
        self.consumers = []
        for input_node in input_nodes:
            self.consumers.append(input_node)
        _default_graph.operations.append(self)

    @abstractmethod
    def compute(self, x_value: np.ndarray, y_value: np.ndarray):
        pass
3. 实现乘法加法类
乘法加法类继承Operation类,并且实现compute方法
class matmul(Operation):
    """
    矩阵乘法
    """

    def __init__(self, x: Union[Variable, placeholder, Operation], y: Union[Variable, placeholder, Operation]) -> None:
        """__init__():

        Args:
            x (Union[Variable, placeholder, Operation]): x
            y (Union[Variable, placeholder, Operation]): y
        """
        super().__init__(input_nodes=[x, y])

    def compute(self, x_value: np.ndarray, y_value: np.ndarray) -> np.ndarray:
        """两个元素相乘

        Args:
            x_value (np.ndarray): x
            y_value (np.ndarray): y

        Returns:
            np.ndarray
        """
        return x_value.dot(y_value)


class add(Operation):
    """
    矩阵加法
    """
    def __init__(self, x: Union[Variable, placeholder, Operation], y: Union[Variable, placeholder, Operation]) -> None:
        super().__init__(input_nodes=[x, y])

    def compute(self, x_value: np.ndarray, y_value: np.ndarray):
        return x_value + y_value
4.实现变量和占位符类
class placeholder:
    """
    占位变量
    """
    def __init__(self) -> None:
        self.consumers = []
        self.output = []
        self.inputs = []
        _default_graph.placeholders.append(self)


class Variable:
    """
    变量
    """
    def __init__(self, initial_value: Optional[list]) -> None:
        self.value = initial_value
        self.consumers = []
        self.output = []
        self.inputs = []
        _default_graph.variables.append(self)
5.实现递归遍历计算图
a
b
+
c
x
遍历顺序为:a–> b–>x–>c–>+
def traverse_postorder(operation: Operation) -> list:
    """遍历计算图

    Args:
        operation (Operation): 节点

    Returns:
        list: 节点列表
    """
    nodes_postorder = []

    def recurse(node: Operation):
        if isinstance(node, Operation):
            for input_node in node.input_nodes:
                recurse(input_node)
        nodes_postorder.append(node)

    recurse(operation)
    return nodes_postorder
6.实现tensorflow的Session对象
class Session:
    @staticmethod
    def run(operation: Operation, feed_dict: dict = None) -> list:
        """计算操作输出

        Args:
            operation (Operation): 要计算输出的操作
            feed_dict (dict): placeholder提供的数据. Defaults to None.

        Returns:
            (list): 输出列表
        """
        nodes_postorder = traverse_postorder(operation)
        for node in nodes_postorder:
            if isinstance(node, placeholder):
                # 如果是placeholder类型,将对应类型的数据给他
                node.output = feed_dict[node]

            elif isinstance(node, Variable):
                # 变量本身就是输出
                node.output = node.value
            else:
                # 输入操作的节点
                node.inputs = [input_node.output for input_node in node.input_nodes]
                # compute()执行具体操作逻辑
                node.output = node.compute(*node.inputs)
            if isinstance(node.output, list):
                # 将list转换成ndarray类型
                node.output = np.array(node.output)

        return operation.output
6.测试
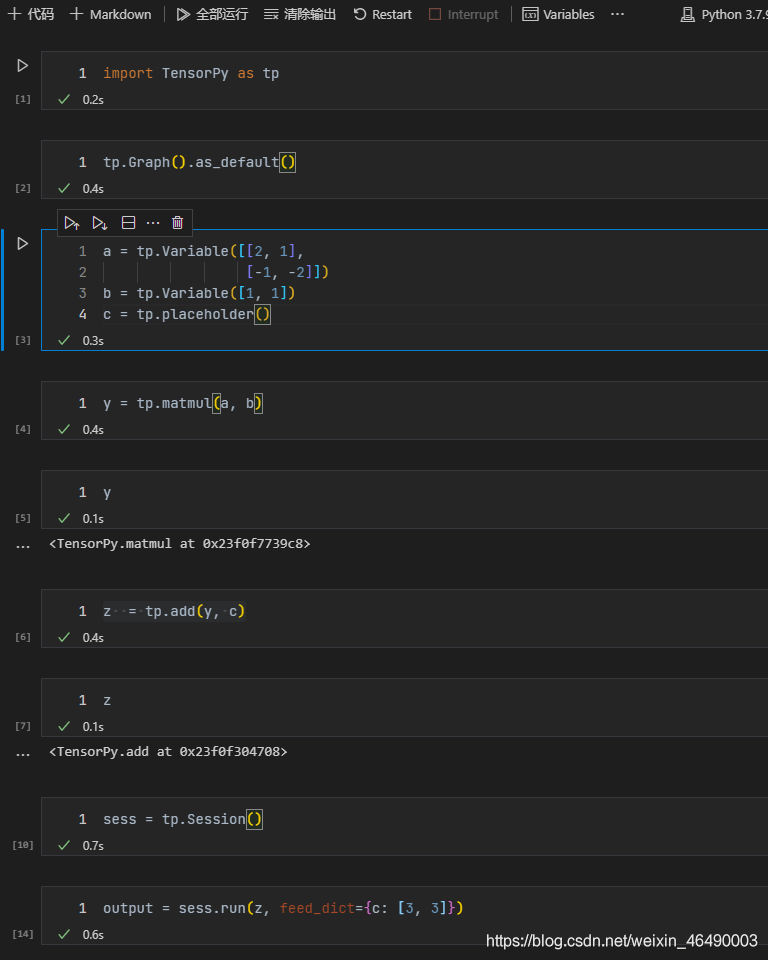
我们实现tensorflow的矩阵运算
在同一目录下建立一个.py或者.ipynb的测试代码文件
touch test.ipynb
然后输入以下代码:

最后我们查看结果:

我们验算以下结果发现正确:
[ 2 1 ? 1 ? 2 ] × [ 1 1 ] + [ 3 3 ] = [ 6 0 ] { \left[ \begin{array}{cc} 2 & 1 \\ -1& -2\\ \end{array} \right ]} \times { \left[\begin{array}{cc} 1 \\ 1 \\ \end{array} \right] } + {\left[\begin{array}{cc} 3\\ 3\\ \end{array}\right] }= { \left[\begin{array}{cc} 6 \\ 0 \\ \end{array} \right] } [2?1?1?2?]×[11?]+[33?]=[60?]
总结
本章实现了计算图的基本方法NOTE 本片所有代码来自于《GAN生成对抗网络原理剖析与Tensorflow实践》非作者原创,转载请注意