tensorflow学习
引言
最近在b站发现了一个非常好的tensorflow教学视频,对学习tensorflow很有帮助,我在看课程的同时记了笔记。
参考内容来自:
up主的b站链接: https://space.bilibili.com/18161609/channel/index.
up主的github: https://github.com/WZMIAOMIAO/deep-learning-for-image-processing.
up主的github: https://blog.csdn.net/qq_37541097/article/details/103482003.
Tensorflow2官方Demo
tensorflow1.0和2.0版本对比:
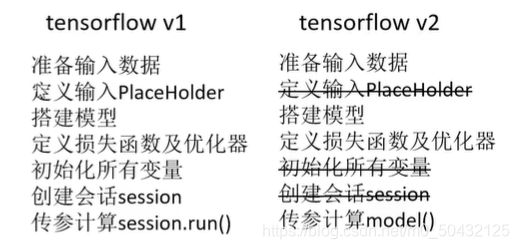
1.tensorflow1版本主要用的静态图机制,在2版本中动态图机制默认开启。相比来说,动态图更加的直观,方便开发者理解和调试。而静态图拥有更高的运算性能,并且部署更加方便,告别了session.run。
tensorflow1版本和2版本中搭建模型的步骤对比:

2.tf.function装饰器(构造高效的python代码)
tf2.0版本将python代码转为tensorflow的图结构,能够在GPU,TPU上运算(陷阱较多)
建议使用前去官网看教程避坑
3.tf.keras模块(官方主推使用keras模块搭建网络)
tensorflow2.1 CPU安装
#Anaconda管理python环境
pip install tensorflow-cpu==2.1.0
#直接安装的Python3
pip3 install tensorflow-cpu==2.1.0
注意:
(1)在2.1版本中,pip install tensorflow默认安装GPU版本,在没有GPU的设备上会自动使用CPU
(2)window用户可能会出现缺少msvcp140_1.dll
解决办法:下载visual C++,然后导入tensorflow
(3)2.1版本默认支持TensorRT(推理优化器)
安装tensorflow链接: https://blog.csdn.net/qq_37541097/article/details/103933366.
代码实例
注意: model.py: 是模型文件
train.py: 是调用模型训练的文件
predict.py: 是调用模型进行预测的文件
class_indices.json: 是训练数据集对应的标签文件
1.model.py
from tensorflow.keras.layers import Dense, Flatten, Conv2D
from tensorflow.keras import Model


class MyModel(Model):
    def __init__(self):
        super(MyModel, self).__init__()
        self.conv1 = Conv2D(32, 3, activation='relu')
        self.flatten = Flatten()
        self.d1 = Dense(128, activation='relu')
        self.d2 = Dense(10, activation='softmax')

    def call(self, x, **kwargs):
        x = self.conv1(x)      # input[batch, 28, 28, 1] output[batch, 26, 26, 32]
        x = self.flatten(x)    # output [batch, 21632]
        x = self.d1(x)         # output [batch, 128]
        return self.d2(x)      # output [batch, 10]
Tensorflow Tensor的通道排序: [batch,height,width,channel]
在pytorch中:

在tensorflow中:

如果在卷积中不需要使用padding中,则设置为valid。
需要使用padding中,则设置为same。
2.train.py
from __future__ import absolute_import, division, print_function, unicode_literals

import tensorflow as tf
from model import MyModel


def main():
    mnist = tf.keras.datasets.mnist

    # download and load data
    (x_train, y_train), (x_test, y_test) = mnist.load_data()
    x_train, x_test = x_train / 255.0, x_test / 255.0

    # Add a channels dimension
    x_train = x_train[..., tf.newaxis]
    x_test = x_test[..., tf.newaxis]

    # create data generator
    train_ds = tf.data.Dataset.from_tensor_slices(
        (x_train, y_train)).shuffle(10000).batch(32)
    test_ds = tf.data.Dataset.from_tensor_slices((x_test, y_test)).batch(32)

    # create model
    model = MyModel()

    # define loss
    loss_object = tf.keras.losses.SparseCategoricalCrossentropy()
    # define optimizer
    optimizer = tf.keras.optimizers.Adam()

    # define train_loss and train_accuracy
    train_loss = tf.keras.metrics.Mean(name='train_loss')
    train_accuracy = tf.keras.metrics.SparseCategoricalAccuracy(name='train_accuracy')

    # define train_loss and train_accuracy
    test_loss = tf.keras.metrics.Mean(name='test_loss')
    test_accuracy = tf.keras.metrics.SparseCategoricalAccuracy(name='test_accuracy')

    # define train function including calculating loss, applying gradient and calculating accuracy
    @tf.function
    def train_step(images, labels):
        with tf.GradientTape() as tape:
            predictions = model(images)
            loss = loss_object(labels, predictions)
        gradients = tape.gradient(loss, model.trainable_variables)
        optimizer.apply_gradients(zip(gradients, model.trainable_variables))

        train_loss(loss)
        train_accuracy(labels, predictions)

    # define test function including calculating loss and calculating accuracy
    @tf.function
    def test_step(images, labels):
        predictions = model(images)
        t_loss = loss_object(labels, predictions)

        test_loss(t_loss)
        test_accuracy(labels, predictions)

    EPOCHS = 5

    for epoch in range(EPOCHS):
        train_loss.reset_states()        # clear history info
        train_accuracy.reset_states()    # clear history info
        test_loss.reset_states()         # clear history info
        test_accuracy.reset_states()     # clear history info

        for images, labels in train_ds:
            train_step(images, labels)

        for test_images, test_labels in test_ds:
            test_step(test_images, test_labels)

        template = 'Epoch {}, Loss: {}, Accuracy: {}, Test Loss: {}, Test Accuracy: {}'
        print(template.format(epoch + 1,
                              train_loss.result(),
                              train_accuracy.result() * 100,
                              test_loss.result(),
                              test_accuracy.result() * 100))


if __name__ == '__main__':
    main()
#获取测试集的前三张图片
imgs = x_test[:3]
labs = y_test[:3]
print(labs)
plot_imgs = np.hstack(imgs) #水平拼接三张图片
plt.imshow(plot_imgs,cmap='gray')
plt.show()
其中@tf.function 装饰器 自动将python代码转化成tensorflow图模型结构,大大提高速度。
3. 训练结果
