1、定义各种参数
下面举例三种常见的参数
batch_size = 8
learning_rate = 1e-4
epoches = 100
2、利用官方的数据加载
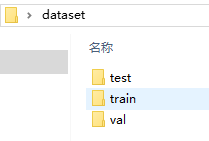
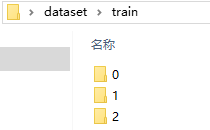
指定训练、验证以及测试的文件夹的路径,其下一个目录的各个文件夹视为各个类别。下一个目录为了方便简单可以直接命名为0、1、2等。到时就可以对应0、1、2等类别。也可以按本身类别作为文件名,可能需要调试注意一下对应的类别0、1、2等。如:


0、1、2文件夹里放置对应类别的图像即可。主要调用的是torchvision.datasets.ImageFolder和torch.utils.data.DataLoader。
import torchvision.datasets as dsets
import torchvision.transforms as transforms

trainpath = './dataset/train/'
valpath = './dataset/val/'

traintransform = transforms.Compose([
    transforms.RandomRotation(20),  # optional
    transforms.ColorJitter(brightness=0.1),
    transforms.Resize([224, 224]),
    transforms.ToTensor(),  # 将图片数据变为tensor格式
    # transforms.Normalize(mean=[0.485, 0.456, 0.406],
    #                      std=[0.229, 0.224, 0.225]),
])

valtransform = transforms.Compose([
    transforms.Resize([224, 224]),
    transforms.ToTensor(),  # 将图片数据变为tensor格式
])

trainData = dsets.ImageFolder(trainpath, transform=traintransform)  # 读取训练集,标签就是train目录下的文件夹的名字,图像保存在格子标签下的文件夹里
valData = dsets.ImageFolder(valpath, transform=valtransform)

trainLoader = torch.utils.data.DataLoader(dataset=trainData, batch_size=batch_size, shuffle=True)
valLoader = torch.utils.data.DataLoader(dataset=valData, batch_size=batch_size, shuffle=False)
这里顺便提一下获取train或者test的总数量。
test_sum = sum([len(x) for _, _, x in os.walk(os.path.dirname(path_test))])
train_sum = sum([len(x) for _, _, x in os.walk(os.path.dirname(path_train))])
3、定义模型
这里,以调用最简单的torchvision自带的resnet34为例。
import torchvision.models as models

model = models.resnet34(pretrained=True) #pretrained表示是否加载已经与训练好的参数
model.fc = torch.nn.Linear(512, 3) #将最后的fc层的输出改为标签数量(如3),512取决于原始网络fc层的输入通道
model = model.cuda()  # 如果有GPU,而且确认使用则保留;如果没有GPU,请删除

""" 可以用以下的例子试一下效果
import torchvision
import torch

model = torchvision.models.resnet34(pretrained=False)
model.fc = torch.nn.Linear(512, 3)
print(model)

input = torch.randn(4,3,224,224)
output = model(input)
print(output.size())  # torch.Size([4, 3])
"""
当然,可以将源码对应的resnet结构全部提取出来,进行改进。
4、定义损失函数以及优化器
criterion = torch.nn.CrossEntropyLoss()  # 定义损失函数

optimizer = torch.optim.Adam(model.parameters(), lr=learning_rate)
# optimizer = torch.optim.SGD(model.parameters(), lr=learning_rate)  # 定义优化器
5、train()函数
train函数里,每一个batch的数据训练过程一般包括:将梯度置为0(optimizer.zero_grad())、将图像传入网络(model(input))、调用损失函数(criterion(target, label))、将loss进行反传(loss.backward())、通过梯度下降执行参数更新(optimizer.step())以及其他你需要统计的东西。
from torch.autograd import Variable

def train(model, optimizer, criterion):
    model.train()
    total_loss = 0
    train_corrects = 0
    for i, (image, label) in enumerate(trainLoader):
        image = Variable(image.cuda())  # 同理
        label = Variable(label.cuda())  # 同理
        optimizer.zero_grad()

        target = model(image)
        loss = criterion(target, label)
        loss.backward()
        optimizer.step()

        total_loss += loss.item()

        max_value, max_index = torch.max(target, 1)
        pred_label = max_index.cpu().numpy()
        true_label = label.cpu().numpy()
        train_corrects += np.sum(pred_label == true_label)

    return total_loss / float(len(trainLoader)), train_corrects / train_sum
6、evaluate()函数
与train()函数的区别在于,不需要更新梯度,因此没有梯度置0以及loss反转的过程以及优化器更新。此外,验证过程,需要将图像送入网络,计算loss。
def evaluate(model, criterion):
    model.eval()
    corrects = eval_loss = 0
    with torch.no_grad():
        for image, label in testLoader:
            image = Variable(image.cuda())  # 如果不使用GPU,删除.cuda()
            label = Variable(label.cuda())  # 同理

            pred = model(image)
            loss = criterion(pred, label)

            eval_loss += loss.item()

            max_value, max_index = torch.max(pred, 1)
            pred_label = max_index.cpu().numpy()
            true_label = label.cpu().numpy()
            corrects += np.sum(pred_label == true_label)

    return eval_loss / float(len(testLoader)), corrects, corrects / test_sum
7、main()主函数
除了前面讲过的部分,这里主要列举多个epoch依次训练的步骤
import time

def main():
    train_loss = []
    valid_loss = []
    accuracy = []

    for epoch in range(1, epoches + 1):
        epoch_start_time = time.time()
        loss, train_acc = train(model, optimizer, criterion)

        train_loss.append(loss)
        print('| start of epoch {:3d} | time: {:2.2f}s | train_loss {:5.6f}  | train_acc {}'.format(epoch, time.time() - epoch_start_time, loss, train_acc))

        loss, corrects, acc = evaluate(model, criterion)

        valid_loss.append(loss)
        accuracy.append(acc)

        if acc > bestacc:
            torch.save(model, save_model_path + 'bestmodel.pth')
            bestacc = acc

        print('| end of epoch {:3d} | time: {:2.2f}s | test_loss {:.6f} | accuracy {}'.format(epoch, time.time() - epoch_start_time, loss, acc))


    print("**********ending*********")
    plt.plot(train_loss)
    plt.plot(valid_loss)
    plt.title('loss')
    plt.ylabel('loss')
    plt.xlabel('epoch')
    plt.legend(['train', 'test'], loc='upper left')
    plt.savefig("./loss.jpg")
    # plt.show()
    plt.cla()
    plt.plot(accuracy)
    plt.title('acc')
    plt.ylabel('acc')
    plt.xlabel('epoch')
    plt.savefig("./acc.jpg")
    # plt.show()
8、predict函數
预测函数可以得到对应的label以及预测的概率。
def predict():
    model = torch.load(best_model_path)
    model = model.cuda()

    # model = models.resnet34()
    # model.load_state_dict(torch.load(best_model_path, map_location=lambda storage, loc: storage), strict=True) # 利用cpu进行测试

    model.eval()

    testLoader = torch.utils.data.DataLoader(dataset=testData, batch_size=1, shuffle=False)

    for i, (image, label) in enumerate(testLoader):
        image = Variable(image.cuda())  # 如果不使用GPU,删除.cuda()
        # image = Variable(image)
        pred = model(image)
        max_value, max_index = torch.max(pred, 1)
        pred_label = max_index.cpu().numpy()
        print(max_value, pred_label)
        """
        probs = F.softmax(pred, dim=1)
        # print("Sample probabilities: ", probs[:2].data.detach().cpu().numpy())
        a, b = np.unravel_index(probs[:2].data.detach().cpu().numpy().argmax(),
                                probs[:2].data.detach().cpu().numpy().shape)  # 索引最大值的位置   ###b就说预测的label
        print(testLoader.dataset.imgs[i][0])

        print('预测结果的概率:', round(probs[:2].data.detach().cpu().numpy()[0][b] * 100))
        print("label:  "+str(b))
        """