? ? ? ?
简介
? ? ? ?写这篇文章的初衷是因为最近带的新人里面很多都没有一个实际项目的经历,偶尔有做过图像识别的,但是对于目标检测项目的完整流程还是知之甚少,这篇文章主要是以比较通俗的口吻来详细介绍一下入门上手一个目标检测项目的完整流程,大神请忽略!
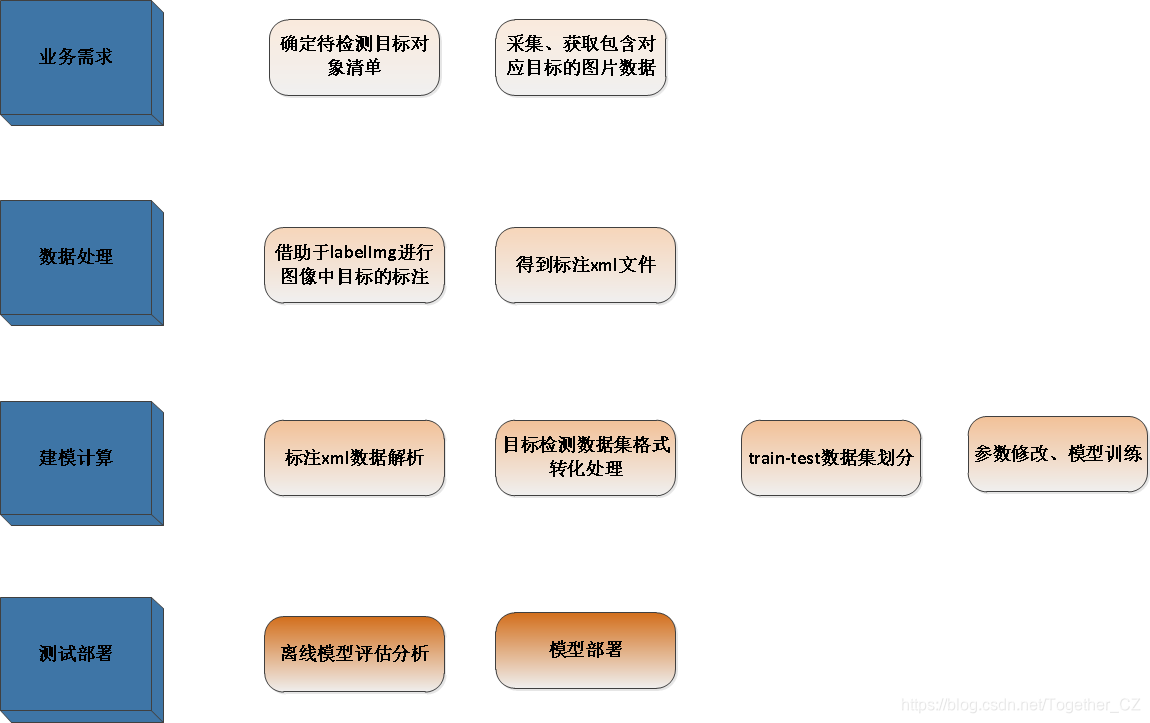
? ? ? 我根据自己以往的一些项目经验,总结汇总得到下面一个大致的流程,比较简明扼要地概括了目标检测项目的处理流程,其中,最后一步主要是公司项目才会用到,科研学术项目一般不会过多关注于部署实施层面的工作。接下来,我就结合自己下方总结的步骤流程来详细展开介绍,如何入门实践自己的第一个目标检测项目。

实战入门? ? ? ? ?
? ? ? ? 这里我们以 people 为待检测的目标对象。
第一步:获取数据集
? ? ? ?我们的数据集来源是网络数据采集和实际拍照采集,主要是获取一些包含人在内的图片就行了,爬虫的话网上也有很多,直接百度搜索【人】即可:

? ? ? 数据获取部分不是本节要讲的重点,这里就交给读者自行完成了,这里先看下数据集样例:

?第二步:数据标注
? ? ? ?获取到我们所需要的图片数据之后,接下来就要对其进行标注处理了,我这里推荐使用的标注软件是labelImg,直接源码安装即可,我是直接网上搜索下载了一个已经打包好的labelImg.exe直接双击即可启动,下面来看下标注的流程。
? ? ? 软件启动界面如下:

? ? ? ?接下来按照截图红框操作点击【Open Dir】打开图片存储目录:

? ? ? 确定后自动打开第一张图片:

? ? ? ?接下来开始标注:
? ? ? ?点击红框按钮,新生成一个标注框:

?

? ? 点击之后可以看到有两条垂直的黑色线条会随着光标移动,这个是用来帮你确定标注框的顶点的。


? ? ? ?绘制完单个标注框之后,填入对应的名称,点击ok即可,这样就完成了单个目标对象的标注工作了。剩下的工作就是无尽的重复处理了,目标检测项目里面数据标注可是需要花大工夫才能完成的,数据量太少的话效果肯定不会好。
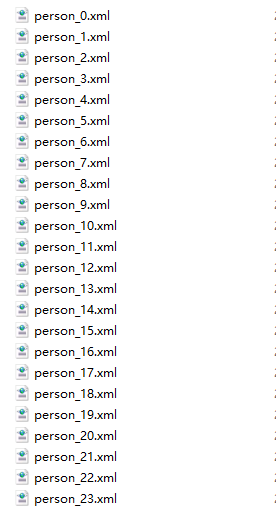
? ? ? ? 标注完成后,会生成与图片数据对等个数的xml文件:

? ? ?单个标注文件部分内容如下:

? ? ?红框部分表示的就是单个标注框的坐标,分别表示左上角和右下角两个坐标,共四个数值。
?
?第三步:目标检测数据格式转化
? ? ? ?这一步主要是将我们标注好的xml数据进行解析处理,生成可用于目标检测模型计算的数据集格式,首先我们会对整体的数据集进行划分计算,生成train.txt和test.txt两个文件,分别用于构建模型的训练数据集和测试数据集,
? ? ? ? ? dataset目录截图如下:

? ? ? ? ?代码实现如下:
import os
import random
random.seed(0)

xmlfilepath='./dataset/xmls/'
saveBasePath="./dataset/"


trainval_percent=0.2
train_percent=0.8
temp_xml = os.listdir(xmlfilepath)
total_xml = []
for xml in temp_xml:
    if xml.endswith(".xml"):
        total_xml.append(xml)
num=len(total_xml)
print("num: ",num)
list=range(num)
tv=int(num*trainval_percent)
tr=int(tv*train_percent)
trainval= random.sample(list,tv)
train=random.sample(trainval,tr)


ftest = open(os.path.join(saveBasePath,'test.txt'), 'w')
ftrain = open(os.path.join(saveBasePath,'train.txt'), 'w')
for i  in list:
    name=total_xml[i][:-4]+'\n'
    if i in train:
        ftrain.write(name)
    if i in trainval:
        ftest.write(name)
ftrain.close()
ftest .close()
? ? ? 代码执行完成之后会在我们的dataset目录下面生成两个文件train.txt和test.txt,这两个文件都是只包含图像的id。dataset目录截图如下所示:

? ? ? ?train.txt截图如下:

? ? ? ?test.txt截图如下:

? ? ? ? 为了演示,这里我总的数据集里面只有40张图片,id从0到39。
? ? ? 之后就要基于这两个文件来构建可用于模型的训练数据集和测试数据集了。项目整体目录如下:

? ? ? ?代码实现如下所示:
sets=['train','test']
classes = ['people']


def convert_annotation(image_id, list_file):
    in_file = open('dataset/xmls/%s.xml'%(image_id), encoding='utf-8')
    tree=ET.parse(in_file)
    root = tree.getroot()
    for obj in root.iter('object'):
        difficult = 0
        if obj.find('difficult')!=None:
            difficult = obj.find('difficult').text
        cls = obj.find('name').text
        if cls not in classes or int(difficult)==1:
            continue
        cls_id = classes.index(cls)
        xmlbox = obj.find('bndbox')
        b = (int(xmlbox.find('xmin').text), int(xmlbox.find('ymin').text), int(xmlbox.find('xmax').text), int(xmlbox.find('ymax').text))
        list_file.write(" " + ",".join([str(a) for a in b]) + ',' + str(cls_id))


prefix=""
for image_set in sets:
    image_ids = open('dataset/%s.txt'%(image_set)).read().strip().split()
    list_file = open('%s.txt'%(image_set), 'w')
    for image_id in image_ids:
        one_line_prefix=prefix+'dataset/JPEGImages/'+image_id+'.jpg'
        list_file.write(one_line_prefix)
        convert_annotation(image_id, list_file)
        list_file.write('\n')
    list_file.close()
? ? ? 代码执行完成之后会在当前目录下生成两个文件train.txt和test.txt,这是模型的训练数据集和测试数据集,这里可能有点绕,因为代码写的比较冗余,上面的两个环节实际上是可以合并到一起变成一步处理到位的。此时项目截图如下:

? ? ? 可以看到:在当前目录下新生成了两个文件,分别是train.txt和test.txt,下面来具体看下,train.txt截图如下:

? ? ? ?我们这里以第四行为例进行解释,前面半部分为图片的路径,后面的数值为标注框的信息,后面我框了两个红框,每个单独的红框表示一个标注框,其中前四个标注框表示左上角和右下角的坐标信息,第五个数值表示的是目标类别列表的索引值,由于这里我们只有一个目标对象, 所以这里的目标索引值均为0。
? ? ? ? ?test.txt截图如下:

? ? ? 到这里,我们的数据集划分就介绍结束了。
?
第四步:模型训练
? ? ? ? 这一环节是我们目标检测项目实战的核心部分,前面几步我们获取、标注、处理得到了可用于模型训练的数据集以及对应的标注数据,接下来就要基于这批数据集来构建我们的目标检测模型了。首先要修改一下配置信息,这里主要是对应于config.py脚本的内容:
#训练数据集路径
annotation_path = 'train.txt'
#类别清单路径
classes_path = 'model_data/classes.txt'
#锚框路径
anchors_path = 'model_data/anchors.txt'
#预训练模型路径
weights_path = 'model_data/pretrain.h5'
#图像输入尺寸
input_shape = (416,416)
#是否归一化
normalize = False
#读取目标清单
class_names = get_classes(classes_path)
#加载锚框文件
anchors = get_anchors(anchors_path)
print('class_names: ', class_names)
print('anchors: ', anchors)
num_classes = len(class_names)
num_anchors = len(anchors)
print('num_classes: ', num_classes)
print('num_anchors: ', num_anchors)
mosaic = False
Cosine_scheduler = False
label_smoothing = 0
? ? ? 相应的注释我也都放到代码块里面了,其他的参数就保持默认设置就行了,别问,问就是我亲身实践测试的结果。
? ? ? 设置完成之后就可以进行模型训练了,训练方式也很简单,终端执行:
python train.py? ? ? ? 记性了,train.py部分实现如下:
def data_generator(annotation_lines, batch_size, input_shape, anchors, num_classes, mosaic=False, random=True):
    '''
    数据生成器
    '''
    n = len(annotation_lines)
    i = 0
    flag = True
    while True:
        image_data = []
        box_data = []
        for b in range(batch_size):
            if i==0:
                np.random.shuffle(annotation_lines)
            if mosaic:
                if flag and (i+4) < n:
                    image, box = get_random_data_with_Mosaic(annotation_lines[i:i+4], input_shape)
                    i = (i+4) % n
                else:
                    image, box = get_random_data(annotation_lines[i], input_shape, random=random)
                    i = (i+1) % n
                flag = bool(1-flag)
            else:
                image, box = get_random_data(annotation_lines[i], input_shape, random=random)
                i = (i+1) % n
            image_data.append(image)
            box_data.append(box)
        image_data = np.array(image_data)
        box_data = np.array(box_data)
        y_true = preprocess_true_boxes(box_data, input_shape, anchors, num_classes)
        yield [image_data, *y_true], np.zeros(batch_size)


def preprocess_true_boxes(true_boxes, input_shape, anchors, num_classes):
    '''
    预处理box
    '''
    assert (true_boxes[..., 4]<num_classes).all(), 'class id must be less than num_classes'
    num_layers = len(anchors)//3
    anchor_mask = [[6,7,8], [3,4,5], [0,1,2]] if num_layers==3 else [[3,4,5], [1,2,3]]
    true_boxes = np.array(true_boxes, dtype='float32')
    input_shape = np.array(input_shape, dtype='int32')
    boxes_xy = (true_boxes[..., 0:2] + true_boxes[..., 2:4]) // 2
    boxes_wh = true_boxes[..., 2:4] - true_boxes[..., 0:2]
    true_boxes[..., 0:2] = boxes_xy/input_shape[::-1]
    true_boxes[..., 2:4] = boxes_wh/input_shape[::-1]
    m = true_boxes.shape[0]
    grid_shapes = [input_shape//{0:32, 1:16, 2:8}[l] for l in range(num_layers)]
    y_true = [np.zeros((m,grid_shapes[l][0],grid_shapes[l][1],len(anchor_mask[l]),5+num_classes),
        dtype='float32') for l in range(num_layers)]
    anchors = np.expand_dims(anchors, 0)
    anchor_maxes = anchors / 2.
    anchor_mins = -anchor_maxes
    valid_mask = boxes_wh[..., 0]>0
    for b in range(m):
        wh = boxes_wh[b, valid_mask[b]]
        if len(wh)==0: continue
        wh = np.expand_dims(wh, -2)
        box_maxes = wh / 2.
        box_mins = -box_maxes
        intersect_mins = np.maximum(box_mins, anchor_mins)
        intersect_maxes = np.minimum(box_maxes, anchor_maxes)
        intersect_wh = np.maximum(intersect_maxes - intersect_mins, 0.)
        intersect_area = intersect_wh[..., 0] * intersect_wh[..., 1]
        box_area = wh[..., 0] * wh[..., 1]
        anchor_area = anchors[..., 0] * anchors[..., 1]
        iou = intersect_area / (box_area + anchor_area - intersect_area)
        best_anchor = np.argmax(iou, axis=-1)
        for t, n in enumerate(best_anchor):
            for l in range(num_layers):
                if n in anchor_mask[l]:
                    i = np.floor(true_boxes[b,t,0] * grid_shapes[l][1]).astype('int32')
                    j = np.floor(true_boxes[b,t,1] * grid_shapes[l][0]).astype('int32')
                    k = anchor_mask[l].index(n)
                    c = true_boxes[b, t, 4].astype('int32')
                    y_true[l][b, j, i, k, 0:4] = true_boxes[b, t, 0:4]
                    y_true[l][b, j, i, k, 4] = 1
                    y_true[l][b, j, i, k, 5+c] = 1

    return y_true


if __name__ == "__main__":
    K.clear_session()
    image_input = Input(shape=(None, None, 3))
    h, w = input_shape
    print('Create YOLOv4-Tiny model with {} anchors and {} classes.'.format(num_anchors, num_classes))
    model_body = yolo_body(image_input, num_anchors//2, num_classes)
    print('Load weights {}.'.format(weights_path))
    model_body.load_weights(weights_path, by_name=True, skip_mismatch=True)
    y_true = [Input(shape=(h//{0:32, 1:16}[l], w//{0:32, 1:16}[l], num_anchors//2, num_classes+5)) for l in range(2)]
    loss_input = [*model_body.output, *y_true]
    model_loss = Lambda(yolo_loss, output_shape=(1,), name='yolo_loss',
        arguments={'anchors': anchors, 'num_classes': num_classes, 'ignore_thresh': 0.5, 'label_smoothing': label_smoothing, 'normalize':normalize})(loss_input)
    model = Model([model_body.input, *y_true], model_loss)
    logging = TensorBoard(log_dir=log_dir)
    checkpoint = ModelCheckpoint(log_dir + 'best.h5',
        monitor='val_loss', save_weights_only=False, save_best_only=True, period=1)
    early_stopping = EarlyStopping(monitor='val_loss', min_delta=0, patience=10, verbose=1)
    val_split = 0.1
    with open(annotation_path) as f:
        lines = f.readlines()
    np.random.seed(10101)
    np.random.shuffle(lines)
    np.random.seed(None)
    num_val = int(len(lines)*val_split)
    num_train = len(lines) - num_val
    freeze_layers = 60
    for i in range(freeze_layers): model_body.layers[i].trainable = False
    print('Freeze the first {} layers of total {} layers.'.format(freeze_layers, len(model_body.layers)))
    if True:
        Init_epoch = 0
        Freeze_epoch = 50
        batch_size = 8
        learning_rate_base = 1e-3
        if Cosine_scheduler:
            warmup_epoch = int((Freeze_epoch-Init_epoch)*0.2)
            total_steps = int((Freeze_epoch-Init_epoch) * num_train / batch_size)
            warmup_steps = int(warmup_epoch * num_train / batch_size)
            reduce_lr = WarmUpCosineDecayScheduler(learning_rate_base=learning_rate_base,
                                                        total_steps=total_steps,
                                                        warmup_learning_rate=1e-4,
                                                        warmup_steps=warmup_steps,
                                                        hold_base_rate_steps=num_train,
                                                        min_learn_rate=1e-6
                                                        )
            model.compile(optimizer=Adam(), loss={'yolo_loss': lambda y_true, y_pred: y_pred})
        else:
            reduce_lr = ReduceLROnPlateau(monitor='val_loss', factor=0.5, patience=3, verbose=1)
            model.compile(optimizer=Adam(learning_rate_base), loss={'yolo_loss': lambda y_true, y_pred: y_pred})
        print('Train on {} samples, val on {} samples, with batch size {}.'.format(num_train, num_val, batch_size))
        model.fit_generator(data_generator(lines[:num_train], batch_size, input_shape, anchors, num_classes, mosaic=mosaic),
                steps_per_epoch=max(1, num_train//batch_size),
                validation_data=data_generator(lines[num_train:], batch_size, input_shape, anchors, num_classes, mosaic=False),
                validation_steps=max(1, num_val//batch_size),
                epochs=Freeze_epoch,
                initial_epoch=Init_epoch,
                callbacks=[logging, checkpoint, reduce_lr, early_stopping])
        model.save_weights(log_dir + 'trained_weights_stage_1.h5')
    for i in range(freeze_layers): model_body.layers[i].trainable = True
    if True:
        Freeze_epoch = 50
        Epoch = 100
        batch_size = 8
        learning_rate_base = 1e-4
        if Cosine_scheduler:
            warmup_epoch = int((Epoch-Freeze_epoch)*0.2)
            total_steps = int((Epoch-Freeze_epoch) * num_train / batch_size)
            warmup_steps = int(warmup_epoch * num_train / batch_size)
            reduce_lr = WarmUpCosineDecayScheduler(learning_rate_base=learning_rate_base,
                                                        total_steps=total_steps,
                                                        warmup_learning_rate=1e-5,
                                                        warmup_steps=warmup_steps,
                                                        hold_base_rate_steps=num_train//2,
                                                        min_learn_rate=1e-6
                                                        )
            model.compile(optimizer=Adam(), loss={'yolo_loss': lambda y_true, y_pred: y_pred})
        else:
            reduce_lr = ReduceLROnPlateau(monitor='val_loss', factor=0.5, patience=3, verbose=1)
            model.compile(optimizer=Adam(learning_rate_base), loss={'yolo_loss': lambda y_true, y_pred: y_pred})
        print('Train on {} samples, val on {} samples, with batch size {}.'.format(num_train, num_val, batch_size))
        model.fit_generator(data_generator(lines[:num_train], batch_size, input_shape, anchors, num_classes, mosaic=mosaic),
                steps_per_epoch=max(1, num_train//batch_size),
                validation_data=data_generator(lines[num_train:], batch_size, input_shape, anchors, num_classes, mosaic=False),
                validation_steps=max(1, num_val//batch_size),
                epochs=Epoch,
                initial_epoch=Freeze_epoch,
                callbacks=[logging, checkpoint, reduce_lr, early_stopping])
        model.save_weights(log_dir + 'model.h5')
? ? ? ? ?训练启动,输出截图如下:

? ? ? ? 可以看到:模型已经正常训练启动了,静静等待模型训练即可, 期间会一直覆盖存储最好的模型,可以随时用于模型的测试。
? ? ?下面是一些模型样例输出:
?

?

?

?

? ? ? 关于模型评估、部署相关的内容我打算拆分出来后面单独写一篇文章来进行介绍,到这里一个完整的目标检测建模处理流程就全部介绍完成了,我主要是从代码实践的角度来进行讲解的,拿的是网上下载的一个开源的yolov4-tiny项目来进行具体实践的,感兴趣的话可以自己动手实践一下,欢迎互相交流学习!
