Conformer: Local Features Coupling Global Representations for Visual Recognition
上一章节中已经将原论文做了简要的解析,这一章节将解析改论文的源码
代码: comformer源码-torch
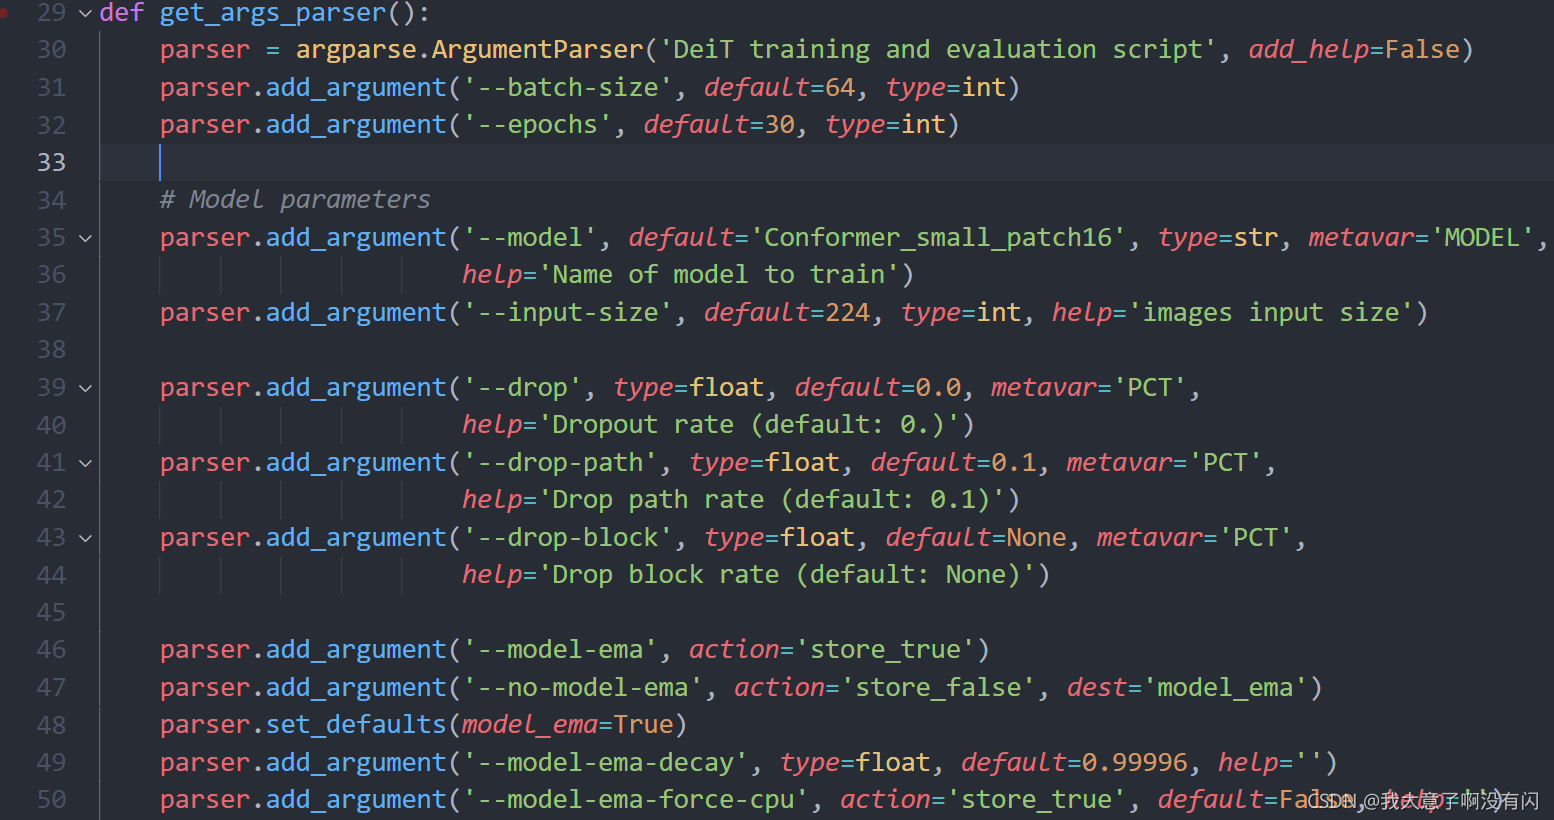
1. main脚本中的参数配置
由于参数配置信息太多,我这里就挑一些主要部分展开。
1)batch_size, 由于源码中的输入图像尺寸是224x224的,而我的显存是12G的,所以设置成了64,train起来是没有问题的;由于是在源码提供的预训练权重基础上进行微调来训练花分类数据集的,所有epoch没有设置成很大,30足够。
2)model:源码中提供了4种模型,分别是Conformer-tiny-patch16,patch16的意思就是经过第二次conv中的卷积尺寸为16/4=4,s=16/4=4,得到的patches数为14x14,并且channel_ratio=1是用来控制卷积分支中的channel深度以及卷积分支最后的class head中的FC layer的数目,其他的参数配置信息与small的配置相同;
Conformer-small-patch16:将56x56x64的特征图经过一个4x4的卷积来实现,除了channel_ratio变成了4,也就是论文中的图所给出的配置,其余的参数配置与tiny完全一致;
Conformer-small-patch32:这里是将56x56x64的特征图经过一个8x8,s=8的卷积来实现的,得到的patches数为7x7其余的参数配置与small-patch16完全相同;
到这里,大家可以思考一个问题:是small-patch16的模型参数量大呢?还是small-patch32的参数量大呢?留个悬念,感兴趣的小伙伴可以在评论区留言或者私信我。
Conformer-base_patch16:与small-patch16相比,改变的参数有channel_ratio=6,embed_dim=576,也就是第二次卷积的时候,使用了576个filter,之前三个都是384。以及num_head=9,即self-attention中的head数目,9表示做了9次attention。
我这里用的模型是small-patch16,如果你想用哪个模型,就该成对应的模型名即可。
另外,源码中的README只提供了tiny,small-patch16以及base三个的预训权重。
3)Dropout/DropPath/DropBlock:源码中使用的DropPath,默认设置为0.1
4)model-ema: EMA即指数移动平均值,关于EMA的理论解释,这里不再展开,网上有大量的解释。这里的参数你无需改变,用来加快模型收敛的的超参数。


5)优化器以及学习率计划的超参数,这里也不展开了,搞来搞去都是那些东西。。。

6)Mixup数据增强的超参数:这一部分还是比较不错的,因为可以扩展到其他的一些CV任务(如检测,分割等)上,比较实用,后面我会详细展开。

7)数据集以及加载你自己训练好的checkpoint的参数信息
注意:源码中是没有’nb_classes’这个参数的,这个是我后来加上去的,因为源码中提供的数据读取方法针对的是ImageNet,CIFAR等。不适用自己的数据集,所以我根据博主:劈里啪啦的读取图像的方法,改写了源码中读取图像的方法。
我这里使用的是单GPU训练,所以将源码配置参数信息的最后一个参数’–dist_url’修改成’’,因为不是多GPU训练,无需开启DDP以及同步BN操作。

下图是源码中加载数据集用到的方法:

下图是修改之后的读取图像方法:

read_split_data是将数据集划分为train和val:
def read_split_data(root: str, val_rate: float=0.2):
    random.seed(42)
    assert os.path.exists(root), "dataset root: {} does not exist.".format(root)

    # 遍历文件夹,一个文件夹对应一个类别
    river_class = [cla for cla in os.listdir(root) if os.path.isdir(os.path.join(root, cla))]
    # 排序,保证顺序一致
    river_class.sort()
    # 生成类别名称以及对应的数字索引
    class_indices = dict((k, v) for v, k in enumerate(river_class))
    json_str = json.dumps(dict((val, key) for key, val in class_indices.items()), indent=4)
    with open('class_indices.json', 'w') as json_file:
        json_file.write(json_str)

    train_images_path = []  # 存储训练集的所有图片路径
    train_images_label = []  # 存储训练集图片对应索引信息
    val_images_path = []  # 存储验证集的所有图片路径
    val_images_label = []  # 存储验证集图片对应索引信息
    every_class_num = []  # 存储每个类别的样本总数
    supported = [".jpg", ".JPG", ".png", ".PNG"]  # 支持的文件后缀类型
    # 遍历每个文件夹下的文件
    for cla in river_class:
        cla_path = os.path.join(root, cla)
        # 遍历获取supported支持的所有文件路径
        images = [os.path.join(root, cla, i) for i in os.listdir(cla_path)
                  if os.path.splitext(i)[-1] in supported]
        # 获取该类别对应的索引
        image_class = class_indices[cla]
        # 记录该类别的样本数量
        every_class_num.append(len(images))
        # 按比例随机采样验证样本
        val_path = random.sample(images, k=int(len(images) * val_rate))

        for img_path in images:
            # train:val = 1:1
            # train_images_path.append(img_path)
            # train_images_label.append(image_class)
            # val_images_path.append(img_path)
            # val_images_label.append(image_class)
            if img_path in val_path:  # 如果该路径在采样的验证集样本中则存入验证集
                val_images_path.append(img_path)
                val_images_label.append(image_class)
            else:  # 否则存入训练集
                train_images_path.append(img_path)
                train_images_label.append(image_class)

    print("{} images were found in the dataset.".format(sum(every_class_num)))
    print("{} images for training.".format(len(train_images_path)))
    print("{} images for validation.".format(len(val_images_path)))

    return train_images_path, train_images_label, val_images_path, val_images_label
MyDataset是用来加载图像的一个类:
class MyDataSet(Dataset):
    """自定义数据集"""

    def __init__(self, images_path: list, images_class: list, transform=None):
        self.images_path = images_path
        self.images_class = images_class
        self.transform = transform

    def __len__(self):
        return len(self.images_path)

    def __getitem__(self, item):
        img = Image.open(self.images_path[item])
        if img.mode != 'RGB':
            img = img.convert('RGB')

        # RGB为彩色图片,L为灰度图片
        # if img.mode != 'RGB':
        #     raise ValueError("image: {} isn't RGB mode.".format(self.images_path[item]))
        label = self.images_class[item]

        if self.transform is not None:
            img = self.transform(img)

        return img, label

    @staticmethod
    def collate_fn(batch):
        # 官方实现的default_collate可以参考
        # https://github.com/pytorch/pytorch/blob/67b7e751e6b5931a9f45274653f4f653a4e6cdf6/torch/utils/data/_utils/collate.py
        images, labels = tuple(zip(*batch))

        images = torch.stack(images, dim=0)
        labels = torch.as_tensor(labels)
        return images, labels
关于transforms数据增强的方法我用的还是源码中的方法,没有改变。
2. 创建模型
以创建Conformer-small-patch16x16为例,debug的顺序如下:


2.1. Conformer类
接着会跳到Conformer脚本中的Conformer类的init函数中:
class Conformer(nn.Module):

    def __init__(self, patch_size=16, in_chans=3, num_classes=1000, base_channel=64, channel_ratio=4, num_med_block=0,
                 embed_dim=768, depth=12, num_heads=12, mlp_ratio=4., qkv_bias=False, qk_scale=None,
                 drop_rate=0., attn_drop_rate=0., drop_path_rate=0.):

        # Transformer
        super().__init__()
        self.num_classes = num_classes
        self.num_features = self.embed_dim = embed_dim  # num_features for consistency with other models
        assert depth % 3 == 0
        # 在图像token的最前面加上一个class token(维度与图像token保持一致384),原来是14*14个token,现在有14*14+1=197个token
        self.cls_token = nn.Parameter(torch.zeros(1, 1, embed_dim))  # (1, 1, 384)
        self.trans_dpr = [x.item() for x in torch.linspace(0, drop_path_rate, depth)]  # stochastic depth decay rule

        # Classifier head
        # 下面两个transformer分支上的class head:对embedding进行layernorm + 一个fc层(embed_dim, num_classes)进行分类
        self.trans_norm = nn.LayerNorm(embed_dim) # (384, )
        self.trans_cls_head = nn.Linear(embed_dim, num_classes) if num_classes > 0 else nn.Identity()  # (384, class)
        # 定义卷积分支上的class head: global average pooling + 一个fc层用于分类(1024, class)
        self.pooling = nn.AdaptiveAvgPool2d(1) # (1, 1, 1024)
        self.conv_cls_head = nn.Linear(int(256 * channel_ratio), num_classes) # (1024, class)

        # Stem stage: get the feature maps by conv block (copied form resnet.py)
        # 论文中的c1 block:conv+max pool (224, 224, 3) -> (112, 112, 64) -> (56, 56, 64)
        self.conv1 = nn.Conv2d(in_chans, 64, kernel_size=7, stride=2, padding=3, bias=False)  # 1 / 2 [112, 112]
        self.bn1 = nn.BatchNorm2d(64)
        self.act1 = nn.ReLU(inplace=True)
        self.maxpool = nn.MaxPool2d(kernel_size=3, stride=2, padding=1)  # 1 / 4 [56, 56]

        # 1 stage
        stage_1_channel = int(base_channel * channel_ratio) # 256
        trans_dw_stride = patch_size // 4                   # 16 / 4
        # C2中卷积分支的第一个block
        self.conv_1 = ConvBlock(inplanes=64, outplanes=stage_1_channel, res_conv=True, stride=1)
        # C2中transformer分支的第一个block:使用4x4conv, (56, 56, 64) -> (14, 14, 384) 得到14x14个patches,维度384
        self.trans_patch_conv = nn.Conv2d(64, embed_dim, kernel_size=trans_dw_stride, stride=trans_dw_stride, padding=0)
        self.trans_1 = Block(dim=embed_dim, num_heads=num_heads, mlp_ratio=mlp_ratio, qkv_bias=qkv_bias,
                             qk_scale=qk_scale, drop=drop_rate, attn_drop=attn_drop_rate, drop_path=self.trans_dpr[0],
                             )

        # 2~4 stage 对应着C2中的后三个block
        init_stage = 2
        fin_stage = depth // 3 + 1
        for i in range(init_stage, fin_stage):
            self.add_module('conv_trans_' + str(i),
                    ConvTransBlock(
                        stage_1_channel, stage_1_channel, False, 1, dw_stride=trans_dw_stride, embed_dim=embed_dim,
                        num_heads=num_heads, mlp_ratio=mlp_ratio, qkv_bias=qkv_bias, qk_scale=qk_scale,
                        drop_rate=drop_rate, attn_drop_rate=attn_drop_rate, drop_path_rate=self.trans_dpr[i-1],
                        num_med_block=num_med_block
                    )
            )

        stage_2_channel = int(base_channel * channel_ratio * 2)
        # 5~8 stage
        init_stage = fin_stage # 5
        fin_stage = fin_stage + depth // 3 # 9
        for i in range(init_stage, fin_stage):
            s = 2 if i == init_stage else 1
            in_channel = stage_1_channel if i == init_stage else stage_2_channel
            res_conv = True if i == init_stage else False # 只有第一次进入到C3时才有short cut
            self.add_module('conv_trans_' + str(i),
                    ConvTransBlock(
                        in_channel, stage_2_channel, res_conv, s, dw_stride=trans_dw_stride // 2, embed_dim=embed_dim,
                        num_heads=num_heads, mlp_ratio=mlp_ratio, qkv_bias=qkv_bias, qk_scale=qk_scale,
                        drop_rate=drop_rate, attn_drop_rate=attn_drop_rate, drop_path_rate=self.trans_dpr[i-1],
                        num_med_block=num_med_block
                    )
            )

        stage_3_channel = int(base_channel * channel_ratio * 2 * 2)
        # 9~12 stage
        init_stage = fin_stage  # 9
        fin_stage = fin_stage + depth // 3  # 13
        for i in range(init_stage, fin_stage):
            s = 2 if i == init_stage else 1
            in_channel = stage_2_channel if i == init_stage else stage_3_channel
            res_conv = True if i == init_stage else False
            last_fusion = True if i == depth else False
            self.add_module('conv_trans_' + str(i),
                    ConvTransBlock(
                        in_channel, stage_3_channel, res_conv, s, dw_stride=trans_dw_stride // 4, embed_dim=embed_dim,
                        num_heads=num_heads, mlp_ratio=mlp_ratio, qkv_bias=qkv_bias, qk_scale=qk_scale,
                        drop_rate=drop_rate, attn_drop_rate=attn_drop_rate, drop_path_rate=self.trans_dpr[i-1],
                        num_med_block=num_med_block, last_fusion=last_fusion
                    )
            )
        self.fin_stage = fin_stage
1)初始化一个全为0的参数class token,用nn.Parameter(1, 1, 384),保证该参数是可训练的。并且该class token是要加在图像token最前面的,并且维度需要和图像token保持一致即384。输入到Transformer分支之前的图像token的shape为(196, 384),加上class token之后呢?变成了(197, 384)。这里是没有加入PE位置编码的,原因论文中也说了:由于网络中的每个bottleneck(除开第一个)中都存在conv分支与Transformer分支的feature fusion,而conv分支中所提取到的local feature很清晰的表示出位置信息了,所以不再需要去精心设计Positional Encoding了。
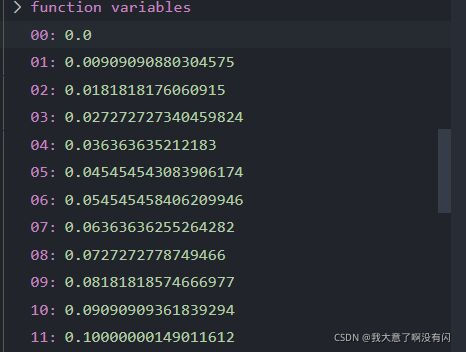
2) 由于Transformer分支总共有12个Encoder,那儿Drop-path设置为0.1,并不是每一个Encoder里面的Drop-path都是0.1,而是生成一个长度为12的从0-0.1的等差数列。也就是源码中的trans_dpr参数,如下图:

3)定义Classifier head,分别卷积分支上的head以及Transformer分支上的head:
Transformer分支上的head,定义一个layer_norm(384)表明在最后一个维度即embed_dim维度上进行layer_norm; 再定义一个分类的输出层,用FC层来表示:输入channel为embed_dim=384,输出channel为num_classes(5);
卷积分支上的head,定义一个自适应的AvgPool,即针对特征图中的每一个channel上的平均池化,shape变换为:[H, W, C] -> [1, 1, C] 这里的C=1024;最后也是接一个分类FC layer,输入channel=256 * channel_ratio = 1024, 输出channel=5。
4)定义论文中的Stem Stage:
Input Images -> Conv -> BN -> Relu -> MaxPool
这里的filter尺寸为7x7,步长为2,padding=3,保证分辨率相对于输入图像只缩小一半;
最大池化层的池化窗口为3x3,步长为2,padding=1,同理分辨率再缩减一半;
shape的完整变换如下:
[224, 224, 3] -> [112, 112, 64] -> [56, 56, 64], 对应论文中的C1 stage。

5)由于C2-C5总共的bottleneck次数为12(1+3+4+3+1),源码中称之为stage1 - 12,为了方便,采用stage1-12的顺序解析。
Stage1
对应这上图中C2 stage中的第一个bottleneck,注意:第一个bottleneck中是没有feature fusion交互信息的。
卷积分支中的bottleneck其实就是ResNet中的Bottleneck,而Transformer分支中首先进行一个普通卷积进行图像的分割,使用filter的尺寸=patch / 4 = 16 / 4 = 4, s=4,转换成14x14x384的feature map;再进行一个MHSA-6.
为了理解Conformer剩下的代码,可先看源码中其他的5个类:
ConvBlock; Block; ConvTransBlock; FCUDown; FCUUp
知道了以上5个类具体做了什么,再看stage1中的定义,是不是就简单了很多呢。
Stage2-4
进行一个for循环,从2开始到4结束。
可以看到这里传递进去的 res_conv参数都是False,表明这三个stage中都没有short cut以及3x3卷积中的s都等于1。关于ConvTransBlock类的实现在2.5章节已经详细说明。
Stage5-8
对于C3中的stage5-8,只有第一次进入到C3时的卷积s=2(针对第一个bottleneck中的3x3conv而言的,下采样的过程) 以后三次的卷积s=1,并且只有第一次的in_channel=256,以后的inchannel=512。
Stage9-12
对于C4中的stage9-11,同上,只有第一次进入到C4中,只有第一个bottleneck中有short cut,其余的stage的bottleneck都没有short cut。
注意:最后一个stage12,与前面的stage的操作都相反,即第一个bottleneck中不进行下采样,即3x3conv的s=1,并且也没有short cut;
而在stage12的第二个bottleneck中的3x3conv的s=2,进行下采样,并且存在short cut。
.
2.2. ConvBlock类
class ConvBlock(nn.Module):

    def __init__(self, inplanes, outplanes, stride=1, res_conv=False, act_layer=nn.ReLU, groups=1,
                 norm_layer=partial(nn.BatchNorm2d, eps=1e-6), drop_block=None, drop_path=None):
        super(ConvBlock, self).__init__()

        expansion = 4
        med_planes = outplanes // expansion
        # 1x1 conv  (56, 56, 64) -> (56, 56, 64)
        self.conv1 = nn.Conv2d(inplanes, med_planes, kernel_size=1, stride=1, padding=0, bias=False)
        self.bn1 = norm_layer(med_planes)
        self.act1 = act_layer(inplace=True)
        # 3x3 conv (56, 56, 64) -> (56, 56, 64)
        self.conv2 = nn.Conv2d(med_planes, med_planes, kernel_size=3, stride=stride, groups=groups, padding=1, bias=False)
        self.bn2 = norm_layer(med_planes)
        self.act2 = act_layer(inplace=True)
        # 1x1 conv 升维 (56, 56, 64) -> (56, 56, 256)
        self.conv3 = nn.Conv2d(med_planes, outplanes, kernel_size=1, stride=1, padding=0, bias=False)
        self.bn3 = norm_layer(outplanes)
        self.act3 = act_layer(inplace=True)
        # short cut (56, 56, 64) -> (56, 56, 256)
        if res_conv:
            self.residual_conv = nn.Conv2d(inplanes, outplanes, kernel_size=1, stride=stride, padding=0, bias=False)
            self.residual_bn = norm_layer(outplanes)

        self.res_conv = res_conv
        self.drop_block = drop_block
        self.drop_path = drop_path

    def zero_init_last_bn(self):
        nn.init.zeros_(self.bn3.weight)

    def forward(self, x, x_t=None, return_x_2=True):
        residual = x

        x = self.conv1(x)
        x = self.bn1(x)
        if self.drop_block is not None:
            x = self.drop_block(x)
        x = self.act1(x)

        x = self.conv2(x) if x_t is None else self.conv2(x + x_t)
        x = self.bn2(x)
        if self.drop_block is not None:
            x = self.drop_block(x)
        x2 = self.act2(x)

        x = self.conv3(x2)
        x = self.bn3(x)
        if self.drop_block is not None:
            x = self.drop_block(x)

        if self.drop_path is not None:
            x = self.drop_path(x)

        if self.res_conv:
            residual = self.residual_conv(residual)
            residual = self.residual_bn(residual)

        x += residual
        x = self.act3(x)

        if return_x_2: # 若该变量为True,表示需要将conv分支中的3x3卷积的输出进行转换到transformer分支中
            return x, x2
        else:
            return x  # 否则transformer的特张图经过转换与conv分支上的特张图fusion之后再进行conv block得到的输出
这里以stage1举例解析init函数,传递进去的参数有 :
输入channel=64
输出channel=256
res_conv=True,表示是否有short cut,True表示该bottleneck存在short cut
stride=1,注意这里的stride步长是用在3x3卷积中的,如果s=1则表示没有进行下采样,而s=2表示需要进行下采样。
self.conv1, self.bn1以及self.act1定义bottleneck中的1x1卷积;同理3x3以及1x1卷积升维同理。接着判断是否存在short cut,如果有,则将输入到该bottleneck中的feature map进行1x1卷积调整channel维度,由于不改变feature map的分辨率,只是调整channel,其实是实线残差连接。
forward函数后面统一讲。
2.3. Block类
# transformer分支上的block:Multihead-6 self-attention + MLP block
class Block(nn.Module):

    def __init__(self, dim, num_heads, mlp_ratio=4., qkv_bias=False, qk_scale=None, drop=0., attn_drop=0.,
                 drop_path=0., act_layer=nn.GELU, norm_layer=partial(nn.LayerNorm, eps=1e-6)):
        super().__init__()
        self.norm1 = norm_layer(dim) # layer norm 1
        self.attn = Attention(
            dim, num_heads=num_heads, qkv_bias=qkv_bias, qk_scale=qk_scale, attn_drop=attn_drop, proj_drop=drop)
        # NOTE: drop path for stochastic depth, we shall see if this is better than dropout here
        self.drop_path = DropPath(drop_path) if drop_path > 0. else nn.Identity()
        self.norm2 = norm_layer(dim) # layer norm 2
        mlp_hidden_dim = int(dim * mlp_ratio) # MLP block中的第一个FC层的hidden units数:384*4=1536
        self.mlp = Mlp(in_features=dim, hidden_features=mlp_hidden_dim, act_layer=act_layer, drop=drop)

    def forward(self, x):
        x = x + self.drop_path(self.attn(self.norm1(x)))
        x = x + self.drop_path(self.mlp(self.norm2(x)))
        return x

#  Multi-head Self-attention
class Attention(nn.Module):
    def __init__(self, dim, num_heads=8, qkv_bias=False, qk_scale=None, attn_drop=0., proj_drop=0.):
        super().__init__()
        self.num_heads = num_heads
        head_dim = dim // num_heads
        # NOTE scale factor was wrong in my original version, can set manually to be compat with prev weights
        self.scale = qk_scale or head_dim ** -0.5
        self.qkv = nn.Linear(dim, dim * 3, bias=qkv_bias)
        self.attn_drop = nn.Dropout(attn_drop)
        self.proj = nn.Linear(dim, dim)
        self.proj_drop = nn.Dropout(proj_drop)

    def forward(self, x):
        B, N, C = x.shape
        qkv = self.qkv(x).reshape(B, N, 3, self.num_heads, C // self.num_heads).permute(2, 0, 3, 1, 4)
        q, k, v = qkv[0], qkv[1], qkv[2]  # make torchscript happy (cannot use tensor as tuple)
        attn = (q @ k.transpose(-2, -1)) * self.scale
        attn = attn.softmax(dim=-1)
        attn = self.attn_drop(attn)
        x = (attn @ v).transpose(1, 2).reshape(B, N, C)
        x = self.proj(x)
        x = self.proj_drop(x)
        return x

# Transformer Encoder中的MLP block
class Mlp(nn.Module):
    def __init__(self, in_features, hidden_features=None, out_features=None, act_layer=nn.GELU, drop=0.):
        super().__init__()
        out_features = out_features or in_features         # 第二个FC层中的节点个数
        hidden_features = hidden_features or in_features   # 第一个FC层中的节点个数
        self.fc1 = nn.Linear(in_features, hidden_features) # (384, 1536)
        self.act = act_layer()
        self.fc2 = nn.Linear(hidden_features, out_features)# (1536, 384)
        self.drop = nn.Dropout(drop)

    def forward(self, x):
        x = self.fc1(x)
        x = self.act(x)
        x = self.drop(x)
        x = self.fc2(x)
        x = self.drop(x)
        return x
Transformer分支中的bottleneck,即论文中的’‘MHSA-6, 384’’ ,传递进去的参数有:
embed_dim = 384 每一个token的维度
num_heads = 6 6-head的self-attention
drop_path 每个stage的drop-path都不同,第一个stage那么就是0,最后一个stage为0.1
act_layer 激活函数默认为GELU
接着进入到Attention类:
init函数
head_dim = 384 / 6 = 64 表示每个head中的token的维度
scale = head_dim ** -0.5 = 1/sqrt(64) = 0.125 计算Q和K的相似度时用于归一化的数值
qkv矩阵:用一次FC层同时得到Q,K以及V三个矩阵,输入channel为384,输出channel为384*3
proj:多个head的输出进行concat后,再做一次矩阵变换得到multi-head attention的结果,输入channel=输出channel=384
forward函数
获取batch,num_patches数以及channel维度,[64, 197, 384];
qkv(x)得到的tensor shape:[64, 197, 3*384],接着reshape得到的shape(64, 197, 3, 6, 64),
permute之后的shape为(3, 64, 6, 197, 64);
获取Q,K以及V矩阵,三个tensor的shape相同: [64, 6, 197, 64];
将key矩阵的最后两个维度进行转置,高维矩阵乘法转换成两个维度的矩阵乘法 [batchsize, 6, 197, 64] * [batchsize, 6, 64, 197],进行归一化后的维度为[batchsize, 6, 197, 197];
在最后一个维度上进行softmax也就是针对每一行进行softmax;
attention x v经过transpose以及reshape:[batchsize, 6, 197, 64] -> [batchsize, 197, 6, 64] -> [batchsize, 197, 384];
最后进行一个线性变换得到multi-head attention的输出 [batch, 197, 384]。
回到Block类中的init函数中:
定义MLP block中的第一个FC层中的hidden units= 384x4=1536;
定义两个layer_norm层;
跳转到MLP类中:
FC1:输入channel为384,输出channel为1536
FC2:输入channel为1536,输出channel为384
act layer:依旧是GELU激活函数
Dropout layer:传递进去的drop参数
forward函数也比较简单:FC1 -> act -> drop -> FC2 -> drop
最后Block类中的forward函数:
x -> layer norm -> MHSA-6 -> Drop-path -> short cut(与输出x进行残差连接)->
layer norm -> MLP block -> Drop-path -> short cut(与第一次残差连接的输出进行add)
2.4. FCUDown & FCUUp
class FCUDown(nn.Module):
    """ CNN feature maps -> Transformer patch embeddings
    """

    def __init__(self, inplanes, outplanes, dw_stride, act_layer=nn.GELU,
                 norm_layer=partial(nn.LayerNorm, eps=1e-6)):
        super(FCUDown, self).__init__()
        self.dw_stride = dw_stride
        # 1x1 conv调整channel,avgpool调整分辨率
        self.conv_project = nn.Conv2d(inplanes, outplanes, kernel_size=1, stride=1, padding=0)
        self.sample_pooling = nn.AvgPool2d(kernel_size=dw_stride, stride=dw_stride)

        self.ln = norm_layer(outplanes)
        self.act = act_layer()

    def forward(self, x, x_t):
        x = self.conv_project(x)  # [N, C, H, W] -> [N, 384, H, W] 调整channel -> 384
        # maxpooling进行分辨率的下采样 [N,384,14,14] -> [N, 384, 196] -> [N, 196, 384]
        x = self.sample_pooling(x).flatten(2).transpose(1, 2)
        x = self.ln(x)
        x = self.act(x)
        # 取transformer输出的tensor的第二个维度上的第一个值即class_token上的值,再增加一个维度 [N,384]->[N,1,384]
        x = torch.cat([x_t[:, 0][:, None, :], x], dim=1)
        # 再和conv分支山的特征图在维度1上进行concat -> [N, 197, 384]
        return x


class FCUUp(nn.Module):
    """ Transformer patch embeddings -> CNN feature maps
    """

    def __init__(self, inplanes, outplanes, up_stride, act_layer=nn.ReLU,
                 norm_layer=partial(nn.BatchNorm2d, eps=1e-6),):
        super(FCUUp, self).__init__()
        # Upsample + 1x1conv + batch norm
        self.up_stride = up_stride
        self.conv_project = nn.Conv2d(inplanes, outplanes, kernel_size=1, stride=1, padding=0)
        self.bn = norm_layer(outplanes)
        self.act = act_layer()
    #transformer—>conv分支,获取除class token之外的所有的token进行操作
    def forward(self, x, H, W):
        B, _, C = x.shape
        # [N, 197, 384] -> [N, 196, 384] -> [N, 384, 196] -> [N, 384, 14, 14]
        x_r = x[:, 1:].transpose(1, 2).reshape(B, C, H, W)
        x_r = self.act(self.bn(self.conv_project(x_r)))
        # 使用双线性插值进行Up sampling得到conv分支上的特征图
        return F.interpolate(x_r, size=(H * self.up_stride, W * self.up_stride))
FCUdown类实现conv分支的feature map向Transformer分支的转换。
init函数中的参数:
dw_stride = 卷积分支的feature map的H或者W / num_patches,由于transformer分支中的patches个数是不变的,一直是14x14,那么C2 stage中的卷积分支的feature map尺寸是56x56, 下采样率为4,而C3 stage中的卷积分支的feature map尺寸是28x28,那么下采样率为2;C4 stage中的feature map尺寸是14x14,所以不需要做下采样,当然也不需要上采样;对于C5 stage,直接看论文提供的图,可能会产生误解,因为看上去好像C5中的bottleneck的分辨率是7x7,那么是需要将卷积分支的feature map进行上采样到transformer分支中去吗?其实并不是,因为最后一个stage即stage12,与之前的所有的stage都不同,原因在于stage12中的第一个bottleneck中的3x3卷积并没有进行下采样,也就是说直到最后一个stage之前的feature map的尺寸依旧是14x14,因此,对于stage12也不需要做任何的下采样以及上采样。
1x1conv用于调整channel的维度;
AvgPool用于调整分辨率;
layer norm用于调整feature values。
forward函数:
先进行1x1conv调整channel:[N,C,H,W] -> [N,384,H,W];
进行最大池化调整尺寸: [N,384,H,W] -> [N, 384, 14, 14] -> [N, 196, 384];
做layer norm以及activation;
注意:这里的x将卷积分支的3x3卷积之后的特征图传进来,xt是对应stage中的transformer分支中的输出,获取X_t中的第一个维度(class token)的值,并在第二个维度的位置上进行扩充一个维度,即[N, 197, 384] -> [N, 384] -> [N, 1, 384],再转换后的卷积分支的feature map x在维度1的位置上进行concat,得到转换后的输入 [N, 197, 384]。
FCUUp类实现的是Transformer分支的输出向卷积分支的转换。
大体类似FCUDown类的实现方法,直接看forward函数:
获取transformer中的tensor的batch size以及channel;
从第一个位置开始取即除class token之外的所有patches的信息,shape为[N, 196, 384];
reshapez之后:[N, 384, 14, 14], 再进行1x1卷积调整channel,bn,activation,最后经过双线性插值得到卷积分支上的feature map。
2.5. ConvTransBlock类
class ConvTransBlock(nn.Module):
    """
    Basic module for ConvTransformer, keep feature maps for CNN block and patch embeddings for transformer encoder block
    """

    def __init__(self, inplanes, outplanes, res_conv, stride, dw_stride, embed_dim, num_heads=12, mlp_ratio=4.,
                 qkv_bias=False, qk_scale=None, drop_rate=0., attn_drop_rate=0., drop_path_rate=0.,
                 last_fusion=False, num_med_block=0, groups=1):

        super(ConvTransBlock, self).__init__()
        expansion = 4
        self.cnn_block = ConvBlock(inplanes=inplanes, outplanes=outplanes, res_conv=res_conv, stride=stride, groups=groups)
        # 除去最后一个stage,stage2-11中的transformer分支转换成conv分支上之后,进行在conv分支上进行的卷积操作都没有short cut
        if last_fusion:
            self.fusion_block = ConvBlock(inplanes=outplanes, outplanes=outplanes, stride=2, res_conv=True, groups=groups)
        else:
            self.fusion_block = ConvBlock(inplanes=outplanes, outplanes=outplanes, groups=groups)

        if num_med_block > 0:
            self.med_block = []
            for i in range(num_med_block):
                self.med_block.append(Med_ConvBlock(inplanes=outplanes, groups=groups))
            self.med_block = nn.ModuleList(self.med_block)
        # conv分支经过1x1conv->Downsample->layer norm转换成transform分支上的特征图
        self.squeeze_block = FCUDown(inplanes=outplanes // expansion, outplanes=embed_dim, dw_stride=dw_stride)
        # transformer分支经过Upsample -> 1x1conv -> batch norm转换成conv分支上的特征图
        self.expand_block = FCUUp(inplanes=embed_dim, outplanes=outplanes // expansion, up_stride=dw_stride)

        self.trans_block = Block(
            dim=embed_dim, num_heads=num_heads, mlp_ratio=mlp_ratio, qkv_bias=qkv_bias, qk_scale=qk_scale,
            drop=drop_rate, attn_drop=attn_drop_rate, drop_path=drop_path_rate)

        self.dw_stride = dw_stride
        self.embed_dim = embed_dim
        self.num_med_block = num_med_block
        self.last_fusion = last_fusion

    def forward(self, x, x_t):
        x, x2 = self.cnn_block(x)
        _, _, H, W = x2.shape
        x_st = self.squeeze_block(x2, x_t)
        x_t = self.trans_block(x_st + x_t)
        if self.num_med_block > 0:
            for m in self.med_block:
                x = m(x)
        x_t_r = self.expand_block(x_t, H // self.dw_stride, W // self.dw_stride)
        x = self.fusion_block(x, x_t_r, return_x_2=False)

        return x, x_t
关于该类的init函数我只提一个地方,其他的类都已经在前面说过了。
注意:这里的last_function参数,如果是最后一个stage12,那么该stage中的第二个bottleneck中的3x3卷积的步长s=2,因为要进行下采样,并且存在short cut。
之前的C2-C4中的11个stage中的bottleneck,当且仅当在第一次进入到该stage时的第一个bottleneck才有残差连接并且3x3卷积中的s=2;此外对于该stage中的其他bottleneck都没有short cut以及3x3卷积中的s都等于1。
举个例子:当第一次进入到C2时,此时是stage1,卷积分支中的bottleneck中的3x3卷积的s=2,并且存在short cut,而该stage中的其余bottleneck都没有short cut,s=1。这里的第一次指的就是第一次进入到该stage,如C3中的bottleneck重复了4次,也是第一次的第一个bottleneck中有short cut以及s=2,其余的都是没有的。
而stage12恰恰相反,是在第二个bottleneck才有short cut以及s=2。
forward函数:
输入x为卷积分支上的feature map,x_t为transformer分支上的feature map;
首先进行卷积分支上的第一个bottleneck,得到的x为1x1,3x3,1x1以及short cut之后的feature map,而x2是经过3x3卷积之后的feature map;
获取x2特征图的h和w,用于进行下一步的down sampling;
X_st:conv分支上的特征图转换成transformer分支上;
X_t:feature fusion之后再进行multi-head attention;
X_t_r:经过MHSA-6之后,transformer的特征图转换到conv分支上;
x:feature fusion之后在进行conv分支上的conv block。
最后返回x以及x_t, 供下一个bottleneck使用。
2.6. Conformer的forward整体流程

具体步骤的解释之前或多或少都有涉及到,不展开细说,提一下最后的两个head的输出,卷积分支的输出conv_cls与transformer分支的输出trans_cls,shape是相同的,都是[batch,num_classes]。
3. train & val
3.1. loss的计算


获取一个batch的图像数据以对应的标签target之后,进行MixUp处理得到一组新的数据以及对应的target,然后进行模型的前向传播得到预测值,并计算loss,loss选用SoftTargetCE:
class SoftTargetCrossEntropy(nn.Module):

    def __init__(self):
        super(SoftTargetCrossEntropy, self).__init__()

    def forward(self, x, target):
        loss = torch.sum(-target * F.log_softmax(x, dim=-1), dim=-1)
        return loss.mean()
由于这里有卷积分支的预测值以及transformer分支的预测值,所以两个分支都要进行loss的计算,然后两个分支的loss进行加和,再进行BP。
3.2. 计算loss以及在val上的acc

与train中的不同地方在于选择的loss是普通的交叉熵loss。
计算loss的设置与train相同,多了一个计算acc的步骤,accuracy的方法定义如下:
def accuracy(output, target, topk=(1,)):
    """Computes the accuracy over the k top predictions for the specified values of k"""
    maxk = max(topk)
    batch_size = target.size(0)
    _, pred = output.topk(maxk, 1, True, True)
    pred = pred.t()
    correct = pred.eq(target.reshape(1, -1).expand_as(pred))
    return [correct[:k].reshape(-1).float().sum(0) * 100. / batch_size for k in topk]
传递进去的参数:output预测值,target标签,以及一个元组,以为topk=(1,)为例。
1)首先获取batch size大小,对于output预测值进行topk排序(1,1,True,True),表示取output的最大值,在维度1的位置上也就是按行取最大值。提一下,这里的output输出是一个list,output[0]获取卷积分支上的预测值,测试以一张图像为例:shape=(1, num_classes)。
经过topk()得到的两个输出值,第一个是该预测值中的最大值是多少,pred是该最大值所在的索引,只需要他的索引值,注意这里的预测值并不是对于每个类别的概率值。
2)最大值索引进行转置,若batch size=1,输出的pred.shape = (8, 1),转置之后的shape变为:(1, 8);
3)target标签进行reshape并扩充维度与pred一致,(8,) -> (1, 8),使用equal()函数计算每个位置上的值是否相同,返回一个true或者false的mask;
4)最后,遍历topk元组中的每一个值,由于这里只有1,那么就遍历一次就好了。此时的k=1,那么就是获取3)中mask的第一个值,然后转换成数值/batch_size * 100,既可以得到这个batch下的Top-1 acc,如果k=5,那么可得到这个batch‘下的Top-5 acc。
4. train的效果图展示

由于使用的输入图像尺寸是224的,训练了28epoch之后的acc才70左右;我尝试将输入图像尺寸改成384或者448大小,在15个epoch左右就可以达到85+以上了,最终的acc可以达到92+。
5. Predict效果图展示
由于源码中是没有提供专门用于测试的脚本的,所以自己写了一个测试用的脚本,感兴趣的小伙伴可以自己尝试看看╮( ̄▽  ̄)╭,具体我就不解释了,写的太累了。。。(×_×)
import argparse
import time
import torch
import json
import os
from PIL import Image

from timm.data import transforms
from timm.models import create_model
from datasets import build_transform
import models
import matplotlib.pyplot as plt
import cv2


def main(args):
    print(args)
    device = torch.device(args.device)
    print(f"Creating model: {args.model}")
    model = create_model(
        args.model,
        pretrained=False,
        num_classes=args.nb_classes,
        drop_rate=args.drop,
        drop_path_rate=args.drop_path,
        drop_block_rate=args.drop_block,
    )
    model.to(device)
    json_path = './class_indices.json'
    assert os.path.exists(json_path), "file: '{}' dose not exist.".format(json_path)
    json_file = open(json_path, "r")
    class_indict = json.load(json_file)

    val_transform = build_transform(is_train=False, args=args)
    # load model weights 载入训练好的权重
    if args.weights:
        model.load_state_dict(torch.load(args.weights, map_location='cpu'))

    model.eval()
    # load image 载入测试图片的根目录
    img_root_path = './test_img'
    for img_file in os.listdir(img_root_path):
        img_path = os.path.join(img_root_path, img_file)
        assert os.path.exists(img_path), "file: '{}' dose not exist.".format(img_path)
        img = cv2.imread(img_path)
        # if img.mode != "RGB":
        #     img = img.convert('RGB')
        img = Image.fromarray(img)
        plt.imshow(img)
        # image preprocess
        img = val_transform(img)
        # expand batch dimension
        img = torch.unsqueeze(img, dim=0)

        start_time = time.time()
        with torch.no_grad():
        # predict class
            outputs = model(img.to(device))
            # conv分支的预测值
            conv_predict = outputs[0]
            prob, predict_conv_cla = conv_predict.topk(1, 1, True, True)
            predict_conv_cla =predict_conv_cla.reshape(-1).item()
            prob = prob.reshape(-1).item()
            # transformer分支的预测值
            # trans_predict = outputs[1]
            # predict_trans_cla = trans_predict.topk(1, 1, True, True)
            # conv + transformer 联合预测值
            # predict_summary = torch.argmax(outputs[0]+outputs[1], dim=0)

        print_conv_res = "predict class: {}  predict prob: {:.3}".format(class_indict[str(predict_conv_cla)],
                                                prob)
        end_time = time.time()
        print("inference one image tims: {}".format(end_time - start_time))
        plt.title(print_conv_res)
        plt.show()
        print(print_conv_res)

        if os.path.exists("./flower_result") is False:
            os.makedirs("./flower_result")
        plt.savefig("./flower_result/{}_result.jpg".format(img_file))


if __name__ == '__main__':
    def get_args_parser():
        parser = argparse.ArgumentParser('Conformer test', add_help=False)
        parser.add_argument('--batch-size', default=8, type=int)
        parser.add_argument('--device', default='cuda:1')
        parser.add_argument('--input_size', type=int, default=384)
        parser.add_argument('--model', default='Conformer_small_patch16', type=str, metavar='MODEL',
                        help='Name of model to train')
        parser.add_argument('--nb_classes', type=int, default=5)
        parser.add_argument('--drop', type=float, default=0.0, metavar='PCT',
                        help='Dropout rate (default: 0.)')
        parser.add_argument('--drop-path', type=float, default=0.1, metavar='PCT',
                        help='Drop path rate (default: 0.1)')
        parser.add_argument('--drop-block', type=float, default=None, metavar='PCT',
                        help='Drop block rate (default: None)')
        parser.add_argument('--weights', type=str, default='./flower_weights/model-29-92.84090287277702.pth')

        return parser

    parser = argparse.ArgumentParser('Conformer test', parents=[get_args_parser()])
    args = parser.parse_args()
    main(args)
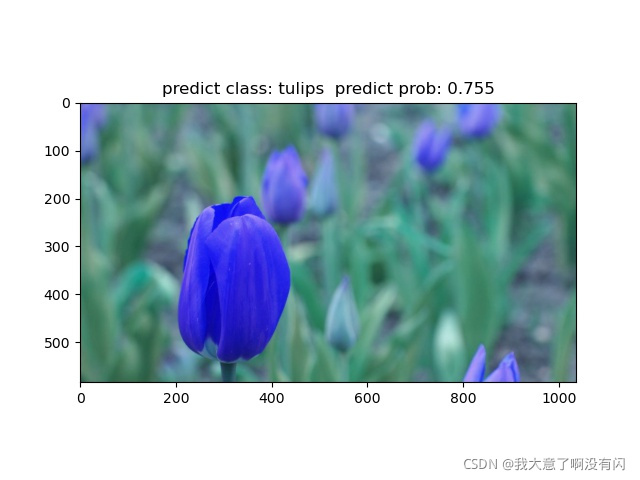
再放几张我的测试图像结果:


注意:这里的predict prob并不是真的概率值啊,仅仅是网络预测值中的最大的一个数值而已,之前搞错了。。。⊙﹏⊙‖∣