目录
1. BP神经网络结构与原理
注:


1.1 结构
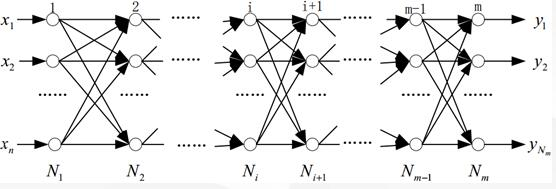
BP网络是在输入层与输出层之间增加若干层(一层或多层)神经元,这些神经元称为隐单元,它们与外界没有直接的联系,但其状态的改变,则能影响输入与输出之间的关系,每一层可以有若干个节点。
1.2 原理
BP(Back Propagation)神经网络的学习过程由信号的正向传播与误差的反向传播两个过程组成。正向传播时,输入样本从输入层传入,经隐层逐层处理后,传向输出层。若输出层的实际输出与期望输出不符,则转向误差的反向传播阶段。误差的反向传播是将输出误差以某种形式通过隐层向输入层逐层反传,并将误差分摊给各层的所有单元,从而获得各层单元的误差信号,此误差信号即作为修正各单元权值的依据。
BP网络由输入层、输出层和隐层组成,N1为输入层,Nm为输出层,其余为隐层。BP神经网络的结构如下:

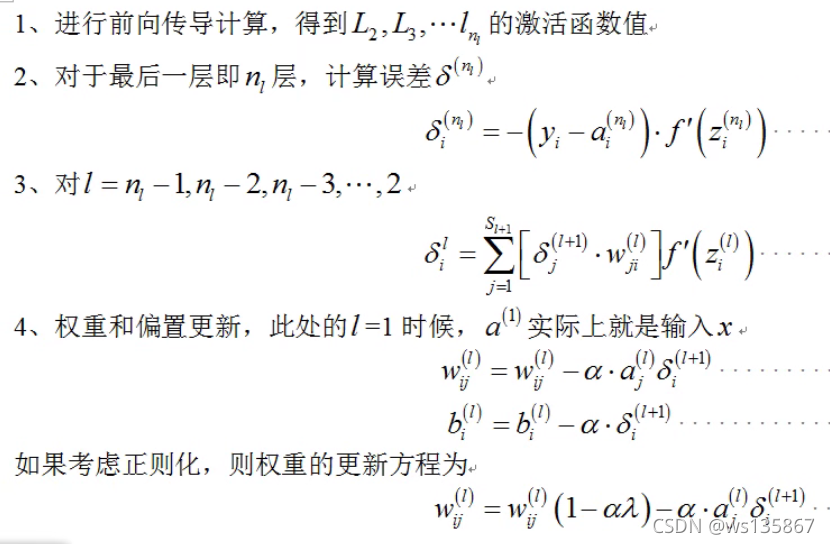
1.3 流程

2. BP神经网络的实现
2.1 第一种实现
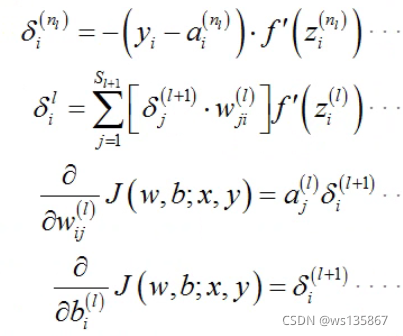
采用误差平方和作为损失函数,基于反向传播算法推导,可得最终的 4 个方程式:

2.1.1 前向计算
        for b, w in zip(self.biases, self.weights):
            z = np.dot(w, activation) + b
            zs.append(z)
            activation = sigmoid(z)
            activations.append(activation)
2.1.2 反向传播
# backward pass 计算最后一层的误差
        delta = self.cost_derivative(activations[-1], y) * \
                sigmoid_prime(zs[-1])
        nabla_b[-1] = delta
        nabla_w[-1] = np.dot(delta, activations[-2].transpose())
        # 计算从倒数第二层至第二层的误差
        for l in range(2, self.num_layers):
            z = zs[-l]
            sp = sigmoid_prime(z)
            delta = np.dot(self.weights[-l + 1].transpose(), delta) * sp
            nabla_b[-l] = delta
            nabla_w[-l] = np.dot(delta, activations[-l - 1].transpose())
2.2 第二种实现
2.2.1 交叉熵代价函数
- 引入交叉熵代价函数目的是解决一些实例在刚开始训练时学习得非常慢的问题,其
主要针对激活函数为 Sigmod 函数
(2) 如果采用一种不会出现饱和状态的激活函数,那么可以继续使用误差平方和作为损
失函数
(3) 如果在输出神经元是 S 型神经元时 , 交叉熵 一 般都是更好的选择
(4) 输出神经元是线性的那么二次代价函数不再会导致学习速度下降的问题。在此情形
下,二次代价函数就是一种合适的选择
(5) 交叉熵无法改善隐藏层中神经元发生的学习缓慢
(6) 交叉熵损失函数只对网络输出“ 明显背离预期” 时发生的学习缓慢有改善效果
(7) 应用交叉熵损失并不能改善或避免神经元饱和 ,而是当输出层神经元发生饱和时,能够避免其学习缓慢的问题。
2.2.2 种规范化技术
- 早停止。跟踪验证数据集上的准确率随训练变化情况。如果我们看到验证数据上的
准确率不再提升,那么我们就停止训练
(2) 正则化
(3) 弃权( Dropout )
(4) 扩增样本集
更好的权重初始化方法:
不好的权重初始化方法会导致出现饱和问题,好的权重初始化方法不仅仅能够带来训练
速度的加快,有时候在最终性能上也有很大的提升。
2.3 python实现
2.3.1 案例一
# -*- coding: utf-8 -*-


import numpy as np
from sklearn import datasets, linear_model
import matplotlib.pyplot as plt


class Config:
    nn_input_dim = 2 #数组输入的维度是2(x,y两个坐标当然是二维啊)
    nn_output_dim = 2#数组输出的维度是2(分为两类当然是二维啊)
    epsilon = 0.01  # 梯度下降学习步长
    reg_lambda = 0.01  # 修正的指数?


def generate_data():
    np.random.seed(0)#伪随机数的种子0,当然也可以是1,2啊
    X, y = datasets.make_moons(200, noise=0.20)#产生200个数据,噪声误差为0.2
    return X, y


def visualize(X, y, model):
    plot_decision_boundary(lambda x:predict(model,x), X, y)#好好看这个代码,函数名字做参数哦
    plt.title("Logistic Regression")


def plot_decision_boundary(pred_func, X, y):
    #把X的第一列的最小值减掉0.5赋值给x_min,把X的第一列的最大值加0.5赋值给x_max
    x_min, x_max = X[:, 0].min() - .5, X[:, 0].max() + .5
    y_min, y_max = X[:, 1].min() - .5, X[:, 1].max() + .5
    h = 0.01
    # 根据最小最大值和一个网格距离生成整个网格,就是在图上细分好多个点,画分类边界的时候要用这些点
    xx, yy = np.meshgrid(np.arange(x_min, x_max, h), np.arange(y_min, y_max, h))
    Z = pred_func(np.c_[xx.ravel(), yy.ravel()])
    Z = Z.reshape(xx.shape)
    plt.contourf(xx, yy, Z, cmap=plt.cm.Spectral)
    plt.scatter(X[:, 0], X[:, 1], c=y, cmap=plt.cm.Spectral)
    plt.show()

def predict(model, x):
    #这是字典啊
    W1, b1, W2, b2 = model['W1'], model['b1'], model['W2'], model['b2']
    z1 = x.dot(W1) + b1# 输入层向隐藏层正向传播
    a1 = np.tanh(z1) # 隐藏层激活函数使用tanh = (exp(x) - exp(-x)) / (exp(x) + exp(-x))
    z2 = a1.dot(W2) + b2# 隐藏层向输出层正向传播
    exp_scores = np.exp(z2)#这两步表示输出层的激活函数为softmax函数哦
    probs = exp_scores / np.sum(exp_scores, axis=1, keepdims=True)
    return np.argmax(probs, axis=1)


def build_model(X, y, nn_hdim, num_passes=20000, print_loss=False):
    num_examples = len(X)
    np.random.seed(0)#初始化权值和偏置
    W1 = np.random.randn(Config.nn_input_dim, nn_hdim) / np.sqrt(Config.nn_input_dim)
    b1 = np.zeros((1, nn_hdim))
    W2 = np.random.randn(nn_hdim, Config.nn_output_dim) / np.sqrt(nn_hdim)
    b2 = np.zeros((1, Config.nn_output_dim))
    model = {}

    for i in range(0, num_passes):

        z1 = X.dot(W1) + b1# 输入层向隐藏层正向传播
        a1 = np.tanh(z1)# 隐藏层激活函数使用tanh = (exp(x) - exp(-x)) / (exp(x) + exp(-x))
        z2 = a1.dot(W2) + b2# 隐藏层向输出层正向传播
        exp_scores = np.exp(z2)#这两步表示输出层的激活函数为softmax函数哦
        probs = exp_scores / np.sum(exp_scores, axis=1, keepdims=True)

        delta3 = probs
        #下面这才是delta3,为损失函数对z2求偏导数,y-y^
        delta3[range(num_examples), y] -= 1
        dW2 = (a1.T).dot(delta3)#损失函数对w2的偏导数
        db2 = np.sum(delta3, axis=0, keepdims=True)#损失函数对b2的偏导数
        delta2 = delta3.dot(W2.T) * (1 - np.power(a1, 2))#损失函数对z1的偏导数
        dW1 = np.dot(X.T, delta2)#损失函数对w1的偏导数
        db1 = np.sum(delta2, axis=0)#损失函数对b1的偏导数
        #个人认为下面两行代码完全没有必要存在
        dW2 += Config.reg_lambda * W2#w2梯度增量的修正  屁话
        dW1 += Config.reg_lambda * W1#w1梯度增量的修正  屁话
        #更新权值和偏置
        W1 += -Config.epsilon * dW1
        b1 += -Config.epsilon * db1
        W2 += -Config.epsilon * dW2
        b2 += -Config.epsilon * db2

        model = {'W1': W1, 'b1': b1, 'W2': W2, 'b2': b2}

    return model


def main():
    X, y = generate_data()
    model = build_model(X, y, 8)
    visualize(X, y, model)


if __name__ == "__main__":
     main()
2.3.2 案例二
class QuadraticCost(object): # 误差平方和代价函数

    @staticmethod
    def fn(a, y):
        """Return the cost associated with an output ``a`` and desired output
        ``y``.
        """
        return 0.5*np.linalg.norm(a-y)**2

    @staticmethod
    def delta(z, a, y):
        """Return the error delta from the output layer."""
        return (a-y) * sigmoid_prime(z)


class CrossEntropyCost(object): # 交叉熵代价函数

    @staticmethod
    def fn(a, y):
        """Return the cost associated with an output ``a`` and desired output
        ``y``.  Note that np.nan_to_num is used to ensure numerical
        stability.  In particular, if both ``a`` and ``y`` have a 1.0
        in the same slot, then the expression (1-y)*np.log(1-a)
        returns nan.  The np.nan_to_num ensures that that is converted
        to the correct value (0.0).
        """
        return np.sum(np.nan_to_num(-y*np.log(a)-(1-y)*np.log(1-a))) # 使用0代替nan 一个较大值代替inf