用tensorflow实现Transformer中英文翻译
个人感想
最近写简历的时候发现简历无法体现出我的实力,比如在简历中写代码能力很强这句话,hr压根看不出你什么水平,可能每个人简历都会写这么一句话。像我这样能力超群,在简历中显得苍白无力。打比赛从来都是自己组队,也没拿过名次。以前总是嫌写博客太浪费时间就没写,现在想想有点后悔。写博客在简历中加个链接至少能让他们了解一下你的水平。所以奉劝大家没事也写写吧。
transformer
简介
transformer 的理论请去仔细阅读Attention Is All You Need 这篇论文。不过如果要想真正理解transformer,还是需要写一遍代码实现。只看理论讲解会忽略很多细节,而且忘的也快。这次写一遍代码让我发现了很多细节,也更加深刻的理解transformer了。本次教程代码参考了官方代码。接下来我将逐步讲解每步代码,有不懂的地方可以评论问我。
数据集准备
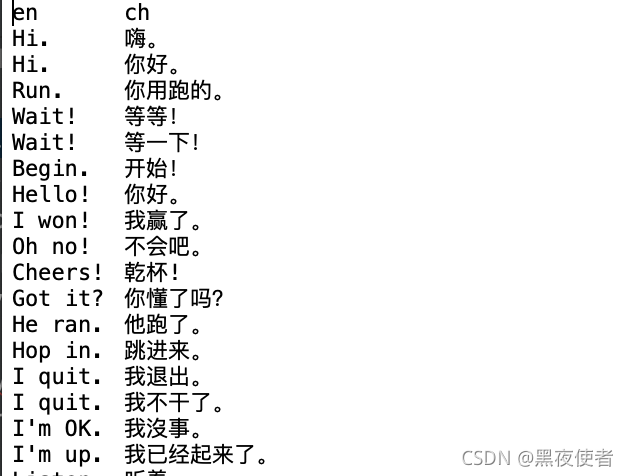
下载地址:http://www.manythings.org/anki/ 解压后有个cmn.txt ,来看下里面的内容:

可以看到后面有无用数据,需要处理。
数据处理
这里我用正则去掉每行cc-by及后面内容,然后用pandas生成一个新的文件。代码如下:
    path = './data/cmn.txt'
    lines = io.open(path, encoding='UTF-8').read().strip().split('\n')
    # print(lines[:5])

    newl = list(map(lambda x: re.sub(r'CC-BY.*$', "", x).strip(), lines))
    d =pd.DataFrame(newl)
    d.to_csv('./data/cmn.txt',index=False,header=False)
处理完如下:

开始写transformer了
导入依赖
import time
import numpy as np
import matplotlib.pyplot as plt
import pandas as pd
import tensorflow as tf
这里说一下我的tensorflow版本是2.5.0 ,现在2.6.0已经可以用了,如果你用的是2.6.0下面有个地方会出错,因为他源码移位置了。
第一步 构建词库,单词转化为数字
这一步中英文的比较简单,中文的要稍微麻烦一点。
首先使用tf.data 读取数据集

说明一下,这里的batch 设的这么大是为了构建词库,不是用来训练的。这个文件里行数是小于25000的,所以一个batch就读完比较方便处理。
接下来为分词做准备,定义两个方法
    def tf_lower_and_split_punct(text):
        text = tf.strings.lower(text)
        # Add spaces around punctuation.
        text = tf.strings.regex_replace(text, '[.?!,?]', r' \0 ')
        # Strip whitespace.
        text = tf.strings.strip(text)
        text = tf.strings.join(['[START]', text, '[END]'], separator=' ')
        return text
     def tf_lower_and_split_punct2(text):
        # Split accecented characters.
        text = tf.strings.unicode_split(text,input_encoding='UTF-8')
        text = tf.strings.reduce_join(text, axis=-1, separator=' ')
        text = tf.strings.join(['[START]', text, '[END]'], separator=' ')
        # # Keep space, a to z, and select punctuation.
        # text = tf.strings.regex_replace(text, '[^ a-z.?!,?]', '')
        # Add spaces around punctuation.
        # Strip whitespace.
        text = tf.strings.strip(text)
        return text
第一个方法是英文处理,先是都转成小写,然后标点符号前后加空格(因为以空格分词),最后在开始加上【start】,结尾加上【end】。中文的处理麻烦一点,要把中文先用空格分隔,然后跟英文处理类似。注意这个start和end 是必须加的,不一定非的是这两个词,充当信标的作用,翻译的时候decode里面必须有词输入,start作为第一个输入。
使用TextVectorization layer来构建词库,它能构建词库,并将输入的单词转化为token。举个例子 ,有个tensor a的内容是 [i love you],vectorize_layer(a)就会变成 [4,6,7],其标准化的方法就是我们刚才定义的。
vectorize_layer = tf.keras.layers.experimental.preprocessing.TextVectorization(
    max_tokens=None,standardize=tf_lower_and_split_punct,
    output_sequence_length=None
)
vectorize_layer2 = tf.keras.layers.experimental.preprocessing.TextVectorization(
    max_tokens=None,standardize=tf_lower_and_split_punct2,
    output_sequence_length=None
)
这两个layer需要adapt,
for line in dataset.take(1):
        ee = line['en']
        cc = line['ch']
vectorize_layer.adapt(ee)
vectorize_layer.adapt2(cc)
不理解的请自己去学tensorflow,我就不细讲每个的用法了。
可以查看下词库

位置编码
transformer 能摆脱rnn做到并行计算离不开位置编码
参照论文里的这个公式

 def get_angles(pos, i, d_model):
        angle_rates = 1 / np.power(10000, (2 * (i // 2)) / np.float32(d_model))
        return pos * angle_rates
 def positional_encoding(position, d_model):
        angle_rads = get_angles(np.arange(position)[:, np.newaxis],
                                np.arange(d_model)[np.newaxis, :],
                                d_model)

        # apply sin to even indices in the array; 2i
        angle_rads[:, 0::2] = np.sin(angle_rads[:, 0::2])

        # apply cos to odd indices in the array; 2i+1
        angle_rads[:, 1::2] = np.cos(angle_rads[:, 1::2])

        pos_encoding = angle_rads[np.newaxis, ...]

        return tf.cast(pos_encoding, dtype=tf.float32)
其中pos是一个常数,d_model是embeding的维度,i就是0到d_model中的一个数。
mask

这里有两个mask,很多人不理解这个mask是什么,mask的作用是什么。我来解释下,对于第一个mask,在一个batch中比如64个,这个64个句子长度不可能都一样,而我们输入需要同样的长度,所以句子少于最长的那个句子的地方就会用0填充。然而在计算loss的时候这些填充的不应该去计算loss,所以mask 就是一个是0或1的tensor,对应句子填充0的地方mask就是1. 举例[45,21,0,0,0] 的mask就是 [0,0,1,1,1]。
对于第二个mask 是在decode中预测下一个单词的时候只能用已有的单词。举例,句子是。[78,21,34,56,0,0,0] , 当预测21时,mask是[0,1,1,1,1,1],当预测34是,mask是[0,0,1,1,1,1],以此类推。
注意力

def scaled_dot_product_attention(q, k, v, mask):

  matmul_qk = tf.matmul(q, k, transpose_b=True)  # (..., seq_len_q, seq_len_k)

  # scale matmul_qk
  dk = tf.cast(tf.shape(k)[-1], tf.float32)
  scaled_attention_logits = matmul_qk / tf.math.sqrt(dk)

  # add the mask to the scaled tensor.
  if mask is not None:
    scaled_attention_logits += (mask * -1e9)

  # softmax is normalized on the last axis (seq_len_k) so that the scores
  # add up to 1.
  attention_weights = tf.nn.softmax(scaled_attention_logits, axis=-1)  # (..., seq_len_q, seq_len_k)

  output = tf.matmul(attention_weights, v)  # (..., seq_len_q, depth_v)

  return output, attention_weights
这个学transformer的应该最熟悉了,就不多解释了。如果你是代码不懂什么意思,请点进去看源码。

下面两个是encode layer中的多头注意力和前馈神经网络
    class MultiHeadAttention(tf.keras.layers.Layer):
        def __init__(self, d_model, num_heads):
            super(MultiHeadAttention, self).__init__()
            self.num_heads = num_heads
            self.d_model = d_model

            assert d_model % self.num_heads == 0

            self.depth = d_model // self.num_heads

            self.wq = tf.keras.layers.Dense(d_model)
            self.wk = tf.keras.layers.Dense(d_model)
            self.wv = tf.keras.layers.Dense(d_model)

            self.dense = tf.keras.layers.Dense(d_model)

        def split_heads(self, x, batch_size):
            """Split the last dimension into (num_heads, depth).
            Transpose the result such that the shape is (batch_size, num_heads, seq_len, depth)
            """
            x = tf.reshape(x, (batch_size, -1, self.num_heads, self.depth))
            return tf.transpose(x, perm=[0, 2, 1, 3])

        def call(self, v, k, q, mask):
            batch_size = tf.shape(q)[0]

            q = self.wq(q)  # (batch_size, seq_len, d_model)
            k = self.wk(k)  # (batch_size, seq_len, d_model)
            v = self.wv(v)  # (batch_size, seq_len, d_model)

            q = self.split_heads(q, batch_size)  # (batch_size, num_heads, seq_len_q, depth)
            k = self.split_heads(k, batch_size)  # (batch_size, num_heads, seq_len_k, depth)
            v = self.split_heads(v, batch_size)  # (batch_size, num_heads, seq_len_v, depth)

            # scaled_attention.shape == (batch_size, num_heads, seq_len_q, depth)
            # attention_weights.shape == (batch_size, num_heads, seq_len_q, seq_len_k)
            scaled_attention, attention_weights = scaled_dot_product_attention(
                q, k, v, mask)

            scaled_attention = tf.transpose(scaled_attention,
                                            perm=[0, 2, 1, 3])  # (batch_size, seq_len_q, num_heads, depth)

            concat_attention = tf.reshape(scaled_attention,
                                          (batch_size, -1, self.d_model))  # (batch_size, seq_len_q, d_model)

            output = self.dense(concat_attention)  # (batch_size, seq_len_q, d_model)

            return output, attention_weights


    def point_wise_feed_forward_network(d_model, dff):
        return tf.keras.Sequential([
            tf.keras.layers.Dense(dff, activation='relu'),  # (batch_size, seq_len, dff)
            tf.keras.layers.Dense(d_model)  # (batch_size, seq_len, d_model)
        ])
这里我们可以清楚的看到多头注意力是怎么实现的。举个例子, 一个(64,10,20 )的input,分别代表意思是(batch,句子长度,embeding维度) ,假设需要4头,就会reshape成(64,10,4,5),然后转置成(64,4,10,5),然后计算attention,然后转置成(64,10,4,5),然后concat 回 (64,10,20)
有了这两个sub layer 就可以实现单个encode layer了
 class EncoderLayer(tf.keras.layers.Layer):
        def __init__(self, d_model, num_heads, dff, rate=0.1):
            super(EncoderLayer, self).__init__()

            self.mha = MultiHeadAttention(d_model, num_heads)
            self.ffn = point_wise_feed_forward_network(d_model, dff)

            self.layernorm1 = tf.keras.layers.LayerNormalization(epsilon=1e-6)
            self.layernorm2 = tf.keras.layers.LayerNormalization(epsilon=1e-6)

            self.dropout1 = tf.keras.layers.Dropout(rate)
            self.dropout2 = tf.keras.layers.Dropout(rate)

        def call(self, x, training, mask):
            attn_output, _ = self.mha(x, x, x, mask)  # (batch_size, input_seq_len, d_model)
            attn_output = self.dropout1(attn_output, training=training)
            out1 = self.layernorm1(x + attn_output)  # (batch_size, input_seq_len, d_model)

            ffn_output = self.ffn(out1)  # (batch_size, input_seq_len, d_model)
            ffn_output = self.dropout2(ffn_output, training=training)
            out2 = self.layernorm2(out1 + ffn_output)  # (batch_size, input_seq_len, d_model)

            return out2
单个layer的作用,可以看到input 先进入多头注意力,然后用残差连接防止梯度消失,然后归一化,后进入前馈神经网络,然后用残差连接防止梯度消失,然后归一化。
再来看看单个decode layer
    class DecoderLayer(tf.keras.layers.Layer):
        def __init__(self, d_model, num_heads, dff, rate=0.1):
            super(DecoderLayer, self).__init__()

            self.mha1 = MultiHeadAttention(d_model, num_heads)
            self.mha2 = MultiHeadAttention(d_model, num_heads)

            self.ffn = point_wise_feed_forward_network(d_model, dff)

            self.layernorm1 = tf.keras.layers.LayerNormalization(epsilon=1e-6)
            self.layernorm2 = tf.keras.layers.LayerNormalization(epsilon=1e-6)
            self.layernorm3 = tf.keras.layers.LayerNormalization(epsilon=1e-6)

            self.dropout1 = tf.keras.layers.Dropout(rate)
            self.dropout2 = tf.keras.layers.Dropout(rate)
            self.dropout3 = tf.keras.layers.Dropout(rate)

        def call(self, x, enc_output, training,
                 look_ahead_mask, padding_mask):
            # enc_output.shape == (batch_size, input_seq_len, d_model)

            attn1, attn_weights_block1 = self.mha1(x, x, x, look_ahead_mask)  # (batch_size, target_seq_len, d_model)
            attn1 = self.dropout1(attn1, training=training)
            out1 = self.layernorm1(attn1 + x)

            attn2, attn_weights_block2 = self.mha2(
                enc_output, enc_output, out1, padding_mask)  # (batch_size, target_seq_len, d_model)
            attn2 = self.dropout2(attn2, training=training)
            out2 = self.layernorm2(attn2 + out1)  # (batch_size, target_seq_len, d_model)

            ffn_output = self.ffn(out2)  # (batch_size, target_seq_len, d_model)
            ffn_output = self.dropout3(ffn_output, training=training)
            out3 = self.layernorm3(ffn_output + out2)  # (batch_size, target_seq_len, d_model)

            return out3, attn_weights_block1, attn_weights_block2
decode layer中做了两次attention,首先把target input 用ahead mask 做attention。然后残差归一化后把这次attention的结果做q, encode的输出做k,v再进行attention,然后跟encode中一样了。
encode decode transform
这个没啥难的,就是组装layer
    class Encoder(tf.keras.layers.Layer):
        def __init__(self, num_layers, d_model, num_heads, dff, input_vocab_size,
                     maximum_position_encoding, rate=0.1):
            super(Encoder, self).__init__()

            self.d_model = d_model
            self.num_layers = num_layers

            self.embedding = tf.keras.layers.Embedding(input_vocab_size, d_model)
            self.pos_encoding = positional_encoding(maximum_position_encoding,
                                                    self.d_model)

            self.enc_layers = [EncoderLayer(d_model, num_heads, dff, rate)
                               for _ in range(num_layers)]

            self.dropout = tf.keras.layers.Dropout(rate)

        def call(self, x, training, mask):
            seq_len = tf.shape(x)[1]

            # adding embedding and position encoding.
            x = self.embedding(x)  # (batch_size, input_seq_len, d_model)
            x *= tf.math.sqrt(tf.cast(self.d_model, tf.float32))
            x += self.pos_encoding[:, :seq_len, :]

            x = self.dropout(x, training=training)

            for i in range(self.num_layers):
                x = self.enc_layers[i](x, training, mask)

            return x  # (batch_size, input_seq_len, d_model)

    class Decoder(tf.keras.layers.Layer):
        def __init__(self, num_layers, d_model, num_heads, dff, target_vocab_size,
                     maximum_position_encoding, rate=0.1):
            super(Decoder, self).__init__()

            self.d_model = d_model
            self.num_layers = num_layers

            self.embedding = tf.keras.layers.Embedding(target_vocab_size, d_model)
            self.pos_encoding = positional_encoding(maximum_position_encoding, d_model)

            self.dec_layers = [DecoderLayer(d_model, num_heads, dff, rate)
                               for _ in range(num_layers)]
            self.dropout = tf.keras.layers.Dropout(rate)

        def call(self, x, enc_output, training,
                 look_ahead_mask, padding_mask):
            seq_len = tf.shape(x)[1]
            attention_weights = {}

            x = self.embedding(x)  # (batch_size, target_seq_len, d_model)
            x *= tf.math.sqrt(tf.cast(self.d_model, tf.float32))
            x += self.pos_encoding[:, :seq_len, :]

            x = self.dropout(x, training=training)

            for i in range(self.num_layers):
                x, block1, block2 = self.dec_layers[i](x, enc_output, training,
                                                       look_ahead_mask, padding_mask)

                attention_weights[f'decoder_layer{i + 1}_block1'] = block1
                attention_weights[f'decoder_layer{i + 1}_block2'] = block2

            # x.shape == (batch_size, target_seq_len, d_model)
            return x, attention_weights
    class Transformer(tf.keras.Model):
        def __init__(self, num_layers, d_model, num_heads, dff, input_vocab_size,
                     target_vocab_size, pe_input, pe_target, rate=0.1):
            super().__init__()
            self.encoder = Encoder(num_layers, d_model, num_heads, dff,
                                   input_vocab_size, pe_input, rate)

            self.decoder = Decoder(num_layers, d_model, num_heads, dff,
                                   target_vocab_size, pe_target, rate)

            self.final_layer = tf.keras.layers.Dense(target_vocab_size)

        def call(self, inputs, training):
            # Keras models prefer if you pass all your inputs in the first argument
            inp, tar = inputs

            enc_padding_mask, look_ahead_mask, dec_padding_mask = self.create_masks(inp, tar)

            enc_output = self.encoder(inp, training, enc_padding_mask)  # (batch_size, inp_seq_len, d_model)

            # dec_output.shape == (batch_size, tar_seq_len, d_model)
            dec_output, attention_weights = self.decoder(
                tar, enc_output, training, look_ahead_mask, dec_padding_mask)

            final_output = self.final_layer(dec_output)  # (batch_size, tar_seq_len, target_vocab_size)

            return final_output, attention_weights

        def create_masks(self, inp, tar):
            # Encoder padding mask
            enc_padding_mask = create_padding_mask(inp)

            # Used in the 2nd attention block in the decoder.
            # This padding mask is used to mask the encoder outputs.
            dec_padding_mask = create_padding_mask(inp)

            # Used in the 1st attention block in the decoder.
            # It is used to pad and mask future tokens in the input received by
            # the decoder.
            look_ahead_mask = create_look_ahead_mask(tf.shape(tar)[1])
            dec_target_padding_mask = create_padding_mask(tar)
            look_ahead_mask = tf.maximum(dec_target_padding_mask, look_ahead_mask)

            return enc_padding_mask, look_ahead_mask, dec_padding_mask
参数设置
num_layers = 4
d_model = 128
dff = 512
num_heads = 8
dropout_rate = 0.1
这里参数设置比论文中小了些,目的是为了加快训练。
优化加速

学习率要在训练过程中发生改变,至于为什么这么变为什么会好,我也不知道,反正照他们的写就行了。


打比赛没时间仔细讲了
transformer = Transformer(
    num_layers=num_layers,
    d_model=d_model,
    num_heads=num_heads,
    dff=dff,
    input_vocab_size=3479,
    target_vocab_size=6671,
    pe_input=1000,
    pe_target=1000,
    rate=dropout_rate)
checkpoint_path = "./ckpt/train"

ckpt = tf.train.Checkpoint(transformer=transformer,
                           optimizer=optimizer)

ckpt_manager = tf.train.CheckpointManager(ckpt, checkpoint_path, max_to_keep=5)

# if a checkpoint exists, restore the latest checkpoint.
if ckpt_manager.latest_checkpoint:
  ckpt.restore(ckpt_manager.latest_checkpoint)
  print('Latest checkpoint restored!!')

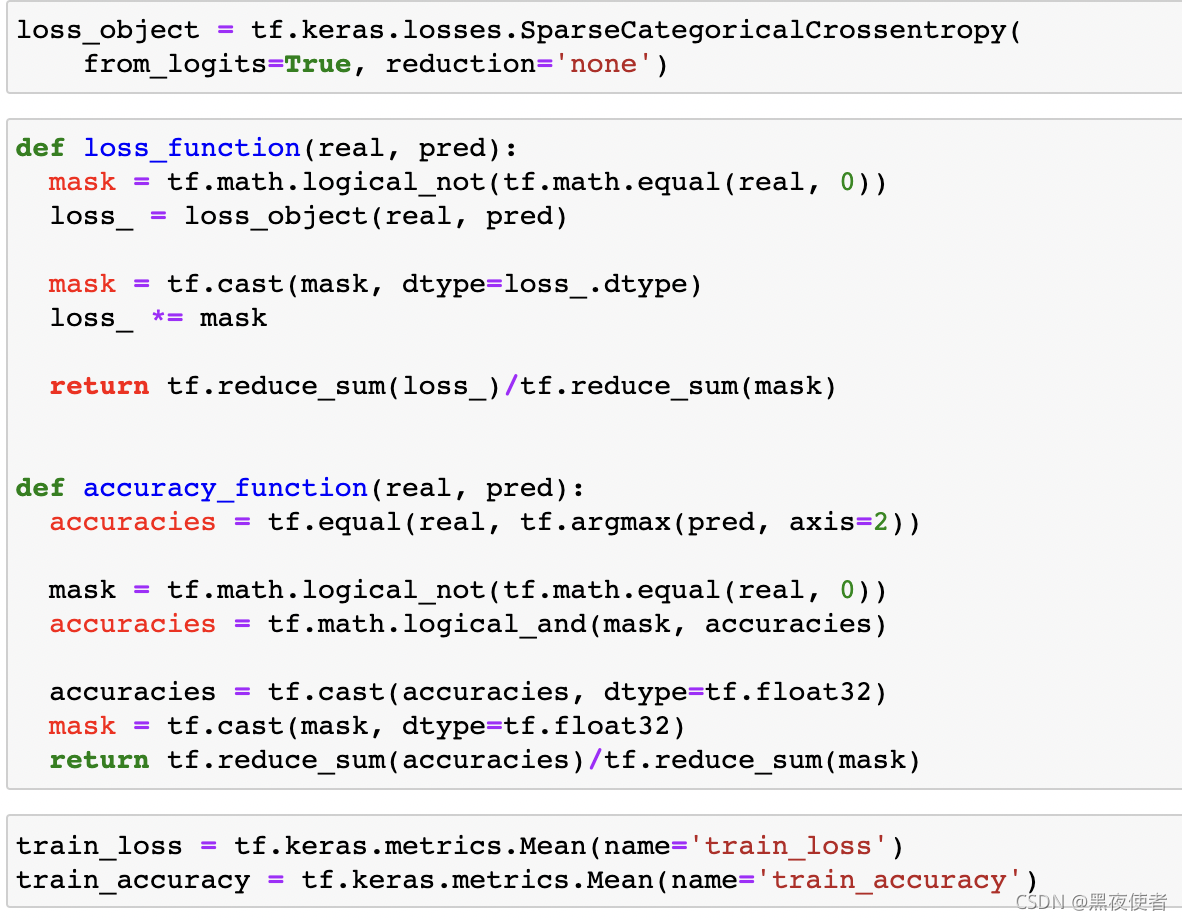
EPOCHS = 10
先写到这,打完比赛再来继续写
# The @tf.function trace-compiles train_step into a TF graph for faster
# execution. The function specializes to the precise shape of the argument
# tensors. To avoid re-tracing due to the variable sequence lengths or variable
# batch sizes (the last batch is smaller), use input_signature to specify
# more generic shapes.

train_step_signature = [
    tf.TensorSpec(shape=(None, None), dtype=tf.int64),
    tf.TensorSpec(shape=(None, None), dtype=tf.int64),
]


@tf.function(input_signature=train_step_signature)
def train_step(inp, tar):
  tar_inp = tar[:, :-1]
  tar_real = tar[:, 1:]

  with tf.GradientTape() as tape:
    predictions, _ = transformer([inp, tar_inp],
                                 training = True)
    loss = loss_function(tar_real, predictions)

  gradients = tape.gradient(loss, transformer.trainable_variables)
  optimizer.apply_gradients(zip(gradients, transformer.trainable_variables))

  train_loss(loss)
  train_accuracy(accuracy_function(tar_real, predictions))