Faster RCNN 理解与源码解析
整体框架
前言的赘述我就不说了,本文只作为学习资料,不作为科普!
-

-
首先我们先看这个整体的结构图,Faster RCNN主要可以分为三个结构,
BACKBONE,RPN,Roi Pooling,classifier这四个部分。
-
最底层的是backbone结构,也可以成为conv layers层,即特征提取层,是通过一些神经网络结构来提取特征网络,比如说有VGG,RESNET50,mobilenet等,都可以作为backbone来实现特征的提取。一般的backbone都是通过有对应的权重文件来进行迁移学习。本文为了方便理解使用简单的mobilenetv2网络。
def create_model(num_classes): ?''' ? Args: ? num_classes: ? # https://download.pytorch.org/models/vgg16-397923af.pth ? # 如果使用vgg16的话就下载对应预训练权重并取消下面注释,接着把mobilenetv2模型对应的两行代码注释掉 ? # vgg_feature = vgg(model_name="vgg16", weights_path="./backbone/vgg16.pth").features ? # backbone = torch.nn.Sequential(*list(vgg_feature._modules.values())[:-1]) # 删除features中最后一个Maxpool层 ? # backbone.out_channels = 512 Returns: ? ''' ?# https://download.pytorch.org/models/mobilenet_v2-b0353104.pth ?backbone = MobileNetV2(weights_path="./backbone/mobilenet_v2.pth").features ? ?backbone.out_channels = 1280 ?# 设置对应backbone输出特征矩阵的channels ?# anchor boxes生成 ?anchor_generator = AnchorsGenerator(sizes=((32, 64, 128, 256, 512),), ? ? ? ? ? ? ? ? ? ? ? ? ? ? ? ? ? ? ?aspect_ratios=((0.5, 1.0, 2.0),)) ? ?roi_pooler = torchvision.ops.MultiScaleRoIAlign(featmap_names=['0'], ?# 在哪些特征层上进行roi pooling ? ? ? ? ? ? ? ? ? ? ? ? ? ? ? ? ? ? ? ? ? ? ? ? ?output_size=[7, 7], ?# roi_pooling输出特征矩阵尺寸 ? ? ? ? ? ? ? ? ? ? ? ? ? ? ? ? ? ? ? ? ? ? ? ? ?sampling_ratio=2) ?# 采样率 ?# 最终的模型由各个部分组合而成。 ?model = FasterRCNN(backbone=backbone, ? ? ? ? ? ? ? ? ? ? num_classes=num_classes, ? ? ? ? ? ? ? ? ? ? rpn_anchor_generator=anchor_generator, ? ? ? ? ? ? ? ? ? ? box_roi_pool=roi_pooler) ? ?return model -
RPN(Region Proposal Networks):
该结构主要是生成faster rcnn中的anchors box,然后对其裁剪过滤判断属于前景和背景,再次阶段会取出一部分不符合规定的anchor box。再RPN中阶段会通过两个卷积层输入对应anchor box回归参数和每个bounding box 的分类矩阵,通过回归参数对生成的anchor boxes 进行回归形成较为精准的proposal(此处的proposal相对于之前较为精准,并不考虑后面roi pooling,再后面roi pooling还需要进行一次box regression)
# RPNHEAD负责预测box regression回归参数和cls分类参数 class RPNHead(nn.Module): ? ?def __init__(self, in_channels, num_anchors): ? ?super(RPNHead, self).__init__() ? ?# 3x3 滑动窗口 ? ?self.conv = nn.Conv2d(in_channels, in_channels, kernel_size=3, stride=1, padding=1) ? ?# 计算预测的目标分数(这里的目标只是指前景或者背景) ? ?self.cls_logits = nn.Conv2d(in_channels, num_anchors, kernel_size=1, stride=1) ? ?# 计算预测的目标bbox regression参数 ? ?self.bbox_pred = nn.Conv2d(in_channels, num_anchors * 4, kernel_size=1, stride=1) ? ? ?for layer in self.children(): ? ? ?if isinstance(layer, nn.Conv2d): ? ? ? ?torch.nn.init.normal_(layer.weight, std=0.01) ? ? ? ?torch.nn.init.constant_(layer.bias, 0) ? ?def forward(self, x): ? ?# type: (List[Tensor]) -> Tuple[List[Tensor], List[Tensor]] ? ?logits = [] ? ?bbox_reg = [] ? ?for i, feature in enumerate(x): ? ? ?t = F.relu(self.conv(feature)) ? ? ?logits.append(self.cls_logits(t)) ? ? ?bbox_reg.append(self.bbox_pred(t)) ? ?return logits, bbox_reg -
Roi Pooling:
该层收集backbone输入的feature maps和RPN生成proposals,综合这些信息后提取proposal feature maps,送入后续全连接层判定目标类别。
-
classification
利用proposal feature maps计算proposal的类别,同时再次bounding box regression获得检测框最终的精确位置。
Anchor box的生成
再了解目标检测算法的一定绕不开anchor box的生成。目标检测的边框表示,都是使用一个矩形的边框来表示,再图像中,可以基于图像坐标系使用多种方法来表示边框
-
最直接的方式,使用矩形框的左上角和右下角再图像坐标系来表示
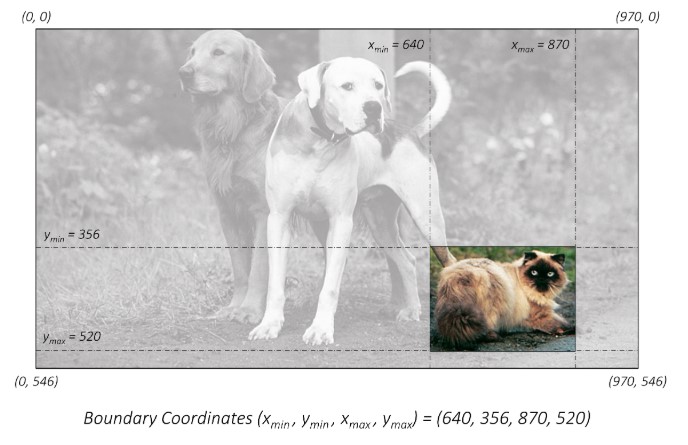
使用绝对坐标的(xmin,ymin,xmax,ymax)。但是这种绝对坐标的表现方式是以原始图像的像素作为基础的,这就需要知道图像的实际尺度,如果图像进行缩放,就无法准确的定位。
-
对图像尺寸归一化
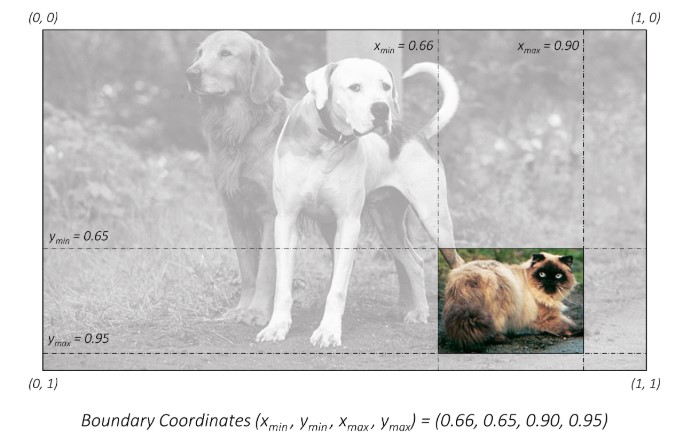
坐标进行归一化,这样只要知道图像的scale,就能很容易的再当前尺度下使用矩形框定位
-
中心坐标的表示方式
使用中心坐标和矩形框的宽高形式来表示矩形框

-
(cx,cy,w,h)(cx,cy,w,h)这种方式很明确的指出来矩形框的大小。 -
在目标检测中,训练数据的额标签通常是基于绝对坐标的表示方式的,而在训练的过程中通常会有尺度的变换这就需要将边框坐标转换为归一化后的形式
-
在计算损失值时,为了平衡尺寸大的目标和尺寸小的目标对损失值的影响,就需要将矩形框表示为中心坐标的方式,以方便对矩形框的宽和高添加权重。
-
最后将归一化的中心坐标形式转换为检测图像的原始尺度上
Faster R-CNN 定义三组纵横比
ratio = [0.5,1,2]和三种尺度scale = [8,16,32],可以组合处9种不同的形状和大小的边框。Anchor Box的生成是以CNN网络最后生成的Feature Map上的点为中心的(映射回原图的坐标),以Faster R-CNN为例,使用VGG网络对对输入的图像下采样了16倍,也就是Feature Map上的一个点对应于输入图像上的一个16×1616×16的正方形区域(感受野)。根据预定义的Anchor,Feature Map上的一点为中心 就可以在原图上生成9种不同大小形状的边框.
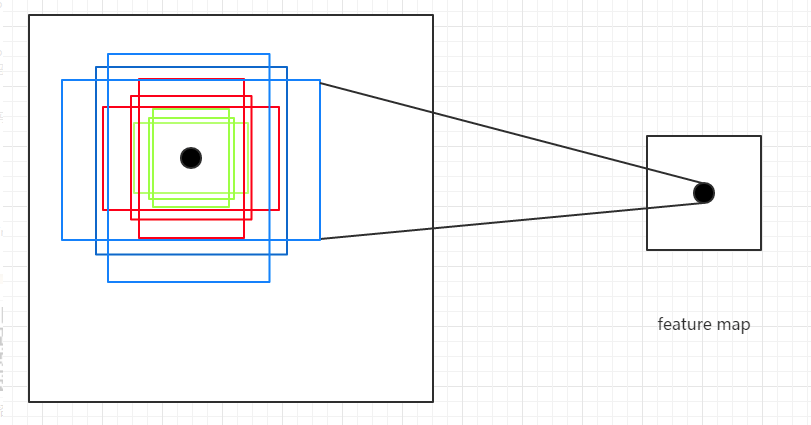
从上图也可以看出为什么需要Anchor。根据CNN的感受野,一个Feature Map上的点对应于原图的16×16的正方形区域,仅仅利用该区域的边框进行目标定位,其精度无疑会很差,甚至根本“框”不到目标。 而加入了Anchor后,一个Feature Map上的点可以生成9中不同形状不同大小的框,这样“框”住目标的概率就会很大,就大大的提高了检查的召回率;再通过后续的网络对这些边框进行调整,其精度也能大大的提高。
class AnchorsGenerator(nn.Module):
 ?def __init__(self, sizes=(128, 256, 512), aspect_ratios=(0.5, 1.0, 2.0)):
 ? ?super(AnchorsGenerator, self).__init__()
 ? ?if not isinstance(sizes[0], (list, tuple)):
 ? ? ?# TODO change this
 ? ? ?sizes = tuple((s,) for s in sizes)
 ? ?if not isinstance(aspect_ratios[0], (list, tuple)):
 ? ? ?aspect_ratios = (aspect_ratios,) * len(sizes)
?
 ? ?assert len(sizes) == len(aspect_ratios)
?
 ? ?# 生成的图像anchors大小张量
 ? ?self.sizes = sizes
 ? ?# 每个anchors的大小比例
 ? ?self.aspect_ratios = aspect_ratios
 ? ?# 创建anchors的函数
 ? ?self.cell_anchors = None
 ? ?self._cache = {}
?
 ? ?# 生成anchors计算张量
 ?def generate_anchors(self, scales, aspect_ratios, dtype=torch.float32, device=torch.device("cpu")):
 ? ?# type: (List[int], List[float], torch.dtype, torch.device) -> Tensor
 ? ?"""
 ?  compute anchor sizes
 ?  Arguments:
 ? ? ?  scales: sqrt(anchor_area)
 ? ? ?  aspect_ratios: h/w ratios
 ? ? ?  dtype: float32
 ? ? ?  device: cpu/gpu
 ?  """
 ? ?# torch.Size([5]) all maps size
 ? ?scales = torch.as_tensor(scales, dtype=dtype, device=device)
 ? ?# # torch.Size([3])
 ? ?aspect_ratios = torch.as_tensor(aspect_ratios, dtype=dtype, device=device)
 ? ?# # torch.Size([3])
 ? ?h_ratios = torch.sqrt(aspect_ratios)
 ? ?# torch.Size([3])
 ? ?w_ratios = 1.0 / h_ratios
?
 ? ?# [r1, r2, r3]' * [s1, s2, s3]
 ? ?# number of elements is len(ratios)*len(scales)
 ? ?# torch.Size([3, 1]) * torch.Size([1, 5])
 ? ?ws = (w_ratios[:, None] * scales[None, :]).view(-1)
 ? ?hs = (h_ratios[:, None] * scales[None, :]).view(-1)
?
 ? ?# left-top, right-bottom coordinate relative to anchor center(0, 0)
 ? ?# 生成的anchors模板都是以(0, 0)为中心的, shape [len(ratios)*len(scales), 4]
 ? ?base_anchors = torch.stack([-ws, -hs, ws, hs], dim=1) / 2
?
 ? ?return base_anchors.round() ?# round 四舍五入
?
 ? ?# 生成每个cell的anchors
 ? ?# 根据提供的sizes和aspect_ratios生成anchors模板
 ?def set_cell_anchors(self, dtype, device):
 ? ?# type: (torch.dtype, torch.device) -> None
 ? ?if self.cell_anchors is not None:
 ? ? ?cell_anchors = self.cell_anchors
 ? ? ?assert cell_anchors is not None
 ? ? ?# suppose that all anchors have the same device
 ? ? ?# which is a valid assumption in the current state of the codebase
 ? ? ?if cell_anchors[0].device == device:
 ? ? ? ?return
?
 ? ?# 根据提供的sizes和aspect_ratios生成anchors模板
 ? ?# anchors模板都是以(0, 0)为中心的anchor
 ? ?# Tensor[15,4]
 ? ?cell_anchors = [
 ? ? ?self.generate_anchors(sizes, aspect_ratios, dtype, device)
 ? ? ?for sizes, aspect_ratios in zip(self.sizes, self.aspect_ratios)
 ?  ]
 ? ?self.cell_anchors = cell_anchors
通过代码就生成了图像的anchor boxes,这么多anchor box预测真实的gtbox,无疑是非常浪费运算成本的一件事,而且效果并不高,在RPN阶段种对anchor boxes进行box regression回归后,还需要通过一系列操作将回归的proposal去除模糊大的部分
筛除小boxes框,nms处理,根据预测概率获取小于或等于post_nms_top_n个目标,使送入ROI POOLING层的proposal更加的精简,能够进行更少的计算。其中调整proposal和划分正负样本计算损失部分不在以下体现
''' RPN模块的正向传播过程 ''' def forward(self, ? ? ? ? ? ?images, ?# type: ImageList ? ? ? ? ? ?features, ?# type: Dict[str, Tensor] ? ? ? ? ? ?targets=None ?# type: Optional[List[Dict[str, Tensor]]] ? ? ? ? ? ): ? ?# type: (...) -> Tuple[List[Tensor], Dict[str, Tensor]] ? ?# RPN uses all feature maps that are available ? ?# features是所有预测特征层组成的OrderedDict ? ?features = list(features.values()) ? ?''' ? ? # 计算每个预测特征层上的预测目标概率和bboxes regression参数 ? ? # objectness和pred_bbox_deltas都是list ? ? # RPN中卷积层输出的bboxes参数和预测回归参数 ? ? # objectness为一个batch中所有图像的宽高个参数[batch,anchors,height.width],regression参数有batch个anchors*4个宽高[batch,anchors*4,height.width] ? ? # objectness也是预测特征的概率 ? ''' ? ?objectness, pred_bbox_deltas = self.head(features) ? ? ?# 生成一个batch图像的所有anchors信息,list(tensor)元素个数等于batch_size ? ?# [cell_anchors * width*height, 4] ? ?# 得到每个原图的anchors坐标,每个图像的anchors相同 ? ?anchors = self.anchor_generator(images, features) ? ? ?# batch_size ? ?num_images = len(anchors) ? ? ?''' ? ? # numel() Returns the total number of elements in the input tensor. ? ? # 计算每个预测特征层上的对应的anchors数量 ? ? # 在金字塔特征结构中,获取多个预测特征层的anhors总数 ? ''' ? ?num_anchors_per_level_shape_tensors = [o[0].shape for o in objectness] ? ?# [batch,height,width] = anchors 总数 ? ?num_anchors_per_level = [s[0] * s[1] * s[2] for s in num_anchors_per_level_shape_tensors] ? ? ?# 调整内部tensor格式以及shape ? ?# 目标分类objectness的shape为list =>[all_anchors,N] ? ?# box回归参数为[batch,cell_anchors * 4 , height,width] => [ all_anchors, N] ? ?# 调整所有的参数,将预测分类和回归参数拼接到一起 ? ?objectness, pred_bbox_deltas = concat_box_prediction_layers(objectness, ? ? ? ? ? ? ? ? ? ? ? ? ? ? ? ? ? ? ? ? ? ? ? ? ? ? ? ? ? ? ? ?pred_bbox_deltas) ? ? ?# apply pred_bbox_deltas to anchors to obtain the decoded proposals ? ?# note that we detach the deltas because Faster R-CNN do not backprop through ? ?# the proposals ? ?# 将预测的bbox regression参数应用到anchors上得到最终预测bbox坐标 ? ?# 通过anchors和回归参数计算真实的bbox坐标 ? ?proposals = self.box_coder.decode(pred_bbox_deltas.detach(), anchors) ? ?proposals = proposals.view(num_images, -1, 4) ? ? ?# 筛除小boxes框,nms处理,根据预测概率获取小于或等于post_nms_top_n个目标 ? ?boxes, scores = self.filter_proposals(proposals, objectness, images.image_sizes, num_anchors_per_level) ? ? ?losses = {} ? ?if self.training: ? ? ? ?assert targets is not None ? ? ? ?# 计算每个anchors最匹配的gt,并将anchors进行分类,前景,背景以及废弃的anchors ? ? ? ?labels, matched_gt_boxes = self.assign_targets_to_anchors(anchors, targets) ? ? ? ?# 结合anchors以及对应的gt,计算regression参数 ? ? ? ?regression_targets = self.box_coder.encode(matched_gt_boxes, anchors) ? ? ? ?loss_objectness, loss_rpn_box_reg = self.compute_loss( ? ? ? ? ? ?objectness, pred_bbox_deltas, labels, regression_targets ? ? ? ) ? ? ? ?losses = { ? ? ? ? ? ?"loss_objectness": loss_objectness, ? ? ? ? ? ?"loss_rpn_box_reg": loss_rpn_box_reg ? ? ? } ? ? ? ?return boxes, losses -
anchor box 的回归
anchor box 的box regression回归借用其他博文https://blog.csdn.net/u013066730/article/details/100577501
这篇博文对faster rcnn的讲解也很清晰。引用文章的内容。
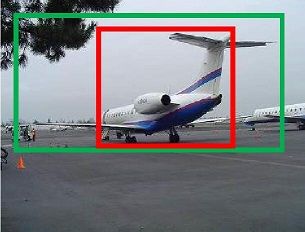
如图所示绿色框为飞机的Ground Truth(GT),红色为提取的positive anchors,即便红色的框被分类器识别为飞机,但是由于红色的框定位不准,这张图相当于没有正确的检测出飞机。所以我们希望采用一种方法对红色的框进行微调,使得positive anchors和GT更加接近。

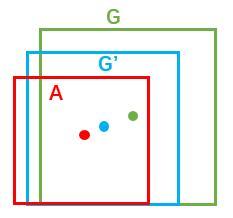
那么经过何种变换F才能从图10中的anchor A变为G'呢? 比较简单的思路就是:
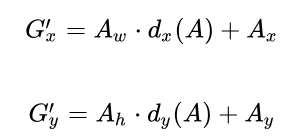
-
再做缩放
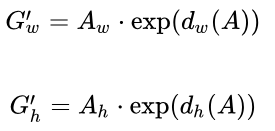
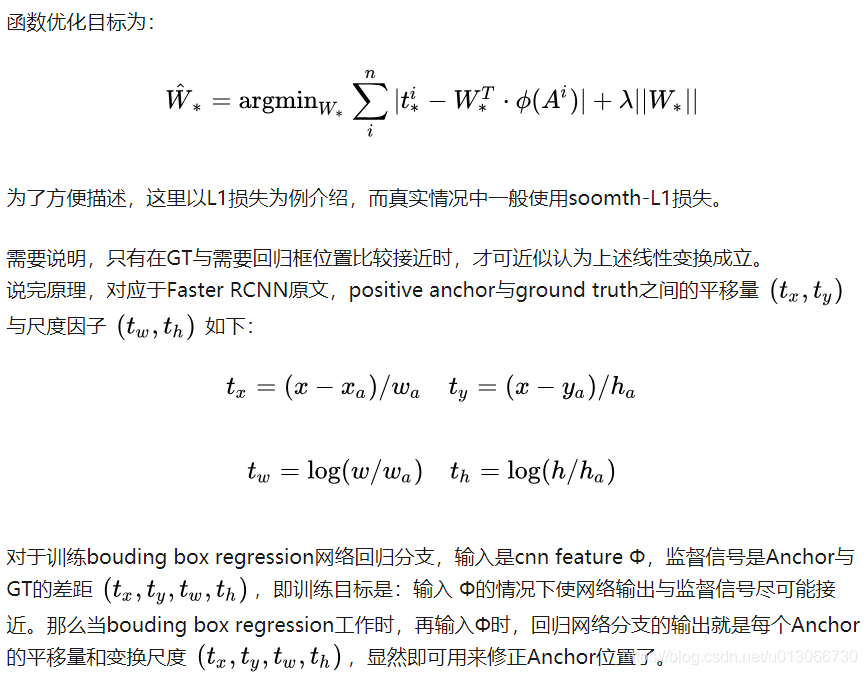
在代码中的具体表现为
# 将预测的bbox回归参数应用到对应anchors上得到预测bbox的坐标 def decode_single(self, rel_codes, boxes): ? ?boxes = boxes.to(rel_codes.dtype) ? ?# 得到anchors的xywh坐标,原始的anchors左边为[cx,cy,w,h] ? ?# xmin, ymin, xmax, ymax ? ?widths = boxes[:, 2] - boxes[:, 0] ? # anchor/proposal宽度 ? ?heights = boxes[:, 3] - boxes[:, 1] ?# anchor/proposal高度 ? ?# 从中心坐标偏移到xywh坐标 ? ?ctr_x = boxes[:, 0] + 0.5 * widths ? # anchor/proposal中心x坐标 ? ?ctr_y = boxes[:, 1] + 0.5 * heights ?# anchor/proposal中心y坐标 ? ? ?# rpnhead预测的回归参数 ? ?wx, wy, ww, wh = self.weights ?# RPN中为[1,1,1,1], fastrcnn中为[10,10,5,5] ? ?dx = rel_codes[:, 0::4] / wx ? # 预测anchors/proposals的中心坐标x回归参数 ? ?dy = rel_codes[:, 1::4] / wy ? # 预测anchors/proposals的中心坐标y回归参数 ? ?dw = rel_codes[:, 2::4] / ww ? # 预测anchors/proposals的宽度回归参数 ? ?dh = rel_codes[:, 3::4] / wh ? # 预测anchors/proposals的高度回归参数 ? ? ?# limit max value, prevent sending too large values into torch.exp() ? ?# self.bbox_xform_clip=math.log(1000. / 16) ? 4.135 ? ?dw = torch.clamp(dw, max=self.bbox_xform_clip) ? ?dh = torch.clamp(dh, max=self.bbox_xform_clip) ? ? ?# 真实的预测边界框回归参数,代表预测的真实的bbox的坐标 ? ?pred_ctr_x = dx * widths[:, None] + ctr_x[:, None] ? ?pred_ctr_y = dy * heights[:, None] + ctr_y[:, None] ? ?pred_w = torch.exp(dw) * widths[:, None] ? ?pred_h = torch.exp(dh) * heights[:, None] ? ? ?# xmin ? ?pred_boxes1 = pred_ctr_x - torch.tensor(0.5, dtype=pred_ctr_x.dtype, device=pred_w.device) * pred_w ? ?# ymin ? ?pred_boxes2 = pred_ctr_y - torch.tensor(0.5, dtype=pred_ctr_y.dtype, device=pred_h.device) * pred_h ? ?# xmax ? ?pred_boxes3 = pred_ctr_x + torch.tensor(0.5, dtype=pred_ctr_x.dtype, device=pred_w.device) * pred_w ? ?# ymax ? ?pred_boxes4 = pred_ctr_y + torch.tensor(0.5, dtype=pred_ctr_y.dtype, device=pred_h.device) * pred_h ? ? ?pred_boxes = torch.stack((pred_boxes1, pred_boxes2, pred_boxes3, pred_boxes4), dim=2).flatten(1) ? ?return pred_boxes @torch.jit._script_if_tracing def encode_boxes(reference_boxes, proposals, weights): ? ?# type: (torch.Tensor, torch.Tensor, torch.Tensor) -> torch.Tensor ? ?""" ? Encode a set of proposals with respect to some ? reference boxes ? ? Arguments: ? ? ? reference_boxes (Tensor): reference boxes(gt) ? ? ? proposals (Tensor): boxes to be encoded(anchors) ? ? ? weights: ? """ ? ? ?# perform some unpacking to make it JIT-fusion friendly ? ?wx = weights[0] ? ?wy = weights[1] ? ?ww = weights[2] ? ?wh = weights[3] ? ? ?# unsqueeze() ? ?# Returns a new tensor with a dimension of size one inserted at the specified position. ? ?proposals_x1 = proposals[:, 0].unsqueeze(1) ? ?proposals_y1 = proposals[:, 1].unsqueeze(1) ? ?proposals_x2 = proposals[:, 2].unsqueeze(1) ? ?proposals_y2 = proposals[:, 3].unsqueeze(1) ? ? ?reference_boxes_x1 = reference_boxes[:, 0].unsqueeze(1) ? ?reference_boxes_y1 = reference_boxes[:, 1].unsqueeze(1) ? ?reference_boxes_x2 = reference_boxes[:, 2].unsqueeze(1) ? ?reference_boxes_y2 = reference_boxes[:, 3].unsqueeze(1) ? ? ?# implementation starts here ? ?# parse widths and heights ? ?ex_widths = proposals_x2 - proposals_x1 ? ?ex_heights = proposals_y2 - proposals_y1 ? ?# parse coordinate of center point ? ?ex_ctr_x = proposals_x1 + 0.5 * ex_widths ? ?ex_ctr_y = proposals_y1 + 0.5 * ex_heights ? ? ?gt_widths = reference_boxes_x2 - reference_boxes_x1 ? ?gt_heights = reference_boxes_y2 - reference_boxes_y1 ? ?gt_ctr_x = reference_boxes_x1 + 0.5 * gt_widths ? ?gt_ctr_y = reference_boxes_y1 + 0.5 * gt_heights ? ? ?targets_dx = wx * (gt_ctr_x - ex_ctr_x) / ex_widths ? ?targets_dy = wy * (gt_ctr_y - ex_ctr_y) / ex_heights ? ?targets_dw = ww * torch.log(gt_widths / ex_widths) ? ?targets_dh = wh * torch.log(gt_heights / ex_heights) ? ? ?targets = torch.cat((targets_dx, targets_dy, targets_dw, targets_dh), dim=1) ? ?return targets -
ROI POOLING层
RoI Pooling层是个池化层,负责收集proposal,把不同大小的proposal resize到相同的尺寸(例如7x7),并计算出proposal feature maps,送入后续网络。
这边引用两篇较为详细的博文来理解roipooling的作用
https://blog.csdn.net/qq_35054151/article/details/111351237
https://blog.csdn.net/lucifer_24/article/details/88727211
https://zhuanlan.zhihu.com/p/31426458
最后放入有注释的源码链接