第 2 周 - 未分级实验室:数据之旅
欢迎来到生产机器学习工程第 2 周的未分级实验室。深度学习背后的范式现在正面临从以模型为中心到以数据为中心的转变。在本实验中,您将看到复杂的数据如何影响模型的结果。为了向您展示在不解决模型的情况下应用数据更改需要多远,您将始终使用一个模型:一个简单的卷积神经网络 (CNN)。在训练这个模型的过程中,你将解决一些常见问题:类不平衡和过度拟合。在您解决这些问题时,实验室将引导您了解有用的诊断工具和方法,以缓解这些常见问题。
开始实验室前的重要注意事项
在 Colab 中打开后,单击屏幕右上角的“连接”按钮以连接到运行时以运行此实验室。
注 1:
在本实验中,您可以选择自己训练模型(这大约需要 20 分钟,为每个模型启用 GPU)或使用已经提供的预训练版本。总共有 3 个 CNN 需要训练,尽管已经调整了一些参数以提供更快的训练时间(例如steps_per_epoch和validation_steps已大幅降低),但这可能会导致运行此实验室花费很长时间,而不是考虑您观察。
为了加快速度,我们提供了每个模型的已保存预训练版本及其各自的训练历史。我们建议您使用这些预先训练的版本以节省时间。但是,我们也认为训练模型是一种重要的学习体验,尤其是如果您以前没有这样做过的话。如果你想自己进行这个训练,也提供了复制训练的代码。在这种情况下,GPU 是绝对必要的,因此请确保启用它。
要确保您的运行时是 GPU,您可以转到运行时 -> 更改运行时类型 -> 从菜单中选择 GPU,然后按保存
注意:可能需要重新启动运行时。
Colab 会告诉您是否需要重新启动——您可以从下拉菜单中的运行时 -> 重新启动运行时选项中执行此操作。
如果您决定使用预训练版本,请确保您没有使用 GPU,因为它不是必需的,并且可能会阻止其他用户访问 GPU。要检查这一点,请转到运行时 -> 更改运行时类型 -> 从菜单中选择无,然后按保存。
笔记2:
Colab不保证对 GPU 的访问。这取决于这些资源的可用性。然而,GPU 访问被拒绝的情况并不常见。如果您遇到这种情况,您仍然可以运行此实验室,而无需自己训练模型。如果您真的想进行训练但被拒绝使用 GPU,请尝试在几个小时后将运行时切换到 GPU。
要了解有关 Colab 政策的更多信息,请查看此常见问题解答。
开始实验
import os
import shutil
import random
import zipfile
import tarfile
import numpy as np
import pandas as pd
import seaborn as sns
import tensorflow as tf
import matplotlib.pyplot as plt

# To ignore some warnings about Image metadata that Pillow prints out
import warnings
warnings.filterwarnings("ignore")
在继续之前,下载实验室中使用的两个数据集,以及预训练的模型和历史:
# Download datasets

# Cats and dogs
!wget https://storage.googleapis.com/mlep-public/course_1/week2/kagglecatsanddogs_3367a.zip

# Caltech birds
!wget https://storage.googleapis.com/mlep-public/course_1/week2/CUB_200_2011.tar

# Download pretrained models and training histories
!wget -q -P /content/model-balanced/ https://storage.googleapis.com/mlep-public/course_1/week2/model-balanced/saved_model.pb
!wget -q -P /content/model-balanced/variables/ https://storage.googleapis.com/mlep-public/course_1/week2/model-balanced/variables/variables.data-00000-of-00001
!wget -q -P /content/model-balanced/variables/ https://storage.googleapis.com/mlep-public/course_1/week2/model-balanced/variables/variables.index
!wget -q -P /content/history-balanced/ https://storage.googleapis.com/mlep-public/course_1/week2/history-balanced/history-balanced.csv

!wget -q -P /content/model-imbalanced/ https://storage.googleapis.com/mlep-public/course_1/week2/model-imbalanced/saved_model.pb
!wget -q -P /content/model-imbalanced/variables/ https://storage.googleapis.com/mlep-public/course_1/week2/model-imbalanced/variables/variables.data-00000-of-00001
!wget -q -P /content/model-imbalanced/variables/ https://storage.googleapis.com/mlep-public/course_1/week2/model-imbalanced/variables/variables.index
!wget -q -P /content/history-imbalanced/ https://storage.googleapis.com/mlep-public/course_1/week2/history-imbalanced/history-imbalanced.csv

!wget -q -P /content/model-augmented/ https://storage.googleapis.com/mlep-public/course_1/week2/model-augmented/saved_model.pb
!wget -q -P /content/model-augmented/variables/ https://storage.googleapis.com/mlep-public/course_1/week2/model-augmented/variables/variables.data-00000-of-00001
!wget -q -P /content/model-augmented/variables/ https://storage.googleapis.com/mlep-public/course_1/week2/model-augmented/variables/variables.index
!wget -q -P /content/history-augmented/ https://storage.googleapis.com/mlep-public/course_1/week2/history-augmented/history-augmented.csv
1. 一个数据故事
为了引导您完成本实验,我们准备了一个模拟真实生活场景的叙述:
假设您的任务是创建一个模型来对猫、狗和鸟的图像进行分类。为此,您选择了一个简单的 CNN 架构,因为众所周知 CNN 在图像分类方面表现良好。您可能熟悉两个广泛使用的数据集:cats vs dogs, 和caltech birds。作为旁注,这两个数据集都可以通过Tensforflow Datasets (TFDS). 但是,您决定不使用,TFDS因为实验室要求您修改数据并将两个数据集合并为一个。
1.1 合并数据集
这些数据集中的原始图像可以在以下路径中找到:
cats_and_dogs_zip = '/content/kagglecatsanddogs_3367a.zip'
caltech_birds_tar = '/content/CUB_200_2011.tar'

base_dir = '/tmp/data'
base_dir在这种情况下,下一步是将数据提取到选择的目录中。
请注意,cats vs dogs图像是在zip文件格式,而caltech birds图像来在tar文件中。
with zipfile.ZipFile(cats_and_dogs_zip, 'r') as my_zip:
  my_zip.extractall(base_dir)
with tarfile.open(caltech_birds_tar, 'r') as my_tar:
  my_tar.extractall(base_dir)
对于猫和狗的图像,不需要进一步的预处理,因为一个类的所有样本都位于一个目录中:PetImages\Cat和PetImages\Dog。让我们检查每个类别有多少图像可用:
base_dogs_dir = os.path.join(base_dir, 'PetImages/Dog')
base_cats_dir = os.path.join(base_dir,'PetImages/Cat')

print(f"There are {len(os.listdir(base_dogs_dir))} images of dogs")
print(f"There are {len(os.listdir(base_cats_dir))} images of cats")
Bird 图像数据集组织完全不同。该数据集通常用于对鸟类进行分类,因此每个物种都有一个目录。让我们将所有种类的鸟类视为一个类。这需要将所有鸟类图像移动到一个目录(PetImages/Bird将用于一致性)。这可以通过运行下一个单元格来完成:
raw_birds_dir = '/tmp/data/CUB_200_2011/images'
base_birds_dir = os.path.join(base_dir,'PetImages/Bird')
os.mkdir(base_birds_dir)

for subdir in os.listdir(raw_birds_dir):
  subdir_path = os.path.join(raw_birds_dir, subdir)
  for image in os.listdir(subdir_path):
    shutil.move(os.path.join(subdir_path, image), os.path.join(base_birds_dir))

print(f"There are {len(os.listdir(base_birds_dir))} images of birds")
事实证明,您尝试预测的每个类都有相似数量的图像!好的!
让我们快速浏览一下您尝试预测的每个类的图像。
from IPython.display import Image, display

print("Sample cat image:")
display(Image(filename=f"{os.path.join(base_cats_dir, os.listdir(base_cats_dir)[0])}"))
print("\nSample dog image:")
display(Image(filename=f"{os.path.join(base_dogs_dir, os.listdir(base_dogs_dir)[0])}"))
print("\nSample bird image:")
display(Image(filename=f"{os.path.join(base_birds_dir, os.listdir(base_birds_dir)[0])}"))
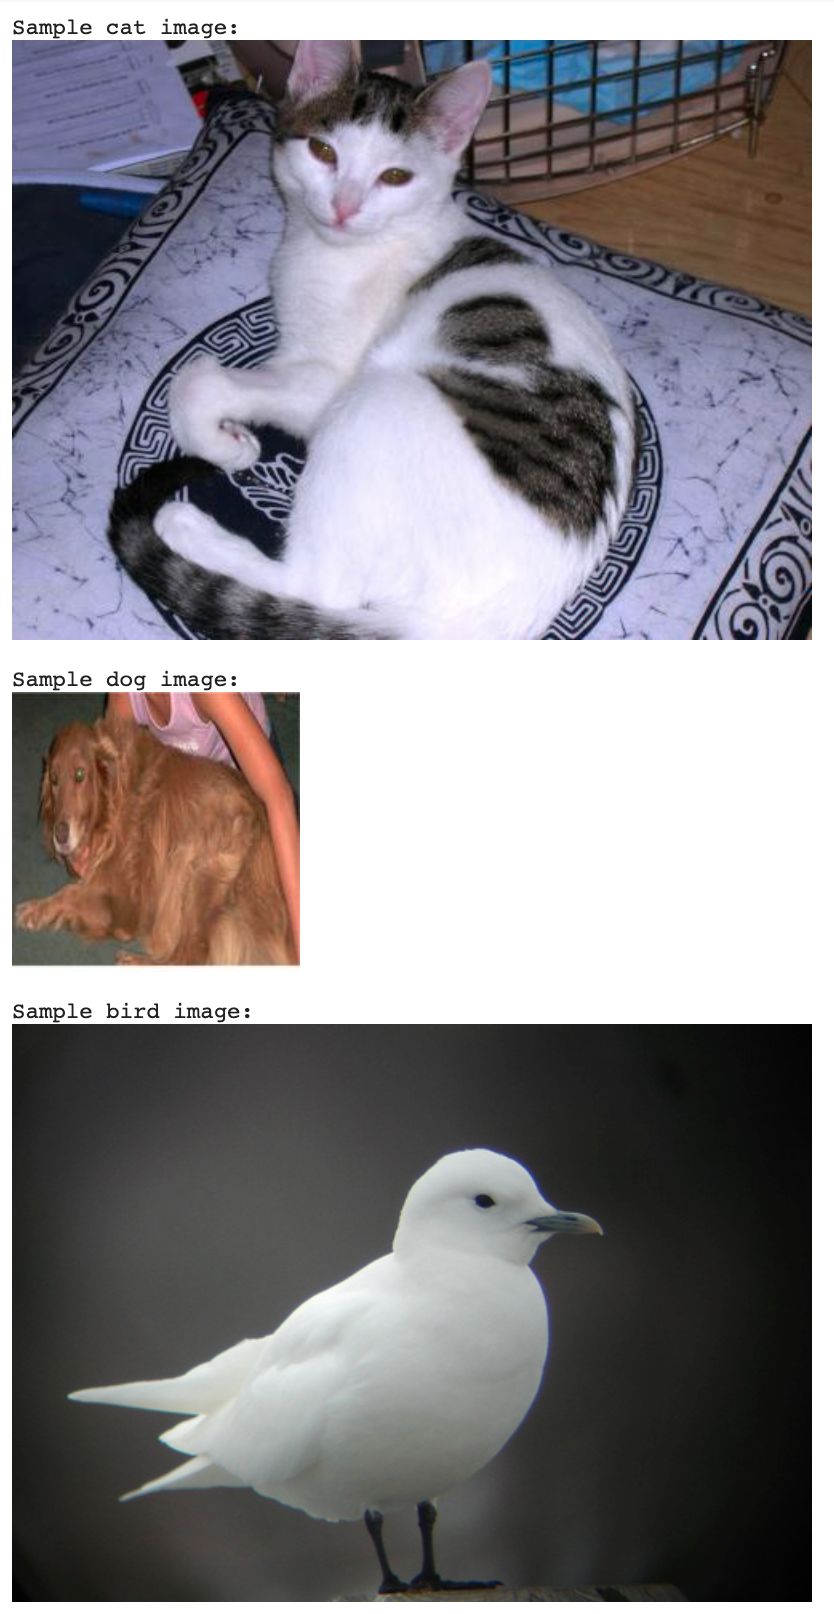
2. 训练/评估拆分
在训练模型之前,您需要将数据拆分为training和evaluating集合。对于培训,我们选择了Keras应用程序编程接口 (API),其中包括从各种目录读取图像的功能。拆分数据的更简单方法是为每个类的每个拆分创建一个不同的目录。
运行下一个单元格以创建用于训练和评估集的目录。
train_eval_dirs = ['train/cats', 'train/dogs', 'train/birds',
                   'eval/cats', 'eval/dogs', 'eval/birds']

for dir in train_eval_dirs:
  if not os.path.exists(os.path.join(base_dir, dir)):
    os.makedirs(os.path.join(base_dir, dir))
现在,让我们定义一个函数,根据需要将一定比例的图像从原始文件夹移动到目标文件夹以生成训练和评估拆分:
def move_to_destination(origin, destination, percentage_split):
  num_images = int(len(os.listdir(origin))*percentage_split)
  for image_name, image_number in zip(sorted(os.listdir(origin)), range(num_images)):
    shutil.move(os.path.join(origin, image_name), destination)
现在您已准备好调用前一个函数并拆分数据:
# Move 70% of the images to the train dir
move_to_destination(base_cats_dir, os.path.join(base_dir, 'train/cats'), 0.7)
move_to_destination(base_dogs_dir, os.path.join(base_dir, 'train/dogs'), 0.7)
move_to_destination(base_birds_dir, os.path.join(base_dir, 'train/birds'), 0.7)


# Move the remaining images to the eval dir
move_to_destination(base_cats_dir, os.path.join(base_dir, 'eval/cats'), 1)
move_to_destination(base_dogs_dir, os.path.join(base_dir, 'eval/dogs'), 1)
move_to_destination(base_birds_dir, os.path.join(base_dir, 'eval/birds'), 1)
值得一提的是,就目前而言,您的数据集存在一些问题,会阻止模型训练和评估。主要是:
- 某些图像已损坏且字节数为零。
- Cats vs Dogs zip 文件包含.db需要删除的每个类的文件。
如果您在培训前未解决此问题,您将收到有关这些问题的错误,并且培训将失败。零字节图像不是有效图像,一旦到达这些文件,Keras 会通知您。以类似的方式.db文件不是有效的图像。在开始运行之前始终确保向训练算法提交具有正确规范的文件是一个很好的做法,因为这些问题可能不会立即遇到,您将不得不解决它们并重新开始训练。
bash在基本目录中运行以下命令将解决这些问题:
!find /tmp/data/ -size 0 -exec rm {} +
!find /tmp/data/ -type f ! -name "*.jpg" -exec rm {} +
第一个命令从文件系统中删除所有零字节文件。第二个删除任何没有.jpg扩展名的文件。
这也提醒人们 bash 的力量。尽管您可以使用 Python 代码实现相同的结果,但 bash 允许您更快地完成此操作。如果您不熟悉 bash 或其他类似 shell 的语言,我们鼓励您学习其中的一些,因为它是用于数据操作的非常有用的工具。
在删除损坏的图像后,让我们检查一下每个拆分和类有多少可用图像:
print(f"There are {len(os.listdir(os.path.join(base_dir, 'train/cats')))} images of cats for training")
print(f"There are {len(os.listdir(os.path.join(base_dir, 'train/dogs')))} images of dogs for training")
print(f"There are {len(os.listdir(os.path.join(base_dir, 'train/birds')))} images of birds for training\n")

print(f"There are {len(os.listdir(os.path.join(base_dir, 'eval/cats')))} images of cats for evaluation")
print(f"There are {len(os.listdir(os.path.join(base_dir, 'eval/dogs')))} images of dogs for evaluation")
print(f"There are {len(os.listdir(os.path.join(base_dir, 'eval/birds')))} images of birds for evaluation")
事实证明,很少有文件提出了上述问题。这是个好消息,但它也提醒我们,数据集的小问题可能会意外地影响训练过程。在这种情况下,4 个无效的图像文件将阻止您训练模型。
在大多数情况下,训练深度学习模型是一项耗时的任务,因此在开始此过程之前一定要准备好一切。
3. 一个意想不到的问题!
让我们面对这个故事中的第一个现实生活问题!有你的办公室停电和一些硬盘驱动器被损坏,并作为其中的一个结果是,许多的图像dogs,并birds已被删除。事实上,只有 20% 的狗图像和 10% 的鸟图像幸存下来。
为了模拟这种情况,让我们快速创建一个名为的新目录,imbalanced并仅为每个类复制上面提到的比例。
for dir in train_eval_dirs:
  if not os.path.exists(os.path.join(base_dir, 'imbalanced/'+dir)):
    os.makedirs(os.path.join(base_dir, 'imbalanced/'+dir))
# Very similar to the one used before but this one copies instead of moving
def copy_with_limit(origin, destination, percentage_split):
  num_images = int(len(os.listdir(origin))*percentage_split)
  for image_name, image_number in zip(sorted(os.listdir(origin)), range(num_images)):
    shutil.copy(os.path.join(origin, image_name), destination)

# Perform the copying
copy_with_limit(os.path.join(base_dir, 'train/cats'), os.path.join(base_dir, 'imbalanced/train/cats'), 1)
copy_with_limit(os.path.join(base_dir, 'train/dogs'), os.path.join(base_dir, 'imbalanced/train/dogs'), 0.2)
copy_with_limit(os.path.join(base_dir, 'train/birds'), os.path.join(base_dir, 'imbalanced/train/birds'), 0.1)

copy_with_limit(os.path.join(base_dir, 'eval/cats'), os.path.join(base_dir, 'imbalanced/eval/cats'), 1)
copy_with_limit(os.path.join(base_dir, 'eval/dogs'), os.path.join(base_dir, 'imbalanced/eval/dogs'), 0.2)
copy_with_limit(os.path.join(base_dir, 'eval/birds'), os.path.join(base_dir, 'imbalanced/eval/birds'), 0.1)

# Print number of available images
print(f"There are {len(os.listdir(os.path.join(base_dir, 'imbalanced/train/cats')))} images of cats for training")
print(f"There are {len(os.listdir(os.path.join(base_dir, 'imbalanced/train/dogs')))} images of dogs for training")
print(f"There are {len(os.listdir(os.path.join(base_dir, 'imbalanced/train/birds')))} images of birds for training\n")

print(f"There are {len(os.listdir(os.path.join(base_dir, 'imbalanced/eval/cats')))} images of cats for evaluation")
print(f"There are {len(os.listdir(os.path.join(base_dir, 'imbalanced/eval/dogs')))} images of dogs for evaluation")
print(f"There are {len(os.listdir(os.path.join(base_dir, 'imbalanced/eval/birds')))} images of birds for evaluation")
对于意外文件丢失,目前没有快速或明确的解决方案。因此,您决定继续使用剩余图像训练模型。
3.1 选择型号
让我们继续创建模型架构,并利用 keras API 定义损失函数、优化器和性能指标:
from tensorflow.keras import layers, models, optimizers

def create_model():
  # A simple CNN architecture based on the one found here: https://www.tensorflow.org/tutorials/images/classification
  model = models.Sequential([
  layers.Conv2D(32, (3, 3), activation='relu', input_shape=(150, 150, 3)),
  layers.MaxPooling2D((2, 2)),
  layers.Conv2D(64, (3, 3), activation='relu'),
  layers.MaxPooling2D((2, 2)),
  layers.Conv2D(64, (3, 3), activation='relu'),
  layers.MaxPooling2D((2, 2)),
  layers.Conv2D(128, (3, 3), activation='relu'),
  layers.MaxPooling2D((2, 2)),
  layers.Flatten(),
  layers.Dense(512, activation='relu'),
  layers.Dense(3, activation='softmax')
  ])


  # Compile the model
  model.compile(
      loss=tf.keras.losses.SparseCategoricalCrossentropy(),
      optimizer=optimizers.Adam(),
      metrics=[tf.keras.metrics.SparseCategoricalAccuracy()]
  )

  return model
让我们打印一个模型摘要作为快速检查。
# Create a model to use with the imbalanced dataset
imbalanced_model = create_model()

# Print the model's summary
print(imbalanced_model.summary())
为了训练模型,您将使用 Keras 的 ImageDataGenerator,它具有内置功能,可以轻松地为您的模型提供原始、重新缩放甚至增强的图像数据。
ImageDataGenerator 中的另一个很酷的功能是flow_from_directory允许根据需要从根目录读取图像的方法。此方法需要以下参数:
- directory:存储图像的根目录的路径。
- target_size:找到的所有图像将被调整到的尺寸。由于图像具有各种分辨率,因此您需要标准化它们的大小。使用了 150x150,但其他值也应该可以正常工作。
- batch_size:每次要求生成器生成下一批图像时生成的图像数。此处使用 32。
- class_mode:标签的表示方式。这里“二进制”用于表示标签将是一维的。这样做是为了与编译模型时使用的损失和评估指标兼容。
如果您想了解有关使用 Keras 的 ImageDataGenerator 的更多信息,请查看本教程。
from tensorflow.keras.preprocessing.image import ImageDataGenerator

# No data augmentation for now, only normalizing pixel values
train_datagen = ImageDataGenerator(rescale=1./255)
test_datagen = ImageDataGenerator(rescale=1./255)

# Point to the imbalanced directory
train_generator = train_datagen.flow_from_directory(
        '/tmp/data/imbalanced/train',
        target_size=(150, 150),
        batch_size=32,
        class_mode='binary')

validation_generator = test_datagen.flow_from_directory(
        '/tmp/data/imbalanced/eval',
        target_size=(150, 150),
        batch_size=32,
        class_mode='binary')
让我们快速检查一下,检查两个生成器(训练和验证)是否对每个类使用相同的标签:
print(f"labels for each class in the train generator are: {train_generator.class_indices}")
print(f"labels for each class in the validation generator are: {validation_generator.class_indices}")
4. 使用类别不平衡数据训练 CNN
# Load pretrained model and history

imbalanced_history = pd.read_csv('history-imbalanced/history-imbalanced.csv')
imbalanced_model = tf.keras.models.load_model('model-imbalanced')
model.save() 或 tf.keras.models.save_model(), NOT tf.saved_model.save() 保存模型。为了确认,在 SavedModel 目录中应该有一个名为“keras_metadata.pb”的文件。
# Run only if you want to train the model yourself (this takes around 20 mins with GPU enabled)

# imbalanced_history = imbalanced_model.fit(
#     train_generator,
#     steps_per_epoch=100,
#     epochs=50,
#     validation_data=validation_generator,
#     validation_steps=80)
为了正确分析模型性能,在训练过程中跟踪不同的指标(例如准确性和损失函数)非常重要。让我们定义一个辅助函数来处理训练历史中的指标,具体取决于您之前选择的方法:
def get_training_metrics(history):

  # This is needed depending on if you used the pretrained model or you trained it yourself
  if not isinstance(history, pd.core.frame.DataFrame):
    history = history.history

  acc = history['sparse_categorical_accuracy']
  val_acc = history['val_sparse_categorical_accuracy']

  loss = history['loss']
  val_loss = history['val_loss']

  return acc, val_acc, loss, val_loss
现在,让我们随着训练过程的进行绘制每个训练时期的指标和损失。
def plot_train_eval(history):
  acc, val_acc, loss, val_loss = get_training_metrics(history)

  acc_plot = pd.DataFrame({"training accuracy":acc, "evaluation accuracy":val_acc})
  acc_plot = sns.lineplot(data=acc_plot)
  acc_plot.set_title('training vs evaluation accuracy')
  acc_plot.set_xlabel('epoch')
  acc_plot.set_ylabel('sparse_categorical_accuracy')
  plt.show()

  print("")

  loss_plot = pd.DataFrame({"training loss":loss, "evaluation loss":val_loss})
  loss_plot = sns.lineplot(data=loss_plot)
  loss_plot.set_title('training vs evaluation loss')
  loss_plot.set_xlabel('epoch')
  loss_plot.set_ylabel('loss')
  plt.show()


plot_train_eval(imbalanced_history)
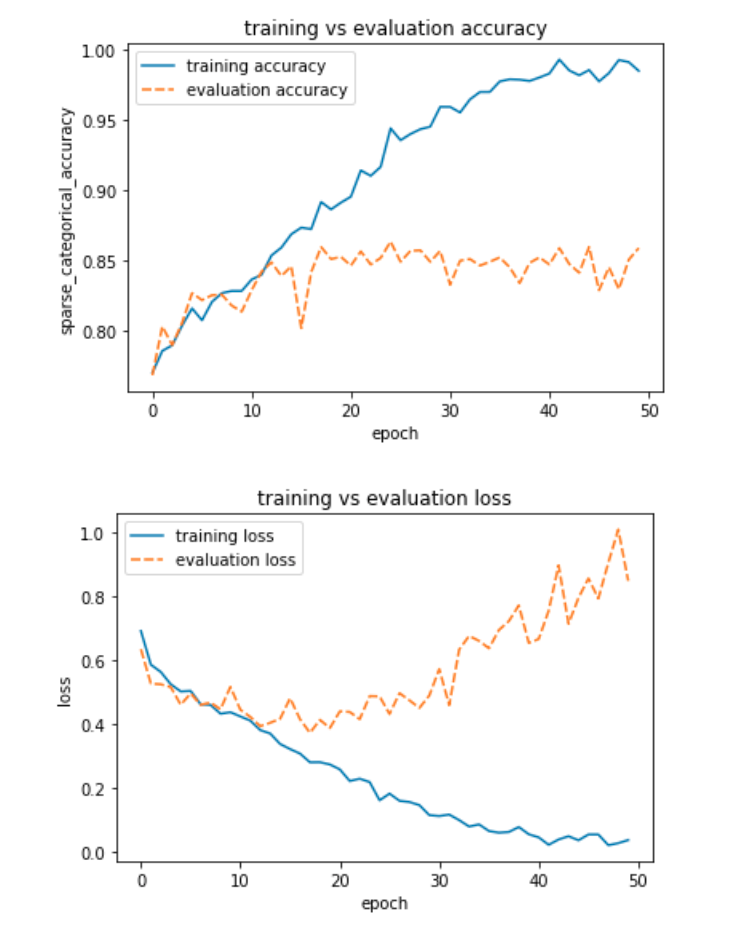
从这两个图中可以很明显地看出模型过度拟合了训练数据。不过评价准确率还是挺高的。也许阶级不平衡毕竟不是什么大问题。也许这太好了,令人难以置信。
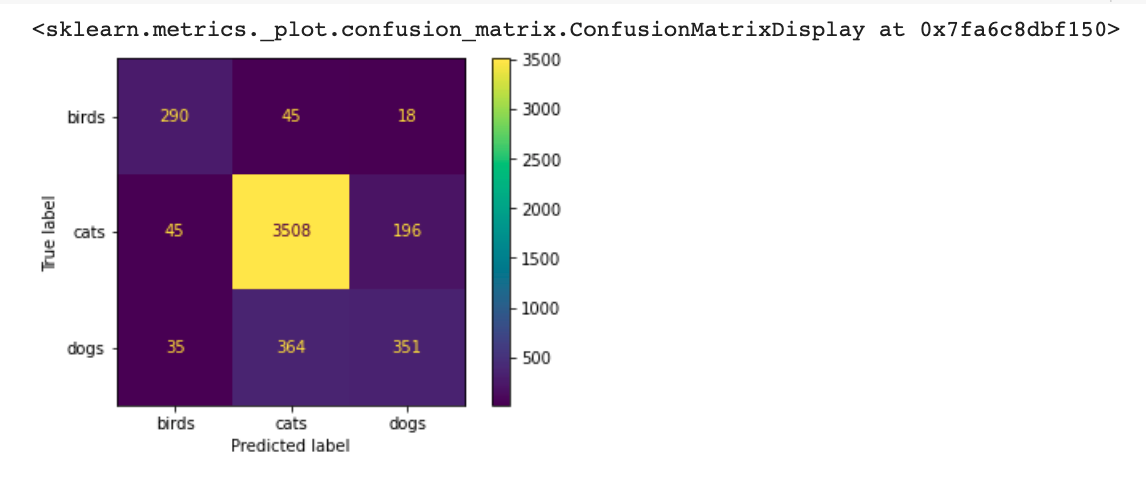
让我们更深入一点,并计算一些额外的指标来探索类不平衡是否阻碍了模型的良好运行。特别是,让我们比较一下:准确度分数、平衡准确度分数和混淆矩阵。sklearn文档中提供了有关准确性分数计算的信息。要刷新关于什么是混淆矩阵的想法,请查看维基百科。
from sklearn.metrics import confusion_matrix, ConfusionMatrixDisplay, accuracy_score, balanced_accuracy_score
# Use the validation generator without shuffle to easily compute additional metrics
val_gen_no_shuffle = test_datagen.flow_from_directory(
    '/tmp/data/imbalanced/eval',
    target_size=(150, 150),
    batch_size=32,
    class_mode='binary',
    shuffle=False)
# Get the true labels from the generator
y_true = val_gen_no_shuffle.classes

# Use the model to predict (will take a couple of minutes)
predictions_imbalanced = imbalanced_model.predict(val_gen_no_shuffle)

# Get the argmax (since softmax is being used)
y_pred_imbalanced = np.argmax(predictions_imbalanced, axis=1)

# Print accuracy score
print(f"Accuracy Score: {accuracy_score(y_true, y_pred_imbalanced)}")

# Print balanced accuracy score
print(f"Balanced Accuracy Score: {balanced_accuracy_score(y_true, y_pred_imbalanced)}")
比较accuracy和balanced accuracy指标,类别不平衡开始变得明显。现在让我们计算confusion matrix预测值。请注意,评估集中也存在类不平衡,因此混淆矩阵将显示猫的绝大多数。
imbalanced_cm = confusion_matrix(y_true, y_pred_imbalanced)
ConfusionMatrixDisplay(imbalanced_cm, display_labels=['birds', 'cats', 'dogs']).plot(values_format="d")
misclassified_birds = (imbalanced_cm[1,0] + imbalanced_cm[2,0])/np.sum(imbalanced_cm, axis=0)[0]
misclassified_cats = (imbalanced_cm[0,1] + imbalanced_cm[2,1])/np.sum(imbalanced_cm, axis=0)[1]
misclassified_dogs = (imbalanced_cm[0,2] + imbalanced_cm[1,2])/np.sum(imbalanced_cm, axis=0)[2]

print(f"Proportion of misclassified birds: {misclassified_birds*100:.2f}%")
print(f"Proportion of misclassified cats: {misclassified_cats*100:.2f}%")
print(f"Proportion of misclassified dogs: {misclassified_dogs*100:.2f}%")
类不平衡是一个真正的问题,如果不及早发现,就会给人一种错误的印象,即您的模型性能比实际情况好。出于这个原因,重要的是依靠几个指标来更好地捕捉这些类型的问题。在这种情况下,标准accuracy指标具有误导性,并提供模型表现比实际更好的错误感觉。
为了证明这一点,进一步考虑一个只预测猫的模型
# Predict cat for all images
all_cats = np.ones(y_true.shape)

# Print accuracy score
print(f"Accuracy Score: {accuracy_score(y_true, all_cats)}")

# Print balanced accuracy score
print(f"Balanced Accuracy Score: {balanced_accuracy_score(y_true, all_cats)}")
如果您只查看accuracy指标,该模型似乎运行得相当好,因为多数类与模型始终预测的相同。
有几种技术可以处理类不平衡。一个非常流行的方法是SMOTE通过创建合成数据对少数类进行过采样。但是,这些技术超出了本实验室的范围。
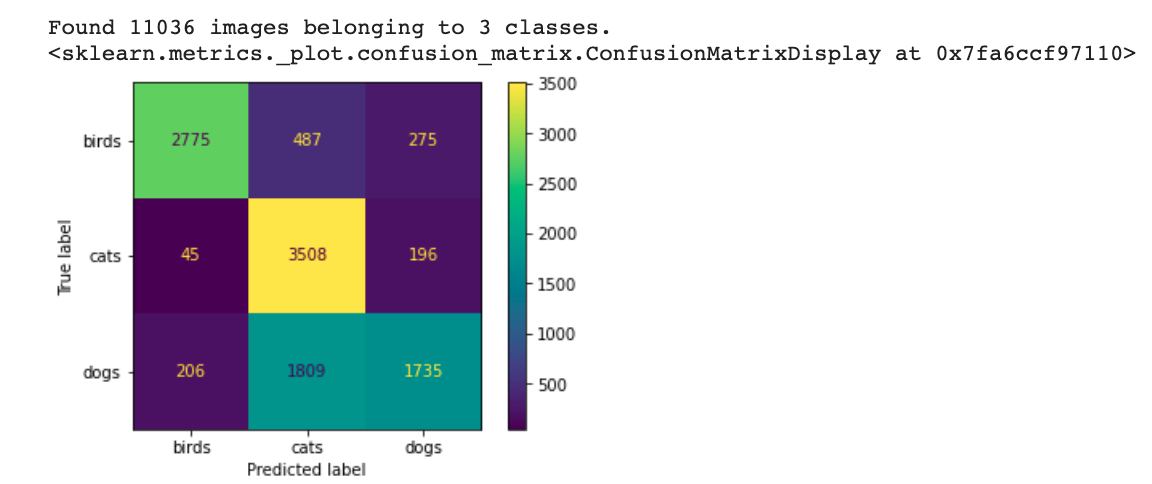
之前的指标是在训练集和评估集上的类不平衡情况下计算的。如果您想知道模型如何仅在训练集上执行类不平衡,请运行以下单元格以查看评估集中具有平衡类的混淆矩阵:
# Use the validation generator without shuffle to easily compute additional metrics
val_gen_no_shuffle = test_datagen.flow_from_directory(
    '/tmp/data/eval',
    target_size=(150, 150),
    batch_size=32,
    class_mode='binary',
    shuffle=False)

# Get the true labels from the generator
y_true = val_gen_no_shuffle.classes

# Use the model to predict (will take a couple of minutes)
predictions_imbalanced = imbalanced_model.predict(val_gen_no_shuffle)

# Get the argmax (since softmax is being used)
y_pred_imbalanced = np.argmax(predictions_imbalanced, axis=1)

# Confusion matrix
imbalanced_cm = confusion_matrix(y_true, y_pred_imbalanced)
ConfusionMatrixDisplay(imbalanced_cm, display_labels=['birds', 'cats', 'dogs']).plot(values_format="d")
5. 使用完整数据集进行训练
目前,在叙述之后,假设您的一位同事足够小心,将完整数据集的备份保存在她的云存储中。现在您可以尝试在没有班级不平衡问题的情况下进行训练,真是一种解脱!
现在您拥有完整的数据集,是时候再试一次,而不会遭受类不平衡的困扰。一般来说,收集更多数据对模型有利!
# Create a model to use with the balanced dataset
balanced_model = create_model()
# Still no data augmentation, only re-scaling
train_datagen = ImageDataGenerator(rescale=1./255)
test_datagen = ImageDataGenerator(rescale=1./255)

# Generators now point to the complete dataset
train_generator = train_datagen.flow_from_directory(
        '/tmp/data/train',
        target_size=(150, 150),
        batch_size=32,
        class_mode='binary')

validation_generator = test_datagen.flow_from_directory(
        '/tmp/data/eval',
        target_size=(150, 150),
        batch_size=32,
        class_mode='binary')
# Load pretrained model and history

balanced_history = pd.read_csv('history-balanced/history-balanced.csv')
balanced_model = tf.keras.models.load_model('model-balanced')
# Run only if you want to train the model yourself (this takes around 20 mins with GPU enabled)

# balanced_history = balanced_model.fit(
#     train_generator,
#     steps_per_epoch=100,
#     epochs=50,
#     validation_data=validation_generator,
#     validation_steps=80)
现在让我们检查一下accuracyvsbalanced accuracy比较的样子:
# Use the validation generator without shuffle to easily compute additional metrics
val_gen_no_shuffle = test_datagen.flow_from_directory(
    '/tmp/data/eval',
    target_size=(150, 150),
    batch_size=32,
    class_mode='binary',
    shuffle=False)
# Get the true labels from the generator
y_true = val_gen_no_shuffle.classes

# Use the model to predict (will take a couple of minutes)
predictions_balanced = balanced_model.predict(val_gen_no_shuffle)

# Get the argmax (since softmax is being used)
y_pred_balanced = np.argmax(predictions_balanced, axis=1)

# Print accuracy score
print(f"Accuracy Score: {accuracy_score(y_true, y_pred_balanced)}")

# Print balanced accuracy score
print(f"Balanced Accuracy Score: {balanced_accuracy_score(y_true, y_pred_balanced)}")
balanced_cm = confusion_matrix(y_true, y_pred_balanced)
ConfusionMatrixDisplay(balanced_cm, display_labels=['birds', 'cats', 'dogs']).plot(values_format="d")
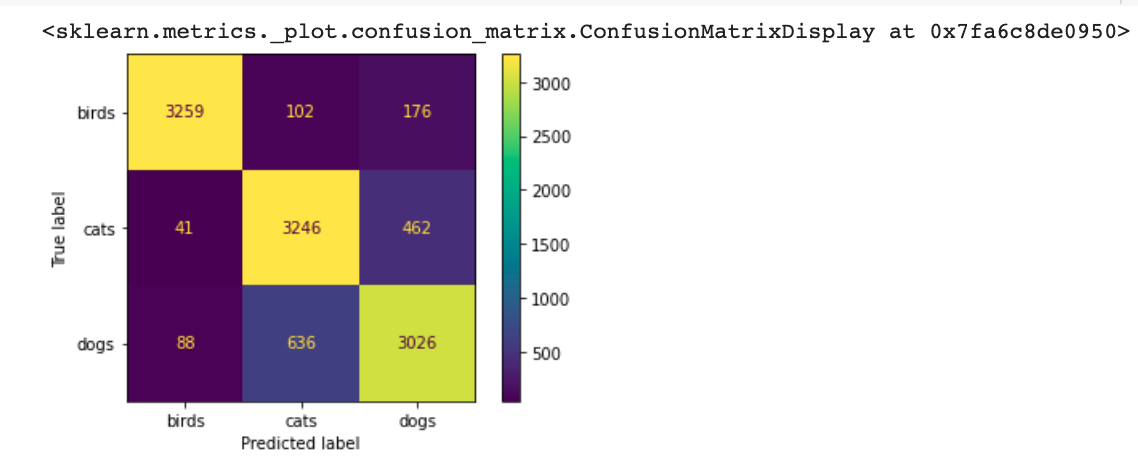
两种基于准确性的指标现在都非常相似。混淆矩阵看起来也比以前好多了。这表明通过向先前欠采样的类添加更多数据已成功缓解了类不平衡。
既然您现在可以信任该accuracy指标,让我们绘制训练历史:
plot_train_eval(balanced_history)
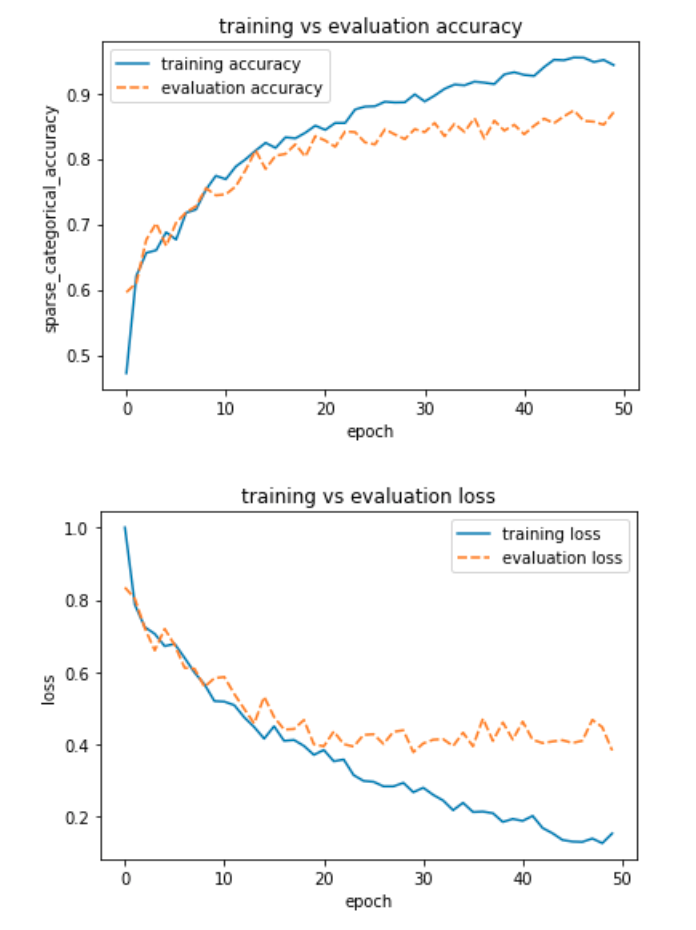
这看起来比不平衡的情况要好得多!然而,过拟合仍然存在。
你能想出解决这个问题的方法吗?如果您熟悉 CNN,您可能会想到添加dropout层。这种直觉是正确的,但目前您决定坚持使用相同的模型,只更改数据以查看是否可以通过这种方式减轻过度拟合。
另一种可能的解决方案是应用数据增强技术。您的整个团队都同意这是要走的路,所以您决定下一步尝试!
6. 数据增强训练
增强图像是一种通过应用几何变换来创建手头图像的新版本的技术。这些变换可以从:放大和缩小、旋转,甚至翻转图像。通过这样做,您将获得一个训练数据集,该数据集将模型暴露给更多种类的图像。这有助于进一步探索特征空间,从而减少过度拟合的机会。
这也是一个非常自然的想法,因为对图像进行轻微(或有时不那么轻微)的更改将产生同样有效的图像。坐在尴尬位置的猫仍然是猫,对吧?
# Create a model to use with the balanced and augmented dataset
augmented_model = create_model()
# Now applying image augmentation
train_datagen = ImageDataGenerator(
        rescale=1./255,
        rotation_range=50,
        width_shift_range=0.15,
        height_shift_range=0.15,
        shear_range=0.2,
        zoom_range=0.2,
        horizontal_flip=True)


test_datagen = ImageDataGenerator(rescale=1./255)

# Still pointing to directory with full dataset
train_generator = train_datagen.flow_from_directory(
        '/tmp/data/train',
        target_size=(150, 150),
        batch_size=32,
        class_mode='binary')

validation_generator = test_datagen.flow_from_directory(
        '/tmp/data/eval',
        target_size=(150, 150),
        batch_size=32,
        class_mode='binary')
请注意,与之前训练的唯一区别是ImageDataGenerator对象现在有一些额外的参数。如果您还没有阅读过有关此主题的更多信息,我们鼓励您在此处阅读。此外,这仅适用于训练生成器,因为该技术应仅应用于训练图像。
但是这些额外的参数到底在做什么呢?
让我们看看这些转换的实际效果。以下单元格应用并显示单个图像的不同转换:
from tensorflow.keras.preprocessing.image import img_to_array, array_to_img, load_img


# Displays transformations on random images of birds in the training partition
def display_transformations(gen):
  train_birds_dir = "/tmp/data/train/birds"
  random_index = random.randint(0, len(os.listdir(train_birds_dir)))
  sample_image = load_img(f"{os.path.join(train_birds_dir, os.listdir(train_birds_dir)[random_index])}", target_size=(150, 150))
  sample_array = img_to_array(sample_image)
  sample_array = sample_array[None, :]


  for iteration, array in zip(range(4), gen.flow(sample_array, batch_size=1)):
    array = np.squeeze(array)
    img = array_to_img(array)
    print(f"\nTransformation number: {iteration}\n")
    display(img)


# An example of an ImageDataGenerator
sample_gen = ImageDataGenerator(
        rescale=1./255,
        rotation_range=50,
        width_shift_range=0.25,
        height_shift_range=0.25,
        shear_range=0.2,
        zoom_range=0.25,
        horizontal_flip=True)

display_transformations(sample_gen)

让我们看另一个更极端的例子:
# An ImageDataGenerator with more extreme data augmentation
sample_gen = ImageDataGenerator(
        rescale=1./255,
        rotation_range=90,
        width_shift_range=0.3,
        height_shift_range=0.3,
        shear_range=0.5,
        zoom_range=0.5,
        vertical_flip=True,
        horizontal_flip=True)

display_transformations(sample_gen)

随意尝试您自己的自定义 ImageDataGenerators!结果看起来很有趣。如果您查看文档,您可能还想使用其他一些参数。
现在您知道数据增强对训练图像做了什么,让我们继续训练:
# Load pretrained model and history

augmented_history = pd.read_csv('history-augmented/history-augmented.csv')
augmented_model = tf.keras.models.load_model('model-augmented')
警告:tensorflow:SavedModel 在加载 Keras 模型时检测到 TF 2.5 之前保存。请确保您使用 model.save() 或 tf.keras.models.save_model(), NOT tf.saved_model.save() 保存模型。为了确认,在 SavedModel 目录中应该有一个名为“keras_metadata.pb”的文件。
# Run only if you want to train the model yourself (this takes around 20 mins with GPU enabled)

# augmented_history = augmented_model.fit(
#     train_generator,
#     steps_per_epoch=100,
#     epochs=80,
#     validation_data=validation_generator,
#     validation_steps=80)
由于您知道类别不平衡不再是问题,因此无需检查更深入的指标。
让我们立即绘制训练历史:
plot_train_eval(augmented_history)
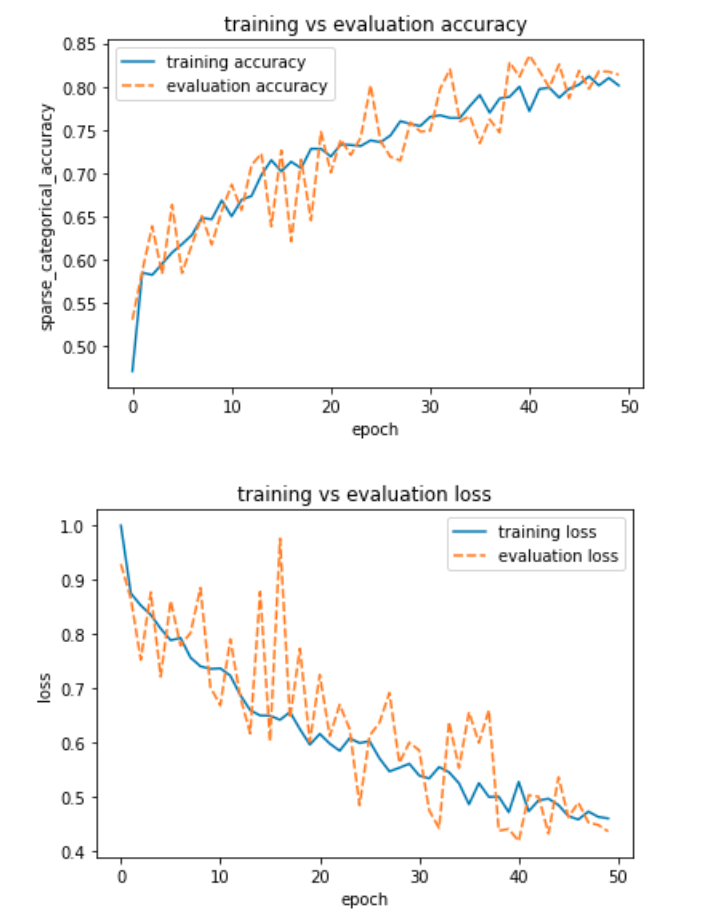
现在,评估精度更接近于训练精度。这表明模型不再过度拟合。相当了不起的发现,仅通过扩充数据集就可以实现。处理过度拟合的另一个选择是在模型中包含前面提到的 dropout 层。
另一点值得一提的是,与没有数据增强的模型相比,该模型的评估准确度略低。这样做的原因是这个模型需要更多的 epochs 来训练。要发现这个问题,请检查没有数据增强的模型,训练准确率几乎达到 100%,而增强的模型仍然可以提高。
7. 总结
恭喜您完成了这个未分级的实验!
看到数据本身是如何影响深度学习模型的,真是太神奇了。希望这个实验能帮助您更好地理解数据的重要性。
特别是,您找到了诊断类不平衡影响的方法,并查看了特定指标来发现这个问题。添加更多数据是克服类不平衡的一种简单方法。然而,这在现实生活场景中并不总是可行的。
在最后一部分中,您对训练数据集中的图像应用了多个几何变换,以生成增强版本。目标是使用数据增强来减少过度拟合。改变网络架构是减少过拟合的另一种方法。在实践中,最好同时实施这两种技术以获得更好的结果。
保持!
参考
https://colab.research.google.com/github/https-deeplearning-ai/MLEP-public/blob/main/course1/week2-ungraded-lab/C1W2_Ungraded_Lab_Birds_Cats_Dogs.ipynb#scrollTo=dOA93ENHczla