最近一直想做一个关键点检测的任务 但是由于技术差 yolov5-face一直没搞明白 无奈破罐破摔试了一下这个 居然让我跑出来了 可能因为它这个代码本身就比较简单(个人观点)好的 废话结束 现在开始
复现
源代码 源代码
环境配置
创建一个虚拟环境 python==3.6.5(3.7版本后面安装代码要求的Cython的时候有困难)
然后按照requirements.txt安装就可以了
人生经验:认真按照要求安装环境 不然真的什么奇葩bug都有 80%的bug都来自环境
数据准备
需要下载一个retinaface数据集
数据集链接:链接:https://pan.baidu.com/s/1Ygexkviq6FZY7PqESTe9nA
提取码:0909
下载好之后里面有一个文件夹 名字叫widerface 里面的内容就是我们需要用到的数据了
然后跟着代码 readme的内容 打开src/retinaface2yololandmark.py

修改路径 其中txt_path的路径就是widerface/train中的label.txt
save_path 就是你希望训练的数据应该放在哪里 可以自己定义 这个文件夹是根据你写的地址代码生成的 所以不需要事先创建文件夹
运行代码retinaface2yololandmark.py
生成的yololandmark_winder_train中训练需要的文件(文件名你也可以自己取)

每一个jpg文件后面加一个同名的txt文件就是它的标签文件
标签由15个数字组成 类别(0) 矩形框的属性数据(x,y,w,h)五个关键点的坐标(x,y)
然后打开src/create_train.py 这个代码用来生成train.txt文件

修改路径 root是之前上一阶段存放训练文件的文件夹的地址
生成的txt文件的地址 和训练文件夹放在同一个大文件夹中
运行代码 生成wider_landmark98_yolo_train.txt

至此数据准备部分就没了
测试和验证:
接下来 就是跟着readme弄就行了
验证会生成txt文件 里面是包含预测信息的txt

修改路径 就可以啦
结果长这样:

测试的话 运行demo.py 修改地址


测试 的时候代码报错说权重文件不存在
将last.pt改成final就行了 (我也不知为什么last文件不能用)

训练

在train.py的这一部分修改train_path 就可以了
终端运行语句:python train.py --net mbv3_large_75 --backbone_weights \ ./pretrained/mobilenetv3-large-0.75-9632d2a8.pth --batch-size 8
训练自己的数据
训练自己的数据 还是要修改一些地方的 因为我是训练三个关键点 所以做了一些改动 训练五个关键点的话 我觉得只需要将自己的数据弄好然后修改路径就可以了
好的 还是先处理数据
*数据处理
labelme标注
标注一个框 框住物体
create point 标注关键点

将生成的jsons文件 放在一个文件夹里面
生成retinaface的label.txt格式的文件
我自己写了一个代码 可以参考一下 (要将每个不同标签的关键点单独处理)
import os
import json

data_dir = 'D:/Desktop/label/new_jsons/'  #存放json文件的文件夹
all_json = os.listdir(data_dir)

with open("D:/Desktop/label/label.txt", "w") as f:

    for j_name in all_json:
        if j_name.split('.')[1] == 'json':
            pic_name = j_name.split('.')[0]
        else:
            pic_name = j_name.split('.')[0] + '.' + j_name.split('.')[1]
        f.write('#' + pic_name + '.jpg' + '\n')
        j = open(data_dir + j_name, encoding='utf-8')

        info = json.load(j)
        shapes_dict = info['shapes']  # 获取图像的所有的框数据
        shapes_list = []  # 图片的框集合
        label_list = []
        for shape in shapes_dict:  # 查找一张图片中的所有的框位置信息
            point_dict = {}
            shape_label = shape['label']  # 获取标签
            label_list.append(shape_label)
            shape_points = shape['points']  # 获取框的位置坐标信息
            point_dict[shape_label] = shape_points
            shapes_list.append(point_dict)

        label_list = list(set(label_list))
        for shape_dict in shapes_list:

            shape_label = shape_dict.keys()

            if str(shape_label) == str("dict_keys(['car'])"):
                shape_points = list(shape_dict.values())[0]
                x1 = shape_points[0][0]
                y1 = shape_points[0][1]
                x2 = shape_points[1][0]
                y2 = shape_points[1][1]
                w = str(round(x2 - x1, 2))
                h = str(round(y2 - y1, 2))
                x1 = str(round(x1, 2))
                y1 = str(round(y1, 2))

            if str(shape_label) == str("dict_keys(['lb'])"):
                shape_points = list(shape_dict.values())[0]
                d1x = shape_points[0][0]
                d1y = shape_points[0][1]
                d1x = str(round(d1x,2))
                d1y = str(round(d1y,2))

            if str(shape_label) == str("dict_keys(['rb'])"):
                shape_points = list(shape_dict.values())[0]
                d2x = shape_points[0][0]
                d2y = shape_points[0][1]
                d2x = str(round(d2x, 2))
                d2y = str(round(d2y, 2))

            if str(shape_label) == str("dict_keys(['lh'])"):
                shape_points = list(shape_dict.values())[0]
                d3x = shape_points[0][0]
                d3y = shape_points[0][1]
                d3x = str(round(d3x, 2))
                d3y = str(round(d3y, 2))

        # # label = x1 + ' ' + y1 + ' ' + w + ' ' + h + ' ' + d1x + ' ' + d1y + ' ' + '0.0' + ' ' + d2x + ' ' + d2y + ' ' + '0.0' + ' ' + d3x + ' ' + d3y + ' ' + '0.0' + ' ' + d4x + ' ' + d4y + ' ' + '0.0' + ' ' + d5x + ' ' + d5y + ' ' + '0.0' + ' ' + '1'
        label = x1 + ' ' + y1 + ' ' + w + ' ' + h + ' ' + d1x + ' ' + d1y + ' ' + '0.0' + ' ' + d2x + ' ' + d2y + ' ' + '0.0' + ' ' + d3x + ' ' + d3y + ' ' + '0.0' + ' ' + '1'
        #
        f.write(label + '\n')
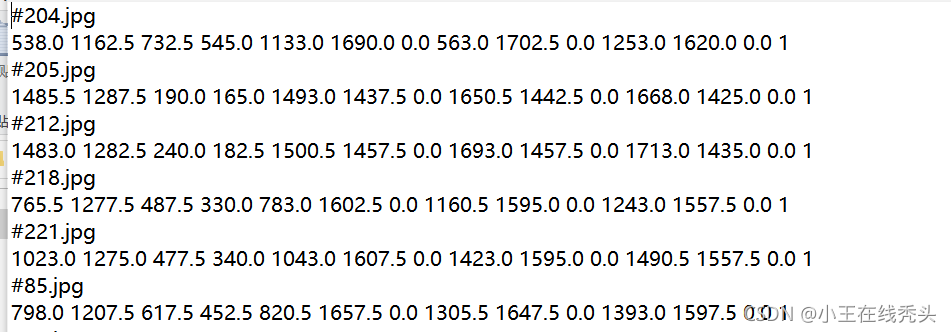
得到的结果 最后一个数字是置信度 但是我不知道怎么设置就写了1

然后一样的程序
打开src/retinaface2yololandmark.py 修改路径 运行
打开src/create_train.py 修改路径 运行
得到训练需要的文件
因为关键点的数量变了 需要修改一些内容
打开hyp.py 这个文件记录一些基础设定

修改point_num 和 flip_idx_pair的内容
最后打开train.py修改路径 运行