����Ŀ¼
�̳�
��������
��װWindows CPU�汾tensorflow
�����:
��cmd,�����������:
- pip install tensorflow
- ����python,����import tensorflow as tf
����:
2021-09-06 21:51:38.471339: W tensorflow/stream_executor/platform/default/dso_loader.cc:64] Could not load dynamic library 'cudart64_110.dll'; dlerror: cudart64_110.dll not found
2021-09-06 21:51:38.472290: I tensorflow/stream_executor/cuda/cudart_stub.cc:29] Ignore above cudart dlerror if you do not have a GPU set up on your machine.
- ����������cudart64_110.dll���� CUDART64_110.DLL
- �����ļ�dll��·��C:\Windows\System32
- ��������import tensorflow as tf������
�����:
����Could not load dynamic library ��cudart64_110.dll��; dlerror: cudart64_110.dll not found����취
�������ļ���·���б仯
ע��:
���г�����Գ��ֽ��,��ͬʱ�����:
2021-09-07 16:33:57.746978: W tensorflow/stream_executor/platform/default/dso_loader.cc:64] Could not load dynamic library 'cublas64_11.dll'; dlerror: cublas64_11.dll not found
2021-09-07 16:33:57.749512: W tensorflow/stream_executor/platform/default/dso_loader.cc:64] Could not load dynamic library 'cublasLt64_11.dll'; dlerror: cublasLt64_11.dll not found
2021-09-07 16:33:57.751775: W tensorflow/stream_executor/platform/default/dso_loader.cc:64] Could not load dynamic library 'cufft64_10.dll'; dlerror: cufft64_10.dll not found
2021-09-07 16:33:57.753878: W tensorflow/stream_executor/platform/default/dso_loader.cc:64] Could not load dynamic library 'curand64_10.dll'; dlerror: curand64_10.dll not found
2021-09-07 16:33:57.756025: W tensorflow/stream_executor/platform/default/dso_loader.cc:64] Could not load dynamic library 'cusolver64_11.dll'; dlerror: cusolver64_11.dll not found
2021-09-07 16:33:57.758276: W tensorflow/stream_executor/platform/default/dso_loader.cc:64] Could not load dynamic library 'cusparse64_11.dll'; dlerror: cusparse64_11.dll not found
2021-09-07 16:33:57.761254: W tensorflow/stream_executor/platform/default/dso_loader.cc:64] Could not load dynamic library 'cudnn64_8.dll'; dlerror: cudnn64_8.dll not found
2021-09-07 16:33:57.762224: W tensorflow/core/common_runtime/gpu/gpu_device.cc:1835] Cannot dlopen some GPU libraries. Please make sure the missing libraries mentioned above are installed properly if you would like to use GPU. Follow the guide at https://www.tensorflow.org/install/gpu for how to download and setup the required libraries for your platform.
Skipping registering GPU devices...
2021-09-07 16:33:57.763272: I tensorflow/core/platform/cpu_feature_guard.cc:142] This TensorFlow binary is optimized with oneAPI Deep Neural Network Library (oneDNN) to use the following CPU instructions in performance-critical operations:  AVX AVX2
To enable them in other operations, rebuild TensorFlow with the appropriate compiler flags.
ԭ����û��װ��GPU�汾��
CUDA
cuDNN
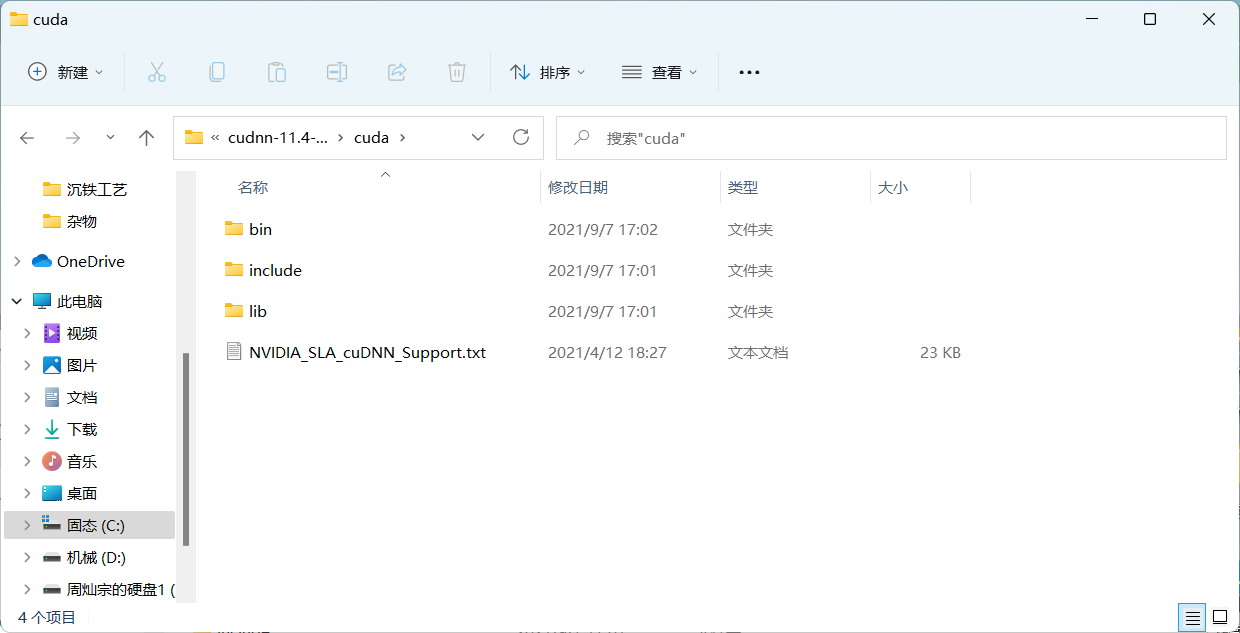
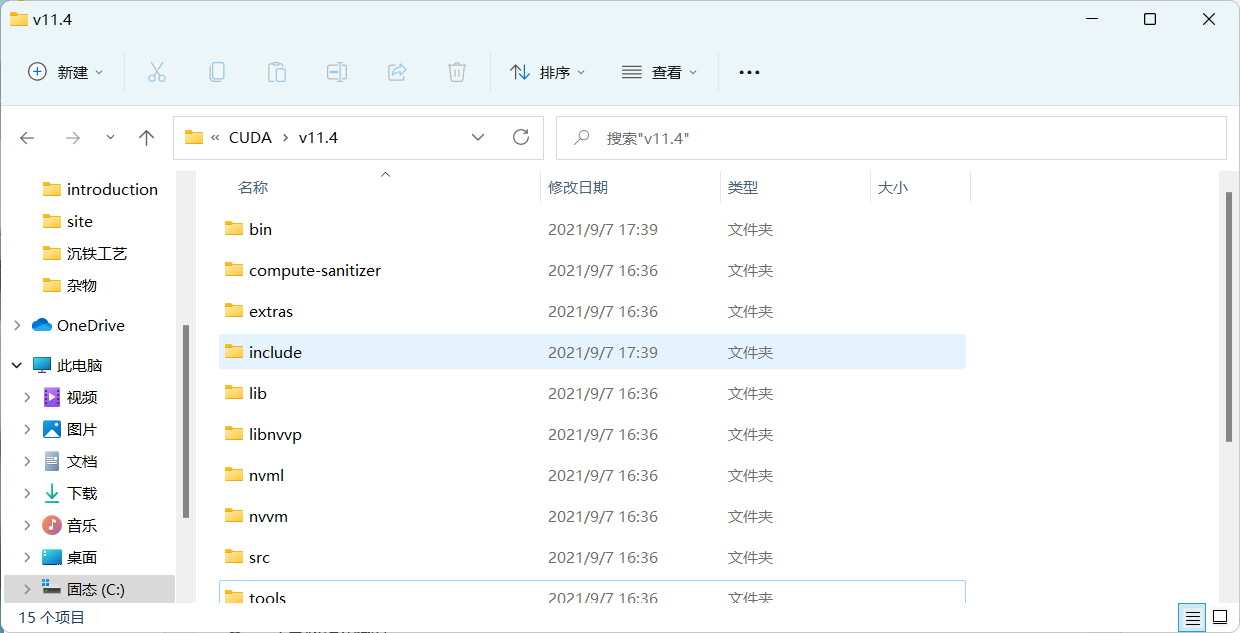
��װCUDA��cuDNN
�����:
- ��Windows�°�װTensorFlow GPU�汾�̳�(������ϸŶ)
C:\Windows\System32\cuda\bin - �ڰ�װcuDNNʱ:����dudnn֮��,����cuDNN��������ļ��е�C:\Program Files\NVIDIA GPU Computing Toolkit\CUDA\v11.4
��װWindows GPU�汾tensorflow
- pip install tensorflow-gpu
����:
ERROR: Could not install packages due to an OSError: [WinError 5] �ܾ����ʡ�: 'c:\\users\\22164\\appdata\\local\\programs\\python\\python39\\Lib\\site-packages\\tensorflow\\lite\\experimental\\microfrontend\\python\\ops\\_audio_microfrontend_op.so'
Consider using the `--user` option or check the permissions.
- pip install --user tensorflow-gpu
����;
  WARNING: The scripts estimator_ckpt_converter.exe, import_pb_to_tensorboard.exe, saved_model_cli.exe, tensorboard.exe, tf_upgrade_v2.exe, tflite_convert.exe, toco.exe and toco_from_protos.exe are installed in 'C:\Users\22164\AppData\Roaming\Python\Python39\Scripts' which is not on PATH.
  Consider adding this directory to PATH or, if you prefer to suppress this warning, use --no-warn-script-location.
��C:\Users\22164\AppData\Roaming\Python\Python39\Scripts����path��������
�鿴ʹ�õ���CPU����GPU
- ʹ�����´���:
from tensorflow.python.client import device_lib
print(device_lib.list_local_devices())
���Բ鿴���ص��豸����Щ
print(tf.config.list_physical_devices('GPU'))
print(tf.config.list_physical_devices('CPU'))
���Բ鿴���ص�CPU/GPU�豸����Щ
- ʹ�����´����������/����GPU
import os
os.environ["CUDA_VISIBLE_DEVICES"] = "-1" # ����GPU,ʹ��CPU
os.environ["CUDA_VISIBLE_DEVICES"] = "0" # ʹ��GPU:0
- ʹ�����´���:
with tf.device('/gpu:0'):
ʹ��ָ���豸���д����
���ѧϰ����
1.1 ���ѧϰ�����ѧϰ������
����ѧϰ��ʵ���˹����ܵ�һ��;��,���ѧϰ�ǻ���ѧϰ��һ���Ӽ�,Ҳ����˵���ѧϰ��ʵ�ֻ���ѧϰ��һ�ַ�����
1.1.1 ������ȡ����
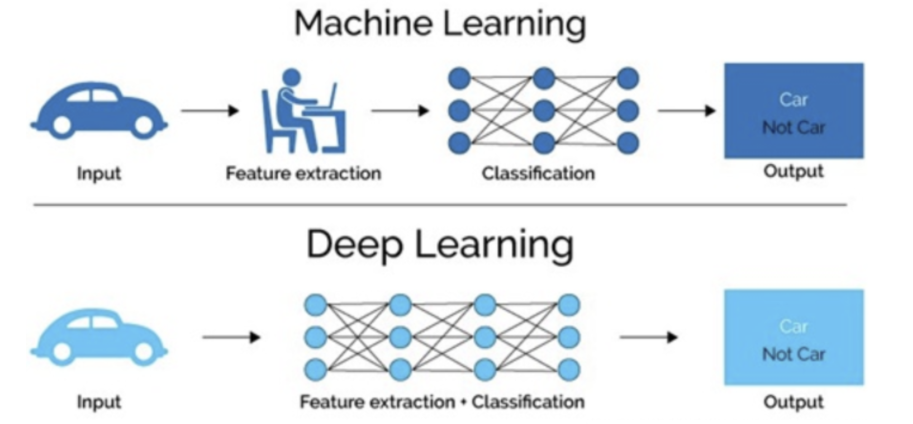
- ����ѧϰ���������̲���Ҫ�ֶ����ɵ�,������Ҫ��������רҵ֪ʶ
- ���ѧϰͨ���ɶ�������,����ͨ��������ģ�������һ��,�����ݴӲ㴫ѡ����һ�������������ӵ�ģ��,ͨ��ѵ�����������Զ��ó�ģ��,����Ҫ�˹�������ȡ���ڡ�
���ѧϰ�㷨��ͼ��������ѧϰ������,�������ѧϰ��һ���dz����صIJ��֡����,������Ϊÿ���������������ȡ���������ʺ���������ȡ������ͼ����������Ȼ���Դ�������
1.1.2 �������ͼ�������Ҫ��

��һ�����ѧϰ��Ҫ������ѵ�����ݼ�
�ڶ���ѵ�������������Ҫ����������
����Ҫ�������졢�������ܵ�ʱ��,����ʹ����������ͼ������ݼ�ѵ����һ��������硣�������ѧϰͨ��
- ��Ҫǿ���GPU�����������м���
- ȫ������ķֲ�ʽѵ����Ԥ�����`һ����ȸ� Tensorflow�ƻ���ѧϰƽ̨
1.1.3 �㷨����
- ����ѧϰ
���ر�Ҷ˹���������� - ���ѧϰ
������
1.2 ���ѧϰ��Ӧ�ó���
- ͼ��ʶ��
����ʶ��
����ʶ��
����ʶ��
����������
�����ؼ��㶨λ
����������֤ - ��Ȼ���Դ�������
��������
�ı�ʶ��
����Ի� - ��������
����ʶ��
1.3 ���ѧϰ��ܽ���
1.3.1 �������ѧϰ��ܶԱ�
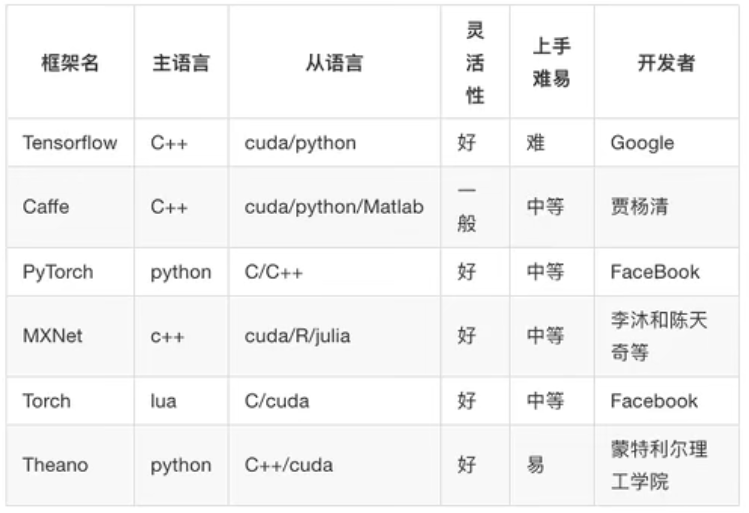
�ܽ�
- ��õĿ�ܵ� Tensorflow�� Pytorch,��Cafe��Cafe2��֮��
- Pytorch��Toch��������ѧ���о�( (research); Tensorflow,Cafe
Cafe2�������ڹ�ҵ���������������( (industrial production) - Caffe�����ڴ�����̬ͼ��( static graph); Torch�� Pytorch�������ڶ�
̬ͼ��( dynamic graph); Tensorflow����������¶���ʵ�á� - Tensorflow��Cafe2�����ƶ���ʹ�á�
1.3.2 TensorFlow���ص�
- �߶����( Deep Flexibility)
�������������������㷨�о�,Ҳ������������ͨ�Ļ���ѧϰ�㷨,
������ֻҪ�Ѽ����ʾ��������ͼ,�������� Tensorflow - ���Զ���( Language Options)
Tensorflomʹ��C+ʵ�ֵ�,Ȼ���� Python��װ���ȸ��������ͨ��SWG
������������Խӿ���֧�� Tensorflow - �豸֧��
Tensorflow���������ڸ���Ӳ����,ͬʱ���ݼ������Ҫ,�������������
����Ӧ���豸,��������ͷ��䵽GPU��,Ҳ������CPU��GPU�ϵļ���
�ֲ�,����֧��ʹ��gRPC����ˮƽ��չ - Tensorboard���ӻ�
Tensorboard�� Tensorflow��һ��WebӦ��,������� Tensorflow���й���,����ӻ� Computation Graph. Tensorboard��ǰ֧��5�ֿ��ӻ�:����scalars)��ͼƬ( Images)����Ƶ( audio)��ֱ��ͼ( histograms)�ͼ���ͼ( Computation Graph). Tensorboardp�� Events Dashboard���������ֵؼ������ʱ�Ĺؼ�ָ��,����loss��ѧϰ����( ( learning rate)������֤���ϵ�ȷ��( accuracy)
1.3.3 TensorFlow�İ�װ
-
1 CPU�汾
-
2 GPU�汾
ע:
- CPU:�����
�ۺ������Ƚ�ǿ
�����������
�������ڴ���������(sequential)���� - GPU:��Ƥ��
ר��ijһ������ܺ�
�����������
�������ڲ���(parallel)����
TensorFlow��ܵ�ʹ��
2.0 ����������
2.0�汾��tensorflow��1.8���кܶһ���ĵط���������ģ���Ҳ��������(�����)����ʹ�ü��������еİ취�����
�÷�:
ָ���м����compat.v1
����:
- 1.8�汾:tf.disable_eager_execution()
- 2.0�汾:tf.compat.v1.disable_eager_execution()
2.1 TF������ͼ
2.1.1 ����:TensorFlowʵ��һ���ӷ�����
import tensorflow as tf
a_t = tf.constant(2)
b_t = tf.constant(3)
c_t = a_t + b_t
print("tensorflow�ӷ�����Ľ��:\n", c_t)
with tf.Session() as sess
c_t_value = sess.run(c_t)
print("c_t_value:\n", c_t_value)
����:�Ҳ���Session()
ԭ��:2.0�汾��tensorflow�Ѿ�û��Session()ģ��
����:�����������
import tensorflow as tf
tf.compat.v1.disable_eager_execution()
a_t = tf.constant(2)
b_t = tf.constant(3)
c_t = a_t + b_t
print("tensorflow�ӷ�����Ľ��:\n", c_t)
sess = tf.compat.v1.Session()
c_t_value = sess.run(c_t)
sess = tf.compat.v1.Session()
TensorFlow�ṹ����
-
һ������ͼ��
����ͼ:��������(����Tensor)�Ͳ���(�ڵ�Operation) -
һ��ִ��ͼ��
���ø�����Դ,������õ����ݺͲ����������� -
ͼ�ͻỰ:
- ͼ:���� Tensorflow�������ʾΪָ��֮���������ϵ��һ�ֱ�ʾ��
- �Ự: Tensorflow��һ���������ػ�Զ���豸����������ͼ�Ļ���
-
����: Tensorflow�еĻ������ݶ���
-
�ڵ�:�ṩͼ����ִ�еIJ���
2.1.2 ������ͼ����
Tensor - ���� - ����
Flow - ����
Tensorflow��һ������������ͼ( data flow graphs),������ֵ����Ŀ�Դ��ܡ�
�ڵ�( Operation)��ͼ�б�ʾ��ѧ����,��( edges)���ʾ�ڽڵ�����ϵ�Ķ�ά��������,������( tensor)
2.2 ͼ��TensorBoard
2.2.1 ʲô��ͼ�ṹ
ͼ������һ��tf.Operation�����ļ��㵥Ԫ�����tf.Tensor�����ļ��㵥Ԫ֮�����������ݡ�
ͼ�ṹ:
����(Tensor) + ����(Operation)
2.2.2 ͼ��ز���
1 Ĭ��ͼ
ͨ�� Tensorflow��Ĭ�ϰ����Ǵ���һ��ͼ��
�鿴Ĭ��ͼ�ķ���
- 1)���÷���
��tf.get_default_graph()����,Ҫ���������ӵ�Ĭ��ͼ����,ֱ�Ӵ���OP����
2.0�汾����:tf.compat.v1.get_default_graph() - 2)�鿴����
op��sess������graph����,Ĭ�϶���һ��ͼ��
.graph
2 ����ͼ
new_g = tf.Graph()
with new_g.as_default():
�������ݺͲ���
ʾ��
ͼ����ʾ
def graph_show():
"""
ͼ����ʾ
:return:
"""
# tensorflow�ӷ�����
a_t = tf.constant(2)
b_t = tf.constant(3)
c_t = a_t + b_t
print("tensorflow�ӷ�����Ľ��:\n", c_t)
# �鿴Ĭ��ͼ
# ����1:���÷���
# default_g = tf.get_default_graph() # 2.0�汾û��get_default_graph()
default_g = tf.compat.v1.get_default_graph()
print("default_g:\n", default_g)
# ����2:�鿴����
print("a_t��ͼ����:\n", a_t.graph)
print("c_t��ͼ����:\n", c_t.graph)
# �Զ���ͼ
new_g = tf.Graph()
# ���Լ���ͼ�ж������ݺͲ���
with new_g.as_default():
a_new = tf.constant(20)
b_new = tf.constant(30)
c_new = a_new + b_new
print("c_new:\n", c_new)
# print(tf.config.list_physical_devices('GPU'))
# print(tf.config.list_physical_devices('CPU'))
# �����Ự
# with tf.Session() as sess # 2.0�汾û��Sessionģ��
# with tf.compat.v1.Session() as sess: # ʹ�����
sess = tf.compat.v1.Session() # ����ʹ�����
c_t_value = sess.run(c_t)
print("c_t_value:\n", c_t_value)
print("sess��ͼ����:\n", sess.graph)
# ���������Զ���ͼ�е����ݡ�����(�ᱨ��,��Ϊ����������Զ����ͼ��)
# c_new_value = sess.run(c_new)
# print("c_new_value:\n", c_new_value)
# ����new_g�ĻỰ
new_sess = tf.compat.v1.Session(graph=new_g)
c_new_value = new_sess.run(c_new)
print("c_new_value:\n", c_new_value)
print("new_sess��ͼ����:\n", new_sess.graph)
���:
tensorflow�ӷ�����Ľ��:
Tensor("add:0", shape=(), dtype=int32)
default_g:
<tensorflow.python.framework.ops.Graph object at 0x00000143571916A0>
a_t��ͼ����:
<tensorflow.python.framework.ops.Graph object at 0x00000143571916A0>
c_t��ͼ����:
<tensorflow.python.framework.ops.Graph object at 0x00000143571916A0>
c_new:
Tensor("add:0", shape=(), dtype=int32)
2021-09-08 10:25:14.248406: I tensorflow/core/platform/cpu_feature_guard.cc:142] This TensorFlow binary is optimized with oneAPI Deep Neural Network Library (oneDNN) to use the following CPU instructions in performance-critical operations: AVX AVX2
To enable them in other operations, rebuild TensorFlow with the appropriate compiler flags.
2021-09-08 10:25:14.896050: I tensorflow/core/common_runtime/gpu/gpu_device.cc:1510] Created device /job:localhost/replica:0/task:0/device:GPU:0 with 2778 MB memory: -> device: 0, name: NVIDIA GeForce GTX 1050 Ti, pci bus id: 0000:01:00.0, compute capability: 6.1
c_t_value:
5
sess��ͼ����:
<tensorflow.python.framework.ops.Graph object at 0x00000143571916A0>
c_new_value:
50
new_sess��ͼ����:
<tensorflow.python.framework.ops.Graph object at 0x000001436BE9BC40>
2021-09-08 10:25:14.944687: I tensorflow/core/common_runtime/gpu/gpu_device.cc:1510] Created device /job:localhost/replica:0/task:0/device:GPU:0 with 2778 MB memory: -> device: 0, name: NVIDIA GeForce GTX 1050 Ti, pci bus id: 0000:01:00.0, compute capability: 6.1
2.2.3 TensorBoard:���ӻ�ѧϰ
- 1 �������л�-events�ļ�
tf.summary.FileWriter(path, graph=sess.graph)
2.0�汾����:tf.compat.v1.summary.FileWriter("��/events", graph=sess.graph) - 2 ����tensorboard
tensorboard --logdir="./events"
ע��: - �������·����events�ļ����ڵ��ļ���
- =ǰ��Ҫ�пո�
ʾ��
(��ǰ�����)
��ͼд�뱾������events�ļ�
# �����Ự
# with tf.Session() as sess # 2.0�汾û��Sessionģ��
# with tf.compat.v1.Session() as sess: # ʹ�����
sess = tf.compat.v1.Session() # ����ʹ�����
c_t_value = sess.run(c_t)
print("c_t_value:\n", c_t_value)
print("sess��ͼ����:\n", sess.graph)
# ���������Զ���ͼ�е����ݡ�����(�ᱨ��,��Ϊ����������Զ����ͼ��)
# c_new_value = sess.run(c_new)
# print("c_new_value:\n", c_new_value)
# 1)��ͼд�뱾������events�ļ�
# tf.summary.FileWriter("../events", graph=sess.graph) # 2.0û��
tf.compat.v1.summary.FileWriter("../events", graph=sess.graph)
���:
������һ���ļ�:events.out.tfevents.{timestamp} . {hostname}
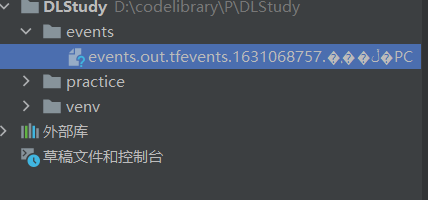
���ն���������:tensorboard --logdir="./events"
D:\codelibrary\P\DLStudy> tensorboard --logdir="./events"
���:
����һ����ҳ,Ctrl+������������Է���

������ҳ����Կ���

ע��:
- ��֪���Dz��ǰ汾������,һ��ʼ��ʾ��ͼ��ͷ�ܴ�,��Ҫ���add,���add to main graph������ʾ������
- �������ʱ����������,����:a_t = tf.constant(2, name=��a_t��)�����㿴����ͼ��
2.2.4 OP
����:Tensor����
����:Operation���� - Op
1 ����OP
| ���� | ʵ�� |
|---|---|
| �������� | add,sub, mul, div, exp, log, greater, less, equal |
| �������� | concat, slice, splot, constant, rank, shape, shuffle |
| �������� | matmul,matrixinverse, matrixdateminant |
| ��״̬������ | Variable, assgin, assginadd |
| ��������� | softmax,sigmoid, relu,convolution,max_pool |
| �洢,�ָ� | Save, Restroe |
| ���м�ͬ������ | Enqueue, Dequeue,MutexAcquire,MutexRelease |
| ������ | Merge,Switch, Enter,Leave,Nextlteration |
tf.constant()����һ����������,������������Ժ�����һ������Const,��������������
| �������� | �������� |
|---|---|
| tf.constant(Tensor����) | ����Tensor���� - Const-��� Tensor���� |
| tf.add(Tensor����1, Tensor����2) | ����Tensor����1, Tensor����2 - Add���� - ��� Tensor����3 |
һ����������(Operation)�� Tensorflowͼ�е�һ���ڵ�,���Խ���0�����߶������Tensor,���ҿ������0�����߶��Tensor, Operation������ͨ��op���캯��(��tf.matui())�����ġ�
����:c= tf.matmul(a,b)�����˩`�� Operation����,����ΪMatmul����,��������a,b��Ϊ����,c��Ϊ���,�����������,��ӡ��ʱ��Ҳ�Ǵ�ӡ����
�ݡ����м�tf.matmul()�Ǻ���,��ִ��matmul�����Ĺ����л�ͨ��Matmul�ഴ��һ����֮��Ӧ�Ķ���
��ӡcon_a
Tensor("Const: 0", shape=(), dtype=float32)
��ӡcon_b:
Tensor("Const_1: 0, shape=(), dtype=f Loat32
��ӡsum_C:
Tensor("Add: 0, shape=(), dtype=float32)
ע��:
- ��ӡ������������ֵ,���������OP���а��������ֵ������ÿһ��OPָ���Ӧһ��Ψһ������,������� Const:0,����� Tensor Board����Ҳ������ʾ
- tf Tensor�����������������tf.Operation��ȷ�������������Ƶ���ʽΪ
��< OP NAME >:< i >��, ����:- "< OP NAME>"�����ɸ�������ָ�������
- "< i >"��һ����������ʾ��������ָ�������е�����
2 ָ������
һ��ͼһ�������ռ�
tf.Graph����Ϊ������� tf.Operation�������һ�������ռ䡣TensorFlow ���Զ�Ϊͼ�е�ÿ��ָ��ѡ��һ��Ψһ����,�û�Ҳ����ָ������������,ʹ�����Ķ����������ɡ����ǿ��������·�ʽ��дָ������:
- ÿ�������µ�tf.Operation���µ�tf.Tensor�� API�������Խ��ܿ�ѡ��name ������
����,tf.constant(42.0, name=��answer��)������һ����Ϊ����answer������tf.Operation������һ����Ϊ��answer:O����tf.Tensor�����Ĭ��ͼ�Ѱ�����Ϊ"answer����ָ��,��TensorFlow ���������ϸ��ӡ�1����""2�����ַ�,�Ա������ƾ���Ψһ�ԡ�
- ���ĺ�֮��,������Tensorboard��ʾ������Ҳ�ᱻ�ġ�
2.3 �Ự
2.3.1 �����Ự
һ������TensorFlow operation���ࡣ�Ự�����������ֿ�����ʽ
- tf.Session:���������ij�����
- tf.InteractiveSession:���ڽ���ʽ�������е�TensorFlow ,����shell
- TensorFlowʹ��tf.Session������ʾ�ͻ��˳���(ͨ��ΪPython����,��Ҳ�ṩ��ʹ���������Ե����ƽӿ�)��C++����ʱ֮�������
- tf.Session����ʹ�÷ֲ�ʽTensorFlow����ʱ�ṩ�Ա��ؼ�����е��豸��Զ���豸�ķ���Ȩ��
ʾ��
tf.InteractiveSession��ʹ��
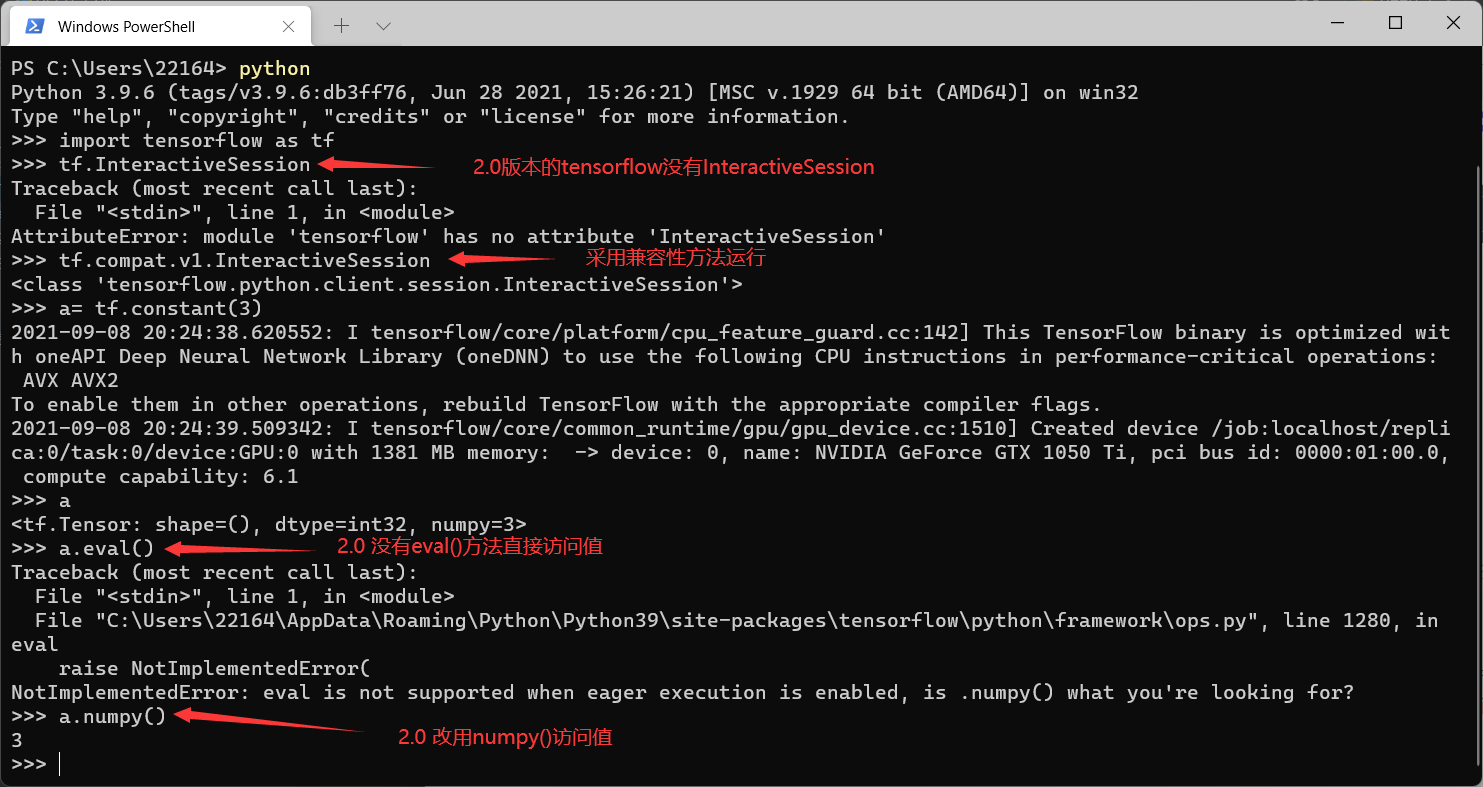
ע��: 2.0�汾��InteractiveSession���eval()����numpy()
2.3.1.1 �Ự������Դ,����Ҫ���� - �����Ĺ�����
init(target=", graph=None, config=None)
�Ự����ӵ�е���Դ,��tf.Variable,tf.QueueBase��tf.ReaderBase������Щ��Դ������Ҫʱ,�ͷ���Щ��Դ�dz���Ҫ�����,��Ҫ��tf.Sessioh.close�Ự�еķ���,�����Ự���������Ĺ�������������������������һ����(ֱ��һ����ǴỰ�������Ҫ�ر�,�����ļ���д����):
def session_demo():
"""
�Ự��ʾ
:return:
"""
a_t = tf.constant(10)
b_t = tf.constant(20)
# ���ᳫֱ����+ - ����ֱ������
# �Ƽ���tensorflow �ṩ�ĺ�����������
# c_t = a_t + b_t
c_t = tf.add(a_t, b_t)
print("tensorflowʵ�ּӷ�����:\n", c_t)
# �����Ự
# ��ͳ�Ķ���Ự
sess = tf.Session()
sum_t = sess.run(c_t)
print("sum_t:\n", sum_t)
sess.close()
# �������Ĺ��������Ự
with tf.Session() as sess:
# ͬʱִ�ж��tensor
print(sess.run([a_t, b_t, c_t]))
# Ҳ������eval �鿴ֵ
print('��eval�鿴�����ֵ', a_t.eval())
print('�Ự������:\n', sess.graph)
2.3.1.2 ��ʼ���Ự����ʱ�IJ���
- target:������˲�������(Ĭ������),�Ự����ʹ�ñ��ؼ�����е��豸������ָ��grpc:/l��ַ,�Ա�ָ��TensorFlow�������ĵ�ַ,��ʹ�ûỰ���Է��ʸ÷��������Ƶļ�����ϵ������豸��
- graph:Ĭ�������,�µ�tf.Session������ǰ��Ĭ��ͼ��
- config:�˲���������ָ��һ��tf.ConfigProto �Ա���ƻỰ����Ϊ������,ConfigProtoЭ�����ڴ�ӡ�豸ʹ����Ϣ
ʾ��
�����Ựʱʹ��config����,��ConfigProtoЭ�����ڴ�ӡ�豸ʹ����Ϣ
def tensorflow_test():
"""
Tensorflow�Ļ����ṹ
:return:
"""
# tensorflow�ӷ�����
a_t = tf.constant(2)
b_t = tf.constant(3)
c_t = a_t + b_t
print("a_t:\n", a_t)
print("tensorflow�ӷ�����Ľ��:\n", c_t)
# �����Ự
# with tf.Session() as sess # 2.0�汾û��Sessionģ��
# with tf.compat.v1.Session() as sess: # ʹ�����
# sess = tf.compat.v1.Session() # ����ʹ�����
# ʹ��config����,ConfigProtoЭ�����ڴ�ӡ�豸ʹ����Ϣ
with tf.compat.v1.Session(config=tf.compat.v1.ConfigProto(allow_soft_placement=True,
log_device_placement=True)) as sess:
c_t_value = sess.run(c_t)
print("c_t_value:\n", c_t_value)
a_t:
Tensor("Const:0", shape=(), dtype=int32)
tensorflow�ӷ�����Ľ��:
Tensor("add:0", shape=(), dtype=int32)
2021-09-08 20:58:45.944506: I tensorflow/core/platform/cpu_feature_guard.cc:142] This TensorFlow binary is optimized with oneAPI Deep Neural Network Library (oneDNN) to use the following CPU instructions in performance-critical operations: AVX AVX2
To enable them in other operations, rebuild TensorFlow with the appropriate compiler flags.
2021-09-08 20:58:46.743283: I tensorflow/core/common_runtime/gpu/gpu_device.cc:1510] Created device /job:localhost/replica:0/task:0/device:GPU:0 with 2778 MB memory: -> device: 0, name: NVIDIA GeForce GTX 1050 Ti, pci bus id: 0000:01:00.0, compute capability: 6.1
2021-09-08 20:58:46.745709: I tensorflow/core/common_runtime/direct_session.cc:361] Device mapping:
/job:localhost/replica:0/task:0/device:GPU:0 -> device: 0, name: NVIDIA GeForce GTX 1050 Ti, pci bus id: 0000:01:00.0, compute capability: 6.1
2021-09-08 20:58:46.748970: I tensorflow/core/common_runtime/placer.cc:114] add: (AddV2): /job:localhost/replica:0/task:0/device:GPU:0
2021-09-08 20:58:46.749642: I tensorflow/core/common_runtime/placer.cc:114] Const: (Const): /job:localhost/replica:0/task:0/device:GPU:0
2021-09-08 20:58:46.750346: I tensorflow/core/common_runtime/placer.cc:114] Const_1: (Const): /job:localhost/replica:0/task:0/device:GPU:0
add: (AddV2): /job:localhost/replica:0/task:0/device:GPU:0
Const: (Const): /job:localhost/replica:0/task:0/device:GPU:0
Const_1: (Const): /job:localhost/replica:0/task:0/device:GPU:0
c_t_value:
5
2.3.2 �Ự��run()
run(fetches, feed_dict=None, options=None, run_metadata=None)
- ͨ��ʹ�� sess. run()������ operation
- fetches:��һ�� operation,�����б���Ԫ��(����������tensorflow�����Ͳ���)
- feed_dict:�������������߸���ͼ��������ֵ,����ʱ��ֵ
- �� tf.placeholder����ʹ��,�����ֵ����״�Ƿ���ռλ�����ݡ�
ʹ��tf.operation.eval()Ҳ������operation,��Ҫ�ڻỰ������
ʾ��
ͬʱ��ӡa_t,b_t,c_t
def tensorflow_test():
"""
Tensorflow�Ļ����ṹ
:return:
"""
# tensorflow�ӷ�����
a_t = tf.constant(2)
b_t = tf.constant(3)
c_t = a_t + b_t
print("a_t:\n", a_t)
print("tensorflow�ӷ�����Ľ��:\n", c_t)
# �����Ự
# with tf.Session() as sess # 2.0�汾û��Sessionģ��
# with tf.compat.v1.Session() as sess: # ʹ�����
# sess = tf.compat.v1.Session() # ����ʹ�����
# ʹ��config����,ConfigProtoЭ�����ڴ�ӡ�豸ʹ����Ϣ
with tf.compat.v1.Session(config=tf.compat.v1.ConfigProto(allow_soft_placement=True,
log_device_placement=True)) as sess:
# c_t_value = sess.run(c_t)
# print("c_t_value:\n", c_t_value)
# ͬʱ�鿴a_t,b_t,c_t
abc = sess.run([a_t, b_t, c_t])
print("abc:\n", abc)
���:
a_t:
Tensor("Const:0", shape=(), dtype=int32)
tensorflow�ӷ�����Ľ��:
Tensor("add:0", shape=(), dtype=int32)
2021-09-08 21:09:55.825888: I tensorflow/core/platform/cpu_feature_guard.cc:142] This TensorFlow binary is optimized with oneAPI Deep Neural Network Library (oneDNN) to use the following CPU instructions in performance-critical operations: AVX AVX2
To enable them in other operations, rebuild TensorFlow with the appropriate compiler flags.
2021-09-08 21:09:56.792615: I tensorflow/core/common_runtime/gpu/gpu_device.cc:1510] Created device /job:localhost/replica:0/task:0/device:GPU:0 with 1467 MB memory: -> device: 0, name: NVIDIA GeForce GTX 1050 Ti, pci bus id: 0000:01:00.0, compute capability: 6.1
2021-09-08 21:09:56.795448: I tensorflow/core/common_runtime/direct_session.cc:361] Device mapping:
/job:localhost/replica:0/task:0/device:GPU:0 -> device: 0, name: NVIDIA GeForce GTX 1050 Ti, pci bus id: 0000:01:00.0, compute capability: 6.1
2021-09-08 21:09:56.798106: I tensorflow/core/common_runtime/placer.cc:114] add: (AddV2): /job:localhost/replica:0/task:0/device:GPU:0
2021-09-08 21:09:56.798696: I tensorflow/core/common_runtime/placer.cc:114] Const: (Const): /job:localhost/replica:0/task:0/device:GPU:0
2021-09-08 21:09:56.799291: I tensorflow/core/common_runtime/placer.cc:114] Const_1: (Const): /job:localhost/replica:0/task:0/device:GPU:0
add: (AddV2): /job:localhost/replica:0/task:0/device:GPU:0
Const: (Const): /job:localhost/replica:0/task:0/device:GPU:0
Const_1: (Const): /job:localhost/replica:0/task:0/device:GPU:0
abc:
[2, 3, 5]
2.3.3 feed����
placeholder�ṩռλ��,runʱ��ͨ��feed_dictָ������
��������Ϊ������һ������,Ȼ������ٸ�ֵ
placeholder�ṩռλ��,runʱ��ͨ��feed_dictָ������
ʾ��
feed����
def session_run_demo():
a = tf.placeholder(tf.float32)
b = tf.placeholder(tf.float32)
sum_ab = tf.add(a, b)
print("sum_ab:", sum_ab)
# �����Ự
with tf.Session() as sess:
print('ռλ�����:', sess.run(sum_ab, feed_dict={a: 3.0, b: 4.0}))
ע��: ��ע������ʱ�Ĵ���eror
- Runtimeerror:����� Session����Ч״̬(�����ѹر�)
- Typeerror:��� fetches����feed_d1ct�������Ͳ�����
- Valueerror:��� fetches��feed_dict����Ч������ Tensor�����ڵļ�
2.4 ����Tensor
print()
ndarray
2.4.1 ����(Tensor)
����:һ������ 0������
����:һά���� [2, 3, 4] 1������
����:������ [[2, 3, 4], [2, 3, 4]] 2������
����
����:n���� n������
2.4.1.1 ����������
| �������� | Python ���� | ���� |
|---|---|---|
| DT_FLOAT | tf.float32 | 32 �����. |
| DT_DOUBLE | tf.float64 | 64 �����. |
| DT_INT64 | tf.int64 | 64 λ�з�������. |
| DT_INT32 | tf.int32 | 32 λ�з�������. |
| DT_INT16 | tf.int16 | 16 λ�з�������. |
| DT_INT8 | tf.int8 | 8 λ�з�������. |
| DT_UINT8 | tf.uint8 | 8 �������. |
| DT_STRING | tf.string | �ɱ䳤�ȵ��ֽ�����.ÿһ������Ԫ�ض���һ���ֽ�����. |
| DT_BOOL | tf.bool | ������. |
| DT_COMPLEX64 | tf.complex64 | ������32λ��������ɵĸ���:ʵ��������. |
| DT_QINT32 | tf.qint32 | ��������Ops��32λ�з�������. |
| DT_QINT8 | tf.qint8 | ��������Ops��8λ�з�������. |
| DT_QUINT8 | tf.quint8 | ��������Ops��8�������. |
2.4.1.2 �����Ľ�
| �� | ��ѧʵ�� | python | ���� |
|---|---|---|---|
| 0 | ���� | ֻ�д�С | s=123 |
| 1 | ���� | ��С�ͷ��� | v = [1,2] |
| 2 | ���� | ���ݱ� | m= [[1,2],[3,4],[5,6]] |
| 3 | 3������ | �������� | �� |
| n | n�� |
ʾ��
def tensor_demo():
"""
��������ʾ
:return:
"""
tensor1 = tf.compat.v1.constant(4.0)
tensor2 = tf.compat.v1.constant([1, 2, 3, 4])
linear_squares = tf.constant([[4], [9], [16], [25]], dtype=tf.int32)
print("tensor1:\n", tensor1)
print("tensor2:\n", tensor2)
print("linear_squares_before:\n", linear_squares)
���;
tensor1:
 Tensor("Const:0", shape=(), dtype=float32)
tensor2:
 Tensor("Const_1:0", shape=(4,), dtype=int32)
linear_squares_before:
 Tensor("Const_2:0", shape=(4, 1), dtype=int32)
����������ʱ��
- �����ָ������,Ĭ�� tf.float32
- ���� tf.int32
- ������ tf.float32
2.4.2 ����������ָ��
2.4.2.1. �̶�ֵ����
tf.zeros(shape, dtype=tf.float32, name=None)
��������Ԫ������Ϊ����������˲�������һ��dtype������״shape������Ԫ������Ϊ������͵�������
tf.zeros_like(tensor, dtype=None, name=None)
��tensor��������(),�˲�������tensor������Ԫ������Ϊ����ͬ�����ͺ���״��������
tf.ones(shape, dtype=tf.float32, name=None)
����һ������Ԫ������Ϊ1���������˲�������һ�����͵�����,dtype��״shape������Ԫ������Ϊ1��
tf.ones_like(tensor, dtype=None, name=None)
��tensor��������(),�˲�������tensor������Ԫ������Ϊ1��ͬ�����ͺ���״��������
tf.fill(dims, value, name=None)
����һ������˱���ֵ���������˲�������һ����������״dims�������value��
tf.constant(value, dtype=None, shape=None, name=��Const��)
����һ������������
2.4.2.2. ���ֵ����
һ�����Ǿ���ʹ�õ����������Math.random() �������Ƿ��Ӿ��ȷֲ��������,�ܹ�ģ��ȸ��ʳ��ֵĿ�,������һ������,1��6��ĸ���Ӧ�����,����ʵ�����и������������Ƿ�����̬�ֲ���,����20������˵����طֲ��ȡ�
��������������һ����Ϸ,Ҫ����趨�������NPC������,�������Math.random(),���ɴ�140��22֮�������,�ͻᷢ��ÿ�����߶ε�������һ�����,���DZȽ���Ȥ��,����������Ҳ������ϰ�߲�ͬ,��ʵӦ�����ر�ߺ��ر𰫵Ķ�����,�����м���������,���Ҫ���������������̬�ֲ���
tf.truncated_normal[shape, mean=0.0, stddev=1.0, ctype=tf.float32, seed=None, name=None)
�ӽضϵ���̬�ֲ���������ֵ,�� tf.random_normal)һ��,�����������ֶ���������������
tf.random_normal(shape, mean=0.0, stddev=1.0, dtype=tf.float32,seed=None, name=None)
����̬�ֲ���������ֵ,�������̬�ֲ���������ɵľ���
��������Ĵ���������op
- tf.Variable
- tf.placeholder
2.4.3 �����ı任
- ndarray���Ե���
���͵���- 1)ndarray.astype(type)
tf.cast(tensor, dtype)
����ı�ԭʼ��tensor
�����µĸı����ͺ��tensor - 2)ndarray.tostring()
- 1)ndarray.astype(type)
- ��״����
- 1)ndarray.reshape(shape)
- -1 �Զ�������״
- 2)ndarray.resize(shape)
- 1)ndarray.reshape(shape)
2.4.3.1 ���ı�
�ı���������ֵ���͵ĺ���:
- tf.string_to_number(string_tensor, out_type=None, name=None)
- tf.to_double(x, name=��ToDouble��)
- tf.to_float(x, name=��ToFloat��)
- tf.to_bfloat16(x, name=��ToBFloat16��)
- tf.to_int32(x, name=��Tolnt32��)
- tf.to_int64(x, name=��Tolnt64��)
- tf.cast(x, dtype, name=None)
2.4.3.2 ��״�ı�
TensorFlow����������������״�任,��̬��״�;�̬��״
- tf.reshape
- tf.set_shape
��̬��״������ʼ��������ʱ����״
���ڶ�̬��״�;�̬��״����������¹���
-
��̬��״
ת����̬��״��ʱ��,1-D��1-D,2-D��2-D,���ܿ�����ı���״(����ԭ����״��[None,None],���Ըij�[3,4],���ܸij�[2,2,2])
�����Ѿ��̶��������ľ�̬��״������,�����ٴ����þ�̬��״ -
��̬��״
tf.reshape()��̬����������ʱ,������Ԫ�ظ�������ƥ�� -
1)��θı侲̬��״
tensor.set_shape(shape)
ֻ������״û����ȫ�̶�����������²ſ��Ըı�/���¾�̬��״ -
2)��θı䶯̬��״
tf.reshape(tensor, shape)
����ı�ԭʼ��tensor
�����µĸı���״���tensor
��̬����������ʱ,������Ԫ�ظ�������ƥ��
ʾ��
- ��������̬��״
def tensor_demo():
"""
��������ʾ
:return:
"""
tensor1 = tf.compat.v1.constant(4.0)
tensor2 = tf.compat.v1.constant([1, 2, 3, 4])
linear_squares = tf.constant([[4], [9], [16], [25]], dtype=tf.int32)
# print("tensor1:\n", tensor1)
# print("tensor2:\n", tensor2)
# print("linear_squares_before:\n", linear_squares)
# �������͵���
l_cast = tf.cast(linear_squares, dtype=tf.float32)
print("linear_squares:\n", linear_squares)
print("l_cast:\n", l_cast)
# ����/�ı侲̬��״
# ����ռλ��
# û����ȫ�̶������ľ�̬��״
a_p = tf.compat.v1.placeholder(dtype=tf.float32, shape=[None, None])
b_p = tf.compat.v1.placeholder(dtype=tf.float32, shape=[None, 10])
# ���Ѿ��̶��ľ�̬��״
c_p = tf.compat.v1.placeholder(dtype=tf.float32, shape=[3, 2])
print('a_p��̬��״:', a_p.get_shape())
print('b_p��̬��״:', b_p.get_shape())
print('c_p��̬��״:', c_p.get_shape())
# ��״����
a_p.set_shape([2, 3])
# ��̬��״�Ѿ��̶����־Ͳ�������
b_p.set_shape([3, 10])
print('a_p�ĺ�ľ�̬��״:', a_p.get_shape())
print('b_p�ĺ�ľ�̬��״:', b_p.get_shape())
# �Ѿ��̶����־Ͳ�����
# c_p.set_shape([2, 3]) # �ᱨ��
# print('c_p�ĺ�ľ�̬��״:', c_p.get_shape()) # �ᱨ��
- ��������̬��״
c_p = tf.compat.v1.placeholder(dtype=tf.float32, shape=[3, 2, 3])
print('c_p��̬��״:', c_p.get_shape())
# ��״����
new_c_p = tf.reshape(c_p, shape=[3, 3, 2])
print('c_p���º�ľ�̬��״:', c_p.get_shape())
print('new_c_p�ľ�̬��״:', new_c_p.get_shape())
2.4.4 ��������ѧ����
- ���������
- ������ѧ����
- ��������
- reduce����
- ������������
��ϸ��ο�: TensorFlow Core v2.6.0
��ЩAPIʹ��,������ʹ�õ�ʱ�����,����ο��ĵ�
2.5 ����OP
TensorFlow�����DZ�ʾ�������Ĺ����־�״̬����ѷ���������ͨ��tf.VariableOP����в������������ص��
- �洢�־û�
- ����ֵ
- ��ָ����ѵ��
���������������ѧϰ��ģ�Ͳ���
2.5.1 ��������
tf.Variable(initial_value=None,trainable=True,collections=None,name=None)
- initial_value:��ʼ����ֵ
- trainable:�Ƿ�ѵ��
- collections:�±��������ӵ��г���ͼ�ļ�����collections,Ĭ��Ϊ[GraphKeys.GLOBAL_VARIABLES],���trainable��True����Ҳ�����ӵ�ͼ�μ���GraphKeys.TRA INABLE_VARIABLES
- ������Ҫ��ʽ��ʼ��,��������ֵ
ʾ��
def varibal_demo():
"""
��������ʾ
:return:
"""
# ��������
a = tf.Variable(initial_value=50)
b = tf.Variable(initial_value=40)
c = tf.add(a, b)
print("a:\n", a)
print("b:\n", b)
print("c:\n", c)
# ��ʼ������
init = tf.compat.v1.global_variables_initializer() # ������Ҫ��ʽ��ʼ��,��������ֵ
with tf.compat.v1.Session() as sess:
# ���г�ʼ��
sess.run(init)
a_value, b_value, c_value = sess.run([a, b, c])
print("a_value:\n", a_value)
print("b_value:\n", b_value)
print("c_value:\n", c_value)
2.5.2 ʹ��tf.variable_scope()�ı����������ռ�
����OP������ǰ�����������ռ��ָ������,ʹ�ýṹ��������
ʾ��
����һ�������ռ�
# ��������
with tf.compat.v1.variable_scope("my_scope"): # ����һ�������ռ�
a = tf.Variable(initial_value=50)
b = tf.Variable(initial_value=40)
c = tf.add(a, b)
print("a:\n", a)
print("b:\n", b)
print("c:\n", c)
���:
ԭ��

����

2.6 API
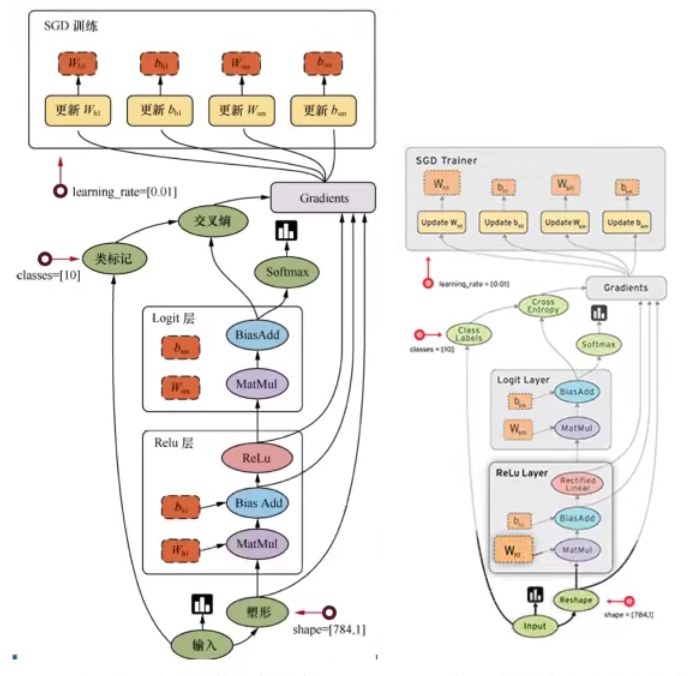
���� Tensorflow��APIͼʾ
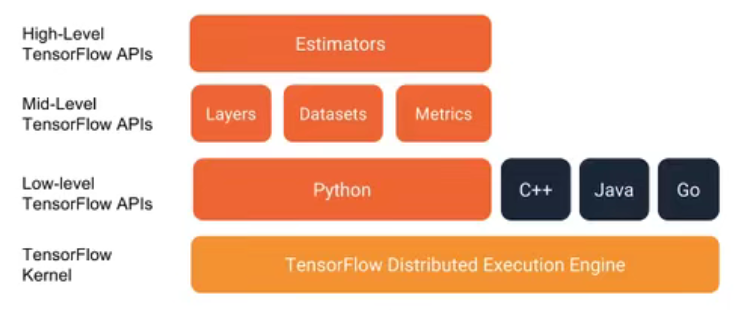
2.6.1 ����API
tf.app
���ģ���൱��ΪTensorFlow���еĽű��ṩһ��main �������,���Զ���ű����е� flags��
tf.image
TensorFlow��ͼ������������Ҫ��һЩ��ɫ�任�����κ�ͼ��ı���ͽ��롣
tf.gfile
�ṩ�ļ�����ģ��
tf.summary
��������TensorBoard���õ�ͳ����־,ĿǰSummary��Ҫ�ṩ��4������;audio��image��histogram.scalar
tf.python_io
������дTFRecords�ļ�
tf.train
���ģ���ṩ��һЩѵ����,��tf.nn�������,ʵ��һЩ������Ż����㡣 tf.nn
���ģ���ṩ��һЩ����������ĵײ㺯����TensorFlow��������ĺ���ģ�顣���а��������Ӹ��ֲ�ĺ���,�������Ӿ����㡢�ػ���ȡ�
2.6.2 ��API
tf.keras
Keras������һ�����������ѧϰ��,tensorflow����ѧϰ����,�����ⲿ��ģ�����ڿ��ٹ���ģ�͡�
tf.layers
��API,�Ը����ĸ����������һ��ģ�͡�����tf.Keras
tf.contrib
tf.contrib.layers�ṩ��������ͼ�е�����㡢����ժҪ�������ǹ�������ͼ�ĸ�����,����tf.contrib�������ȶ���ʵ�����,�п����Ժ�API��ı䡣
tf.estimator
һ��Estimator�൱��Model + Training + Evaluate �ĺ��塣��ģ����,�Ѿ�ʵ���˼��ּķ������ͻع���,����:Baseline,Learning �� DNN������� DNN������,ֻ��ȫ��������,û���ṩ����֮��ġ�
2.7 ����:ʵ�����Իع�
2.7.1 ���Իع�ԭ����ϰ
- 1)����ģ��
y = w 1 x 1 + w 2 x 2 + �� �� + w n x n + b y = w_1x_1 + w_2x_2 + ���� + w_nx_n + b y=w1?x1?+w2?x2?+����+wn?xn?+b - 2)������ʧ����
������� - 3)�Ż���ʧ
�ݶ��½�
2.7.2 ����:ʵ�����Իع��ѵ��
����ȷ��
- ����ʵ����
100����
x ����ֵ ��״ (100, 1)
y_true Ŀ��ֵ (100, 1)
y_true = 0.8x + 0.7 - �ٶ�x �� y ֮��Ĺ�ϵ ����
y = kx + b
k �� 0.8 b �� 0.7
API
����
- ��������
tf.matmul(x, w) - ƽ��
tf.square(error) - ��ֵ
tf.reduce_mean(error)
�ݶ��½��Ż�
- tf.train.GradientDescentOptimizer(learning_rate)
�ݶ��½��Ż� - learning_rate:ѧϰ��,һ��Ϊ0~1֮��Ƚ�С��ֵ
- method:
- minimize(loss)
- return:�ݶ��½�op
���̷���
(
100
,
1
)
?
(
1
,
1
)
=
(
100
,
1
)
(100, 1) * (1, 1) = (100, 1)
(100,1)?(1,1)=(100,1)
y
_
p
r
e
d
i
c
t
=
x
?
w
e
i
g
h
t
s
(
1
,
1
)
+
b
i
a
s
(
1
,
1
)
y\_predict = x * weights(1, 1) + bias(1, 1)
y_predict=x?weights(1,1)+bias(1,1)
- 1)����ģ��
y_predict = tf.matmul(x, weights) + bias
- 2)������ʧ����
error = tf.reduce_mean(tf.square(y_predict - y_true))
- 3)�Ż���ʧ
optimizer = tf.train.GradientDescentOptimizer(learning_rate=0.01).minimize(error)
5 ѧϰ�ʵ����á��������������ݶȱ�ը
ʾ��
��ʵ��һ�����Իع�
def linear_regression():
"""
��ʵ��һ�����Իع�
:return:
"""
# 1.������
x = tf.compat.v1.random_normal(shape=[100, 1])
y_true = tf.matmul(x, [[0.8]]) + 0.7
# 2.����ģ��
# ����ģ�Ͳ����ñ���
weight = tf.Variable(initial_value=tf.compat.v1.random_normal(shape=[1, 1])) # ��ʹ�����ֵ��weight���г�ʼ��
bias = tf.Variable(initial_value=tf.compat.v1.random_normal(shape=[1, 1])) # ��ʹ�����ֵ��bias���г�ʼ��
y_predict = tf.matmul(x, weight) + bias
# 3.������ʧ����
error = tf.reduce_mean(tf.square(y_predict - y_true))
# 4.�Ż���ʧ
optimizer = tf.compat.v1.train.GradientDescentOptimizer(learning_rate=0.01).minimize(error)
# ��ʽ�س�ʼ������
init = tf.compat.v1.global_variables_initializer()
# �����Ự
with tf.compat.v1.Session() as sess:
# ��ʼ������
sess.run(init)
# �鿴��ʼ��ģ�Ͳ���֮���ֵ
print("ѵ��ǰģ�Ͳ���Ϊ:Ȩ��%f,ƫ��%f,��ʧ%f" % (weight.eval(), bias.eval(), error.eval()))
# ��ʼѵ��
for i in range(1000):
sess.run(fetches=optimizer)
print("��%d��ѵ����ģ�Ͳ���Ϊ:Ȩ��%f,ƫ��%f,��ʧ%f" % (i+1, weight.eval(), bias.eval(), error.eval()))
# �鿴��ʼ��ģ�Ͳ���֮���ֵ
print("ѵ����ģ�Ͳ���Ϊ:Ȩ��%f,ƫ��%f,��ʧ%f" % (weight.eval(), bias.eval(), error.eval()))
���:
ѵ��ǰģ�Ͳ���Ϊ:Ȩ��-1.970245,ƫ��-1.167298,��ʧ12.787583
��1��ѵ����ģ�Ͳ���Ϊ:Ȩ��-1.900054,ƫ��-1.120071,��ʧ8.568954
��2��ѵ����ģ�Ͳ���Ϊ:Ȩ��-1.845930,ƫ��-1.085134,��ʧ10.069593
��3��ѵ����ģ�Ͳ���Ϊ:Ȩ��-1.801681,ƫ��-1.054058,��ʧ8.939274
��4��ѵ����ģ�Ͳ���Ϊ:Ȩ��-1.734405,ƫ��-1.007101,��ʧ11.473066
��5��ѵ����ģ�Ͳ���Ϊ:Ȩ��-1.679682,ƫ��-0.980237,��ʧ9.313668
��6��ѵ����ģ�Ͳ���Ϊ:Ȩ��-1.619766,ƫ��-0.943636,��ʧ8.337710
��7��ѵ����ģ�Ͳ���Ϊ:Ȩ��-1.570481,ƫ��-0.905890,��ʧ9.915030
��8��ѵ����ģ�Ͳ���Ϊ:Ȩ��-1.524673,ƫ��-0.874753,��ʧ8.296886
��9��ѵ����ģ�Ͳ���Ϊ:Ȩ��-1.477295,ƫ��-0.834806,��ʧ7.259823
��10��ѵ����ģ�Ͳ���Ϊ:Ȩ��-1.422785,ƫ��-0.804612,��ʧ7.320126
......
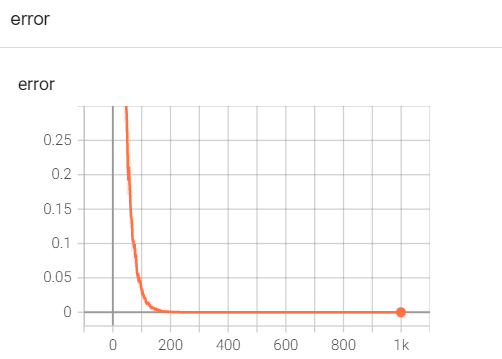
��1000��ѵ����ģ�Ͳ���Ϊ:Ȩ��0.799999,ƫ��0.699999,��ʧ0.000000
ѵ����ģ�Ͳ���Ϊ:Ȩ��0.799999,ƫ��0.699999,��ʧ0.000000
ѧϰ�ʵ����á��������������ݶȱ�ը
ѧϰ��Խ��,ѵ�����Ϻý���IJ���ԽС;ѧϰ��ԽС,ѵ�����Ϻý���IJ���Խ��
����ѧϰ���������ݶȱ�ը�������ݶȱ�ը/�ݶ���ʧ?
�ڼ������,Ȩ�ص�ֵ��÷dz���,�������̳�,����NaNֵ
��ν���ݶȱ�ը����(��������統�и����׳���)
- �����������
- ����ѧϰ��
- ʹ���ݶ��d��(��ѵ�������м������ƶȵĴ�С
- ʹ�ü����
������ trainable���ù۲�
trainable�IJ�������,ָ���Ƿ�ѵ��
weights = tf.Variable(initial_value=tf.random_normal(shape=[1, 1]), name='weight',trainable=False)
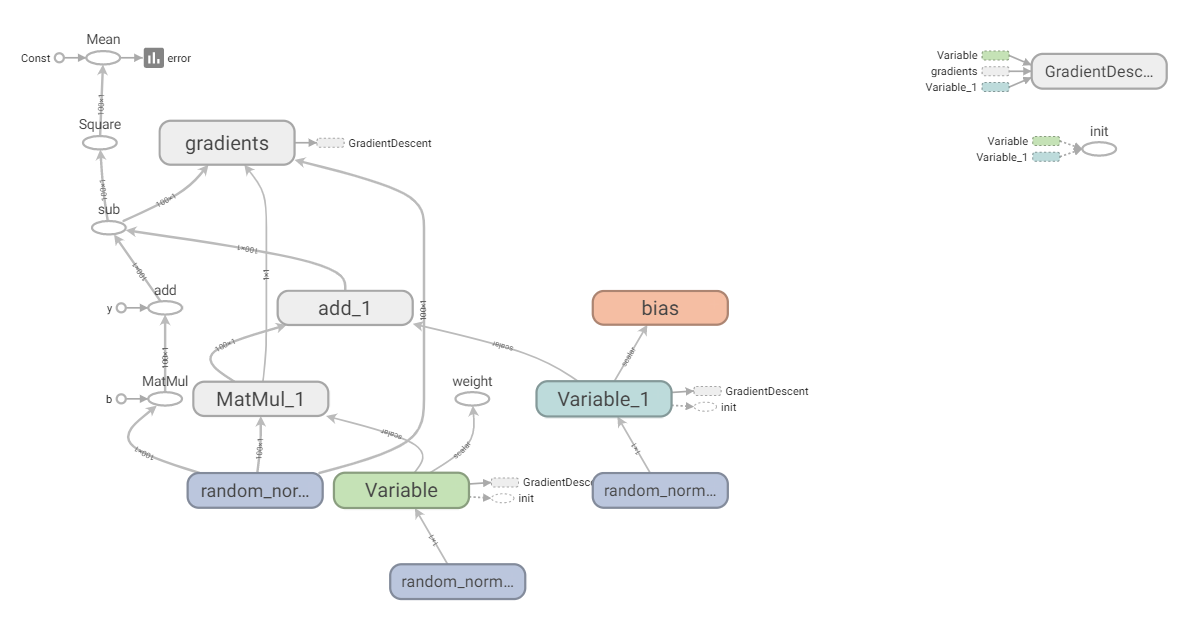
2.7.3 ������������
- ����Tensorboard��ʾ
- ���������ռ�
- ģ�ͱ���ͼ���
- �����������
2.7.3.1 ���ӱ�����ʾ
Ŀ��:��TensorBoard���й۲�ģ�͵IJ�������ʧֵ�ȱ���ֵ�ı仯��
- �ռ�����
- tf.summary.scalar(name=",tensor)�ռ�������ʧ������ȷ�ʵȵ�ֵ����,nameΪ����������,tensorΪֵ
- tf.summary.histogram(name=",tensor)�ռ���ά�ȵı�������
tf.summary.image(name=",tensor)�ռ������ͼƬ��������ʾͼƬ
- �ϲ�����д���¼��ļ�
- merged = tf.summary.merge_all()
- ���кϲ�: summary = sess.run(merged),ÿ�ε�����������
- ����:FileWriter.add_summary(summary,i),i��ʾ�ڼ��ε�ֵ
���ӱ�����ʾ���岽��:
1)�����¼��ļ�
2)�ռ�����
3)�ϲ�����
4)ÿ���ʹ�����һ�κϲ�����
5)ÿ���ʹ��� summary:����д���¼��ļ�
ʾ��
�����˱�����ʾ
def linear_regression():
"""
��ʵ��һ�����Իع�
:return:
"""
# 1.������
x = tf.compat.v1.random_normal(shape=[100, 1])
y_true = tf.matmul(x, [[0.8]]) + 0.7
# 2.����ģ��
# ����ģ�Ͳ����ñ���
weight = tf.Variable(initial_value=tf.compat.v1.random_normal(shape=[1, 1])) # ��ʹ�����ֵ��weight���г�ʼ��
bias = tf.Variable(initial_value=tf.compat.v1.random_normal(shape=[1, 1])) # ��ʹ�����ֵ��bias���г�ʼ��
y_predict = tf.matmul(x, weight) + bias
# 3.������ʧ����
error = tf.reduce_mean(tf.square(y_predict - y_true))
# 4.�Ż���ʧ
optimizer = tf.compat.v1.train.GradientDescentOptimizer(learning_rate=0.01).minimize(error)
# 2_�ռ�����
tf.compat.v1.summary.scalar("error", error)
tf.compat.v1.summary.histogram("weight", weight)
tf.compat.v1.summary.histogram("bias", bias)
# 3_�ϲ�����
merged = tf.compat.v1.summary.merge_all()
# ��ʽ�س�ʼ������
init = tf.compat.v1.global_variables_initializer()
# �����Ự
with tf.compat.v1.Session() as sess:
# ��ʼ������
sess.run(init)
# 1_�����¼��ļ�
file_writer = tf.compat.v1.summary.FileWriter("../linear", graph=sess.graph)
# �鿴��ʼ��ģ�Ͳ���֮���ֵ
print("ѵ��ǰģ�Ͳ���Ϊ:Ȩ��%f,ƫ��%f,��ʧ%f" % (weight.eval(), bias.eval(), error.eval()))
# ��ʼѵ��
for i in range(1000):
sess.run(fetches=optimizer)
print("��%d��ѵ����ģ�Ͳ���Ϊ:Ȩ��%f,ƫ��%f,��ʧ%f" % (i+1, weight.eval(), bias.eval(), error.eval()))
# ���кϲ���������
summary = sess.run(merged)
# ��ÿ�ε�����ı���д���¼��ļ�
file_writer.add_summary(summary, i)
# �鿴��ʼ��ģ�Ͳ���֮���ֵ
print("ѵ����ģ�Ͳ���Ϊ:Ȩ��%f,ƫ��%f,��ʧ%f" % (weight.eval(), bias.eval(), error.eval()))
���:
ע��:
- 2.0�汾����Ȼtf��summar.scalar����,������tf.compat.v1.summary.scalar(��error��, error)�IJ������Ͳ�һ������������ʾ����д�����TypeError: Fetch argument None has invalid type <class ��NoneType��>��
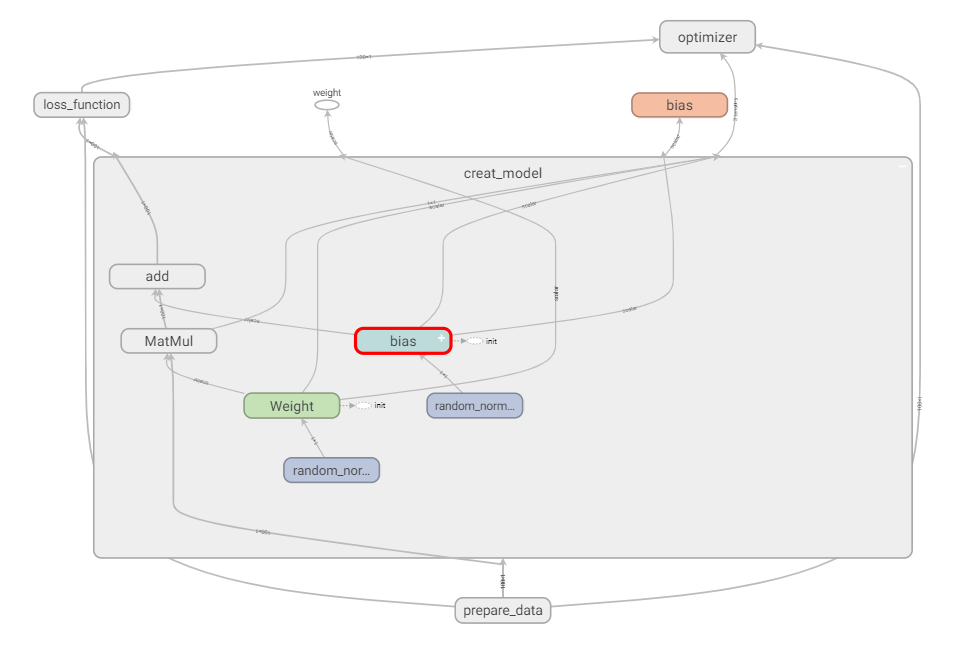
2.7.3.2 ���������ռ�
ʹ����ṹ��������,Tensorboardͼ�ṹ���
����:with tf.variable_scope( ��lr_model��" ):
���������ռ���岽��:
1)ʵ����Saver
2)����
saver.save(sess, path)
3)����
saver.restore(sess, path)
ʾ��
���������ռ�
def linear_regression():
"""
��ʵ��һ�����Իع�
:return:
"""
with tf.compat.v1.variable_scope("prepare_data"):
# 1.������
x = tf.compat.v1.random_normal(shape=[100, 1])
y_true = tf.matmul(x, [[0.8]]) + 0.7
with tf.compat.v1.variable_scope("creat_model"):
# 2.����ģ��
# ����ģ�Ͳ����ñ���
weight = tf.Variable(initial_value=tf.compat.v1.random_normal(shape=[1, 1])) # ��ʹ�����ֵ��weight���г�ʼ��
bias = tf.Variable(initial_value=tf.compat.v1.random_normal(shape=[1, 1])) # ��ʹ�����ֵ��bias���г�ʼ��
y_predict = tf.matmul(x, weight) + bias
with tf.compat.v1.variable_scope("loss_function"):
# 3.������ʧ����
error = tf.reduce_mean(tf.square(y_predict - y_true))
with tf.compat.v1.variable_scope("optimizer"):
# 4.�Ż���ʧ
optimizer = tf.compat.v1.train.GradientDescentOptimizer(learning_rate=0.01).minimize(error)
# 2_�ռ�����
tf.compat.v1.summary.scalar("error", error)
tf.compat.v1.summary.histogram("weight", weight)
tf.compat.v1.summary.histogram("bias", bias)
# 3_�ϲ�����
merged = tf.compat.v1.summary.merge_all()
# ��ʽ�س�ʼ������
init = tf.compat.v1.global_variables_initializer()
# �����Ự
with tf.compat.v1.Session() as sess:
# ��ʼ������
sess.run(init)
# 1_�����¼��ļ�
file_writer = tf.compat.v1.summary.FileWriter("../linear", graph=sess.graph)
# �鿴��ʼ��ģ�Ͳ���֮���ֵ
print("ѵ��ǰģ�Ͳ���Ϊ:Ȩ��%f,ƫ��%f,��ʧ%f" % (weight.eval(), bias.eval(), error.eval()))
# ��ʼѵ��
for i in range(1000):
sess.run(fetches=optimizer)
print("��%d��ѵ����ģ�Ͳ���Ϊ:Ȩ��%f,ƫ��%f,��ʧ%f" % (i+1, weight.eval(), bias.eval(), error.eval()))
# ���кϲ���������
summary = sess.run(merged)
# ��ÿ�ε�����ı���д���¼��ļ�
file_writer.add_summary(summary, i)
# �鿴��ʼ��ģ�Ͳ���֮���ֵ
print("ѵ����ģ�Ͳ���Ϊ:Ȩ��%f,ƫ��%f,��ʧ%f" % (weight.eval(), bias.eval(), error.eval()))

��ָ������
with tf.compat.v1.variable_scope("prepare_data"):
# 1.������
x = tf.compat.v1.random_normal(shape=[100, 1], name="feature")
y_true = tf.matmul(x, [[0.8]]) + 0.7
with tf.compat.v1.variable_scope("creat_model"):
# 2.����ģ��
# ����ģ�Ͳ����ñ���
weight = tf.Variable(initial_value=tf.compat.v1.random_normal(shape=[1, 1]), name="Weight") # ��ʹ�����ֵ��weight���г�ʼ��
bias = tf.Variable(initial_value=tf.compat.v1.random_normal(shape=[1, 1]), name="bias") # ��ʹ�����ֵ��bias���г�ʼ��
y_predict = tf.matmul(x, weight) + bias
ͼ�ṹ��ø�����
2.7.3.3 ģ�͵ı��������
tf.train.Saver(var_list=None,max_to_keep=5)
����ͼ���ģ��(�����ļ���ʽ: checkpoint�ļ�)
- var_list:ָ����Ҫ����ͻ�ԭ�ı�������������Ϊһ��dict��һ���б�����.
- max_to_keep:ָʾҪ��������������ļ�������������������ļ�ʱ,��ɾ���Ͼɵ��ļ��������0,�������м����ļ���Ĭ��Ϊ 5(���������µ�5�������ļ���)
����:
���������(ָ��Ŀ¼+ģ������)
saver.save(sess,' /tmp/ckpt/test/myregression.ckpt ')
saver.restore(sess,'/tmp/ckpt/test/myregression.ckpt ' )
��Ҫ�ж�ģ���Ƿ����,ֱ��ָ��Ŀ¼
checkpoint =tf.train.latest_checkpoint("/tmp/model/")
saver.restore(sess, checkpoint)
ģ�͵ı�������ؾ��岽��:
1)ʵ����Saver
2)����
saver.save(sess, path)
3)����
saver.restore(sess, path)
ʾ��
�ڻỰ�б���ģ��
# ����ģ��
if i % 10 == 0:
saver.save(sess, "../model/my_linear.ckpt")
����ģ��
# ����ģ��
if os.path.exists("../model/checkpoint"): # ȷ���ļ��Ƿ����
saver.restore(sess, "../model/my_linear.ckpt")
2.7.3.4 �����в���ʹ��
-
tf.app.flags,��֧��Ӧ�ô������н��ܲ���,��������ָ����Ⱥ���õȡ���tf.app.flags�����и��ֶ������������
- DEFINE_string(flag_name, default_value, docstring)
- DEFINE_integer(flag_name, default_value, docstring)
- DEFINE_boolean(flag_name, default_value, docstring)
- DEFINE_float(flag_name, default_value,docstring)
-
tf.app.flags,��flags��һ��FLAGS��־,���ڳ����п��Ե��õ�����ǰ�涨���flag_name
-
ͨ��tf.app.run() ����main ������
ʾ��
import tensorflow as tf
# 1)�����������
tf.app.flags.DEFINE_integer("max_step", 100, "ѵ��ģ�͵IJ���")
tf.app.flags.DEFINE_string("model_dir", "Unknown", "ģ�ͱ����·��+ģ������")
# 2)������
FLAGS = tf.app.flags.FLAGS
def command_demo():
"""
�����в�����ʾ
:return:
"""
print("max_step:\n", FLAGS.max_step)
print("model_dir:\n", FLAGS.model_dir)
return None
def main(argv):
print(argv)
if __name__ == '__main__':
command_demo()
tf.app.run() # �����main����,argv Ϊ���ļ���·��
��������ִ��
python 03-�������.py --max_step=3 --model-dir=hello
���:
max_step:
3
model_dir:
hello
['03-�������.py']
ע��:
- ͨ��tf.app.run()*����main ����ʱ,main������Ҫд����argv��argvʵ���Ͼ���.py�ļ���·����
TensorFlow��ܵ�ʹ���ܽ�
���ݶ�ȡ��������
�����ֻ�ȡ���ݵ�TensorFlow����ķ���:
- QueueRunner:���ڶ��е�����ܵ���TensorFlowͼ�ο�ͷ���ļ��ж�ȡ���ݡ�
- Feeding:����ÿһ��ʱ,Python�����ṩ���ݡ�
- Ԥ��������:TensorFlowͼ�е�����������������(����С���ݼ�)��
3.1 �ļ���ȡ����
���߳� + ����
3.1.1 �ļ���ȡ����

- ��һ��:�����ļ�������
- �ڶ���:��ȡ�����
- ������:������
- ע:��Щ������Ҫ����������Щ���в������߳�,�Ա������ڽ����ļ���ȡ�Ĺ������ܹ�˳��������ӳ��Ӳ�����
3.1.1.1 �����ļ�������
file_queue = tf.train.string_input_producer(string_tensor,shuffle=True)
3.1.1.2 ��ȡ�����
�ı�:
��ȡ:tf.TextLineReader()
����:tf.decode_csv()
ͼƬ:
��ȡ:tf.WholeFileReader()
����:
tf.image.decode_jpeg(contents)
tf.image.decode_png(contents)
������:
��ȡ:tf.FixedLengthRecordReader(record_bytes)
����:tf.decode_raw()
TFRecords
��ȡ:tf.TFRecordReader()
key, value = ��ȡ��.read(file_queue)
key:�ļ���
value:һ������
3.1.1.3 ����������
tf.train.batch(tensors, batch_size, num_threads = 1, capacity = 32, name=None)
�ֶ������߳�
tf.train.QueueRunner()
�����Ự:
tf.train.start_queue_runners(sess=None, coord=None)
3.2 ͼƬ����
3.2.1 ͼ�����֪ʶ
�ı� ������ -> ��ά����
�ֵ� one-hot -> ��ά����
ͼƬ ����ֵ
1 ͼƬ��Ҫ��
�ڰ�ͼ���Ҷ�ͼ
һ��ͨ��
��[0, 255]��
��ɫͼ
����ͨ��
һ�����ص� ����ͨ��ֵ����
R [0, 255]
G [0, 255]
B [0, 255]
2 TensorFlow�б�ʾͼƬ
Tensor����
ָ�����ơ���״������
shape = [height, width, channel]
3 ͼƬ����ֵ����
[samples, features]
ΪʲôҪ����ͼƬ��ͳһ��С?
1)ÿһ��������������Ҫһ����
2)��СͼƬ�Ĵ�С
tf.image.resize_images(images, size)
4 ���ݸ�ʽ
�洢:uint8
ѵ��:float32
3.2.4 ����:��ͼƬ��ȡ
1)�����ļ�������
file_queue = tf.train.string_input_producer(string_tensor,shuffle=True)
2)��ȡ�����
��ȡ:
reader = tf.WholeFileReader()
key, value = reader.read(file_queue)
����:
image_decoded = tf.image.decode_jpeg(value)
3)����������
image_decoded = tf.train.batch([image_decoded], 100, num_threads = 2, capacity=100)
�ֶ������߳�
3.3 ����������
tensor����
shape:[height, width, channel] -> [32, 32, 3] [0, 1, 2] -> []
[[32 * 32�Ķ�ά����],
[32 * 32�Ķ�ά����],
[32 * 32�Ķ�ά����]]
--> [3, 32, 32] [channel, height, width] ��ά�����ת�� [0, 1, 2] -> [1, 2, 0]
[3, 2] -ת��-> [2, 3]
1)NHWC��NCHW
T = transpose ת��
3.3.2 CIFAR10 ���������ݶ�ȡ
���̷���:
1)�����ļ�������
2)��ȡ�����
3)����������
�����Ự
�ֶ������߳�
3.4 TFRecords
3.4.1 ʲô��TFRecords�ļ�
3.4.2 Example�ṹ����
cifar10
����ֵ - image - 3072���ֽ�
Ŀ��ֵ - label - 1���ֽ�
example = tf.train.Example(features=tf.train.Features(feature={
"image":tf.train.Feature(bytes_list=tf.train. BytesList(value=[image])
"label":tf.train.Feature(int64_list=tf.train. Int64List(value=[label]))
}))
example.SerializeToString()
3.4.3 ����:CIFAR10���ݴ���TFRecords�ļ�
���̷���
3.4.4 ��ȡTFRecords�ļ�API
1)�����ļ�������
2)��ȡ�ͽ���
��ȡ
����example
feature = tf.parse_single_example(value, features={
"image":tf.FixedLenFeature([], tf.string),
"label":tf.FixedLenFeature([], tf.int64)
})
image = feature["image"]
label = feature["label"]
����
tf.decode_raw()
3)��������������
3.5 ���������
3.5.1 ������
�����
����ֵ��Ȩ�� ���Լ�Ȩ
y = w1x1 + w2x2 + ���� + wnxn + b
ϸ����-�����
sigmoid
sign
���ز�
�����
������Ԫ - ��֪��
��֪��(PLA: Perceptron Learning Algorithm))
x1, x2
w1x1 + w2x2 + b = ����
w2x2 = -w1x1 - b + ����
x2 = kx1 + b
x2 = kx1 + b
x1 x2
������
0 0 0
0 1 0
1 0 0
1 1 1
�������
0 0 0
0 1 1
1 0 1
1 1 0
������Ԫ���ܽ��һЩ��������
1)�����Ԫ
2)���Ӽ����
3.6 ������ԭ��
���ع�
y = w1x1 + w2x2 + ���� + wnxn + b
sigmoid -> [0, 1] -> ����������
��ʧ����:������Ȼ��ʧ
������������
���躯��
y_predict =
softmax - ���������
������ʧ����
loss = ��������ʧ
�Ż���ʧ
�ݶ��½�
3.6.1 softmax�ع� - ���������
����Ҫ����������
2.3, 4.1, 5.6
3.6.2 ��������ʧ
3.7 ����:Mnist��д����ʶ��
3.7.1 ���ݼ�����
1 ����ֵ
[None, 784] * W[784, 10] + Bias = [None, 10]
����ȫ���Ӳ�:
y_predict = tf.matmul(x, W) + Bias
������ʧ:
loss = tf.nn.softmax_cross_entropy_with_logits(labels=y_true, logits=y_predict,name=None)
��μ���ȷ��?
np.argmax(y_predict, axis=1)
tf.argmax(y_true, axis=1)
y_predict [None, 10]
y_true [None, 10]
tf.equal()
������ȷ��?
1)����ѵ������
2)����ѧϰ��
3)����Ȩ��ϵ���ij�ʼ��ֵ
4)�ı��Ż���