TENSOR数据操作
如何对内存中的数据进?操作
torch.Tensor和NumPy中的多维数组相似,Tensor 更加适合深度学习,GPU计算和?动求梯度。
“tensor" “张量”,?个多维数组
标量可以看作是0维张量
向量可以看作1维张量
矩阵可以看作是?维张量。
1 创建TENSOR
创建?个5x3的未初始化的 Tensor
import torch
x = torch.empty(5, 3)
创建?个5x3的随机初始化的 Tensor
x = torch.rand(5, 3)
创建?个5x3的long型全0的 Tensor
x = torch.zeros(5, 3, dtype=torch.long)
直接根据数据创建:
x = torch.tensor([5.5, 3])
通过现有的 Tensor 来创建
x = x.new_ones(5, 3, dtype=torch.float64)
# 返回的tensor默认具有相同的torch.dtype和torch.device
x = torch.randn_like(x, dtype=torch.float) # 指定新的数据类型
获取 Tensor 的形状:
print(x.size())
print(x.shape)
# 输出
torch.Size([5, 3])
torch.Size([5, 3])
注意:返回的torch.Size其实就是?个tuple, ?持所有tuple的操作。
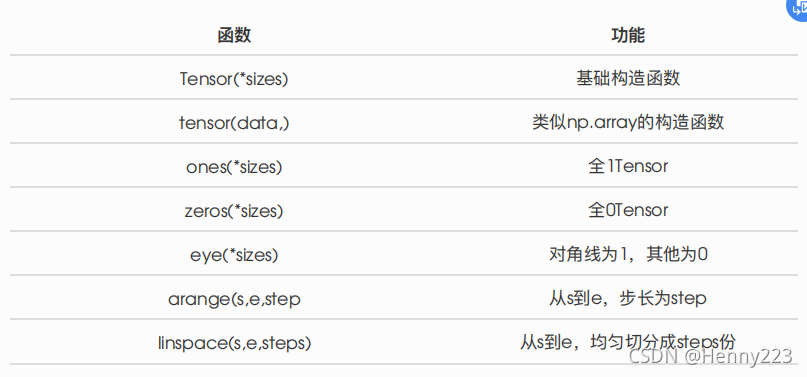
还有很多函数可以创建 Tensor


2 操作
2.1 算术操作
方法一
y = torch.rand(5, 3)
print(x + y)
方法二
print(torch.add(x, y))
指定输出
result = torch.empty(5, 3)
torch.add(x, y, out=result)
print(result)
方法三
# adds x to y
y.add_(x)
print(y)
2.2 索引
索引出来的结果与原数据共享内存,也即修改?个,另?个会跟着修改
y = x[0, :]
y += 1
print(y)
print(x[0, :]) # 源tensor也被改了
# 输出
tensor([1.6035, 1.8110, 0.9549])
tensor([1.6035, 1.8110, 0.9549])

2.3 改变形状
方法一:? view() 来改变 Tensor 的形状:
y = x.view(15)
z = x.view(-1, 5) # -1所指的维度可以根据其他维度的值推出来
print(x.size(), y.size(), z.size())
# 输出
torch.Size([5, 3]) torch.Size([15]) torch.Size([3, 5])
x += 1
print(x)
print(y) # 也加了1
注意 view() 返回的新tensor与源tensor共享内存(其实是同?个tensor),也即更改其中的?个,另外?个也会跟着改变。(顾名思义,view仅仅是改变了对这个张量的观察?度)
方法二:推荐先?clone 创造?个副本然后再使? view 。(不共享内存)
x_cp = x.clone().view(15)
x -= 1
print(x)
print(x_cp)
使? clone 还有?个好处是会被记录在计算图中,即梯度回传到副本时也会传到源 Tensor 。
方法三:将?个标量 Tensor 转换成?个Python number
x = torch.randn(1)
print(x)
print(x.item())
2.4 线性代数

其他Tensor操作:https://pytorch.org/docs/stable/tensors.html
3 广播机制
当对两个形状不同的 Tensor 按元素运算时,可?播(broadcasting)机制:先适当复制元素使这两个 Tensor 形状相同后再按元素运算。
x = torch.arange(1, 3).view(1, 2)
print(x) y = torch.arange(1, 4).view(3, 1)
print(y)
print(x + y)
# 输出
tensor([[1, 2]])
tensor([[1],
         [2],
         [3]])
tensor([[2, 3],
         [3, 4],
         [4, 5]])
4 运算的内存开销
索引、 view 是不会开辟新内存的,?像 y = x + y 这样的运算是会新开内存的,然后将 y 指向新内存。
方法一:我们把 x + y 的结果通过 [:] 写进 y 对应的内存中。
x = torch.tensor([1, 2])
y = torch.tensor([3, 4])
id_before = id(y)
y[:] = y + x
print(id(y) == id_before) # True
方法二:使?运算符全名函数中的 out 参数或者?加运算符 +=
x = torch.tensor([1, 2])
y = torch.tensor([3, 4])
id_before = id(y)
torch.add(x, y, out=y) # y += x, y.add_(x)
print(id(y) == id_before) # True
5 TENSOR 和NUMPY相互转换
我们很容易? numpy() 和 from_numpy() 将 Tensor 和NumPy中的数组相互转换。但是需要注意的?
点是: 这两个函数所产?的的Tensor和NumPy中的数组共享相同的内存(所以他们之间的转换很快),改变其中?个时另?个也会改变!!!
还有?个常?的将NumPy中的array转换成 Tensor 的?法就是 torch.tensor() , 需要注意的是,此?法总是会进?数据拷?(就会消耗更多的时间和空间),所以返回的 Tensor 和原来的数据不再共享内存。
5.1 Tensor 转NumPy
使?numpy() 将 Tensor 转换成NumPy数组:(共享内存)
a = torch.ones(5)
b = a.numpy()
print(a, b)
a += 1
print(a, b)
b += 1
print(a, b)
# 输出
tensor([1., 1., 1., 1., 1.]) [1. 1. 1. 1. 1.]
tensor([2., 2., 2., 2., 2.]) [2. 2. 2. 2. 2.]
tensor([3., 3., 3., 3., 3.]) [3. 3. 3. 3. 3.]
5.2 NumPy数组转 Tensor
方法一:使? from_numpy() (共享内存)
import numpy as np
a = np.ones(5)
b = torch.from_numpy(a)
print(a, b)
a += 1
print(a, b)
b += 1
print(a, b)
[1. 1. 1. 1. 1.] tensor([1., 1., 1., 1., 1.], dtype=torch.float64)
[2. 2. 2. 2. 2.] tensor([2., 2., 2., 2., 2.], dtype=torch.float64)
[3. 3. 3. 3. 3.] tensor([3., 3., 3., 3., 3.], dtype=torch.float64)
所有在CPU上的 Tensor (除了 CharTensor )都?持与NumPy数组相互转换。
方法二:直接? torch.tensor() (不再共享内存)
c = torch.tensor(a)
a += 1
print(a, c)
[4. 4. 4. 4. 4.] tensor([3., 3., 3., 3., 3.], dtype=torch.float64)
6 TENSOR ON GPU
# 以下代码只有在PyTorch GPU版本上才会执?
if torch.cuda.is_available():
 device = torch.device("cuda") # GPU
 y = torch.ones_like(x, device=device) # 直接创建?个在GPU上的Tensor
 x = x.to(device) # 等价于 .to("cuda")
 z = x + y
 print(z)
 print(z.to("cpu", torch.double)) # to()还可以同时更改数据类型