简介
超分辨率是指对图像细节进行放大或改进的过程。当增加图像的尺寸时,额外的像素需要以某种方式进行插值。传统的图像处理技术并不能得到好的结果,因为它们在放大时没有把周围环境作为背景。深度学习和最近的GANs在这里发挥了作用,提供了更好的结果。
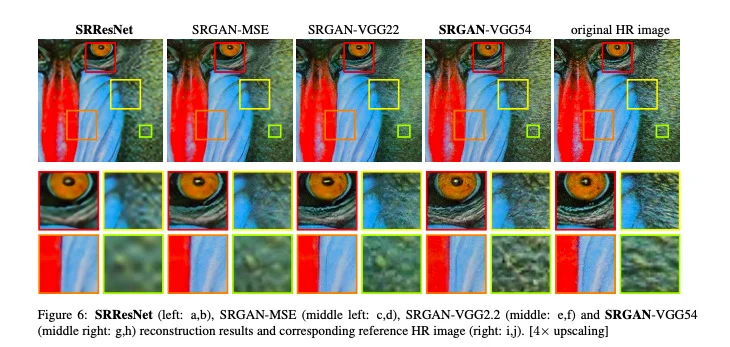
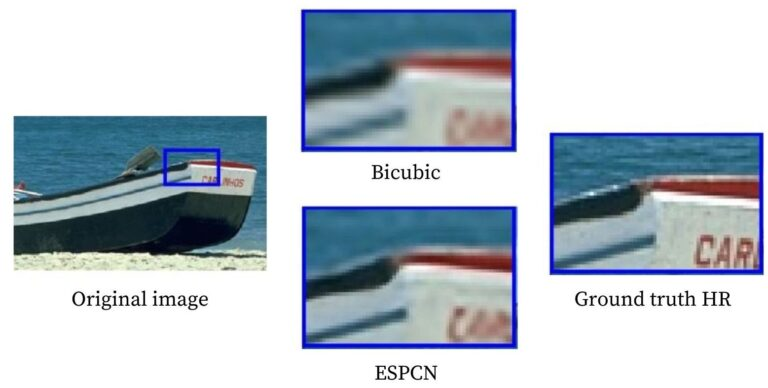
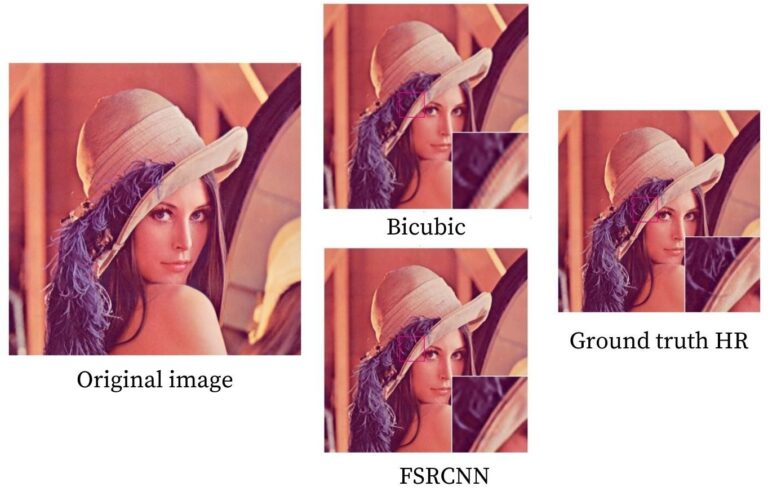
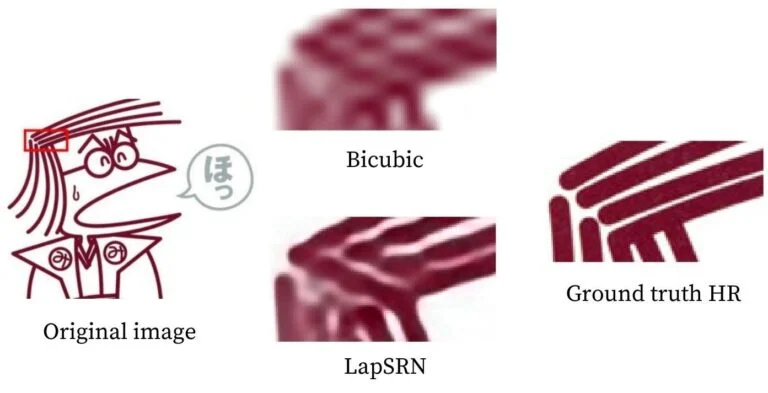
下面给出的图像说明了超分辨率。放大后,原来的高分辨率图像显示出了最好的细节。其他图像采用各种超分辨率方法重建后得到。你可以在这里读到更多细节。
1.OpenCV的超分辨率
用于图像的缩放,OpenCV目前有四种深度学习算法供选择。在本文中,我们将对所有这些方法进行回顾。我们还将看到它们的结果,并将它们与使用OpenCV中双三次插值方法进行缩放的图像进行比较。我们将讨论的四种方法是(1)EDSR Model(2)ESPCN Model(3)FSRCNN Model(4)LapSRN Model
请注意,前三个算法提供了2、3和4倍的比率,而最后一个算法有2、4和8倍的原始大小!每个所需比率的TensorFlow模型可以通过上面提供的链接下载。
为了使用上面列出的模型实现超分辨率,我们需要使用标准OpenCV模块之外的功能。这就是为什么我们也必须安装opencv-contrib模块的原因。此外,超分辨率出现在模块dnn_superres(基于深度神经网络的超分辨率)中,该模块在C++的OpenCV4.1版本和Python的OpenCV4.3版本中实现。
注意:如果你已经安装了OpenCV,最好创建一个虚拟环境并在其中安装OpenCV-contrib,以避免任何依赖问题。默认情况下,这将安装最新版本的OpenCV以及OpenCV-contrib模块。如果您在运行此命令之前已经安装了OpenCV,您也可以选择卸载它。
代码地址:
链接:https://pan.baidu.com/s/1M0l63vxYbS7zrF3Pn9IYaQ
提取码:123a
为了比较上述算法,我们将使用以下图片作为参考。

(1)Python
import cv2
import matplotlib.pyplot as plt
# 读取图片
img = cv2.imread("AI-Courses-By-OpenCV-Github.png")
plt.imshow(img[:,:,::-1])
plt.show()
# 裁剪OpenCV标识
img = img[5:60,700:755]
plt.imshow(img[:,:,::-1])
plt.show()

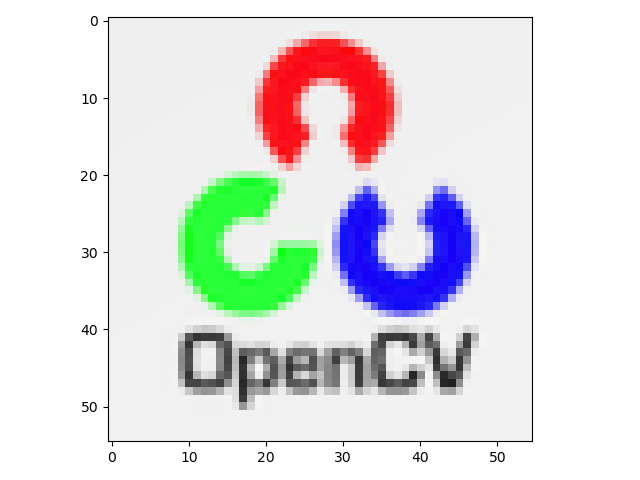
我们首先导入opencv和matplotlib并读取测试图片。为了裁剪OpenCV标识,我们使用上面给出的代码。
(2)C++
#include <iostream>
#include <fstream>
#include <opencv2/opencv.hpp>
#include <opencv2/dnn_superres.hpp>

using namespace std;
using namespace cv;
using namespace dnn;

// 读取图片
Mat img = imread("AI-Courses-By-OpenCV-Github.png");
// 裁剪感兴趣区域
Rect roi;
roi.x = 700;
roi.y = 5;
roi.width = 55;
roi.height = 55;
img = img(roi);
imshow("roi", img);
cv2.waitKey();
cv2.destroyAllWindows();
return;
2.EDSR
Lim等人在他们的论文中提出了两种方法,EDSR和MDSR。在EDSR方法中,不同的尺度需要不同的模型。相比之下,在MDSR模型中,一个单一的模型可以重建不同的尺度。然而,在本文中,我们只讨论EDSR。
使用了一个ResNet风格的体系结构,没有批处理规范化层。他们发现,拿掉BN层,可以提高性能。这使得他们可以构建性能更好的更大的模型。为了克服在大型模型中发现的不稳定性,他们在每个残差块中使用了因子为0.1的残差缩放,方法是在最后一个卷积层之后放置常数缩放层。此外,在残差块后不使用ReLU激活层。
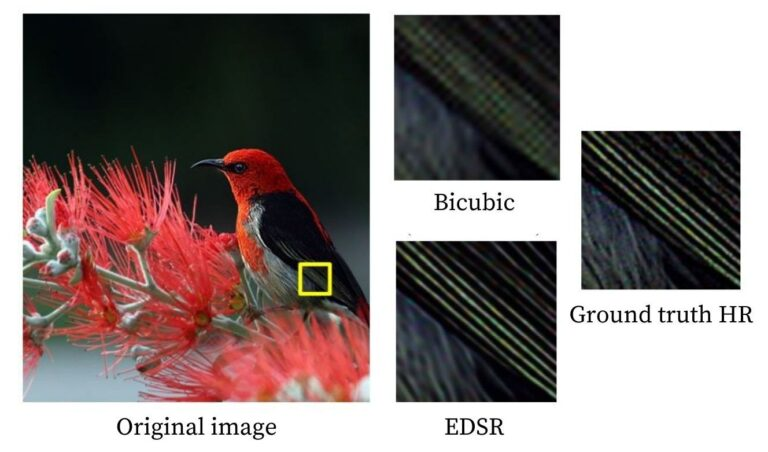
该架构最初用比例因子2进行训练。然后在训练比例因子为3和4时使用这些预先训练的权重。这不仅加速了训练,而且提高了模型的性能。下图是EDSR方法和双三次插值方法的4倍超分辨率结果与原始高分辨率图像的对比。
(1)Python
import cv2
import matplotlib.pyplot as plt
# 读取图片
img = cv2.imread("AI-Courses-By-OpenCV-Github.png")
img = img[5:60,700:755]
sr = cv2.dnn_superres.DnnSuperResImpl_create()
path = "EDSR_x4.pb"
sr.readModel(path)
sr.setModel("edsr",4)
result = sr.upsample(img)
# 调整图像大小
resized = cv2.resize(img,dsize=None,fx=4,fy=4)
plt.figure(figsize=(12,8))
plt.subplot(1,3,1)
# 原始图像
plt.imshow(img[:,:,::-1])
plt.subplot(1,3,2)
# SR上采样图像
plt.imshow(result[:,:,::-1])
plt.subplot(1,3,3)
# OpenCV 上采样图像
plt.imshow(resized[:,:,::-1])
plt.show()
(2)C++
#include <iostream>
#include <opencv2/dnn_superres.hpp>
#include <opencv2/imgproc.hpp>
#include <opencv2/highgui.hpp>

using namespace std;
using namespace cv;
using namespace dnn;
using namespace dnn_superres;

Mat upscaleImage(Mat img, string modelName, string modelPath, int scale){
	DnnSuperResImpl sr;
	sr.readModel(modelPath);
	sr.setModel(modelName,scale);
	// 输出图片
	Mat outputImage;
	sr.upsample(img, outputImage);
	return outputImage;
}

int main(int argc, char *argv[])
{
	// 读取图片
	Mat img = imread("AI-Courses-By-OpenCV-Github.png");
	// 裁剪感兴趣区域
	Rect roi;
	roi.x = 700;
	roi.y = 5;
	roi.width = 55;
	roi.height = 55;
	img = img(roi);

	// EDSR (x4)
	string path = "EDSR_x4.pb";
	string modelName = "edsr";
	int scale = 4;
	Mat result = upscaleImage(img, modelName, path, scale);

	// 使用OpenCV上采样
	Mat resized;
	cv::resize(img, resized, cv::Size(), scale, scale);

	imshow("Original image",img);
	imshow("SR upscaled",result);
	imshow("OpenCV upscaled",resized);
	waitKey(0);
	destroyAllWindows();

	return 0;
}
(
左
)
原
始
图
像
,
(
中
)
E
D
S
R
4
倍
放
大
图
像
,
(
右
)
图
像
使
用
O
p
e
n
C
V
的
r
e
s
i
z
e
函
数
放
大
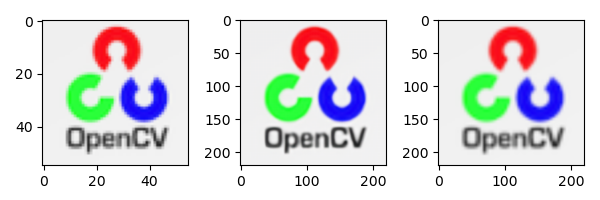
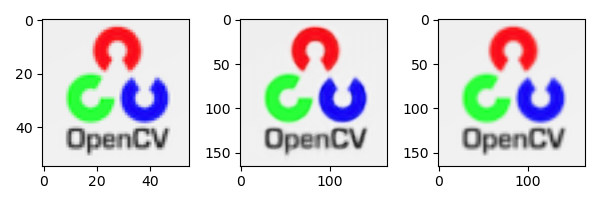
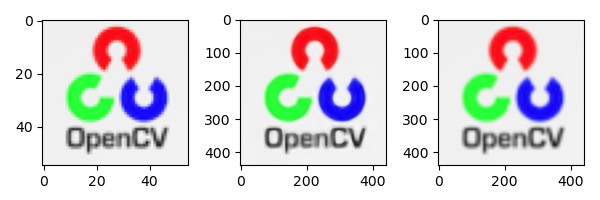
(左)原始图像,(中) EDSR4倍放大图像,(右)图像使用OpenCV的resize函数放大
(左)原始图像,(中)EDSR4倍放大图像,(右)图像使用OpenCV的resize函数放大
3.ESPCN
Shi等人没有使用双三次滤波器对低分辨率进行尺度放大后进行超分辨率,而是在低分辨率本身提取特征映射,并使用复杂的尺度放大滤波器得到结果。上采样层仅部署在网络的末端。这确保了模型中复杂操作发生在更低的维度上,这使得它更快,特别是与其他技术相比。
ESPCN的基本结构受到SRCNN的启发。代替传统的卷积层,使用亚像素卷积层,其作用类似于反卷积层。最后一层利用亚像素卷积层生成高分辨率图。与此同时,他们发现Tanh激活函数比标准的ReLU激活函数效果要好得多。
下图是ESPCN方法、双三次插值方法与原始高分辨率图像的3x超分辨率结果对比。
(1)Python
import cv2
import matplotlib.pyplot as plt
# 读取图片
img = cv2.imread("AI-Courses-By-OpenCV-Github.png")
img = img[5:60,700:755]
sr = cv2.dnn_superres.DnnSuperResImpl_create()
path = "ESPCN_x3.pb"
sr.readModel(path)
sr.setModel("espcn",3)
result = sr.upsample(img)
# 调整图像大小
resized = cv2.resize(img,dsize=None,fx=3,fy=3)
plt.figure(figsize=(6,2))
plt.subplot(1,3,1)
# 原始图像
plt.imshow(img[:,:,::-1])
plt.subplot(1,3,2)
# SR上采样图像
plt.imshow(result[:,:,::-1])
plt.subplot(1,3,3)
# OpenCV 上采样图像
plt.imshow(resized[:,:,::-1])
plt.show()
(2)C++
#include <iostream>
#include <opencv2/dnn_superres.hpp>
#include <opencv2/imgproc.hpp>
#include <opencv2/highgui.hpp>

using namespace std;
using namespace cv;
using namespace dnn;
using namespace dnn_superres;

Mat upscaleImage(Mat img, string modelName, string modelPath, int scale){
	DnnSuperResImpl sr;
	sr.readModel(modelPath);
	sr.setModel(modelName,scale);
	// Output image
	Mat outputImage;
	sr.upsample(img, outputImage);
	return outputImage;
}

int main(int argc, char *argv[])
{
	// 读取图片
	Mat img = imread("AI-Courses-By-OpenCV-Github.png");
	// 裁剪感兴趣区域
	Rect roi;
	roi.x = 700;
	roi.y = 5;
	roi.width = 55;
	roi.height = 55;
	img = img(roi);

	// ESPCN (x3)
	string path = "ESPCN_x3.pb";
	string modelName = "espcn";
	int scale = 3;
	Mat result = upscaleImage(img, modelName, path, scale);

	// 使用OpenCV调整图像大小
	Mat resized;
	cv::resize(img, resized, cv::Size(), scale, scale);

	imshow("Original image",img);
	imshow("SR upscaled",result);
	imshow("OpenCV upscaled",resized);
	waitKey(0);
	destroyAllWindows();

	return 0;
}
(
左
)
原
始
图
像
,
(
中
)
E
S
P
C
N
x
3
升
级
图
像
,
(
右
)
图
像
使
用
O
p
e
n
C
V
的
r
e
s
i
z
e
函
数
放
大
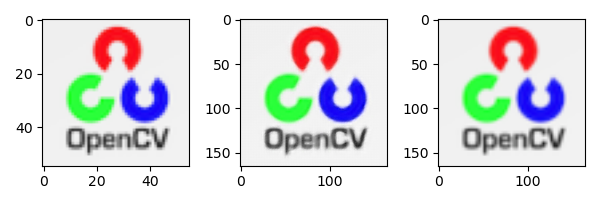
(左)原始图像,(中)ESPCN_x3升级图像,(右)图像使用OpenCV的resize函数放大
(左)原始图像,(中)ESPCNx?3升级图像,(右)图像使用OpenCV的resize函数放大
4.FSRCNN
FSRCNN和ESPCN有着非常相似的概念。它们的基本结构都受到SRCNN的启发,并在最后采用了上采样层以提高速度,而不是在早期插入它。此外,他们甚至缩小了输入特征维数,使用更小的滤波器尺寸,最后使用更多的映射层,这使得模型更小更快。
下图是FSRCNN方法、双三次插值方法与原始高分辨率图像的3x超分辨率结果对比。
(1)Python
import cv2
import matplotlib.pyplot as plt
# 读取图片
img = cv2.imread("AI-Courses-By-OpenCV-Github.png")
img = img[5:60,700:755]
sr = cv2.dnn_superres.DnnSuperResImpl_create()
path = "FSRCNN_x3.pb"
sr.readModel(path)
sr.setModel("fsrcnn",3)
result = sr.upsample(img)
# 调整图像大小
resized = cv2.resize(img,dsize=None,fx=3,fy=3)
plt.figure(figsize=(6,2))
plt.subplot(1,3,1)
# 原始图像
plt.imshow(img[:,:,::-1])
plt.subplot(1,3,2)
# SR上采样图像
plt.imshow(result[:,:,::-1])
plt.subplot(1,3,3)
# OpenCV 上采样图像
plt.imshow(resized[:,:,::-1])
plt.show()
(2)C++
#include <iostream>
#include <opencv2/dnn_superres.hpp>
#include <opencv2/imgproc.hpp>
#include <opencv2/highgui.hpp>

using namespace std;
using namespace cv;
using namespace dnn;
using namespace dnn_superres;

Mat upscaleImage(Mat img, string modelName, string modelPath, int scale){
	DnnSuperResImpl sr;
	sr.readModel(modelPath);
	sr.setModel(modelName,scale);
	// 输出
	Mat outputImage;
	sr.upsample(img, outputImage);
	return outputImage;
}

int main(int argc, char *argv[])
{
	// 读取图片
	Mat img = imread("AI-Courses-By-OpenCV-Github.png");
	// 裁剪ROI
	Rect roi;
	roi.x = 850;
	roi.y = 0;
	roi.width = img.size().width - 850;
	roi.height = 80;
	img = img(roi);

	// FSRCNN (x3)
	string path = "FSRCNN_x3.pb";
	string modelName = "fsrcnn";
	int scale = 3;
	Mat result = upscaleImage(img, modelName, path, scale);

	// 使用OpenCV调整图像大小
	Mat resized;
	cv::resize(img, resized, cv::Size(), scale, scale);

	imshow("Original image",img);
	imshow("SR upscaled",result);
	imshow("OpenCV upscaled",resized);
	waitKey(0);
	destroyAllWindows();
	return 0;
}
(
左
)
原
始
图
像
,
中
(
)
F
S
R
C
N
N
_
3
倍
的
放
大
图
像
,
(
右
)
使
用
O
p
e
n
C
V
的
r
e
s
i
z
e
函
数
放
大
图
像
(左)原始图像,中()FSRCNN\_3倍的放大图像,(右)使用OpenCV的resize函数放大图像
(左)原始图像,中()FSRCNN_3倍的放大图像,(右)使用OpenCV的resize函数放大图像
5.LapSRN
LapSRN在开始和结束的对比策略中提供了一个中间地带。它建议一直到最后都要温和地上采样。它的名字是基于拉普拉斯金字塔的,结构基本上就像一个金字塔,在低分辨率的图像上不断升级,直到最后。对于速度,参数共享是非常依赖的;就像EDSR模型一样,他们还提出了一个可以重建不同尺度的单一模型,称之为MS-LapSRN。然而,在本文中,我们只讨论LapSRN。
该模型包括两个分支:特征提取和图像重建。不同尺度之间存在参数共享,例如4x使用2x模型的参数等。这意味着一个金字塔用于缩放2x,两个用于缩放4x,三个用于缩放8x!制作这种深度模型意味着它们可能会遇到梯度消失的问题。因此,他们尝试不同类型的本地跳连接,如不同源跳连接和共享源连接。模型的损失函数使用Charbonnier损失,不使用批处理归一化层。
下图是LapSRN方法和双三次插值方法的8倍超分辨率结果与原始高分辨率图像的对比。
(1)Python
import cv2
import matplotlib.pyplot as plt
# 读取图片
img = cv2.imread("AI-Courses-By-OpenCV-Github.png")
img = img[5:60,700:755]
sr = cv2.dnn_superres.DnnSuperResImpl_create()
path = "LapSRN_x8.pb"
sr.readModel(path)
sr.setModel("lapsrn",8)
result = sr.upsample(img)
# 调整图像大小
resized = cv2.resize(img,dsize=None,fx=8,fy=8)
plt.figure(figsize=(6,2))
plt.subplot(1,3,1)
# 原始图像
plt.imshow(img[:,:,::-1])
plt.subplot(1,3,2)
# SR上采样图像
plt.imshow(result[:,:,::-1])
plt.subplot(1,3,3)
# OpenCV 上采样图像
plt.imshow(resized[:,:,::-1])
plt.show()
(2)C++
#include <iostream>
#include <opencv2/dnn_superres.hpp>
#include <opencv2/imgproc.hpp>
#include <opencv2/highgui.hpp>

using namespace std;
using namespace cv;
using namespace dnn;
using namespace dnn_superres;

Mat upscaleImage(Mat img, string modelName, string modelPath, int scale){
	DnnSuperResImpl sr;
	sr.readModel(modelPath);
	sr.setModel(modelName,scale);
	// 输出
	Mat outputImage;
	sr.upsample(img, outputImage);
	return outputImage;
}

int main(int argc, char *argv[])
{
	// 读取图片
	Mat img = imread("AI-Courses-By-OpenCV-Github.png");
	// 裁剪感兴趣区域
	Rect roi;
	roi.x = 850;
	roi.y = 0;
	roi.width = img.size().width - 850;
	roi.height = 80;
	img = img(roi);

	// LapSRN (x2)
	string path = "LapSRN_x8.pb";
	string modelName = "lapsrn";
	int scale = 8;
	Mat result = upscaleImage(img, modelName, path, scale);

	// 使用OpenCV的上采样
	Mat resized;
	cv::resize(img, resized, cv::Size(), scale, scale);

	imshow("Original image",img);
	imshow("SR upscaled",result);
	imshow("OpenCV upscaled",resized);
	waitKey(0);
	destroyAllWindows();

	return 0;
}
6.结果对比

为了显示这里的结果,上面图像中只有蝴蝶区域被裁剪掉了。使用超分辨率模型进行了四次放大,如下表所示。
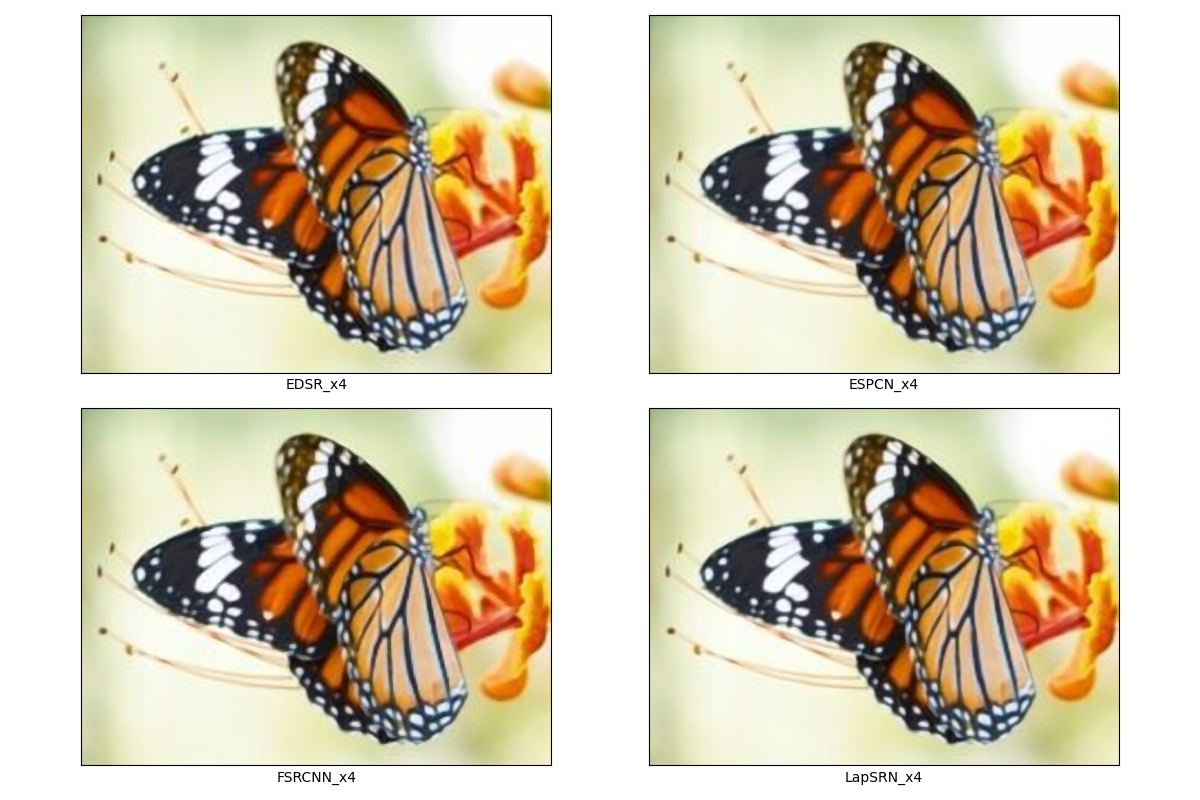
比较的Python代码:
import cv2
import matplotlib.pyplot as plt

# 读取图片
img = cv2.imread("image.png")
plt.imshow(img[130:290, 150:360, ::-1])
# plt.show()
plt.figure(figsize=(12, 8))
img = img[130:290, 150:360]

# EDSR_x4
sr = cv2.dnn_superres.DnnSuperResImpl_create()
path = "EDSR_x4.pb"
sr.readModel(path)
sr.setModel("edsr", 4)
result_edsr = sr.upsample(img)
plt.subplot(2, 2, 1)
plt.xticks([])
plt.yticks([])
plt.xlabel("EDSR_x4")
plt.imshow(result_edsr[:, :, ::-1])

# ESPCN_x4
sr = cv2.dnn_superres.DnnSuperResImpl_create()
path = "ESPCN_x4.pb"
sr.readModel(path)
sr.setModel("espcn", 4)
result_espcn = sr.upsample(img)
plt.subplot(2, 2, 2)
plt.xticks([])
plt.yticks([])
plt.xlabel("ESPCN_x4")
plt.imshow(result_espcn[:, :, ::-1])

# FSRCNN_x4
sr = cv2.dnn_superres.DnnSuperResImpl_create()
path = "FSRCNN_x4.pb"
sr.readModel(path)
sr.setModel("fsrcnn", 4)
result_fsrcnn = sr.upsample(img)
plt.subplot(2, 2, 3)
plt.xticks([])
plt.yticks([])
plt.xlabel("FSRCNN_x4")
plt.imshow(result_fsrcnn[:, :, ::-1])

# LapSRN_x4
sr = cv2.dnn_superres.DnnSuperResImpl_create()
path = "LapSRN_x4.pb"
sr.readModel(path)
sr.setModel("lapsrn", 4)
result_lapsrn = sr.upsample(img)
plt.subplot(2, 2, 4)
plt.imshow(result_lapsrn[:, :, ::-1])
plt.xticks([])
plt.yticks([])
plt.xlabel("LapSRN_x4")
plt.show()
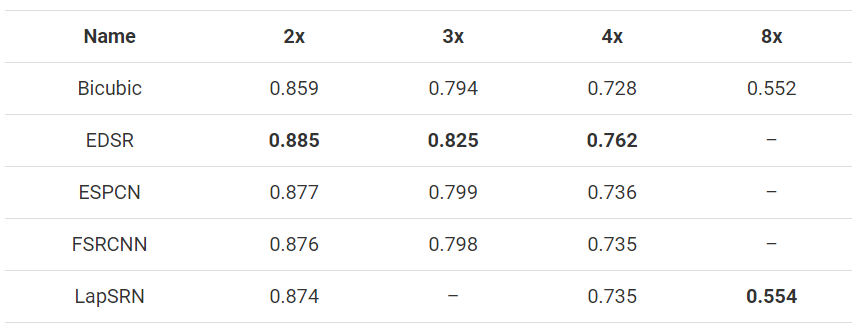
仅仅通过放大图像,用肉眼很难分辨出不同的结果。因此,为了验证所有模型的性能,这些技术被应用于3张尺寸为500x333的图像,并缩小到所需的尺寸,然后将其上采样回500x333。然后利用PSNR和SSIM将放大后的图像与原始图像进行比较。计算了所有图像的平均结果,如下图所示。
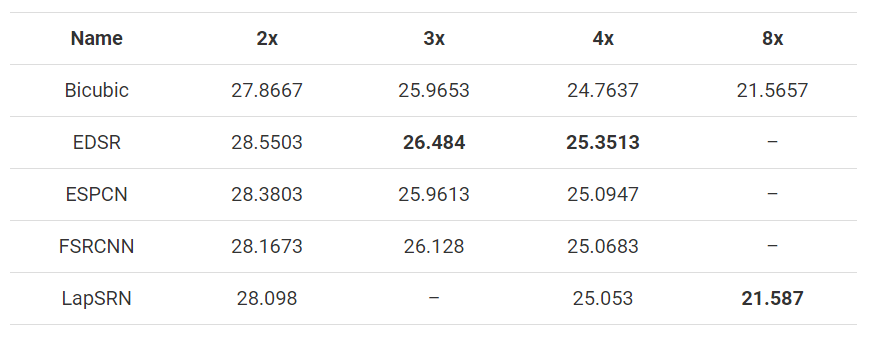
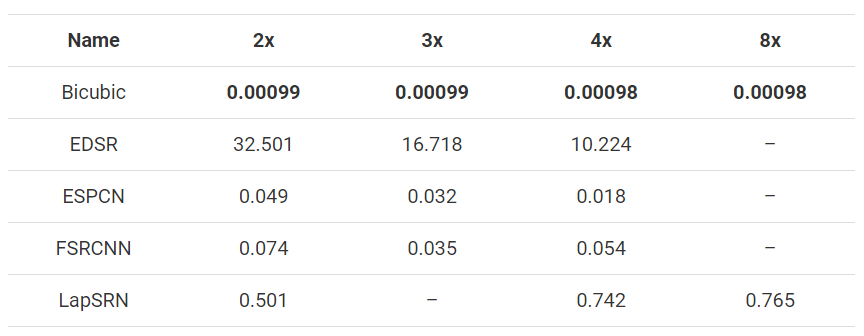
此外,还记录了在Intel i5-7200U上花费的时间,下面给出了所有图像的平均值。请记住,3x的图像大小花费的时间小于2x,如果缩放系数更大,情况也是如此。
(1)Python
import numpy as np
import cv2 as cv
import argparse
import sys


def getPSNR(I1, I2):
    s1 = cv.absdiff(I1, I2)  # |I1 - I2|
    s1 = np.float32(s1)  # 这里我们使用的CV_32F来计算,因为8位无符号char是不能进行平方计算
    s1 = s1 * s1  # |I1 - I2|^2
    sse = s1.sum()  # 每通道元素和
    if sse <= 1e-10:
        return 0  # 对于较小的值返回0
    else:
        shape = I1.shape
        mse = 1.0 * sse / (shape[0] * shape[1] * shape[2])
        psnr = 10.0 * np.log10((255 * 255) / mse)
        return psnr


def getMSSISM(i1, i2):
    C1 = 6.5025
    C2 = 58.5225
    # INITS

    I1 = np.float32(i1)  # 不能在单字节像素上进行计算,范围不够。
    I2 = np.float32(i2)

    I2_2 = I2 * I2  # I2^2
    I1_2 = I1 * I1  # I1^2
    I1_I2 = I1 * I2  # I1 * I2
    # END INITS

    # PRELIMINARY COMPUTING
    mu1 = cv.GaussianBlur(I1, (11, 11), 1.5)
    mu2 = cv.GaussianBlur(I2, (11, 11), 1.5)

    mu1_2 = mu1 * mu1
    mu2_2 = mu2 * mu2
    mu1_mu2 = mu1 * mu2

    sigma1_2 = cv.GaussianBlur(I1_2, (11, 11), 1.5)
    sigma1_2 -= mu1_2

    sigma2_2 = cv.GaussianBlur(I2_2, (11, 11), 1.5)
    sigma2_2 -= mu2_2

    sigma12 = cv.GaussianBlur(I1_I2, (11, 11), 1.5)
    sigma12 -= mu1_mu2

    t1 = 2 * mu1_mu2 + C1
    t2 = 2 * sigma12 + C2
    t3 = t1 * t2  # t3 = ((2*mu1_mu2 + C1).*(2*sigma12 + C2))

    t1 = mu1_2 + mu2_2 + C1
    t2 = sigma1_2 + sigma2_2 + C2
    t1 = t1 * t2  # t1 =((mu1_2 + mu2_2 + C1).*(sigma1_2 + sigma2_2 + C2))

    ssim_map = cv.divide(t3, t1)  # ssim_map =  t3./t1;

    mssim = cv.mean(ssim_map)  # mssim = average of ssim map
    return mssim


if __name__ == "__main__":
    # 读取输入的两幅图像,要保证两张图像大小一致
    img1 = cv.imread('image.jpg')
    img2 = cv.imread('output.jpg')
    img2 = cv.resize(img2, (img1.shape[1],img1.shape[0]))
    print(img1.shape)
    print(img2.shape)
    # 调用函数
    psnr = getPSNR(img1, img2)
    mssimV = getMSSISM(img1, img2)
    print(psnr)
    print(mssimV)
(2)C++
#include <opencv2/core/core.hpp>
#include <opencv2/highgui/highgui.hpp>
// 2个图像之间PSNR值越大,则越相似。
//输入格式是Mat类型,I1,I2代表是输入的两幅图像
double getPSNR(const Mat& I1, const Mat& I2)
{
    Mat s1;
    absdiff(I1, I2, s1);       // |I1 - I2|AbsDiff函数是 OpenCV 中计算两个数组差的绝对值的函数
    s1.convertTo(s1, CV_32F);  // 这里我们使用的CV_32F来计算,因为8位无符号char是不能进行平方计算
    s1 = s1.mul(s1);           // |I1 - I2|^2
    Scalar s = sum(s1);         //对每一个通道进行加和
    double sse = s.val[0] + s.val[1] + s.val[2]; // sum channels
    if( sse <= 1e-10) // 对于非常小的值我们将约等于0
        return 0;
    else
    {
        double  mse =sse /(double)(I1.channels() * I1.total());//计算MSE
        double psnr = 10.0*log10((255*255)/mse);
        return psnr;//返回PSNR
    }
}
Scalar getMSSIM( const Mat& i1, const Mat& i2)
{
	 const double C1 = 6.5025, C2 = 58.5225;
	 /***************************** INITS **********************************/
	 int d = CV_32F;
	 Mat I1, I2;
	 i1.convertTo(I1, d);           // 不能在单字节像素上进行计算,范围不够。
	 i2.convertTo(I2, d);

	 Mat I2_2   = I2.mul(I2);        // I2^2
	 Mat I1_2   = I1.mul(I1);        // I1^2
	 Mat I1_I2  = I1.mul(I2);        // I1 * I2

	 /***********************初步计算 ******************************/

	 Mat mu1, mu2;   //初步的计算
	 GaussianBlur(I1, mu1, Size(11, 11), 1.5);
	 GaussianBlur(I2, mu2, Size(11, 11), 1.5);

	 Mat mu1_2   =   mu1.mul(mu1);
	 Mat mu2_2   =   mu2.mul(mu2);
	 Mat mu1_mu2 =   mu1.mul(mu2);

	 Mat sigma1_2, sigma2_2, sigma12;
	 GaussianBlur(I1_2, sigma1_2, Size(11, 11), 1.5);
	 sigma1_2 -= mu1_2;
	 GaussianBlur(I2_2, sigma2_2, Size(11, 11), 1.5);
	 sigma2_2 -= mu2_2;
	 GaussianBlur(I1_I2, sigma12, Size(11, 11), 1.5);
	 sigma12 -= mu1_mu2;
	 / 公式
	 Mat t1, t2, t3;
	 t1 = 2 * mu1_mu2 + C1;
	 t2 = 2 * sigma12 + C2;
	 t3 = t1.mul(t2);          // t3 = ((2*mu1_mu2 + C1).*(2*sigma12 + C2))

	 t1 = mu1_2 + mu2_2 + C1;
	 t2 = sigma1_2 + sigma2_2 + C2;
	 t1 = t1.mul(t2);   // t1 =((mu1_2 + mu2_2 + C1).*(sigma1_2 + sigma2_2 + C2))

	 Mat ssim_map;
	 divide(t3, t1, ssim_map);     // ssim_map =  t3./t1;

	 Scalar mssim = mean( ssim_map ); // mssim = ssim_map的平均值
	 return mssim;
}
int main()
{
	//先定义PSNR
	double psnr;
	Scalar mssimV;
	//然后读取输入的两幅图像,要保证两张图像大小一致
	Mat img1=imread('1.jpg');
	Mat img2=imread('2.jpg');
	//调用函数
	psnr = getPSNR(img1,img2);
	mssimV = getMSSIM(img1,img2);
	cout << " PSNR: " << setiosflags(ios::fixed) << setprecision(3) << psnrV << "dB";
	cout << " MSSIM: "
                << " R " << setiosflags(ios::fixed) << setprecision(2) << mssimV.val[2] * 100 << "%"
                << " G " << setiosflags(ios::fixed) << setprecision(2) << mssimV.val[1] * 100 << "%"
                << " B " << setiosflags(ios::fixed) << setprecision(2) << mssimV.val[0] * 100 << "%";
}
在考察压缩后的视频时,这个值大约在30到50之间,数字越大则表明压缩质量越好。如果图像差异很明显,就可能会得到15甚至更低的值。PSNR算法简单,检查的速度也很快。但是其呈现的差异值有时候和人的主观感受不成比例。所以有另外一种称作结构相似性(Structural Similarity Index Measure, SSIM)的算法做出了这方面的改进。
SSIM操作会针对图像的每个通道返回一个相似度,取值范围应该在0到1之间,取值为1时代表完全符合。然而尽管SSIM能产生更优秀的数据,但是由于高斯模糊很花时间,所以在一个实时系统(每秒24帧)中,人们还是更多地采用PSNR算法。
正是这个原因,最开始的源码里,我们用PSNR算法去计算每一帧图像,而仅当PSNR算法计算出的结果低于输入值的时候,用SSIM算法去验证。
应用
超分辨率不仅仅是将科幻或犯罪电影的侦查变成现实的工具。超分辨率的应用遍及各个领域。
医学成像(Medical Imaging):超分辨率是提高x射线和CT扫描质量的一个很好的解决方案。它有助于突出有关人体解剖和功能信息的重要细节。提高分辨率或增强医学图像也有助于突出肿瘤。多媒体,图像和视频处理应用(Multimedia, Image, and Video Processing Applications):超分辨率可以将手机视频中的模糊帧转换成清晰可读的图像或快照。生物识别(Biometric Identification):通过对人脸、指纹和虹膜图像的增强,超分辨率在生物识别中起着至关重要的作用。形状、结构和纹理都得到了极大的增强,这有助于识别生物指纹。遥感(Remote Sensing):在遥感和卫星成像中使用超分辨率的概念已经发展了几十年。事实上,第一个超分辨率的想法是由对更高质量和更高分辨率的陆地卫星遥感图像的需求所激发的。天文成像(Astronomical imaging):提高天文图片的分辨率有助于关注微小的细节,这些微小的细节可能会成为外太空的重大发现。监控成像(Surveillance Imaging):交通监控和安全系统在维护平民安全方面起着非常重要的作用。在数字录像上应用超分辨率在识别交通或安全违规方面大有帮助。
总结
在这篇博客中,我们简单介绍了超分辨率的概念。我们选择了四种超分辨率模型,讨论了它们的体系结构和结果,以突出图像超分辨率选择的多样性和这些方法的效率。
总结我们的观察,EDSR轻松地给出了四种方法中最好的结果。但是,它速度很慢,不能用于实时应用程序。ESPCN和FSRCNN是实时性和性能的首选方法。对于8倍的放大系数,即使可以使用2倍和4倍的组合模型,LapSRN的8倍放大模型在大多数情况下表现更好。虽然这些方法在速度上都不能与传统的双三次方法相媲美,但它们都具有一定的优越性。
参考目录
https://blog.csdn.net/yat_chiu/article/details/77893485
https://learnopencv.com/super-resolution-in-opencv/
http://www.opencv.org.cn/opencvdoc/2.3.2/html/doc/tutorials/highgui/video-input-psnr-ssim/video-input-psnr-ssim.html