卡尔曼滤波在目标跟踪中的运用
一、算法简述
??卡尔曼滤波(Kalman filtering)是一种利用线性系统状态方程,通过系统输入输出观测数据,对系统状态进行最优估计的算法。可在任何含有不确定信息的动态系统中使用卡尔曼滤波,对系统下一步的走向做出有根据的预测,即使伴随着各种干扰,卡尔曼滤波总是能指出真实发生的情况。在连续变化的系统中,使用卡尔曼滤波是非常理想的,它具有占用内存小的优点,并且速度很快,很适合用于实时问题和嵌入式系统。
??在目标跟踪应用中,使用卡尔曼滤波器对系统进行预测,可以有效地解决目标移动过程中出现遮挡导致目标丢失的情况。
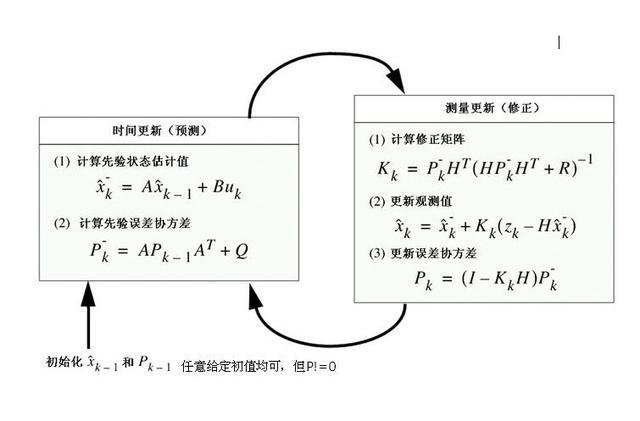
??算法主要流程如下图所示:

??接下来,我们使用python基于卡尔曼滤波算法进行对鼠标移动的跟踪。
二、算法实践
1. 手写卡尔曼滤波器
参数解释:
X(k):k时刻系统状态
A:状态转移矩阵,对应opencv里kalman滤波器的transitionMatrix矩阵
B:控制输入矩阵,对应opencv里kalman滤波器的controlMatrix矩阵
U(k):k时刻对系统的控制量
Z(k):k时刻的测量值
H:系统测量矩阵,对应opencv里kalman滤波器的measurementMatrix矩阵
Q:过程噪声协方差矩阵,对应opencv里的kalman滤波器的processNoiseCov矩阵
R:观测噪声协方差矩阵,对应opencv里的kalman滤波器的measurementNoiseCov矩阵
P: 状态估计协方差矩阵
状态和参数初始化
# 状态初始化
last_mes = current_mes = np.zeros((4, 1), np.float32)
last_pre = current_pre = np.zeros((4, 1), np.float32)
# 状态转移矩阵,上一时刻的状态转移到当前时刻
A = np.array([[1, 0, 1, 0],
              [0, 1, 0, 1],
              [0, 0, 1, 0],
              [0, 0, 0, 1]], np.float32)
# 状态观测矩阵
H = np.eye(4)
# 过程噪声协方差矩阵Q,p(w)~N(0,Q),噪声来自真实世界中的不确定性,
# 在跟踪任务当中,过程噪声来自于目标移动的不确定性(突然加速、减速、转弯等)
Q = np.eye(4) * 0.1
# 观测噪声协方差矩阵R,p(v)~N(0,R)
# 观测噪声来自于检测框丢失、重叠等
R = np.eye(4) * 1
# 控制输入矩阵B
B = None
# 状态估计协方差矩阵P初始化
P = np.eye(4)
P_posterior = np.array(P)
(1)计算先验状态估计值
# -----计算先验状态估计值-------------
X_prior = np.dot(A, last_pre)
(2)计算先验误差协方差
# -----计算先验误差协方差矩阵P--------
P_prior_1 = np.dot(A, P_posterior)
P_prior = np.dot(P_prior_1, A.T) + Q
(3)计算修正矩阵
# ------计算修正矩阵-----------------
k1 = np.dot(P_prior, H.T)
k2 = np.dot(np.dot(H, P_prior), H.T) + R
K = np.dot(k1, np.linalg.inv(k2))
(4)更新观测值
# ------更新观测值------------
current_pre_1 = current_mes - np.dot(H, X_prior)
current_pre = X_prior + np.dot(K, current_pre_1)
(5)更新误差协方差
# ------更新误差协方差矩阵P-----
P_posterior_1 = np.eye(4) - np.dot(K, H)
P_posterior = np.dot(P_posterior_1, P_prior)
完整代码如下:
import cv2
import numpy as np

frame = np.zeros((800, 800, 3), np.uint8)

# 状态初始化
last_mes = current_mes = np.zeros((4, 1), np.float32)
last_pre = current_pre = np.zeros((4, 1), np.float32)
# 状态转移矩阵,上一时刻的状态转移到当前时刻
A = np.array([[1, 0, 1, 0],
              [0, 1, 0, 1],
              [0, 0, 1, 0],
              [0, 0, 0, 1]], np.float32)
# 状态观测矩阵
H = np.eye(4)
# 过程噪声协方差矩阵Q,p(w)~N(0,Q),噪声来自真实世界中的不确定性,
# 在跟踪任务当中,过程噪声来自于目标移动的不确定性(突然加速、减速、转弯等)
Q = np.eye(4) * 0.1
# 观测噪声协方差矩阵R,p(v)~N(0,R)
# 观测噪声来自于检测框丢失、重叠等
R = np.eye(4) * 1
# 控制输入矩阵B
B = None
# 状态估计协方差矩阵P初始化
P = np.eye(4)
P_posterior = np.array(P)


def mousemove(event, x, y, s, p):
    global frame, current_mes, last_mes, current_pre, last_pre, P_posterior
    last_pre = current_pre
    last_mes = current_mes
    dx = x - last_pre[0]
    dy = y - last_pre[1]
    current_mes = np.array([[x], [y], [dx], [dy]], np.float32)

    '''predict'''
    # -----计算先验状态估计值-------------
    X_prior = np.dot(A, last_pre)
    # -----计算先验误差协方差矩阵P--------
    P_prior_1 = np.dot(A, P_posterior)
    P_prior = np.dot(P_prior_1, A.T) + Q

    '''correct'''
    # ------计算修正矩阵-----------------
    k1 = np.dot(P_prior, H.T)
    k2 = np.dot(np.dot(H, P_prior), H.T) + R
    K = np.dot(k1, np.linalg.inv(k2))
    # ------更新观测值------------
    current_pre_1 = current_mes - np.dot(H, X_prior)
    current_pre = X_prior + np.dot(K, current_pre_1)
    # ------更新误差协方差矩阵P-----
    P_posterior_1 = np.eye(4) - np.dot(K, H)
    P_posterior = np.dot(P_posterior_1, P_prior)

    lmx, lmy = last_mes[0], last_mes[1]
    lpx, lpy = last_pre[0], last_pre[1]
    cmx, cmy = current_mes[0], current_mes[1]
    cpx, cpy = current_pre[0], current_pre[1]
    cv2.line(frame, (lmx, lmy), (cmx, cmy), (255, 255, 255))	# 白色线为测量值
    cv2.line(frame, (lpx, lpy), (cpx, cpy), (0, 0, 255))		# 红色线为预测值


cv2.namedWindow("kalman_mouse_tracker")
cv2.setMouseCallback("kalman_mouse_tracker", mousemove)

while (True):
    cv2.imshow('kalman_mouse_tracker', frame)
    if cv2.waitKey(1) & 0xFF == ord('q'):
        break

cv2.destroyAllWindows()
2. 调用opencv自带的卡尔曼滤波器
初始化参数
kalman = cv2.KalmanFilter(4, 2)  # 4:状态数,包括(x,y,dx,dy)坐标及速度(每次移动的距离);2:观测量,能看到的是坐标值
kalman.measurementMatrix = np.array([[1, 0, 0, 0], [0, 1, 0, 0]], np.float32)  # 系统测量矩阵
kalman.transitionMatrix = np.array([[1, 0, 1, 0], [0, 1, 0, 1], [0, 0, 1, 0], [0, 0, 0, 1]], np.float32)  # 状态转移矩阵
kalman.processNoiseCov = np.array([[1, 0, 0, 0], [0, 1, 0, 0], [0, 0, 1, 0], [0, 0, 0, 1]],np.float32) * 0.003  # 系统过程噪声协方差
预测和校准
kalman.correct(current_measurement)    # 用当前测量来校正卡尔曼滤波器
current_prediction = kalman.predict()  # 计算卡尔曼预测值,作为当前预测
完整代码如下:
import cv2
import numpy as np

# 创建一个空帧,定义(700, 700, 3)画图区域
frame = np.zeros((700, 1000, 3), np.uint8)

# 初始化测量坐标和鼠标运动预测的数组
last_measurement = current_measurement = np.array((2, 1), np.float32)
last_prediction = current_prediction = np.zeros((2, 1), np.float32)


# 定义鼠标回调函数,用来绘制跟踪结果
def mousemove(event, x, y, s, p):
    global frame, current_measurement, last_measurement, current_prediction, last_prediction
    last_prediction = current_prediction  # 把当前预测存储为上一次预测
    last_measurement = current_measurement  # 把当前测量存储为上一次测量
    current_measurement = np.array([[np.float32(x)], [np.float32(y)]])  # 当前测量
    kalman.correct(current_measurement)  # 用当前测量来校正卡尔曼滤波器
    current_prediction = kalman.predict()  # 计算卡尔曼预测值,作为当前预测

    lmx, lmy = last_measurement[0], last_measurement[1]  # 上一次测量坐标
    cmx, cmy = current_measurement[0], current_measurement[1]  # 当前测量坐标
    lpx, lpy = last_prediction[0], last_prediction[1]  # 上一次预测坐标
    cpx, cpy = current_prediction[0], current_prediction[1]  # 当前预测坐标

    # 绘制从上一次测量到当前测量以及从上一次预测到当前预测的两条线
    cv2.line(frame, (lmx, lmy), (cmx, cmy), (255, 255, 255), 1)  # 白色线为测量值
    cv2.line(frame, (lpx, lpy), (cpx, cpy), (0, 0, 255))  	     # 红色线为预测值
    # cv2.circle(frame, (cpx, cpy), 2, (0, 255, 0), -1)


# 窗口初始化
cv2.namedWindow("kalman_mouse_tracker")

# opencv采用setMouseCallback函数处理鼠标事件,具体事件必须由回调(事件)函数的第一个参数来处理,该参数确定触发事件的类型(点击、移动等)
cv2.setMouseCallback("kalman_mouse_tracker", mousemove)

kalman = cv2.KalmanFilter(4, 2)  # 4:状态数,包括(x,y,dx,dy)坐标及速度(每次移动的距离);2:观测量,能看到的是坐标值
kalman.measurementMatrix = np.array([[1, 0, 0, 0], [0, 1, 0, 0]], np.float32)  # 系统测量矩阵
kalman.transitionMatrix = np.array([[1, 0, 1, 0], [0, 1, 0, 1], [0, 0, 1, 0], [0, 0, 0, 1]], np.float32)  # 状态转移矩阵
kalman.processNoiseCov = np.array([[1, 0, 0, 0], [0, 1, 0, 0], [0, 0, 1, 0], [0, 0, 0, 1]],np.float32) * 0.003  # 系统过程噪声协方差

while True:
    cv2.imshow("kalman_mouse_tracker", frame)
    key = cv2.waitKey(1) & 0xFF
    if key == ord('q'):
        break
cv2.destroyAllWindows()
总结
??对于上述所介绍的卡尔曼滤波的预测和更新都是基于线性计算基础上的,只适用于线性系统。但是在现实中,大多数系统往往是非线性的。这时,需要引入适用于非线性问题的扩展卡尔曼滤波(EKF)。