目录
1.简介
目标站点:晋江文学城书库
爬虫工具:BeautifulSoup
数据分析:pandas,matplotlib
词云:wordcloud,re
PS. 鉴于江湖上一直流传着jj老板抠门得很,程序员只有3个服务器也只有几台办公还在小区里面,建议爬的时候通过sleep放慢爬取速度,减少给服务器的压力。
2.爬虫
2.1 url解析
在文库首页上随便勾选几个选项试试,观察url的变化(注意【】框出的部分):
-
性向:言情,按发表时间排序,只显示已完成,得到的url:
https://www.jjwxc.net/bookbase.php?fw0=0&fbsj0=0&ycx0=0&【xx1=1】&mainview0=0&sd0=0&lx0=0&fg0=0&bq=&removebq=&【sortType=3】&collectiontypes=ors&searchkeywords=&【page=0】&【isfinish=2】 -
性向:纯爱,按作品收藏排序,只显示无限制,跳转到第4页,得到的url:
https://www.jjwxc.net/bookbase.php?fw0=0&fbsj0=0&ycx0=0&【xx2=2】&mainview0=0&sd0=0&lx0=0&fg0=0&bq=&removebq=&【sortType=4】&【page=4】&【isfinish=0】&collectiontypes=ors&searchkeywords=
总结出来几个参数:
- 页数: page,从1开始(但0也是第一页)。上限为1000。
- 性向:言情是xx1=1、纯爱xx2=2、百合xx3=3,如果要同时选择多个性向就一起写上
- 排序方式:sortType,更新时间=1,作品收藏=4,发表时间=3,作品积分=2
- 是否完结:isfinish,无限制=0,连载中=1,已完结=2
2.2 页面元素解析
想要爬取的数据如下:

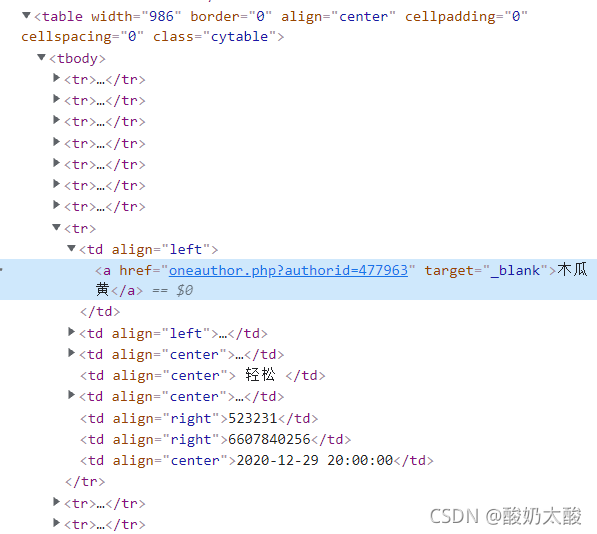
按F12打开开发者工具,查看页面元素,发现所有信息在一个table中(class=“cytable”),每行是一个tr,每个单元格是一个td。

2.3 登录
尝试跳转到超过10的页面时会出现要求登录的界面:

登录晋江账号后,按F12打开开发者工具,打开network选项卡,刷新页面,寻找到对应数据包,在headers中复制cookie,加到爬虫的请求头中。

2.4 完整代码
def main(save_path, sexual_orientation):
	"""
	save_path: 文件保存路径
    sexual_orientation: 1:言情,2:纯爱,3:百合,4:女尊,5:无CP
    """
    for page in range(1, 1001):
        url = get_url(page, sexual_orientation)
        headers = {
            'cookie': 你的cookie,
            'User-Agent': 'Mozilla/5.0 (Windows NT 10.0; Win64; x64) AppleWebKit/537.36 (KHTML, like Gecko) Chrome/93.0.4577.63 Safari/537.36'}
        html = requests.get(url, headers=headers)
        html.encoding = html.apparent_encoding
        try:
            data = parse(html.content)
        except:
            print("爬取失败:", page)
            continue
        if len(data) == 0:
            break
        df = pd.DataFrame(data)
        df.to_csv(save_path, mode='a', header=False, index=False)
        print(page)
        time.sleep(3)


def get_url(page, sexual_orientation):
    url = f"https://www.jjwxc.net/bookbase.php?fw0=0&fbsj0=0&ycx1=1&xx{sexual_orientation}={sexual_orientation}&mainview0=0&sd0=0&lx0=0&fg0=0&bq=-1&" \
          f"sortType=3&isfinish=2&collectiontypes=ors&page={page}"
    return url


def parse(document):
    soup = BeautifulSoup(document, "html.parser")
    table = soup.find("table", attrs={'class': 'cytable'})
    rows = table.find_all("tr")
    data_all = []
    for row in rows[1:]:
        items = row.find_all("td")
        data = []
        for item in items:
            text = item.get_text(strip=True)
            data.append(text)
        data_all.append(data)
    return data_all

if __name__ == "__main__":
	main("言情.txt", 1)
3. 数据分析与可视化
使用pandas读取爬到的数据,如下:

进行简单的预处理
# 去重
df = df.drop_duplicates(subset=["author", "name"])
print("文章数量:", df.shape[0])

# 时间类型转换
df["publish_time"] = pd.to_datetime(df["publish_time"])

# 字数转换为万字
df["word"] /= 10000

# 积分转换为万
df["points"] /= 10000
3.1 柱状图
查看字数的最小值和最大值:
df["word"].min(), df["word"].max()
结果:(0.0001, 616.9603)(单位:万字),故分组时最小值设为0,最大值设为700。
# 设置数据分组的位置
bins_words = [0, 0.5, 1, 10, 20, 40, 60, 80, 100, 700]

# 2018年以前发表的小说字数分布
words_distribution1 = pd.value_counts(pd.cut(df.query("publish_time<'2018-01-01'")["word"], bins=bins_words), sort=False)
words_distribution1 /= np.sum(words_distribution1)  # 归一化

# 2018年以后发表的小说字数分布
words_distribution2 = pd.value_counts(pd.cut(df.query("publish_time>='2018-01-01'")["word"], bins=bins_words), sort=False)
words_distribution2 /= np.sum(words_distribution2)  # 归一化

# 画图
plt.figure(dpi=100)
plt.title("小说字数分布图", fontsize=15)
loc = np.array([i for i in range(len(words_distribution1.index))])
plt.bar(loc-0.15, words_distribution1.values, width=0.3, label="2018年以前")
plt.bar(loc+0.15, words_distribution2.values, width=0.3, label="2018年以后")
plt.xticks(loc, words_distribution1.index, rotation=45)
plt.xlabel("字数/万字")
plt.ylabel("比例")
plt.legend()

3.2 饼图
- 类型统计。
大部分类型的格式为“原创-纯爱-架空历史-仙侠”,可以以“-”为间隔进行分割,取第三个标签。
然而还有少量作品的类型格式为“随笔”/“评论”/“未知”,直接访问下标为2的元素会报错,因此加入一个if语句进行处理。# 类型统计 tags = df["type"].apply(lambda x: x.split("-")[2] if len(x.split("-"))==4 else x) tag_count = pd.value_counts(tags) # 合并数量过少的类别 tag_count["其他"] = tag_count["未知"] + tag_count["随笔"] + tag_count["评论"] + tag_count["诗歌"] + tag_count[""] tag_count = tag_count.drop(["未知","随笔","评论","诗歌", ""]) - 风格统计
# 风格统计 manner_count = pd.value_counts(df["manner"]) # 合并数量过少的类别 manner_count["其他"] = manner_count["暗黑"] + manner_count["爆笑"] + manner_count["未知"] manner_count = manner_count.drop(["暗黑", "爆笑", "未知"]) - 画图
fig, axes = plt.subplots(1, 2, figsize=(10,5), dpi=100)
fig.subplots_adjust(wspace=0.05)
axes[0].pie(tag_count,
        labels=tag_count.index,
        autopct='%1.2f%%',
        pctdistance=0.7,
        colors=[plt.cm.Set3(i) for i in range(len(tag_count))],
        textprops={'fontsize':10},
        wedgeprops={'linewidth': 1, 'edgecolor': "black"}
       )
axes[0].set_title("类型", fontsize=15)

axes[1].pie(manner_count,
        labels=manner_count.index,
        autopct='%1.2f%%',
        pctdistance=0.7,
        colors=[plt.cm.Accent(i) for i in range(len(manner_count))],
        textprops={'fontsize':10},
        wedgeprops={'linewidth': 1, 'edgecolor': "black"}
       )
axes[1].set_title("风格", fontsize=15)
4. 小说标题词云
from wordcloud import WordCloud
import jieba
import pandas as pd
import matplotlib.pyplot as plt
import re
4.1 分词
- 要点:
- 使用jieba分词库对每个标题进行分词(使用DataFrame的矢量化操作,加快处理速度)
- 原始标题中含有较多符号(如(上)、[ABO]、被河蟹后变成的*号)和英文字符,可以使用正则表达式进行去除。
去除前 vs 去除后:

- 代码:
# 增加自定义词
jieba.add_word("快穿")
# 对每个标题进行分词,以英文逗号为间隔
words_arr = df["name"].apply(lambda x: ",".join(jieba.cut(x))).values
# 将分词结果连起来
text = ",".join(words_arr)
# 用正则表达式过滤不是中文或者逗号的字符(例如括号、星号)
reg = "[^\u4e00-\u9fa5,]"
text = re.sub(reg, '', text)
4.2 词频统计
-
要点
- 使用DataFrame进行词频统计
- 发现高频词汇中有空字符串(正则去除符号时的产物)和大量单字,对于数据分析来说无意义,因此需要进行去除。
去除前 去除后 

-
代码
# 词频统计
words_list = text.split(",")
df_freq = pd.DataFrame(pd.value_counts(words_list), columns=["频数"])
df_freq.index.name="词汇"
# 去除单字
stop_words = df_freq[df_freq.index.str.len()<=1].index.tolist()
df_freq = df_freq[df_freq.index.str.len()>1]
# 热门词汇可视化
plt.figure(figsize=(15, 5))
x = [i for i in range(20)]
y = df_freq.iloc[:20].values.flatten()
labels = df_freq.index[:20]
plt.bar(x, y, color='steelblue', width=0.5)
plt.xticks(ticks=x, labels=labels, fontsize=15, rotation=45)
plt.title("晋江文学城小说标题Top20热门词汇", fontsize=15)
4.3 词云可视化
- 要点
- 蒙版:这里使用一张8bit灰度模式的晋江文学城logo作为蒙版。本质是一个二维矩阵,需要显示的部分值为0,不需要显示的部分值为1。使用其他图片(如RGB格式)可根据此规则自行转化。
- 停用词:将词频统计中去除的单字作为停用词。

- 代码
# 生成蒙版
mask = plt.imread(r"D:\2021研一上\地理信息可视化\数据\logo.bmp")
wordcloud = WordCloud(font_path=r"C:\Windows\Fonts\simhei.ttf",
                      stopwords=stop_words,
                      width=800, height=600,
                      mask=mask,
                      max_font_size=150,
                      mode='RGBA', background_color=None).generate(text)
fig = plt.figure(figsize=(10, 10))
ax = fig.add_subplot(111)
ax.axis("off")
ax.imshow(wordcloud, interpolation='bilinear')
plt.tight_layout(pad=4.5)
fig.savefig("wordcloud.png")
