Python pyttsx3 ��������֮:�����ϳɲ���
pyttsx3 ��python����õ�����ת������,ʹ�÷���,���ܽ�Ϊ����
��װ pyttsx3:
���Ȱ�װ pyttsx3 lib:
- pip install pyttsx3
API��װ
Ȼ���װ��pyttsx3 API,�½�һ��speaker.py ����:
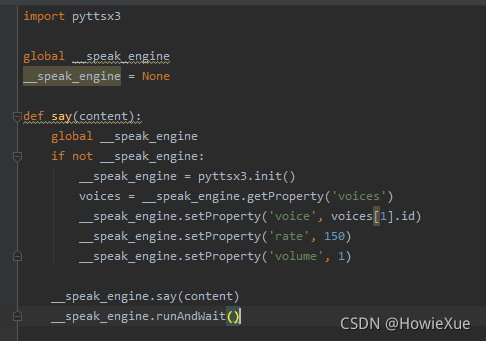
import pyttsx3

global __speak_engine
__speak_engine = None

def say(content):
	global __speak_engine
	if not __speak_engine:
		__speak_engine = pyttsx3.init()
		voices = __speak_engine.getProperty('voices')
		__speak_engine.setProperty('voice', voices[1].id)
		__speak_engine.setProperty('rate', 150)
		__speak_engine.setProperty('volume', 1)

	__speak_engine.say(content)
	__speak_engine.runAndWait()
����Property��rate/voice/volume���Ը�����Ҫ���е���:
APIʹ��
������ʹ����ֱ�ӵ��� say(��),�Ϳ���ʵ����Ӣ������������:
(python3����ֱ�ӵ��ò�������)
ʹ�þ���:
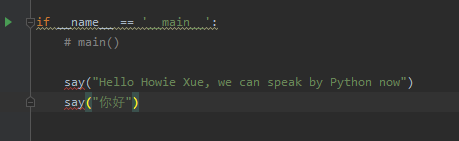
from speaker import *
if __name__ == '__main__':
say("Hello Howie Xue, we can speak by Python now")
say("���")
�������������Ƽ�:
һƪ����ϵ��:
- һƪ�������߳�缼��(������ѡ�ͼ�ԭ������)
- һƪ����:Android/iOS�ֻ����ͨ����Ƶ�ӿ�(������)������ͨ��
- һƪ����:Android�ֻ����ͨ��USB�ӿ�������ͨ��(��ԭ������������ѡ��)
LoRa Meshϵ��:
- LoRaѧϰ:LoRa�ؼ�����(��Ƶ����,������,����)���趨������
- LoRaѧϰ:�ŵ�ռ�ü��ԭ��(CAD)
- LoRa/FSK ����Ƶ�ײ��η���(Ƶ�����Dz���LoRa/FSK���������ʡ�Ƶ������)
���簲ȫϵ��:
- ATECC508AоƬ�����ʼ�(һ):��ʶ����оƬ
- SHA/HMAC/AES-CBC/CTR �㷨ִ��Ч�ʼ�RAM���� ���Խ��
- ��������/ǩ��/��ϣ�㷨���ܱȽ� (��ƽ̨ AES/DES, DH, ECDSA, RSA��)
- AES�ӽ���Ч�ʲ���(������AES128/256)�C��Ƕ��ʽCortex-M0��M3 ƽ̨Ϊ��
Ƕ��ʽ����ϵ��:
- Ƕ��ʽѧϰ�нϺõ�������Ŀ�Ϳ�������(���������ϡ�ѧϰ��Ƶ��Ƕ��ʽѧϰ�滮)
- IAR����ʹ�ü��ɻ���:���ݶϵ㡢CallStack�����ö�ջ���鿴ջʹ�ú�ջ��ȡ�Memory��Set Next Statement��
- Linux�ں˱�������(Menuconfig)�������ļ�ϵͳ ��ϸ����
- Android�ײ����C����(JNIʵ��)
- ��ݮ�ɵ��ֵ�һ��:�ϵ���������װ�������塢������̡�����SSH��
- Android/Linux�豸����&���� ˫������(ͬʱ���ڡ�����)
AI / ����ѧϰϵ��:
- AI: ����ѧϰ���붮�ļ�������:Lable��Feature��Model��
- AI:����������CNN �������ϵķ��� (Overcome Overfitting)
- AI: ʲô�ǻ���ѧϰ��������ϴ(Data Cleaning)
- AI: ����ѧϰ��ģ�������ѵ����?(���Դ���ѧϰ)
- ���ݿ��ӻ�:TensorboardX��װ��ʹ��(��װ����+ʵ����ʾ)