写在前面的话
基于dlib库的模型,实现人脸识别和焦点人物的检测。最后呈现的效果为焦点人物的识别框颜色与其他人物框不一样。
准备工作
需要安装好python环境,安装好dlib、opencv-python库等,具体可以看报错信息(可以使用PyCharm来运行和编辑py文件),然后把需要的库补全,文章最后会有完整代码,但是需要与shape_predictor_68_face_landmarks.dat模型文件同处一个路径下,然后启用。(百度可以下载到)
设计过程
- 因为是在自己电脑完成的必做题设计,所以前期还经历了相应的Python安装与环境配置,相应的资源库安装,例如dlib、opencv-python等等。
- 然后运行综合了(68个人脸特征点检测模型完成静止图像的人脸检测与标注)和(完成实时摄制视频的人脸检测与定位)的参考文件opencv_webcam_face_detection.py,发现可以实现实时视频的人脸检测。
- 对参考文件的代码进行分析,理解每一句代码的意思。对比查找设计需要的功能模块,实现1280x720视频输出,实现类win10相机的焦点人物识别。
- 上网查找并学习相应资料,参考win10相机的算法,创建自己的基于距离与面积的焦点人物算法,根据自己的需要对源代码进行添加及修改。
- 最后对代码进行测试,且不断修改成最适合的版本。
Python程序
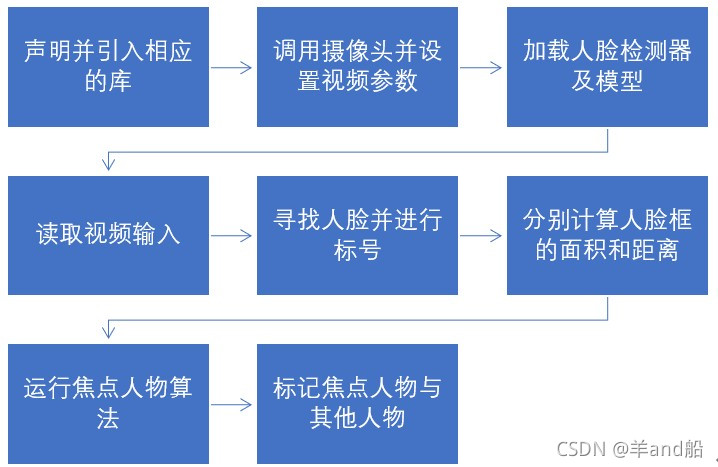
流程图

焦点人物算法
内在逻辑:模仿win10相机,当有多于1个人时,优先选择最居中的为焦点人物,但若在其他地方的人脸面积大于4倍中心的人脸面积,则选择其他地方的作为焦点人物。
实际代码
import dlib
import cv2
import math

# 摄像头参数设置
cam = cv2.VideoCapture(0)  # 参数0,调用计算机的摄像头
cam.set(3, 1280)  # 参数3,设定宽度分辨为1280
cam.set(4, 720)  # 参数4,设定高度分辨为720

# 设定人脸框的边框颜色及宽度,便于分辨焦点人物
color_focus = (255, 0, 255)  # 设定焦点人脸框的颜色,紫红色
color_other = (255, 255, 255)  # 设定其余人脸框的颜色,白色
lineWidth_focus = 2  # 设定焦点人脸框的宽度
lineWidth_other = 1  # 设定其他人脸框的宽度

# 设定计算的一些参数
w = cam.get(3) / 2  # 设定屏幕中心的横坐标X
h = cam.get(4) / 2  # 设定屏幕中心的纵坐标Y
d_center = 10000  # 预设人脸框到屏幕中心的距离
index_center = 0  # 预设距离优先时的人脸框序号
index_area = 0  # 预设面积优先时的人脸框序号
area_center = -1  # 预设距离中心最近人脸框的面积
area = -1  # # 预设人脸框面积最大时的面积

detector = dlib.get_frontal_face_detector()  # 加载这个库自带的人脸检测器
predictor_path = "shape_predictor_68_face_landmarks.dat"  # 设置人脸预测模型的路径位置
predictor = dlib.shape_predictor(predictor_path)  # 人脸预测实例化
while True:  # 当获取到视频输入时
    ret_val, img = cam.read()  # 读取视频每一帧,颜色格式为BGR格式,
    rgb_image = cv2.cvtColor(img, cv2.COLOR_BGR2RGB)  # 颜色BGR格式转为RGB格式
    faces = detector(rgb_image)  # 返回RGB格式人脸捕捉框

    # 逻辑算法:当有多于1个人时,优先选择最居中的为焦点人物,但若其他地方的人脸面积大于4倍中心的人脸面积,则选择该为焦点人物。
    # 这个for循环先求出距离屏幕中心最近时的人脸框的序号和距离优先面积
    for i, det in enumerate(faces):  # 遍历所有人脸框,i是人脸框序号,det是每个人脸框
        d = math.sqrt((w-(det.left()+(det.right()-det.left())/2))**2+(h-(det.top()+(det.bottom()-det.top())/2))**2)
        # 计算该人脸框到屏幕中心的距离
        if d < d_center:  # 对比刚计算出的距离与设定的最近距离,达成选择更小
            index_center = i  # 更新距离最近时的人脸框序号
            d_center = d  # 更新最近距离
            area_center = abs((det.right() - det.left()) * (det.bottom() - det.top()))  # 算出该人脸框的面积(距离更近优先)

    # 这个for循环求出面积最大的人脸框的序号和面积优先面积
    for i, det in enumerate(faces):  # 遍历所有人脸框,i是人脸框序号,det是每个人脸框
        if abs((det.right() - det.left()) * (det.bottom() - det.top())) > area:  # 对比该人脸面积与设定的最大面积,实现选择更大
            index_area = i  # 更新面积更大时的人脸框序号
            area = abs((det.right() - det.left()) * (det.bottom() - det.top()))  # 算出该人脸框的面积(面积更大优先)

    if area > 5*area_center:  # 判断依据,若面积优先面积大于距离优先面积的5倍,就实现面积优先选择焦点人物,否则就距离优先。
        index_center = index_area   # 面积优先时,使用面积最大的人脸框序号
    for i, det in enumerate(faces):  # 遍历所有人脸框
        if i == index_center:  # 确定焦点人脸框的序号
            print(d_center, i)  # 输出焦点人物的距离中心位置,方便调试
            cv2.rectangle(img, (det.left(), det.top()), (det.right(), det.bottom()), color_focus, lineWidth_focus)
            # 绘出焦点人脸框
            shape = predictor(img, det)  # 从预测模型处,得到68个人物特征点
            for p in shape.parts():  # 遍历68个人物特征点
                cv2.circle(img, (p.x, p.y), 2, (124, 252, 0), -1)  # 设定焦点人物的68个点的形状颜色,茶绿色、实心
        else:
            cv2.rectangle(img, (det.left(), det.top()), (det.right(), det.bottom()), color_other, lineWidth_other)
            # 绘出其他人脸框
            shape = predictor(img, det)  # 从预测模型处,得到68个人物特征点
            for p in shape.parts():  # 遍历68个人物特征点
                cv2.circle(img, (p.x, p.y), 2, (255, 255, 255), -1)  # 设定其他人物的68个点的形状颜色,白色、实心
    cv2.imshow('my webcam', img)  # 输出绘好框后的帧动画
    if cv2.waitKey(1) == 27:  # 设置一个滞留时间,等待用户触发事件,若用户按下 ESC(ASCII码为27),则执行 if 体
        break  # (if主体)退出

cv2.destroyAllWindows()  # 销毁所有输出图像窗
运行情况
为了容易分辨焦点人物与其他人物,首先将焦点人物框的宽度设为2,颜色设为紫红色,68个识别点设为茶绿色;其他人物框的宽度设为1,颜色设为白色,68个识别点设为白色。
然后进行多次测试,通过整理测试结果,发现算法没有错误,焦点人物按照距离和面积两个因素来决定。成功运行图如下:
不展示图了,但是主人物为紫红框,其他人物为白色圈。与预期一致。
如果能给你提供一点帮助,希望你能点个赞,谢谢。