爬取汽车之家某品牌图片
需求
爬取汽车之家某品牌的汽车图片
目标url
https://car.autohome.com.cn/photolist/series/52880/6957393.html#pvareaid=3454450
页面分析
最开始出现的全景的图片不是爬取的范畴。每一页有90张图片,还要做一个翻页的处理。


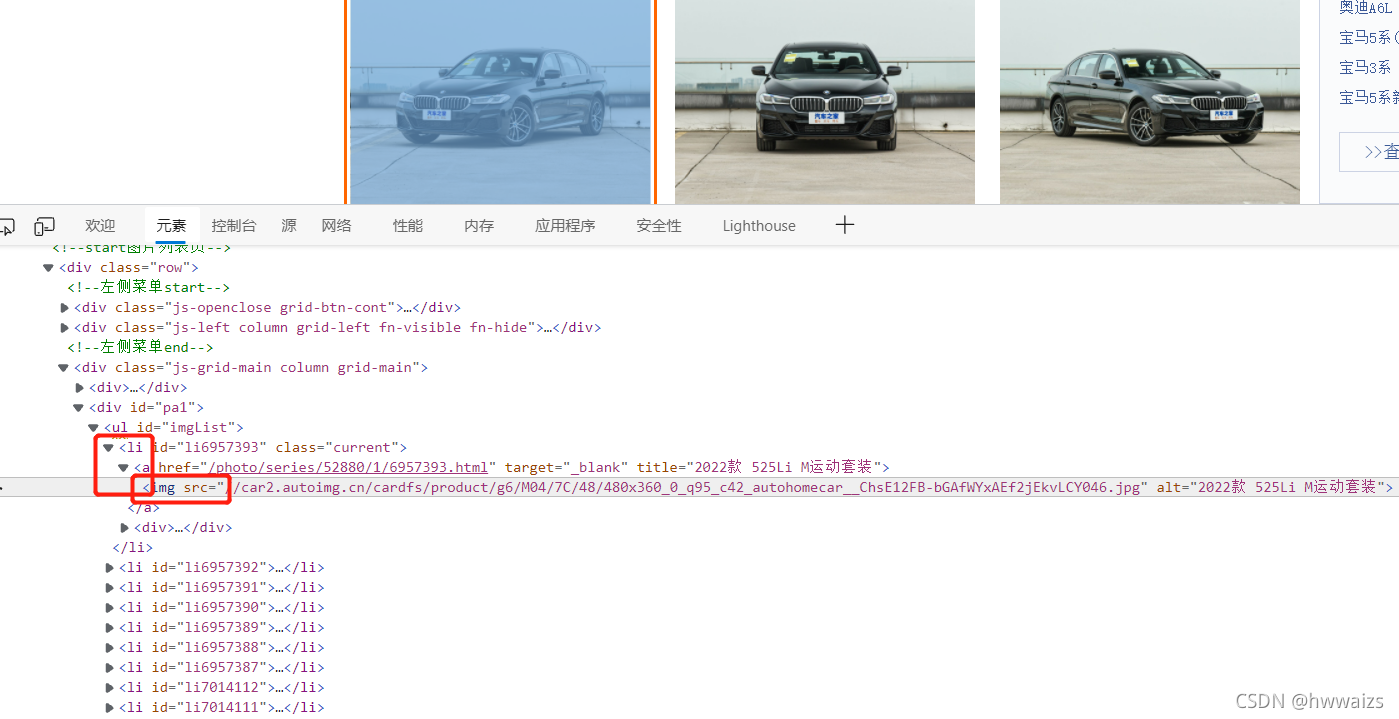
找到一张图片,点右键,检查,可以发现每一张图片都存放在一个li标签内,所有的li标签都存放在ul标签内,图片的链接信息存放在li标签下a标签里的img标签内,复制src后面的地址,在新的网址中可以打开图片,说明存放的是图片的url地址。在打开图片的网址中,可以发现浏览器对图片地址进行了补全的操作。
下面要判断网页是动态还是静态加载出来的,对img标签进行判断,看是否存放在源码中,点击右键,检查网页源码,可以看到img里图片的url信息在源码中存在,所以目标url即为要爬取的url

下面进行翻页的处理。
第2页的url:https://car.autohome.com.cn/photolist/series/65/p2/
第3页的url:https://car.autohome.com.cn/photolist/series/65/p3/
这时我们把p3改为p1,发现也可以访问第1页
第1页的url:https://car.autohome.com.cn/photolist/series/65/p1/
实现步骤
创建scrapy框架,用https://car.autohome.com.cn/photolist/series/52880/6957393.html#pvareaid=3454450,作为目标url进行访问。
import scrapy
from pic.items import PicItem

class AutoSpider(scrapy.Spider):
    name = 'auto'
    allowed_domains = ['car.autohome.com.cn']
    start_urls = ['https://car.autohome.com.cn/photolist/series/52880/6957393.html#pvareaid=3454450']

    def parse(self, response):
        lis = response.xpath('//ul[@id="imgList"]/li')
        for li in lis:
            item = PicItem()
            item['src'] = 'http:' + li.xpath('./a/img/@src').get()
            print(item)
这里我们用xpath进行寻找,id="imgList"在源码中存在,可以直接对id后面的路径进行xpath。
可以得到第一页的图片信息,我们尝试用得到的第一页的url进行访问。https://car.autohome.com.cn/photolist/series/65/p1/,访问之后我们发现获取的最后几个图片的地址是一样的。

这时我们去源码中看一下。

我们发现有些图片的的地址在src2中,直接用src获取不到图片的真正地址。这个时候要进行一个判断。
        for li in lis:
            item = PicItem()
            # 如果有src2属性就直接获取,否则获取src的值
            try:
                item['src'] = 'http:' + li.xpath('./a/img/@src2').get()
            except:
                item['src'] = 'http:' + li.xpath('./a/img/@src').get()
            print(item)
先对src2进行判断,如果有就用里面的内容,否则就用src里的内容,这样得到图片的url就是正常的了。
在scrapy里有一种拼接的方法,但是在没有掌握规律之前,慎用。
class AutoSpider(scrapy.Spider):
    name = 'auto'
    allowed_domains = ['car.autohome.com.cn']
    start_urls = ['https://car.autohome.com.cn/photolist/series/65/p1/']

    def parse(self, response):
        page_url = '//car.autohome.com.cn/photolist/series/65/p2/'
        print(response.urljoin(page_url))
输出的结果为
https://car.autohome.com.cn/photolist/series/65/p2/
实现了url地址的拼接。
也可以用os模块实现路径的拼接
import os
path = os.path.join('D:\PycharmProjects\爬虫\day25\pic\images','xxx.jpg')
print(path)
拼接之后的结果为
D:\PycharmProjects\爬虫\day25\pic\images\xxx.jpg
也可以用当前系统的路径进行拼接
# 打印当前运行的py文件的完整路径
print(__file__)   # D:/PycharmProjects/爬虫/day25/pic/demo.py
#os.path.dirname() 返回文件的路径,简单理解为往上退了以及目录
print(os.path.dirname(__file__))  # D:/PycharmProjects/爬虫/day25/pic
# 再往上退一级目录
print(os.path.dirname(os.path.dirname(__file__)))
相当于从当前路径退了两级,运行的结果是
D:/PycharmProjects/爬虫/day25
第一种用pipelines保存图片
下面要对爬取的图片进行保存操作,在爬虫文件中把print(item) 改为 yield item,对pipelines进行保存图片程序的编写。
from urllib import request
import os

class PicPipeline:
    def process_item(self, item, spider):
        # print(item['src'])
        src = item['src']
        # 对图片进行保存的文件名,用__分割,取后面的字符,不会重复
        img_name = src.split('__')[-1]
        # 在pic下创建images文件夹用于保存图片
        # 现在要进行的操作是 把图片保存到images文件夹
        # 文件夹的路径
        file_path = os.path.join(os.path.dirname(os.path.dirname(__file__)), 'images')
        # 图片的路径
        img_path = os.path.join(file_path, img_name)
        # print(img_path)
        # 保存图片,第一个参数为请求的url,第二个参数是保存的路径
        print(f"正在下载{img_name}图片")
        request.urlretrieve(src, img_path)

        return item
第二种用Images Pipeline下载图片
使用images pipeline下载文件步骤:
- 定义好一个Item,然后在这个item中定义两个属性,分别为image_urls以及images。image_urls是用来存储需要下载的文件的url链接,需要给一个列表
- 当文件下载完成后,会把文件下载的相关信息存储到item的images属性中。如下载路径、下载的url和图片校验码等
- 在配置文件settings.py中配置IMAGES_STORE,这个配置用来设置文件下载路径
- 启动pipeline:在ITEM_PIPELINES中设置scrapy.pipelines.images.ImagesPipeline:1
代码实施:
- item.py里增加
image_urls = scrapy.Field()
images = scrapy.Field() - 爬虫文件中item[‘src’]改为item[‘image_urls’],后面的url加上列表
- 在setting里做配置
  ITEM_PIPELINES = {
   # 'pic.pipelines.PicPipeline': 300,
    'scrapy.pipelines.images.ImagesPipeline': 1
}
import os
# 文件夹的路径
file_path = os.path.join(os.path.dirname(os.path.dirname(__file__)), 'images')
# 配置文件的下载路径(文件路径)
IMAGES_STORE = file_path
运行程序即可,爬取的图片保存在images文件夹下的full文件夹里,但是图片的名字是随机生成的。
我们可以尝试看一下原因。from scrapy.pipelines.images import ImagesPipeline,导入ImagesPipeline类,鼠标左键点击进入源码中,在178行左右有个file_path函数
    def file_path(self, request, response=None, info=None, *, item=None):
    	# 哈希生成32位的十六进制数据作为图片的名字
        image_guid = hashlib.sha1(to_bytes(request.url)).hexdigest()
        # 返回文件夹下full文件夹内,图片的名字是哈希随机生成的
        return f'full/{image_guid}.jpg'
哈希的简单使用
import hashlib
h = hashlib.sha1()
print(h)  # 返回哈希对象 <sha1 HASH object @ 0x00000244B4A15760>
h.update('images'.encode('utf-8'))  # 对数据加密
# hexdigest()返回的是十六进制的字符串
print(h.hexdigest())  # 19f49d852660fe0a079cbf95c3efb34ba88de911