简述:从TensorFlow的安装,我深刻的理解了一个词叫按部就班。就是你不能跳,嫌下载的慢,节约时间提前把需要的东西都下载下来,认为它会自动兼容拼接。如果在pytorch那里还是勉强可以的,但是在TensorFlow这里,如果你和我一样是个菜狗子就不要跳,按照我掉了无数次的坑,总结出来的康庄大道走吧。当然如果你遇到了新的错误,一起分享补充,做大做强,再创辉煌。

第一步:
安装Python,具体安装就不写了,但这里我建议安装3.6 - 3.7版本的
原因有二:
1,轮子文件好找,如果镜像源没有实现或其他原因在线下载慢,直接弄个离线轮子文件就快了,多种方法多条路。

2,相较于高版本的,3.6 - 3.7更完善,在3.8 出现很久的一段时间里TensorFlow都是不支持的,现在好像能用了,anaconda里就能用,但我没有测试。
第二步:
安装运行环境,pycharm或者anaconda。
anaconda自带有Python,所以你第一步没有下载或者像我一样pycharm搭配的是py3.8的版本,像体验新事物,可以直接下一个anaconda。当然pycharm也可以使用添加anaconda下载的py版本。以安装anaconda为例:
- 百度网盘地址:
conda=4.8.3版本
链接:https://pan.baidu.com/s/1VPqaJ1FrW1RYiQgx_tzLzA
提取码:nqit - 当然也可以到清华镜像源去下载
https://mirrors.tuna.tsinghua.edu.cn/tensorflow/windows/cpu/ - 官网下载:https://www.anaconda.com/download/
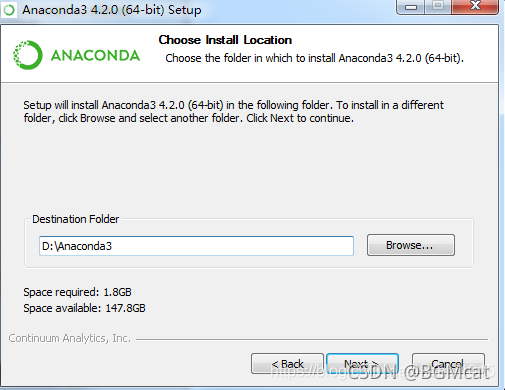
基本上anaconda安装很简单,选择好安装地址,next next,想改改路径就改改,不改默认c磁盘就好了。


检查anaconda的安装:
打开cmd 或anaconda prompt输入conda --version

给你的anaconda配置一个py环境
查看所有的py版本

我们就选用py3.6版本
好像默认带一个环境base有py3.6版本,这个我忘记了。我们也可以创建一个环境project为他配置一个py3.6,这个project是一个相对独立的环境,下载到这个环境中的库,其他的环境无法使用。
- 创建环境:conda create -n project python=3.6
- 激活tensflow的环境:conda activate project
- tensorflow的环境添加到了Anaconda里面:conda info --envs
- 检测当前环境中的python的版本:python --version
- 退出tensorflow的环境:conda deactivate
- 切换到tensorflow的环境:activate project
查看所有的虚拟环境:

第三步:
检查显卡型号
在桌面上右击如果能找到NVIDA控制面板,则说明该电脑有GPU。方法如下:桌面上右键单击-》点击NVIDIA控制面板-》系统信息-》组件,会看到如下的信息,当前支持的是11.0

对应显卡型号下载对应的cuda版本
没有的话,在NVIDIA官网搜索并安装自己电脑对应的显卡驱动
官网:https://www.nvidia.cn/Download/index.aspx?lang=cn
第四步:
安装CUDA,对应版本在文末
下载CUDA相应版本:https://developer.nvidia.com/cuda-downloads
如果需要下载CUDA的历史版本,请到这里:https://developer.nvidia.com/cuda-toolkit-archive

选择精简(Express)安装,一直右击即可
安装完成后,桌面会出现一个小地球图标啊

检查cuda:
cmd输入命令:(返回版本等信息)
nvcc -V

第五步:
安装cudnn,对应版本在文末
下载地址:https://developer.nvidia.com/rdp/cudnn-archive
但要注册,跳过祖册的方法就是加钱!当然不是,右击你要下载的cudnn版本,选择复制链接,打开迅雷下载,虽然慢点,但不用在为那恶心网站苦恼了。
解压完成后,将对应文件夹下的东西,复制到CUDA 的安装路径 C:\Program Files\NVIDIA GPU Computing Toolkit\CUDA\v10.0的对应文件夹中,bin.lib,include.

第六步:
安装TensorFlow,对应版本在文末
pip uninstall tensorflow #卸载原来的
#下载新的
pip install  tensorflow==2.3.0 -i https://pypi.tuna.tsinghua.edu.cn/simple
测试TensorFlow:
在pycharm或在有tensorflow的project的环境下,执行命令:python后,输入
import tensorflow as tf
sess=tf.Session()
a=tf.constant(10)
b=tf.constant(20)
print(sess.run(a+b))
正常来说出现successful,和30,单不正常的话,就难搞了

后续报错:
- 报错:AttributeError: module ‘tensorflow’ has no attribute ‘Session’
问题产生的原因:是tensorflow版本不同导致的,tensorflow版本2.0无法兼容版本1.0.,改为
import tensorflow as tf
tf.compat.v1.disable_eager_execution()
sess=tf.compat.v1.Session()
a=tf.constant(10)
b=tf.constant(20)
print(sess.run(a+b))
-
若出现警告E:\software\Anaconda3\lib\site-packages\h5py_init_.py:36: FutureWarning:
Conversion of the second argument of issubdtype fromfloattonp.floatingis deprecated. In future, it will be treated asnp.float64 == np.dtype(float).type.from ._conv import register_converters as _register_converters
请忽略,不要看网上的攻略说降级numpy就可以。。降了以后tensorflow直接挂了,未来h5py版本升级后会解决的。 -
报Could not load dynamic library ‘cudnn64_7.dll’; dlerror: cudnn64_7.dll not found,未找到cudnn64_7.dll,说明你下载的cudnn版本一个是v8.*.*,应该下载v7.*.*

-
Could not load dynamic library ‘cusolver64_10.dll’; dlerror: cusolver64_10.dll not found,未找到cusolver64_10.dll,那就是你cuda和TensorFlow的版本不匹配,按照这个表下载对于版本。
官网查询:https://tensorflow.google.cn/install/source

测试获取GPU:
import tensorflow as tf
tf.debugging.set_log_device_placement(True)
gpus = tf.config.experimental.list_physical_devices('GPU')
for gpu in gpus:
    tf.config.experimental.set_memory_growth(gpu, True)
print(gpus)
logical_gpus = tf.config.experimental.list_logical_devices('GPU')
print(logical_gpus)
2021-10-18 20:24:10.396253: I tensorflow/core/common_runtime/gpu/gpu_device.cc:1257] Device interconnect StreamExecutor with strength 1 edge matrix:
2021-10-18 20:24:10.396498: I tensorflow/core/common_runtime/gpu/gpu_device.cc:1263]      0
2021-10-18 20:24:10.396650: I tensorflow/core/common_runtime/gpu/gpu_device.cc:1276] 0:   N
2021-10-18 20:24:10.397459: I tensorflow/core/common_runtime/gpu/gpu_device.cc:1402] Created TensorFlow device (/job:localhost/replica:0/task:0/device:GPU:0 with 1342 MB memory) -> physical GPU (device: 0, name: GeForce MX250, pci bus id: 0000:01:00.0, compute capability: 6.1)
[LogicalDevice(name='/device:GPU:0', device_type='GPU')]
最终得到这种全是successful的图,那就ok,收工。
