课程学习
本节课主要对于大白AI课程:https://mp.weixin.qq.com/s/STbdSoI7xLeHrNyLlw9GOg
《Pytorch模型推理及多任务通用范式》课程中的第五节课进行学习。
作业题目
包含以下必做题和思考题
1、必做题:
1.1 自己找 2 张其他图,用 Yolox_s 进行目标检测,并注明输入尺寸和两个阈值。
2、思考题:
2.1 Yolox_s:用 time 模块和 for 循环,对”./images/1.jpg” 连续推理 100 次,统计时间开销。有 CUDA 的同学,改下代码: self.device=torch.device(‘cuda’),统计时间开销。
2.2 有 CUDA 的同学,分别用 Yolox_tiny、 Yolox_s、 Yolox_m、 Yolox_l、 Yolox_x对”./images/1.jpg” 连续推理 100 次,统计时间开销。
3、总结
3.1 作业总结
3.2 课程总结
作业答案
1、必做题
1.1 找两张图片用 Yolox_s 进行目标检测
这里我还是用前两节课的猫和狗图片,输入尺寸和两个阈值都为默认值,输入尺寸为640,置信度阈值为0.5,nms阈值为0.45:


输出结果如下:


2、思考题:
2.1 统计时间开销
和之前的的思考题内容一致,不再做细致的讨论,修改__main__代码如下:
if __name__ == '__main__':
    import time

    print("Starting")
    # 实例化
    print("Loading Weight...")
    t_all_LW = 0
    t_start = time.time()
    model_detect = ModelPipline()
    label_names = model_detect.label_names
    t_end = time.time()
    t_all_LW += t_end - t_start
    print("Loading Weight Time:{}".format(t_all_LW))

    # 加载图片
    image = cv2.imread('./images/1.jpg')

    # 第一次推理时间
    print("First Predicting...")
    t_all_FP = 0
    t_start = time.time()
    result = model_detect.predict(image)
    t_end = time.time()
    t_all_FP += t_end - t_start
    print("First Predicting Time:{}".format(t_all_FP))

    # 一百次推理时间
    print("100 Predicting...")
    t_all = 0
    for i in range(100):
        t_start = time.time()
        result = model_detect.predict(image)
        t_end = time.time()
        t_all += t_end - t_start
    print("100 Predicting Time:{}".format(t_all))

    # 可视化
    print("Visualization...")
    if result is not None:
        bboxes, scores, labels = result
        image = vis(image, bboxes, scores, labels, label_names)
    cv2.imwrite('./demos/1.jpg', image)

    print("Ending")
先测试下cpu的推理速度:
Starting
Loading Weight…
Loading Weight Time:0.2010512351989746
First Predicting…
First Predicting Time:0.6204280853271484
100 Predicting…
100 Predicting Time:52.23311710357666
Visualization…
Ending
因为是s模型,推理速度还可以,接着测试cuda下的推理速度,修改self.device = torch.device(‘cuda’),开始测试:
Starting
Loading Weight…
Loading Weight Time:1.889430046081543
First Predicting…
First Predicting Time:0.8607349395751953
100 Predicting…
100 Predicting Time:4.55137825012207
Visualization…
Ending
结论和之前相同。
2.2 使用cuda测试YoloX的各个版本
首先我们下载权重文件:

三个小时,先摸会🐟吧。。算了,太慢了,我还是科学上网去github上下载吧。
这里我先下好了YoloX_m的模型,修改./models_yolox/yolox_s.py 中的 depth 和 width和YoloX_m的对应,这里我将模型的宽度和深度写成了字典,方便调用,修改后的yolox.py文件如下。
import torch.nn as nn
from .yolo_head import YOLOXHead
from .yolo_pafpn import YOLOPAFPN


class YOLOX(nn.Module):
    def __init__(self, num_classes, yolox_version="yolox_s"):
        super().__init__()
        # yolox的深度和宽度
        self.num_classes = num_classes
        self.depth_width = {
            "yolox_tiny": [0.33, 0.375],
            "yolox_s": [0.33, 0.50],
            "yolox_m": [0.67, 0.75],
            "yolox_l": [1.00, 1.00],
            "yolox_x": [1.33, 1.25],
        }
        self.depth, self.width = self.depth_width[version]
        self.in_channels = [256, 512, 1024]
        self.backbone = YOLOPAFPN(self.depth, self.width, in_channels=self.in_channels)
        self.head = YOLOXHead(self.num_classes, self.width, in_channels=self.in_channels)


    def forward(self, x):
        fpn_outs = self.backbone(x)
        outputs = self.head(fpn_outs)
        return outputs
修改完成后,再修改get_model代码如下:
def get_model(self):
        # Lesson 2 的内容
        model = YOLOX(num_classes=self.num_classes, yolox_version="yolox_m")
        pretrained_state_dict = torch.load('./weights/yolox_m.pth', map_location=lambda storage, loc: storage)[
            "model"]
        model.load_state_dict(pretrained_state_dict, strict=True)
        model.to(self.device)
        model.eval()
        return model
使用cuda开始推理,推理结果如下:
Starting
Loading Weight…
Loading Weight Time:2.1591570377349854
First Predicting…
First Predicting Time:0.941857099533081
100 Predicting…
100 Predicting Time:9.919167518615723
Visualization…
Ending
这时候,推理时间没有问题,但是github上下载的模型的预测结果出了问题,根本没有预测到任何目标,yolox_m的模型,居然效果不如yolox_s?这肯定是哪里出了问题。

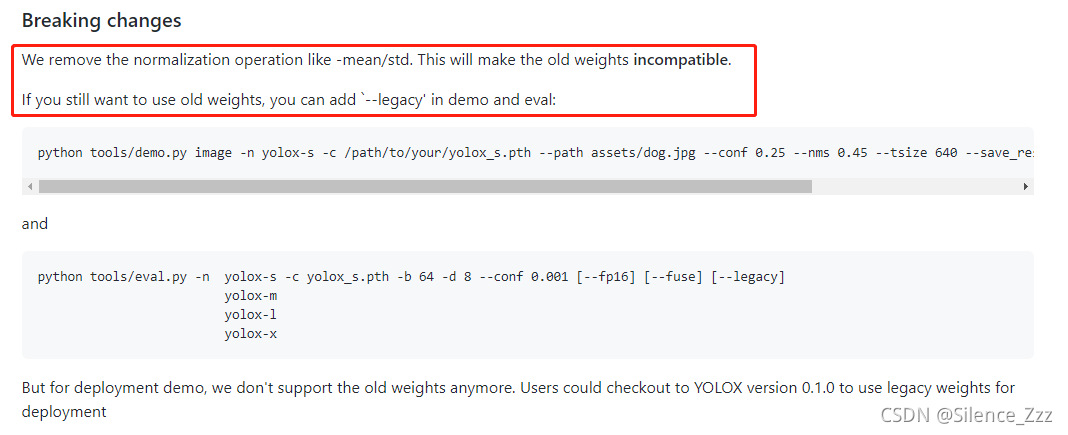
果然,在github的yolox仓库里发现了问题,官方在8.19的更新中,更换了最新的模型,去除了归一化的过程,所以这时候如果用旧代码去推理新模型,这样肯定会出问题。

我根据官方提示,定位到源码的yolox/data/dataloading.py中的ValTransform类:
class ValTransform:
    """
    Defines the transformations that should be applied to test PIL image
    for input into the network

    dimension -> tensorize -> color adj

    Arguments:
        resize (int): input dimension to SSD
        rgb_means ((int,int,int)): average RGB of the dataset
            (104,117,123)
        swap ((int,int,int)): final order of channels

    Returns:
        transform (transform) : callable transform to be applied to test/val
        data
    """

    def __init__(self, swap=(2, 0, 1), legacy=False):
        self.swap = swap
        self.legacy = legacy

    # assume input is cv2 img for now
    def __call__(self, img, res, input_size):
        img, _ = preproc(img, input_size, self.swap)
        if self.legacy:
            img = img[::-1, :, :].copy()
            img /= 255.0
            img -= np.array([0.485, 0.456, 0.406]).reshape(3, 1, 1)
            img /= np.array([0.229, 0.224, 0.225]).reshape(3, 1, 1)
        return img, np.zeros((1, 5))
其中我们可以看到,如果想用老模型,只需要重新进行归一化处理即可,反过来思考,我们要使用新的模型,只需要去除preprocess代码中的归一化操作就可以得到正常的推理了:
    def preprocess(self, image):
        # 原图尺寸
        h, w = image.shape[:2]
        # 生成一张 w=h=640的mask,数值全是114
        padded_img = np.ones((self.inputs_size[0], self.inputs_size[1], 3)) * 114.0
        # 计算原图的长边缩放到640所需要的比例
        r = min(self.inputs_size[0] / h, self.inputs_size[1] / w)
        # 对原图做等比例缩放,使得长边=640
        resized_img = cv2.resize(image, (int(w * r), int(h * r)), interpolation=cv2.INTER_LINEAR).astype(np.float32)
        # 将缩放后的原图填充到 640×640的mask的左上方
        padded_img[: int(h * r), : int(w * r)] = resized_img
        # BGR——>RGB
        padded_img = padded_img[:, :, ::-1]
        # # 归一化和标准化,和训练时保持一致,新模型不再需要归一化
        # inputs = padded_img / 255
        # inputs = (inputs - np.array([0.485, 0.456, 0.406])) / np.array([0.229, 0.224, 0.225])
        ##以下是图像任务的通用处理
        # (H,W,C) ——> (C,H,W)
        inputs = padded_img.transpose(2, 0, 1)
        # (C,H,W) ——> (1,C,H,W)
        inputs = inputs[np.newaxis, :, :, :]
        # NumpyArray ——> Tensor
        inputs = torch.from_numpy(inputs)
        # dtype float32
        inputs = inputs.type(torch.float32)
        # 与self.model放在相同硬件上
        inputs = inputs.to(self.device)
        return inputs, r
这时候报错了:
Traceback (most recent call last):
File “D:/VSCodeProject/Pytorch_Learning/pytorch-推理范式/lesson_5/inference_detection.py”, line 132, in
result = model_detect.predict(image)
File “D:/VSCodeProject/Pytorch_Learning/pytorch-推理范式/lesson_5/inference_detection.py”, line 31, in predict
inputs, r = self.preprocess(image)
File “D:/VSCodeProject/Pytorch_Learning/pytorch-推理范式/lesson_5/inference_detection.py”, line 71, in preprocess
inputs = torch.from_numpy(inputs)
ValueError: At least one stride in the given numpy array is negative, and tensors with negative strides are not currently supported. (You can probably work around this by making a copy of your array with array.copy().)
根据提示,显示,将NumpyArray —> Tensor的过程中,加入copy函数:
# NumpyArray ——> Tensor
inputs = torch.from_numpy(inputs.copy())
重新进行推理:

推理正常,且识别效果要比yolox_s版本要好,推理时间正常:
Starting
Loading Weight…
Loading Weight Time:2.163299560546875
First Predicting…
First Predicting Time:0.8040077686309814
100 Predicting…
100 Predicting Time:7.489165544509888
Visualization…
Ending
接着我们依次测试yolox_tiny、yolox_l和yolox_x:
yolox_tiny推理结果和推理速度:

Starting
Loading Weight…
Loading Weight Time:1.8215892314910889
First Predicting…
First Predicting Time:0.7729787826538086
100 Predicting…
100 Predicting Time:3.979935646057129
Visualization…
Ending
yolox_l推理结果和推理速度:

Starting
Loading Weight…
Loading Weight Time:2.417222499847412
First Predicting…
First Predicting Time:0.8462471961975098
100 Predicting…
100 Predicting Time:11.834988832473755
Visualization…
Ending
yolox_x推理结果和推理速度:

Starting
Loading Weight…
Loading Weight Time:3.007777690887451
First Predicting…
First Predicting Time:0.9800820350646973
100 Predicting…
100 Predicting Time:19.388036489486694
Visualization…
Ending
数据汇总如下表,时间单位为秒(s):
| yolox_version | Loading Weight Time | First Predicting Time | 100 Predicting Time |
|---|---|---|---|
| yolox_tiny | 1.8215892314910889 | 0.7729787826538086 | 3.979935646057129 |
| yolox_s | 1.889430046081543 | 0.8607349395751953 | 4.55137825012207 |
| yolox_m | 2.163299560546875 | 0.8040077686309814 | 7.489165544509888 |
| yolox_l | 2.417222499847412 | 0.8462471961975098 | 11.834988832473755 |
| yolox_x | 3.007777690887451 | 0.9800820350646973 | 19.388036489486694 |
我们可以看到,在同等的gpu下,模型加载速度和除去第一次后的模型推理速度,会随着模型的增大而变慢,且幅度较大,而首次推理时间幅度较小,在第三节课的作业中,我也说到了其原因,是因为需要cuda初始化,有额外的耗时。多个模型的存在可以更好的在工业上进行部署,比如小算力的硬件,可以选择yolox_s或者yolox_tiny模型,或者是更小的yolox_nano模型,而在大算力的服务器端,可以选择yolox_l、yolo_x的模型去训练部署算法。这种scaled的方法,最早来自EfficientNet,但是在yolov4和yolov5引入后,在工业部署方面,也取得不错的效果。
3、总结
最后一次作业啦,也是认真的完成,这里先对此次作业总结,再对课程进行总结。
3.1 作业总结
此次作业,使用大潘老师教我们的推理三板斧去做yolox的模型推理预测,关于三部分的作用,老师在第三次课已经介绍完成了,后面的两次课可以说是对第三节课的巩固和推理扩展。yolox在暑假发布的时候,我就down下来跑了demo,但是当时在用使用yolov5的框架在训练模型。这次作业原本是想用老师提供的模型文件去做,但是百度网盘下载真的很慢,所以选择了去官网下载新的权重,却遇到了一个bug,所幸很快解决了问题,正常完成了作业。
3.2 课程总结
那再谈谈本次课程吧,按照大潘老师的问题来回答。
1)这次课程对你的帮助有哪些?
首先非常感谢大潘老师还有大白老师给了我这样一个机会,学习到Pytorch推理的通用范式,老师辛苦了。通过四次课的作业,我慢慢的理解了模型推理不过是这么一回事,加载模型、前处理、模型推理、后处理,输出检测结果,整个推理过程简单清晰,之前可能也只能是用别人写好的代码来进行推理,现在感觉可以尝试自己去写写看。
我是一个研三在读生,读了个双非的研究生,老师对这些东西的了解程度几乎为零,实验室之前的师兄也只是半懂不懂,代码层面的几乎没怎么做过,几乎全靠自学。学习目标检测一年左右了(研一受到疫情的影响),目前秋招工作已经找好了,在一个刚成立没多久的公司做视觉算法工程师。虽然都说视觉很卷,但那只是说针对大厂来看,小厂或是小公司对视觉算法工程师的需求还是蛮多的。幸运的在十月中旬就找好了一份工作,准备忙完学校的事情就去那边实习,所学的东西只有在实践中才能不断提升自己。
报名大白的课程是因为大白的yolo系列详解,自今我电脑了还有大白老师的yolov3的网络框架图,对于一个刚刚入门视觉的小白来说,大白老师给我的帮助真的很大。这次能够参加大潘老师的课程,对我来说,更是深层次的理解了模型推理的过程,我相信,在之后的工作中,一定能够用到这些东西。希望后续的课程,也能继续参加。
2)对课程的优化改进有什么建议?
以下是我对这次课程的建议:
1、采取视频+代码演示的形式
采取视频+代码演示的形式可以更直观的展现代码层面的运行和调试,对于新手来说可能会更友好点,同时也更好的避免了时间问题错过老师的课程。虽然大潘老师的课堂笔记真的很赞,但是如果是视频课的形式,也可以将课程上传到b站等视频网站中,对于宣传来说,视频的效果是直观且有效的,缺点是需要花费更多的时间来管理视频的录制和上传(毕竟课程是老师空闲时间准备的,辛苦啦大潘老师)。
2、介绍工作过程中的完整流程
对于我来说,即将步入工作环境,但是只是在实验室经过自己的训练来看,对整个工作过程中的完整流程还是不太了解,对于新手来说,更是无从下手,很多人只是按教程跑了一遍罢了,这很难在工作中展示自己的核心竞争力。
3、可以介绍下数据加载(Dataloader)和训练(Training)的过程(yolox,源码解析?)
做为算法部署来看,只需要拿到模型,然后进行推理就可以了,但是很多时候,算法工程师应该需要调试数据加载和并进行训练,这两部分相对于推理部分来说,要更为复杂,因此之后如果有进阶课程,希望可以讲一讲这两部分细节。
4、介绍模型部署方面的知识结构或体系
最后,算法在能够推理过后,其实远远还不能够达到部署的要求,关于算法部署,一直都没有成熟的课程介绍,不同端侧的区别,不同推理框架的介绍和使用,其实部署方面好像更多的是硬件工程师来做,但是免不了有的算法工程师也需要完成这些工作,因此希望在之后的课程中能够了解到模型部署方面的只是结构或体系。
以上,是我对本次课程的个人总结和建议啦!下次课程见!!