前言
这个项目的话我也是偶然在B站看到一个阿婆主(SvePana)在讲解这个,跟着他的视频敲的代码并学习起来的。并写在自己这里做个笔记也为大家提供代码哈哈哈哈。
一、Keras?
1.Keras简介
Keras是由纯python编写的基于theano/tensorflow的深度学习框架。 Keras是一个高层神经网络API,支持快速实验,能够把你的idea迅速转换为结果,如果有如下需求,可以优先选择Keras。
2.为什么
目前Keras已经被TensorFlow收录,添加到TensorFlow 中,成为其默认的框架,成为TensorFlow官方的高级API。Keras简易和快速的原型设计(keras具有高度模块化,极简,和可扩充特性),用户友好:Keras是为人类而不是天顶星人设计的API。用户的使用体验始终是我们考虑的首要和中心内容。Keras遵循减少认知困难的最佳实践:Keras提供一致而简洁的API, 能够极大减少一般应用下用户的工作量,同时,Keras提供清晰和具有实践意义的bug反馈。
二、全连接神经网络实现
1.思路
导入数据-------> 选择模型------>设计神经网络------->编译------->训练权重参数------->预测
2.实现代码
定义函数 train() 实现(导入数据———>训练权重参数)。
定义函数 text() 实现 预测及输出结果。
导入数据:mnist = tf.keras.datasets.mnist #导入mnist
选择模型:model = tf.keras.models.Sequential()
有两种类型的模型,序贯模型(Sequential)和函数式模型(Model),函数式模型应用更为广泛,序贯模型是函数式模型的一种特殊情况。
序贯模型(Sequential) :单输入单输出,一条路通到底,层与层之间只有相邻关系,没有跨层连接。这种模型编译速度快,操作也比较简单;
设计神经网络:
		tf.keras.layers.Flatten(input_shape=(28,28)),
        tf.keras.layers.Dense(512,activation='relu'),
        tf.keras.layers.Dense(128,activation='relu'),
        tf.keras.layers.Dense(10,activation='softmax',kernel_regularizer=tf.keras.regularizers.l2())
编译:
model.compile(optimizer = 优化器,

                        loss = 损失函数,

                        metrics = ["准确率”]')
训练权重参数:
history = model.fit(x_train,y_train,batch_size=每次训练图片数量,epochs=训练次数,
validation_data=(x_test,y_test),validation_freq=1,callbacks=[cp_callback])
model.summary()
train函数全部代码
def train():
    mnist = tf.keras.datasets.mnist #导入mnist
    (x_train,y_train),(x_test,y_test) = mnist.load_data() #分割
    x_train,x_test =x_train/255.0, x_test/255.0
    model = tf.keras.models.Sequential([
        tf.keras.layers.Flatten(input_shape=(28,28)),
        tf.keras.layers.Dense(512,activation='relu'),
        tf.keras.layers.Dense(128,activation='relu'),
        tf.keras.layers.Dense(10,activation='softmax',kernel_regularizer=tf.keras.regularizers.l2())])
    model.compile(optimizer= 'adam',
                  loss=tf.keras.losses.SparseCategoricalCrossentropy(from_logits=False),
                  metrics=['sparse_categorical_accuracy'])#评价指标 categorical_accuracy和 sparse_categorical_accuracy
                  #注意修改路径
    checkpoint_save_path="C:/Users/VULCAN/sxti/TEST/Disconnect_detection/mnist.ckpt"
    if os.path.exists(checkpoint_save_path + '.index'):
        print('------load the model--------')
        model.load_weights(checkpoint_save_path)
    cp_callback = tf.keras.callbacks.ModelCheckpoint(filepath=checkpoint_save_path,
                                                     save_weights_only=True,
                                                     save_best_only=True)#断点续训
    history = model.fit(x_train,y_train,batch_size=25,epochs=30,validation_data=(x_test,y_test),validation_freq=1,callbacks=[cp_callback])
    model.summary()

    #以下为打印训练准确率及损失率等
    acc = history.history['sparse_categorical_accuracy']
    val_acc = history.history['val_sparse_categorical_accuracy']
    loss = history.history['loss']
    val_loss = history.history['val_loss']
    f = Figure(figsize=(6,6),dpi=60)
    a = f.add_subplot(1,2,1)
    a.plot(acc,label = 'Training Accuracy')
    a.plot(val_acc,label = 'Validation Accuracy')#验证精度
    a.legend()
    b = f.add_subplot(1,2,2)
    b.plot(loss,label = 'Training Loss')
    b.plot(val_loss,label = 'Validation Loss')
    b.legend()
    canvas = FigureCanvasTkAgg(f,master=root)
    canvas.draw()
    canvas.get_tk_widget().place(x=60,y=100)
test函数全部代码
#预测结果打印
def text():
	#注意修改路径与函数train上面保存的路径一致
    model_save_path = "C:/Users/VULCAN/sxti/TEST/Disconnect_detection/mnist.ckpt"
    model = tf.keras.models.Sequential([
        tf.keras.layers.Flatten(input_shape=(28,28)),
        tf.keras.layers.Dense(512,activation='relu'),
        tf.keras.layers.Dense(128,activation='relu'),
        tf.keras.layers.Dense(10,activation='softmax',kernel_regularizer=tf.keras.regularizers.l2())])
    model.load_weights(model_save_path)
    for i in range(1):
        img = Image.open("tem2.png")
        #强制压缩为28,28
        img = img.resize((28,28),Image.ANTIALIAS)
        #将原有图像转换为灰度图
        img_arr = np.array(img.convert("L"))
        #图片反相
        for i in range(28):
            for  j in range(28):
                if img_arr[i][j]<100:
                    img_arr[i][j]=255
                else:
                    img_arr[i][j]= 0
        img_arr = img_arr/255.0
        x_predict = img_arr[tf.newaxis,...]
        result = model.predict(x_predict)
        pred = np.argmax(result , axis = 1)
        #在GUI界面显示结果
        e4 = l = tk.Label(root,text = pred, bg="white",font=("Arial,12"),width=8)
        e4.place(x=990,y=440)
三、GUI设计
这部分我直接附上代码并在代码中作必要的注释。
全部所需的库函数:
#使用Tkinter前需要先导入
import tkinter as tk
#导入对话框模块
import tkinter.filedialog
#创建画布需要的库
from matplotlib.backends.backend_tkagg import FigureCanvasTkAgg
#创建工具栏需要的库
from matplotlib.backends.backend_tkagg import NavigationToolbar2Tk
#快捷键需要的模块2
from matplotlib.backend_bases import key_press_handler
#导入绘图需要的模块
from matplotlib.figure import Figure
import cv2
import tensorflow as tf
import os
import numpy as np
from matplotlib import pyplot as plt
from PIL import Image,ImageTk
其他关于图片文件的导入及摄像头调用的函数定义代码:
#调取摄像头并拍摄图片
def buttonl():
    capture = cv2.VideoCapture(0)   #cv2模块调取摄像头
    while(capture.isOpened()):
        ret,frame = capture.read() #ret表示捕获是否成功
        frame = frame[:,80:560] #拍照默认为640*480
        cv2.imwrite("tem1.png",frame)
        dig_Gray = cv2.cvtColor(frame,cv2.COLOR_BGR2GRAY)
        ref2,dig_Gray = cv2.threshold(dig_Gray,100,255,cv2.THRESH_BINARY)
        cv2.imwrite("tem2.png",dig_Gray)
        break
    global photo1,photo2
    #将图片显示到界面上
    img1 = Image.open("tem1.png")
    img1 = img1.resize((128,128))
    photo1 = ImageTk.PhotoImage(img1)
    l1 = tk.Label(root,bg="red",image = photo1).place(x=950,y=100)
    img2 = Image.open("tem2.png")
    img2 = img2.resize((128,128))
    photo2 = ImageTk.PhotoImage(img2)
    l2 = tk.Label(root,bg="red",image = photo2).place(x=950,y=250)

 #保存当前摄像头画面
def frame():
    capture = cv2.VideoCapture(0)
    #控件定义
    while(capture.isOpened()):
        ref,frame = capture.read()
        frame = frame[:,80:560]
        cvimage = cv2.cvtColor(frame,cv2.COLOR_BGR2RGBA)
        pilImage = Image.fromarray(cvimage)
        pilImage = pilImage.resize((360,360),Image.ANTIALIAS)
        tkImage = ImageTk.PhotoImage(image = pilImage)
        canvas.create_image(0,0,anchor = "nw",image = tkImage)
        root.update()
        root.after(10)
#选择文件
def select_pic():
    file_path = tk.filedialog.askopenfilename(title="选择文件",initialdir = (os.path.expanduser(r"")))
    image = Image.open(file_path)
    image.save("tem1.png")
    gray = image.convert("L")
    gray.save("tem2.png")
    global photo3,photo4
#将图片显示在界面上
    img3 = Image.open("tem1.png")
    img3 = image.resize((128,128))
    photo3 = ImageTk.PhotoImage(img3)
    l3 = tk.Label(root,bg="red",image = photo3).place(x=950,y=100)
    img4 = Image.open("tem2.png")
    img4 = img4.resize((128,128))
    photo4 = ImageTk.PhotoImage(img4)
    l4 = tk.Label(root,bg="red",image = photo4).place(x=950,y=250)
主函数部分:
if __name__ =='__main__':
    root = tk.Tk()
    #第二步,给窗口的可视化起名字
    root.title('手写体数字识别')
    #第三步,设定窗口的大小(长*宽)
    root.geometry('1176x520')  #这里的乘是小x
    root.configure(bg = "#C0C0C0")
    f = Figure(figsize=(6,6), dpi=60)
    a=f.add_subplot(1,2,1)  #添加子图:1行1列第一个
    a.plot(0,0)
    b=f.add_subplot(1,2,2)  #添加子图,1行1列第二个
    b.plot(0,0)
    #将绘制的图形显示到tkinter:创建属于root的canvas画布,并将图f置于画布上
    canvas=FigureCanvasTkAgg(f,master=root)
    canvas.draw()#注意show方法已经过时,改用draw
    canvas.get_tk_widget().place(x=60,y=100)
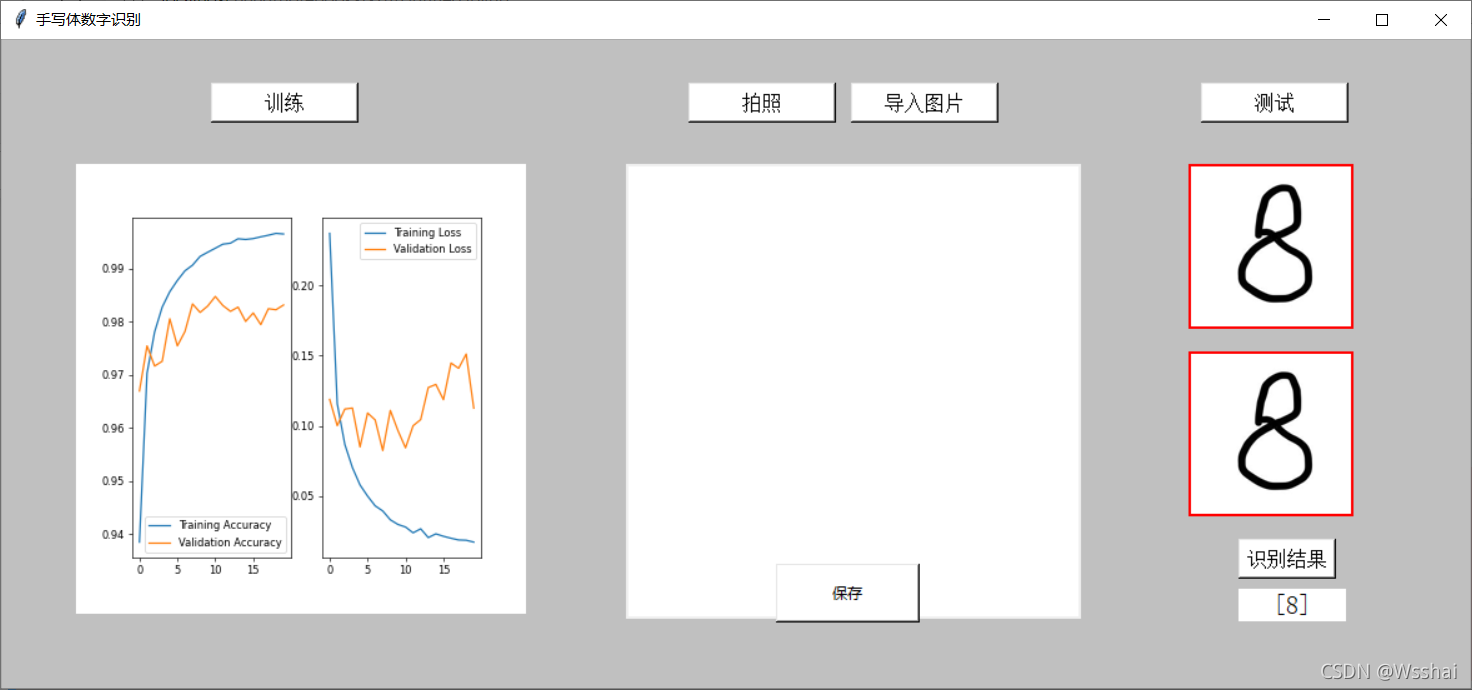
    b1 = tk.Button(root,text='训练',bg='white',font=('Arial',12),width=12,height=1,command=train).place(x=168,y=35)
    b2 = tk.Button(root,text='拍照',bg='white',font=('Arial',12),width=12,height=1,command=frame).place(x=550,y=35)
    b3 = tk.Button(root,text='测试',bg='white',font=('Arial',12),width=12,height=1,command=text).place(x=960,y=35)
    b4 = tk.Button(root,text='导入图片',bg='white',font=('Arial',12),width=12,height=1,command=select_pic).place(x=680,y=35)
    b5 = tk.Button(root,text='识别结果',font=('Arial',12),bg='white',command=text).place(x=990,y=400)
    canvas=tk.Canvas(root,bg="white",width=360,height=360)  #绘制画布
    #控件位置设置
    canvas.place(x=500,y=100)
    b6=tk.Button(root,text="保存",bg="white",width=15,height=2,command=buttonl).place(x=620,y=420)
    #第六步,主窗口循环显示
    root.mainloop()
最后附上界面
