开发环境
- Python3.9 + Anaconda3-2021.04-Windows-x86_64
- CUDA10.0
- Pycharm Community
1、安装python3.9
2、安装Anaconda
https://www.anaconda.com/ 安装时勾选添加到环境变量即可
Test result:cmd命令中输入conda list会输出conda已经安装好的包

or test:conda --version

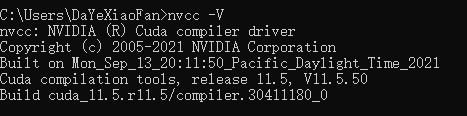
3、安装CUDA,要有显卡
查看显卡方法:电脑搜索“设备管理器”-显示适配器

如果满足去官网下载安装即可,https://developer.nvidia.com/cuda-downloads

傻瓜式安装到到自己想要安装的目录即可。
Test Result:cmd输入nvcc -V
4、安装Pytorch
(Pytorch官网下载贼慢,这里配置清华镜像源)
conda config --add channels https://mirrors.tuna.tsinghua.edu.cn/anaconda/pkgs/free/
conda config --add channels https://mirrors.tuna.tsinghua.edu.cn/anaconda/pkgs/main/
conda config --set show_channel_urls yes
conda config --add channels https://mirrors.tuna.tsinghua.edu.cn/anaconda/cloud/pytorch/
# for legacy win-64
conda config --add channels https://mirrors.tuna.tsinghua.edu.cn/anaconda/cloud/peterjc123/
https://pytorch.org/get-started/locally/
官网https://pytorch.org/get-started/locally/
把官方命令中的-c pytorch去掉即可(因为它会默认到pytorch官网网站)
