前言
最近在鼓捣KITTI数据集,上一篇绘制了KITTI数据集中odometry的xy数据。之后也进行了一些详细的了解,odometry数据集中每一帧图像的相机坐标都是有12个元素构成,即[R|t],R是旋转矩阵,t是平移向量,今天突发奇想,想将旋转矩阵转为旋转向量。本来是想着自己写的,写了一半出去玩了一天,回来之后找到了相关的转换算法,就是deepvo项目中有一个转换算法。
Show you the Code
下面这段是主要的转换代码,项目里面把这段代码封装在helper.py里面
import numpy as np
import math

# epsilon for testing whether a number is close to zero
_EPS = np.finfo(float).eps * 4.0

def isRotationMatrix(R) :
	Rt = np.transpose(R)
	shouldBeIdentity = np.dot(Rt, R)
	I = np.identity(3, dtype = R.dtype)
	n = np.linalg.norm(I - shouldBeIdentity)
	return n < 1e-6

def R_to_angle(Rt):
# Ground truth pose is present as [R | t]
# R: Rotation Matrix, t: translation vector
# transform matrix to angles
	Rt = np.reshape(np.array(Rt), (3,4))
	t = Rt[:,-1]
	R = Rt[:,:3]

	assert(isRotationMatrix(R))

	x, y, z = euler_from_matrix(R)

	theta = [x, y, z]
	pose_15 = np.concatenate((theta, t, R.flatten()))
	assert(pose_15.shape == (15,))
	return pose_15

def eulerAnglesToRotationMatrix(theta) :
    R_x = np.array([[1,         0,                  0                   ],
                    [0,         np.cos(theta[0]), -np.sin(theta[0]) ],
                    [0,         np.sin(theta[0]), np.cos(theta[0])  ]
                    ])
    R_y = np.array([[np.cos(theta[1]),    0,      np.sin(theta[1])  ],
                    [0,                     1,      0                   ],
                    [-np.sin(theta[1]),   0,      np.cos(theta[1])  ]
                    ])
    R_z = np.array([[np.cos(theta[2]),    -np.sin(theta[2]),    0],
                    [np.sin(theta[2]),    np.cos(theta[2]),     0],
                    [0,                     0,                      1]
                    ])
    R = np.dot(R_z, np.dot( R_y, R_x ))
    return R

def euler_from_matrix(matrix):

	# y-x-z Tait–Bryan angles intrincic
	# the method code is taken from https://github.com/awesomebytes/delta_robot/blob/master/src/transformations.py

    i = 2
    j = 0
    k = 1
    repetition = 0
    frame = 1
    parity = 0


    M = np.array(matrix, dtype=np.float64, copy=False)[:3, :3]
    if repetition:
        sy = math.sqrt(M[i, j]*M[i, j] + M[i, k]*M[i, k])
        if sy > _EPS:
            ax = math.atan2( M[i, j],  M[i, k])
            ay = math.atan2( sy,       M[i, i])
            az = math.atan2( M[j, i], -M[k, i])
        else:
            ax = math.atan2(-M[j, k],  M[j, j])
            ay = math.atan2( sy,       M[i, i])
            az = 0.0
    else:
        cy = math.sqrt(M[i, i]*M[i, i] + M[j, i]*M[j, i])
        if cy > _EPS:
            ax = math.atan2( M[k, j],  M[k, k])
            ay = math.atan2(-M[k, i],  cy)
            az = math.atan2( M[j, i],  M[i, i])
        else:
            ax = math.atan2(-M[j, k],  M[j, j])
            ay = math.atan2(-M[k, i],  cy)
            az = 0.0

    if parity:
        ax, ay, az = -ax, -ay, -az
    if frame:
        ax, az = az, ax
    return ax, ay, az

def normalize_angle_delta(angle):
    if(angle > np.pi):
        angle = angle - 2 * np.pi
    elif(angle < -np.pi):
        angle = 2 * np.pi + angle
    return angle
项目的另外一个数据处理函数中调用了这个功能,在项目里面的process.py里面,这边稍加了修改
import os
import numpy as np
import time
from helper import R_to_angle
# transform poseGT [R|t] to [theta_x, theta_y, theta_z, x, y, z]
# save as .npy file
def create_pose_data():
	info = {'00': [0, 4540], '01': [0, 1100], '02': [0, 4660], '03': [0, 800], '04': [0, 270], '05': [0, 2760], '06': [0, 1100], '07': [0, 1100], '08': [1100, 5170], '09': [0, 1590], '10': [0, 1200]}
	start_t = time.time()
	for video in info.keys():
		file_name = 'KITTI/poses/{}.txt'.format(video) # 这里的地址如果不一样的话,需要更改哦
		print('Transforming {} ...'.format(file_name))
		with open(file_name) as f:
			lines = [line.split('\n')[0] for line in f.readlines()]
			#print(lines[0])
			poses = [ R_to_angle([float(value) for value in l.split(' ')]) for l in lines]  # list of pose (pose=list of 12 floats)
			print(poses[0])
			poses = np.array(poses)
			base_file_name = os.path.splitext(file_name)[0]
			#print(poses[0])
			np.save(base_file_name+'.npy', poses)
			print('Video {}: shape={}'.format(video, poses.shape))
	print('elapsed time = {}'.format(time.time()-start_t))

if __name__ == '__main__':
	#clean_unused_images()
	create_pose_data()
作者为了方便后续的训练,将其保存为npy文件。里面的格式是[r, t, R]。其中r是旋转向量,t是平移向量,R是原来的旋转矩阵,也是保存在其中。
注意事项
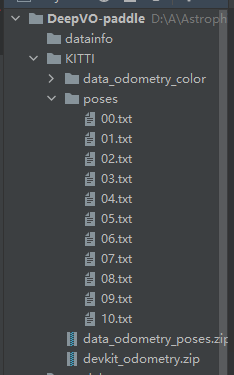
运行代码之前需要注意的是数据集保存的格式,像我保存的格式如下,pose是从官网下载的数据,主要是保存的相机的位置,也就是这次需要操作的所有文件都在里面了。而data_odometry_color文件夹里面保存的是彩色的相机数据,官网很难下载到,我是从下面的链接下载的,在此感谢该作者的,嘻嘻。

参考
DeepVO项目的地址:https://github.com/Kallaf/Visual-Odometry
KITTI官网:http://www.cvlibs.net/datasets/kitti/raw_data.php
百度云下载链接:https://blog.csdn.net/wyy13273181006/article/details/107686370?ops_request_misc=%257B%2522request%255Fid%2522%253A%2522163689359816780261931883%2522%252C%2522scm%2522%253A%252220140713.130102334.pc%255Fall.%2522%257D&request_id=163689359816780261931883&biz_id=0&utm_medium=distribute.pc_search_result.none-task-blog-2allfirst_rank_ecpm_v1~rank_v31_ecpm-6-107686370.first_rank_v2_pc_rank_v29&utm_term=dkitti%E6%95%B0%E6%8D%AE%E9%9B%86odometry&spm=1018.2226.3001.4187