目录
?
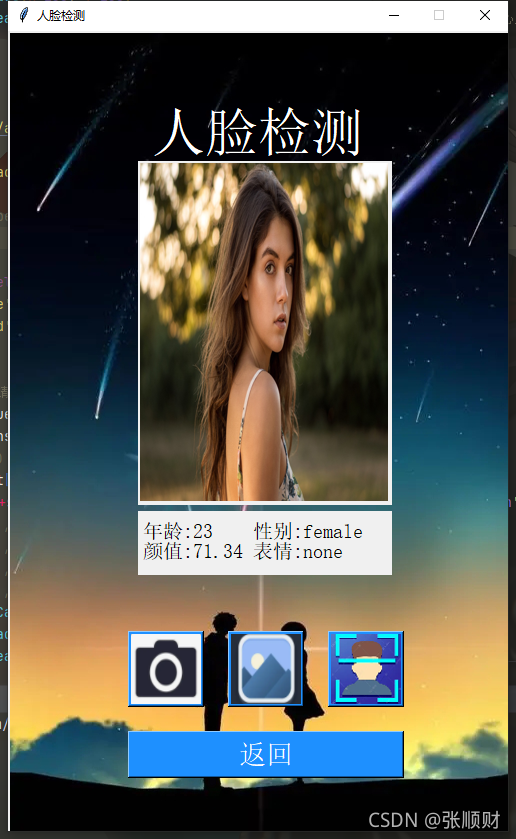
实现结果如下:

?
?百度API
人脸检测也是调用百度API去实现的。所以我们需要在百度AI开放平台-全球领先的人工智能服务平台里去进行人脸检测与属性分析的应用创建然后获取自己的ID、API key和Secre Key。
?进入百度AI平台后选择开放能力下的人脸与人体技术-->人脸检测与属性分析

?选择【立即使用】进入,然后选择【创建应用】,根据提示创建完成即可获得自己的ID、API key和Secre Key。

?API的具体参数和调用方法请查看技术文档https://ai.baidu.com/ai-doc/FACE/yk37c1u4t
本章只展现了颜值检测的一些信息,还有更多功能可以探索。
tkinter界面设计.
1.界面的初始化及布局:
    def __init__(self):
        #创建窗口
        self.interface = Tk()# Toplevel() # Tk()
        self.interface.resizable(width=False, height=False)
        self.interface.title('人脸检测')  #设置标题
        self. interface. geometry('500x800') #设置窗口大小

        # 打开图像,转为tkinter兼容的对象,
        IMG = Image.open('4.jpg').resize([500,800])
        self.IMG = ImageTk.PhotoImage(IMG)
        #创建画布,将图像作为画布背景, 铺满整个窗口
        self.canvas = Canvas(self.interface, width=500, height=800) #设置画布的宽、高
        self.canvas.place(x=0, y=0)
        self.canvas.create_image(250,400,image = self.IMG) #把图像放到画布,默认放置中心点
        self.canvas.create_text(250, 100, text='人脸检测', font=('宋体', 40),fill = 'white')


        # 创建按钮
        cam = Image.open('cam.png').resize([70, 70])
        self.cam = ImageTk.PhotoImage(cam)
        Button(self.interface,image = self.cam, font=('宋体', 20), fg='white',
               command=lambda :self.Camera(), bg='dodgerblue', activebackground='black',
               activeforeground='white').place(x=120, y=600)  # activebackground 设置按键按下有变化 activebforeground设置前景色
        pic = Image.open('pic.png').resize([70, 70])
        self.pic = ImageTk.PhotoImage(pic)
        Button(self.interface, image = self.pic, font=('宋体', 20), fg='white',
               command=lambda :self.OpenPhoto(), bg='dodgerblue', activebackground='black',
               activeforeground='white').place(x=220, y=600)
        face = Image.open('face.png').resize([70, 70])
        self.face = ImageTk.PhotoImage(face)
        Button(self.interface,image = self.face, font=('宋体', 20), fg='white',
               command=lambda :self.Detect(), bg='dodgerblue', activebackground='black',
               activeforeground='white').place(x=320, y=600)
        Button(self.interface, width=19, text='返回', font=('宋体', 20), fg='white',
               command=lambda :self.back(), bg='dodgerblue', activebackground='black',
               activeforeground='white').place(x=120, y=700)

        self.interface.mainloop(0)
2.access_token的获取模块
    def token(self):
        api_key = '人脸检测的APIkey'
        secret_key = '人脸检测的Secretkey'
        # 获取token的网址传递AIPkey和secretkey
        host = 'https://aip.baidubce.com/oauth/2.0/token?grant_type=client_credentials&client_id=' + api_key + '&client_secret=' + secret_key
        # 用POST方式对URL网址进行请求,获得响应结果
        response = requests.post(url=host)
        # 以JSON格式获取响应内容
        result = response.json()
        access_token = result['access_token']
        return access_token
?3.摄像头的调用模块
①这里如果你是笔记本电脑调用内置摄像头? cap = cv2.VideoCapture(0) 这个参数为0;
如果是调用其他外置摄像头? cap = cv2.VideoCapture(1) 这个参数为1;
②if cv2.waitKey(1) in [27, ord('q')]:
27 是键盘 esc 键的ASCII码值,这里按下esc或者输入q 退出摄像头的调用
?if cv2.waitKey(1) in [ord('c'), 13]:
13?是键盘 enter 键的ASCII码值,这里按下enter 或者输入c 拍下照片并保存
③img_name = '%s/%s.jpg' % ('IMG', 'cam')
这里是图片的保存目录及图片名称;IMG是保存目录,cam是图片名称
    def Camera(self):
        cap = cv2.VideoCapture(0)  # 0为内置摄像头,1为外接摄像头cv
        while True:
            success, img = cap.read()
            cv2.imshow('Capture', img)
            if cv2.waitKey(1) in [27, ord('q')]:
                break
                cv2.destroyAllWindows()
            if cv2.waitKey(1) in [ord('c'), 13]:
                img_name = '%s/%s.jpg' % ('IMG', 'cam')
                cv2.imwrite(img_name, img)
                cv2.destroyAllWindows()
                f = open(img_name, 'rb').read()
                # 在将二进制进行转码
                self.img = base64.b64encode(f).decode('utf-8')
                break
        self.SetImg(img_name)
4.打开系统文件选择照片的模块
    def OpenPhoto(self):
        root = tkinter.Tk()  # 创建一个窗口
        root.withdraw()  # 隐藏窗口实例
        # 利用文件对话框获取文件路径
        file_path = tkinter.filedialog.askopenfilename(title='选择文件')
        # 在程序窗口显示图片文件
        # 打开图像
        # img = 'lena.jpg'
        pic = Image.open(file_path)
        # 显示文件
        plt.axis('off')
        # plt.imshow(pic)
        # plt.show()
        # 将文件转为base64编码
        # 先以二进制读取文件
        f = open(file_path, 'rb').read()
        # 在将二进制进行转码
        self.img = base64.b64encode(f).decode('utf-8')
        # print(img)
        root.destroy()
        self.SetImg(file_path)
5.将拍下的照片或者系统文件里选择的照片放置到界面上的模块(其实就是跟界面设计里的的背景设置一样)
    def SetImg(self,photo_path):
        # 打开图像,转为tkinter兼容的对象,
        image = Image.open(photo_path).resize([250, 340])
        self.image = ImageTk.PhotoImage(image)
        # 创建画布,将图像作为画布背景, 铺满整个窗口
        self.canvas = Canvas(self.interface, width=250, height=340)  # 设置画布的宽、高
        self.canvas.place(x=130, y=130)
        self.canvas.create_image(125, 170, image=self.image)  # 把图像放到画布,默认放置中心点
6.调用API进行人脸检测并输出返回信息的模块
    def Detect(self):
        # 确定连接网址
        URL = 'https://aip.baidubce.com/rest/2.0/face/v3/detect'
        # 设置URL参数
        URL = URL + '?access_token=' + self.token()
        # 调用图像数据
        # img = self.OpenPhoto()
        # 设置请求参数
        params = {
            'image': self.img,
            'image_type': 'BASE64',
            'face_field': 'age,gender,beauty,expression'

        }
        # 向网址发生POST请求
        response = requests.post(url=URL, data=params)
        result = response.json()
        # print(result)
        result = result['result']['face_list'][0]
        text = ('年龄:'+str(result['age'])+'    性别:'+str(result['gender']['type'])+'\n'+'颜值:'+str(result['beauty'])+' 表情:'+str(result['expression']['type']))
        # print('年龄:', result['age'])
        # print('性别:', result['gender']['type'])
        # print('颜值:', result['beauty'])
        # print('表情:', result['expression']['type'])
        self.canvas = Canvas(self.interface, width=250, height=60)  # 设置画布的宽、高
        self.canvas.place(x=130, y=480)
        self.canvas.create_text(115, 30, text = text, font=('宋体', 15), fill='black')
完整代码
from tkinter import *
from PIL import Image,ImageTk
import tkinter.filedialog
from PIL import Image
import matplotlib.pyplot as plt
import base64
import requests
import cv2


#主界面面设计,创建类,在构造方法中没计界面
class FacePage():
    def __init__(self):
        #创建窗口
        self.interface = Tk()# Toplevel() # Tk()
        self.interface.resizable(width=False, height=False)
        self.interface.title('人脸检测')  #设置标题
        self. interface. geometry('500x800') #设置窗口大小

        # 打开图像,转为tkinter兼容的对象,
        IMG = Image.open('4.jpg').resize([500,800])
        self.IMG = ImageTk.PhotoImage(IMG)
        #创建画布,将图像作为画布背景, 铺满整个窗口
        self.canvas = Canvas(self.interface, width=500, height=800) #设置画布的宽、高
        self.canvas.place(x=0, y=0)
        self.canvas.create_image(250,400,image = self.IMG) #把图像放到画布,默认放置中心点
        self.canvas.create_text(250, 100, text='人脸检测', font=('宋体', 40),fill = 'white')


        # 创建按钮
        cam = Image.open('cam.png').resize([70, 70])
        self.cam = ImageTk.PhotoImage(cam)
        Button(self.interface,image = self.cam, font=('宋体', 20), fg='white',
               command=lambda :self.Camera(), bg='dodgerblue', activebackground='black',
               activeforeground='white').place(x=120, y=600)  # activebackground 设置按键按下有变化 activebforeground设置前景色
        pic = Image.open('pic.png').resize([70, 70])
        self.pic = ImageTk.PhotoImage(pic)
        Button(self.interface, image = self.pic, font=('宋体', 20), fg='white',
               command=lambda :self.OpenPhoto(), bg='dodgerblue', activebackground='black',
               activeforeground='white').place(x=220, y=600)
        face = Image.open('face.png').resize([70, 70])
        self.face = ImageTk.PhotoImage(face)
        Button(self.interface,image = self.face, font=('宋体', 20), fg='white',
               command=lambda :self.Detect(), bg='dodgerblue', activebackground='black',
               activeforeground='white').place(x=320, y=600)
        Button(self.interface, width=19, text='返回', font=('宋体', 20), fg='white',
               command=lambda :self.back(), bg='dodgerblue', activebackground='black',
               activeforeground='white').place(x=120, y=700)

        self.interface.mainloop(0)

    # client_id 为官网获取的AK, client_secret 为官网获取的SK
    def token(self):
        api_key = '人脸检测的APIkey'
        secret_key = '人脸检测的Secretkey'
        # 获取token的网址传递AIPkey和secretkey
        host = 'https://aip.baidubce.com/oauth/2.0/token?grant_type=client_credentials&client_id=' + api_key + '&client_secret=' + secret_key
        # 用POST方式对URL网址进行请求,获得响应结果
        response = requests.post(url=host)
        # 以JSON格式获取响应内容
        result = response.json()
        access_token = result['access_token']
        return access_token

    def Camera(self):
        cap = cv2.VideoCapture(0)  # 0为内置摄像头,1为外接摄像头cv
        while True:
            success, img = cap.read()
            cv2.imshow('Capture', img)
            if cv2.waitKey(1) in [27, ord('q')]:
                break
                cv2.destroyAllWindows()
            if cv2.waitKey(1) in [ord('c'), 13]:
                img_name = '%s/%s.jpg' % ('IMG', 'cam')
                cv2.imwrite(img_name, img)
                cv2.destroyAllWindows()
                f = open(img_name, 'rb').read()
                # 在将二进制进行转码
                self.img = base64.b64encode(f).decode('utf-8')
                break
        self.SetImg(img_name)
        # cv2.imshow('getFaceIamge', img)

    def OpenPhoto(self):
        root = tkinter.Tk()  # 创建一个窗口
        root.withdraw()  # 隐藏窗口实例
        # 利用文件对话框获取文件路径
        file_path = tkinter.filedialog.askopenfilename(title='选择文件')
        # 在程序窗口显示图片文件
        # 打开图像
        # img = 'lena.jpg'
        pic = Image.open(file_path)
        # 显示文件
        plt.axis('off')
        # plt.imshow(pic)
        # plt.show()
        # 将文件转为base64编码
        # 先以二进制读取文件
        f = open(file_path, 'rb').read()
        # 在将二进制进行转码
        self.img = base64.b64encode(f).decode('utf-8')
        # print(img)
        root.destroy()
        self.SetImg(file_path)

    def SetImg(self,photo_path):
        # 打开图像,转为tkinter兼容的对象,
        image = Image.open(photo_path).resize([250, 340])
        self.image = ImageTk.PhotoImage(image)
        # 创建画布,将图像作为画布背景, 铺满整个窗口
        self.canvas = Canvas(self.interface, width=250, height=340)  # 设置画布的宽、高
        self.canvas.place(x=130, y=130)
        self.canvas.create_image(125, 170, image=self.image)  # 把图像放到画布,默认放置中心点


    def Detect(self):
        # 确定连接网址
        URL = 'https://aip.baidubce.com/rest/2.0/face/v3/detect'
        # 设置URL参数
        URL = URL + '?access_token=' + self.token()
        # 调用图像数据
        # img = self.OpenPhoto()
        # 设置请求参数
        params = {
            'image': self.img,
            'image_type': 'BASE64',
            'face_field': 'age,gender,beauty,expression'

        }
        # 向网址发生POST请求
        response = requests.post(url=URL, data=params)
        result = response.json()
        # print(result)
        result = result['result']['face_list'][0]
        text = ('年龄:'+str(result['age'])+'    性别:'+str(result['gender']['type'])+'\n'+'颜值:'+str(result['beauty'])+' 表情:'+str(result['expression']['type']))
        # print('年龄:', result['age'])
        # print('性别:', result['gender']['type'])
        # print('颜值:', result['beauty'])
        # print('表情:', result['expression']['type'])
        self.canvas = Canvas(self.interface, width=250, height=60)  # 设置画布的宽、高
        self.canvas.place(x=130, y=480)
        self.canvas.create_text(115, 30, text = text, font=('宋体', 15), fill='black')


    def back(self):
        self.interface.destroy()
FacePage()
素材:


