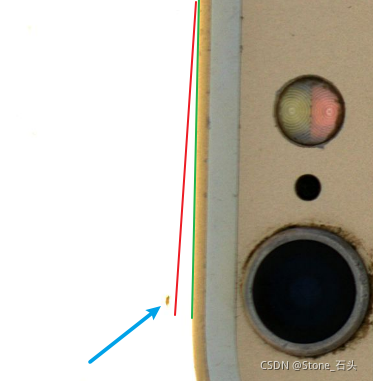
场景:找到下图中手机的边缘直线。

思路:通过从左到右边缘找点的方法找到边缘点集,再将这些点集拟合成一条直线。
分析:边缘点集容易确定,但是蓝色箭头的异常点会包含在点集中,这时用OpenCV中的fitLine拟合直线会拟合成类似红色那条,可是我们实际想要的直线是绿色那条。
方案:离群(异常)点一般会离拟合后的直线比较远,可以很自然地想到让这些离群点的权重减少后重新拟合一遍;具体原理可参考《机器视觉算法与应用》,对应Halcon中函数fit_line_contour_xld的tukey方法;
效果:下图为迭代10次的效果,随着迭代次数增加颜色变浅,可以看到直线离左上角几个离群点越来越远了。

代码:
void FitLineWeight(vector<Point2f> vecPointInput, vector<float> vWeights, float& fWeight, float& fBias)
{
	float x1 = 0;
	float x2 = 0;
	float y1 = 0;
	float x1y1 = 0;
	float n = 0;
	for (size_t i = 0; i < vecPointInput.size(); i++)
	{
		float x = vecPointInput[i].x;
		float y = vecPointInput[i].y;
		float weight = vWeights[i];
		x1 += weight * x;
		y1 += weight * y;
		x2 += weight * x * x;
		x1y1 += weight * x * y;
		n += weight;
	}
	Mat matX = (Mat_<float>(2, 2) <<
		n, x1, x1, x2);
	Mat matY = (Mat_<float>(2, 1) <<
		y1, x1y1);
	Mat matABC;
	solve(matX, matY, matABC);
	fBias = matABC.at<float>(0, 0);
	fWeight = matABC.at<float>(1, 0);
}

void FitLineItera(vector<Point2f> vecPointInput, int nIteraNum, float& fWeight, float& fBias)
{
	vector<float> vWeights(vecPointInput.size(), 1);
	FitLineWeight(vecPointInput, vWeights, fWeight, fBias);
	if (nIteraNum < 1) nIteraNum = 1;
	int nCount = 0;
	while (nCount < nIteraNum)//多次迭代
	{
		vector<float> vWeights;
		vector<float> vDist;
		for (size_t i = 0; i < vecPointInput.size(); i++)
		{
			float fDistance;
			if (0 == fWeight) fWeight += 0.000001;
			PointToLineDistance(vecPointInput[i], fWeight, fBias, fDistance);
			vDist.push_back(fDistance);
		}
		vector<float> vDistCopy;
		vDistCopy.assign(vDist.begin(), vDist.end());
		sort(vDistCopy.begin(), vDistCopy.end());
		double sigma = vDistCopy[vDistCopy.size() / 2] / 0.675;
		sigma *= 2;
		vWeights.clear();
		for (size_t i = 0; i < vDist.size(); i++)
		{
			double weight;
			if (vDist[i] <= sigma)//Tukey
			{
				double rate = vDist[i] / sigma;
				weight = pow((1 - rate * rate), 2);
			}
			else
			{
				weight = 0;
			}
			vWeights.push_back(weight);
		}
		FitLineWeight(vecPointInput, vWeights, fWeight, fBias);
		nCount++;
	}
}

bool DrawLine(Mat& imgDraw, float fLineWeight, float fLineBias, const Scalar& color, int thickness, int lineType)
{
	vector<Point> vecLine;
	int nWidth = imgDraw.cols;
	int nHight = imgDraw.rows;
	int nTempX;
	int nTempY;
	nTempX = 0;//直线与矩形左边的交点
	nTempY = fLineWeight * nTempX + fLineBias;
	if (nTempY > 0 && nTempY < nHight - 1)
		vecLine.push_back(Point(nTempX, nTempY));
	nTempX = nWidth - 1;//直线与矩形右边的交点
	nTempY = fLineWeight * nTempX + fLineBias;
	if (nTempY > 0 && nTempY < nHight - 1)
		vecLine.push_back(Point(nTempX, nTempY));
	nTempY = 0;//直线与矩形上边的交点
	nTempX = (nTempY - fLineBias) / fLineWeight;
	if (nTempX > 0 && nTempX < nWidth - 1)
		vecLine.push_back(Point(nTempX, nTempY));
	nTempY = 0;//直线与矩形下边的交点
	nTempX = (nTempY - fLineBias) / fLineWeight;
	if (nTempX > 0 && nTempX < nWidth - 1)
		vecLine.push_back(Point(nTempX, nTempY));
	if (2 != vecLine.size())
		return false;
	line(imgDraw, vecLine[0], vecLine[1], color, thickness, lineType);
	return true;
}

int main()
{
	vector<Point2f> vecPointInput;
	vecPointInput.push_back(Point2f(70.0, 110.0));
	vecPointInput.push_back(Point2f(100.0, 180.0));
	vecPointInput.push_back(Point2f(220.0, 219.0));
	vecPointInput.push_back(Point2f(260.0, 265.0));
	vecPointInput.push_back(Point2f(280.0, 278.0));
	vecPointInput.push_back(Point2f(320.0, 360.0));
	vecPointInput.push_back(Point2f(420.0, 427.0));
	vecPointInput.push_back(Point2f(480.0, 477.0));
	vecPointInput.push_back(Point2f(520.0, 511.0));
	vecPointInput.push_back(Point2f(560.0, 558.0));
	vecPointInput.push_back(Point2f(600.0, 601.0));
	float fWeight;
	float fBias;
	Mat imgShow = Mat(Size(1000,1000), CV_8UC3, Scalar(255, 255, 255));
	for (size_t i = 0; i < vecPointInput.size(); i++)
		drawMarker(imgShow, vecPointInput[i], Scalar(0 ,0, 255), MARKER_CROSS, 10, 1);
	for (int i = 0; i < 10; i++)
	{
		FitLineItera(vecPointInput, i, fWeight, fBias);
		DrawLine(imgShow, fWeight, fBias, Scalar(5 + 25 * i, 50 + 20 * i, 0), 2);
	}
}
最后:
参考该方法可以很容易实现拟合有离群点的圆,这里不再赘述。
有什么建议可加v讨论:gaoshijue666