论文地址:Cross-Transformer
pytorch源码:Cross-Transformer
CrossFromer最细节的论文以及代码解析
1. Abstract
论文中提出现有的视觉Transformer中依然存在对图像输入的建能力: 不同尺度的特征图之间的Attention。其主要原因有两个:1. 模型每一层的embedding都是同一个尺度的,并没有跨尺度的features;2. 一些视觉Transformer模型不去对小尺度的features map进行Attention,为了降低Self-Attention的计算成本,比如最先的VIT,其实作者应该是想表明,很少有模型针对高分辨率低语义特征的特征图去做self-attention。为了弥补这一缺陷,论文提出了两个Attention机制和跨尺度的embedding layer 来解决:Cross-scale Embedding layer(CEL)和Long Short Distance Attention(LSDA)。CEL融合了多个尺度的特征信息,实现了跨尺度的Embedding,LSDA将原始的Self-Attention分割成两部分,即short-distance和long-distance attention,不仅仅保持了大尺度和小尺度的特性而且还降低了计算代价。通过这两种设计,实现了跨尺度的attention,另外,提出了一种dynamic position bias动态位置偏差,使得之前的relative position bias相对位置偏差可以更适用于可变尺寸的图像输入。
2 . Introduction
Transformer需要一系列embeddings作为输入,为了适用于视觉任务,大多基于Transformer的backbone首先将输入图像经过一个patch embedding layer给图像分割成相同大小且不重叠的patch。比如,PVT中的Patch layer使用4x4,s=4的conv layer将224x224的输入图像下采样成56x56的大小,并且经过一个线性映射得到Transformer block的输入。在Transformer内部,Self-attention机制可以构建任何两个patch之间的依赖,但是由于图像数据所生成的embedding的长度相比于NLP任务是巨大的,因此传统的Self-Attention所带来的的计算代价和显存占用也是巨大的。先前的Transformer backbone如PVT,PVT-V2,Twins以及Swin或多或少解决了部分问题,但是依旧存在一个问题:不能对不同尺度的feature之间建立Attention,而这种能力对于视觉任务来说是非常重要的。比如,一个图像上通常包含许多不同尺度的物体,建立他们之间的联系需要一个跨尺度的attention机制,尤其对于目标检测和语义分割任务,需要大规模(粗粒度)特征和小规(细粒度)特征之间的交互。
论文中提出这包括两个原因:
1. embedding序列总是从单一尺度的patch中生成,因此相同层之间的embedding仅仅是包含单一尺度的特征。这里的layer,我理解的是同一个stage中,embedding是相同尺寸的
2. 在self-attention内部,key和value的生成总是会被合并,这里我理解的是之前的Transformer block中的K和V的生成总是通过一个相同的线性映射来得到。因此,即使embedding同时具有小尺度和大尺度的特征,但由于合并操作也会失去一部分小尺度的特征,从而损害了跨尺度的attention。
为了解决这一问题,论文提出:
- Cross-scale Embedding Layer(CEL): 使用一个金字塔结构,将模型分割成多个stage,CEL layer在每个stage的最开始使用。每一个stage中包括若干个bottleneck,下一个stage中的输入使用上一个stage中的最后一个bottleneck的输出,并且使用多个不同尺度的卷积核(8x8, 4x4等)来随机采样patch。然后将这些不同尺度的patch经过concat和线性映射得到当前stage的输入。
- Long Short Distance Attention(LSDA): 将传统的Self-Attention分割成两个部分,一个short-distance attention(SDA)和一个long-distance attention(LDA),SDA建模邻居embedding之间的依赖,LDA建模远距离的embedding的依赖。
另外,relative position bias RPB相对位置偏置在视觉任务上的Transformer是有效的,论文提出当输入图像尺寸固定的时候,RPB带来的性能提升是有局限的。为了使得RPB可以适用于输入图像尺寸可变的任务,作者提出一种Dynamic position bias(DPB)。输入是两个embedding的距离然后输出一个position bias。DPB与RPB的区别我会在后面的源码解析中进行扩展,这里先跳过。
和之前一样,相关工作直接跳过。。。
3. CrossFormer
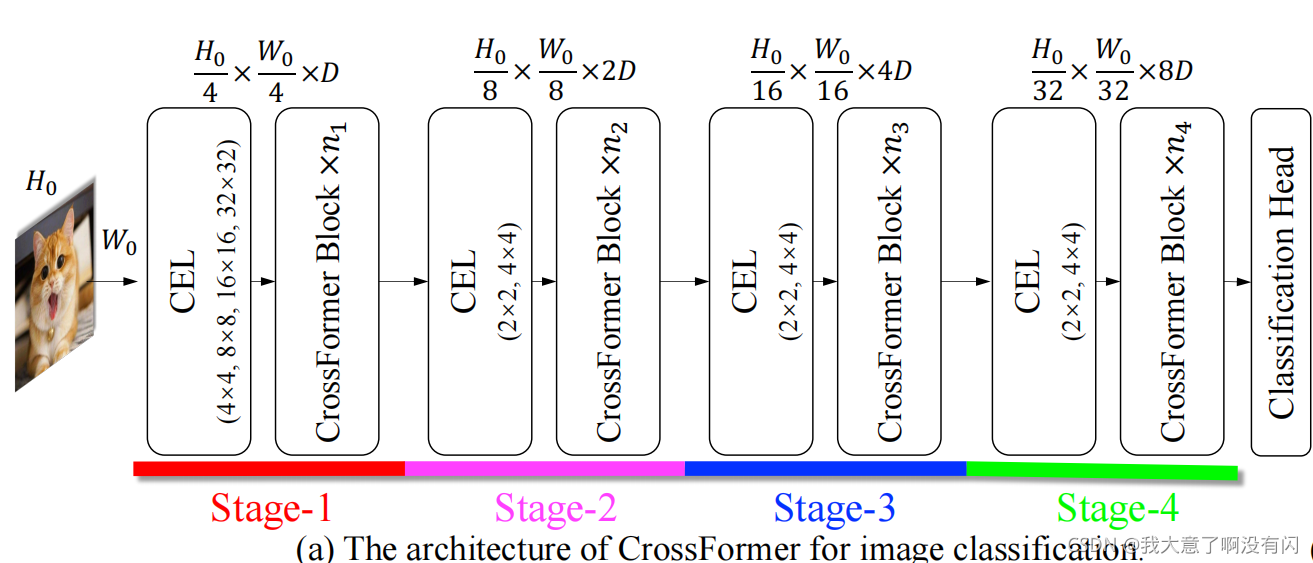
CrossFormer类似于PVT,Swin等框架,也是使用金字塔结构,将模型分割成4个stage。其中每个stage中包含一个CEL层和一系列的CrossFormer block,除第一个stage中将embedding的数目降低为4倍之外,之后的stage都是将embedding的数目降低为输入尺寸的2倍,并且stage2-4的channel维度是前一个stage的两倍。
3.1. Cross-scale Embedding Layer(CEL)
CEL应用在每个stage的最开始,类似于PVT中的Patch Layer,对于第一个stage的CEL,使用4个不同尺寸的卷积核,4个卷积核的步长保持一致均为4,保证得到的是相同尺寸的feature map。4个输出经过concat + Layer Norm + dropout得到Transformer block的输入。

考虑到大卷积核所带来的的计算代价更大,因此对于大尺度的卷积核的数量较少,也就对应着上图中的Dim即大尺度的卷积核得到的feature map的channel小,小尺度的卷积核得到的feature map的channel大。另外,对于Stage2-4中的CEL都是使用2x2和4x4的卷积核,并且卷积步长s均为2, 对应着图1中的feature map下采样倍率为2。
3.2. CrossFormer block
每一个CrossFormer block包含一个SDA和LDA以及一个MLP,类似以Swin中每一个block包括一个W-MSA以及一个SW-MSA。并且SDA和LDA是交替使用的,如下图,其实非常像Swin:
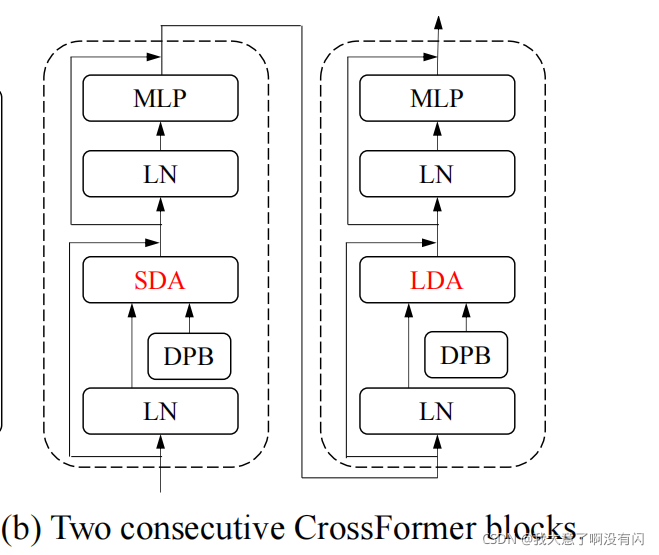
其中,每一个block中都会应用DPB以及short cut。
3.2.1 Long Short Distance Attention (LSDA)

将self-attention分割成两部分:short-distance attention(SDA)和long-distance attention(LDA)。对于SDA,每一个HxW的大小的feature map,会被分割成Group,其实就是Swin里面的Windows self-attention,同一组的GxG中的embedding才会做self-attention,组与组之间是没有关联的。对于LDA,其实就是跨window的Self-attention,其中embedding的采样间距interval I是根据输入图像尺寸和G得到的,必须要保证
Input Size = G x I。这里作者举了一个例子:比如上图中的输入图像尺寸为9x9,LDA中的参数G=3,那么group size即为3x3,可以划分成9/3 x 9/3 = 9个group,那么interval I就等于9/3 = 3。其实在代码中实现也是很简单的,这个后面再说。需要注意的是,在lda中,距离为Interval的embedding属于同一组,如果图像大小为224x224,则每个stage中的group总是有7x7的embedding。
另外,对于上图b中的黄色embedding,两个黄色的embedding不是相邻的,如果没有大尺度的patch的帮助,很难获得他们之间的关系。因此,如果这两个embedding仅仅由小尺度的patch来建模(LDA),那么就很难在他们之间建立依赖。相反,相邻的大尺度patch也就是SDA提供了足够的上下文关系来衔接这两个远距离的embedding,在大尺度patch的指导下,LDA将会变得更容易更有意义。
并且SDA和LDA仅仅是在self-attention加了tensor的reshape和permute操作,因此并没有带来额外的计算代价。如下图论文中提供的伪代码:

3.2.2 Dynamic Position Bias
相对位置偏置RPB在原来的self-attention中引入了一个相对偏置,因此带有RPB的LSDA的attention map如下:

这里的Q,K以及V分别表示self-attention中的Query,Key以及Value,这里的
d
\sqrt{d}
d?
即为scale参数。B的维度为G2xG2,在先前的设计中,RPB矩阵是固定的,(xij, yij)表示第i个embedding和第j个embedding之间的距离。关于RPB,这里引用霹雳吧啦的讲解:

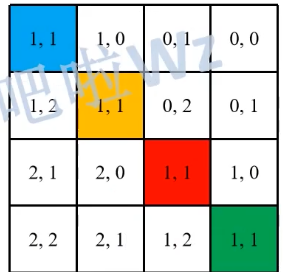
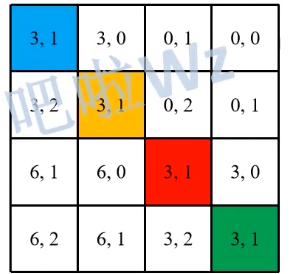
这里的feature map为2x2,左下角显示的是4个pixel的绝对位置索引,以每个位置为参考点,分别减去包括自己所在的全部pixel的位置坐标,就可以得到4x4 = 16个相对位置索引。并且每一个参考点得到的相对位置索引在行的位置上进行展平,为了方便,RPB的作者是使用一元坐标来表示每个相对位置索引的,那么如何将二元坐标转换成一元左边并且可以很好的区分?如果直接相加的话,(右下角)存在许多重复点,比如第一行的第二个位置索引(0, -1)与第一行第三个位置索引是重复的均为-1,那么这样就无法区分是位置了。正确做法是:
-
首先让offset从0开始,也就是对每个相对位置索引的行坐标以及列坐标都加上M-1(M即为feature map的大小);
-
接着将行坐标 x (2M-1),得到:
-
最后将行列坐标直接相加,得到:
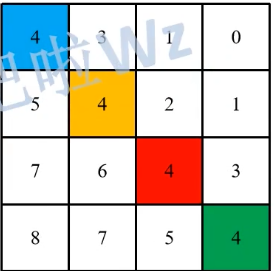
于是,上述的每个参考点的相对位置索引就不会重复了。
上面求得的是Relative position index,是在代码中的初始化得到的,并且一旦feature map的尺寸确定,relative position index 是不会改变的,而relative position bias是可训练参数,如下面Swin中的代码:
 # define a parameter table of relative position bias 根据window size生成相对位置编码 [23*23, num_heads]
        self.relative_position_bias_table = nn.Parameter(
            torch.zeros((2 * window_size[0] - 1) * (2 * window_size[1] - 1), num_heads))  # 2*Wh-1 * 2*Ww-1, nH
# relative position bias: [window_size^2, window_size^2, num_heads] -> [num_heads, window_size^2, window_size^2]
        relative_position_bias = self.relative_position_bias_table[self.relative_position_index.view(-1)].view(
            self.window_size[0] * self.window_size[1], self.window_size[0] * self.window_size[1], -1)  # Wh*Ww,Wh*Ww,nH
        relative_position_bias = relative_position_bias.permute(2, 0, 1).contiguous()  # nH, Wh*Ww, Wh*Ww
        attn = attn + relative_position_bias.unsqueeze(0) # [512, 4, 144, 144]

再结合上面这个例子,relative position bias table的大小是(2M - 1) x (2M - 1)。再根据relative position index从relative position bias table中取值,比如第一行的index为4, 3,1,0那么对应的bias为0.1,0.8,0.2个0.1。
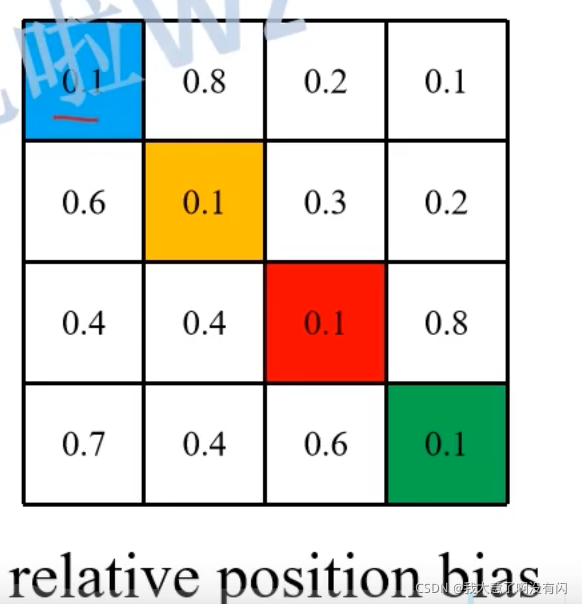
再解释下relative position bias table的尺寸为什么是(2M - 1) x (2M -1)的?
由于相对位置索引的范围在【-M+1, M-1】,那么这个区间有(M-1)-(-M-1) =2M-1个值,因此行坐标和列坐标都有2M-1种可能的取值,那么relative position bias table的shape为(2M-1) x (2M-1)。
而CrossFromer中提出的DPB是一个基于MLP模块的RPB,相对于原始的RPB,不再使用torch.zeros()来生成一个全为0的tensor,在经过正态分布初始化去训练这个单一的参数,而是使用一个MLP block(包括3个线性映射+Layer norm + Relu 3.2.1中的图C)得到relative position bias table。
4. Variants of CrossFormer
下图展示了以224x224的图像输入尺寸的4种不同尺寸的CrossFormer, D表示该channel维度,H表示head数目,G表示SDA的group size以及I表示LDA中的Interval,另外模型中的每个stage中的head_dim均为32 :

另外,作者在附注中也给出了关于检测和分割任务的CrossFormer框架:

5. Code
这里只有解析源码中的crossformer脚本,其他的关于数据集的读取以及训练的细节在之前的博客中都已经提及,所以这里不再一一解析。
5.1. Cross-scale Embedding Layer
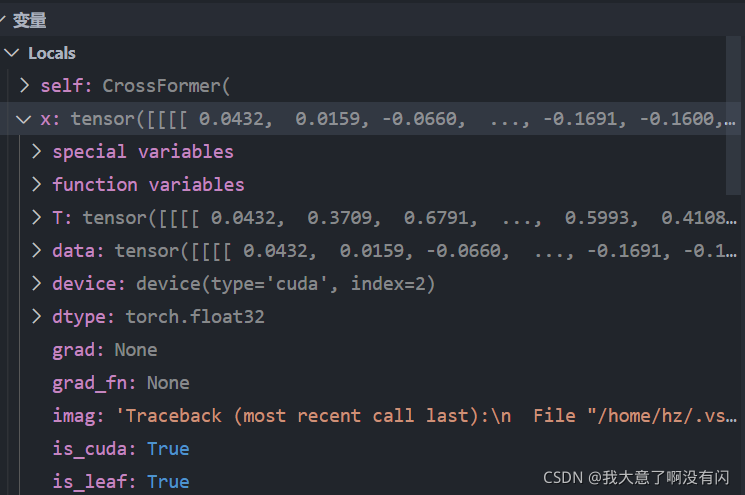
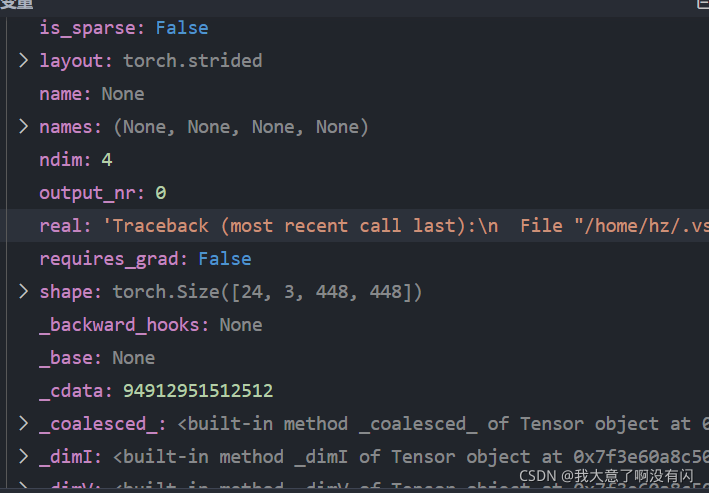
我在调式使用的是448x448的图像尺寸,bs=24。刚开始我发现设置448,如果依旧使用论文中所提出的配置是不正确的,因为要满足Input Size = G x I。但是我后来看到附录中关于检测和分割任务中的模型配置参数,如上图中的Stage1中的feature map为320x200,而GxI=224,其实并没有满足这个条件,所以我就继续调式使用448的大小。如下图:
那个第一个Stage中的CEL是怎么实现的呢?下面为PatchEmbed类中的init函数中关于4个卷积的初始化部分
 self.projs = nn.ModuleList()
        for i, ps in enumerate(patch_size):
            if i == len(patch_size) - 1:
                dim = embed_dim // 2 ** i # 对于conv4中的卷积核个数为12
            else:
                dim = embed_dim // 2 ** (i + 1) # conv1-conv3的卷积核个数依次为: 48, 24, 12
            stride = patch_size[0] # 四个conv layer的步长均为4
            padding = (ps - patch_size[0]) // 2 # 四个conv layer的padding依次为:0, 2, 6, 14
            self.projs.append(nn.Conv2d(in_chans, dim, kernel_size=ps, stride=stride, padding=padding))
由于我在调试的时候使用的模型是CrossFormer-S,那么第一个Stage1中的dim为96,且使用4个不同尺度的卷积核,卷积核个数依旧为:48, 24, 12, 12对应着4x4,8x8,16x16,32x32。
搭建4个conv layer, conv1: [3, 48],s=4,4x4;
conv2:[3, 24],s=4,8x8,p=2;
conv3:[3,12],s=4,16x16,p=6;
conv4:[3, 12]s=4,32x32,p=14 使用不同的padding,相同的卷积步长将输入图像下采样到4倍:

然后再看他的foreward过程,如下:
    def forward(self, x):
        B, C, H, W = x.shape
        # FIXME look at relaxing size constraints
        assert H == self.img_size[0] and W == self.img_size[1], \
            f"Input image size ({H}*{W}) doesn't match model ({self.img_size[0]}*{self.img_size[1]})."
        xs = []
        for i in range(len(self.projs)):
            # 经过4个conv输出的feature map调整channel [bs, H/4 * W/4, 48/24/12/12]
            tx = self.projs[i](x).flatten(2).transpose(1, 2)
            xs.append(tx)  # B Ph*Pw C
        x = torch.cat(xs, dim=2) # 在embed dim维度上进行concat [bs, H/4 * W/4, 96]
        if self.norm is not None:
            x = self.norm(x)
        return x
得到4个不同尺度的feature map在维度2的维度(channel)进行concat,在经过一Layer Norm得到Stage的输入:【bs,H/4 * W/4, 96】
同理对于Stage2-Stage4中的CEL也是类似的,就不再赘述了,需要注意的是后面的3个CEL仅仅是两个卷积操作,s均为2.
5.2. CrossFormer Block
先来看一个stage的init函数,如下:
class Stage(nn.Module):
    """ CrossFormer blocks for one stage.

    Args:
        dim (int): Number of input channels.
        input_resolution (tuple[int]): Input resolution.
        depth (int): Number of blocks.
        num_heads (int): Number of attention heads.
        group_size (int): variable G in the paper, one group has GxG embeddings
        mlp_ratio (float): Ratio of mlp hidden dim to embedding dim.
        qkv_bias (bool, optional): If True, add a learnable bias to query, key, value. Default: True
        qk_scale (float | None, optional): Override default qk scale of head_dim ** -0.5 if set.
        drop (float, optional): Dropout rate. Default: 0.0
        attn_drop (float, optional): Attention dropout rate. Default: 0.0
        drop_path (float | tuple[float], optional): Stochastic depth rate. Default: 0.0
        norm_layer (nn.Module, optional): Normalization layer. Default: nn.LayerNorm
        downsample (nn.Module | None, optional): Downsample layer at the end of the layer. Default: None
        use_checkpoint (bool): Whether to use checkpointing to save memory. Default: False.
    """

    def __init__(self, dim, input_resolution, depth, num_heads, group_size,
                 mlp_ratio=4., qkv_bias=True, qk_scale=None, drop=0., attn_drop=0.,
                 drop_path=0., norm_layer=nn.LayerNorm, downsample=None, use_checkpoint=False,
                 patch_size_end=[4], num_patch_size=None):

        super().__init__()
        self.dim = dim
        self.input_resolution = input_resolution
        self.depth = depth
        self.use_checkpoint = use_checkpoint

        # build blocks
        self.blocks = nn.ModuleList()
        for i in range(depth):
            lsda_flag = 0 if (i % 2 == 0) else 1
            self.blocks.append(CrossFormerBlock(dim=dim, input_resolution=input_resolution,
                                 num_heads=num_heads, group_size=group_size,
                                 lsda_flag=lsda_flag,
                                 mlp_ratio=mlp_ratio,
                                 qkv_bias=qkv_bias, qk_scale=qk_scale,
                                 drop=drop, attn_drop=attn_drop,
                                 drop_path=drop_path[i] if isinstance(drop_path, list) else drop_path,
                                 norm_layer=norm_layer,
                                 num_patch_size=num_patch_size))

        # patch merging layer 只对stage1-3在进行bottleneck结束后有downsample即stage2-4的Cross Embed
        if downsample is not None:
            self.downsample = downsample(input_resolution, dim=dim, norm_layer=norm_layer,
                                         patch_size=patch_size_end, num_input_patch_size=num_patch_size)
        else:
            self.downsample = None

    def forward(self, x):
        for blk in self.blocks:
            if self.use_checkpoint:
                x = checkpoint.checkpoint(blk, x)
            else:
                x = blk(x)
        if self.downsample is not None:
            x = self.downsample(x)
        return x
需要注意只有两个地方,一个是lsda_flag参数,这个参数类似于Swin-Transformer中的shift_size参数,当lada_flag参数为0时,使用的是SDA,为1则使用LDA,相互交替使用。
另一个需要注意的参数为downsample,也就是论文中的CrossEmbedding layer,不过这里只有Stage1-3才有这个layer,也就是Stage1中的CrossFormer Block执行结束,然后执行Stage2中的CEL,只不过源码中将下一个CEL与前一个stage打包在一起,其实是一样的。
下面为一个CrossFormer block:
class CrossFormerBlock(nn.Module):
    r""" CrossFormer Block.

    Args:
        dim (int): Number of input channels.
        input_resolution (tuple[int]): Input resulotion.
        num_heads (int): Number of attention heads.
        group_size (int): Group size.
        lsda_flag (int): use SDA or LDA, 0 for SDA and 1 for LDA.
        mlp_ratio (float): Ratio of mlp hidden dim to embedding dim.
        qkv_bias (bool, optional): If True, add a learnable bias to query, key, value. Default: True
        qk_scale (float | None, optional): Override default qk scale of head_dim ** -0.5 if set.
        drop (float, optional): Dropout rate. Default: 0.0
        attn_drop (float, optional): Attention dropout rate. Default: 0.0
        drop_path (float, optional): Stochastic depth rate. Default: 0.0
        act_layer (nn.Module, optional): Activation layer. Default: nn.GELU
        norm_layer (nn.Module, optional): Normalization layer.  Default: nn.LayerNorm
    """

    def __init__(self, dim, input_resolution, num_heads, group_size=7, lsda_flag=0,
                 mlp_ratio=4., qkv_bias=True, qk_scale=None, drop=0., attn_drop=0., drop_path=0.,
                 act_layer=nn.GELU, norm_layer=nn.LayerNorm, num_patch_size=1):
        super().__init__()
        self.dim = dim
        self.input_resolution = input_resolution
        self.num_heads = num_heads
        self.group_size = group_size
        self.lsda_flag = lsda_flag
        self.mlp_ratio = mlp_ratio
        self.num_patch_size = num_patch_size
        if min(self.input_resolution) <= self.group_size:
            # if group size is larger than input resolution, we don't partition groups
            self.lsda_flag = 0
            self.group_size = min(self.input_resolution)

        self.norm1 = norm_layer(dim)

        self.attn = Attention(
            dim, group_size=to_2tuple(self.group_size), num_heads=num_heads,
            qkv_bias=qkv_bias, qk_scale=qk_scale, attn_drop=attn_drop, proj_drop=drop,
            position_bias=True)

        self.drop_path = DropPath(drop_path) if drop_path > 0. else nn.Identity()
        self.norm2 = norm_layer(dim)
        mlp_hidden_dim = int(dim * mlp_ratio)
        self.mlp = Mlp(in_features=dim, hidden_features=mlp_hidden_dim, act_layer=act_layer, drop=drop)

        attn_mask = None
        self.register_buffer("attn_mask", attn_mask)

    def forward(self, x):
        H, W = self.input_resolution
        B, L, C = x.shape
        assert L == H * W, "input feature has wrong size %d, %d, %d" % (L, H, W)

        shortcut = x
        x = self.norm1(x)
        x = x.view(B, H, W, C) # [bs, H/4, W/4, 96] -> [bs, H/4, W/4, 96]

        # group embeddings 所有model所有stage中的group size均相同7
        G = self.group_size
        if self.lsda_flag == 0: # 0 for SDA [bs, I, G, I, G, C] -> [bs,I, I, 7, 7, C]
            x = x.reshape(B, H // G, G, W // G, G, C).permute(0, 1, 3, 2, 4, 5)
        else: # 1 for LDA                   [bs, G, I, G, I, C] -> [bs,I, I, 7, 7, C]
            x = x.reshape(B, G, H // G, G, W // G, C).permute(0, 2, 4, 1, 3, 5)

        x = x.reshape(B * H * W // G**2, G**2, C) # [bs*16*16, 49, 96]

        # multi-head self-attention
        x = self.attn(x, mask=self.attn_mask)  # [num_groups*bs, 49, embed_dim]

        # ungroup embeddings 拆分成group*group 还原回原始的输入feature map的维度
        x = x.reshape(B, H // G, W // G, G, G, C) #[bs, num_groups, num_groups, 7, 7, embed_dim]
        if self.lsda_flag == 0:
            x = x.permute(0, 1, 3, 2, 4, 5).reshape(B, H, W, C)
        else:
            x = x.permute(0, 3, 1, 4, 2, 5).reshape(B, H, W, C)
        x = x.view(B, H * W, C) # [bs, H*W, embed_dim]

        # FFN
        x = shortcut + self.drop_path(x) # Dropout + Short cut
        x = x + self.drop_path(self.mlp(self.norm2(x)))

        return x
对于224的图像分类任务,CrossFromer中的参数配置的G均为7,那么以第一个stage为例,当第一次来到CrossFormer block时,lsda_flag参数为0,那么执行的是SDA,即group self-attention,那么输入tensor的shape为:【24, 112, 112, 96】,那么划分group之后的tensor shape为:【24,16,16,7,7,96】。
在H和W方向上分别除上G,得到的16x16个7x7大小的group或者说window。在reshape之后的shape为:
【6144,49, 96】将H和W方向上的groups数目与batch size维度打包在一起。
接着进行group内的Self-Attention :
class Attention(nn.Module):
    r""" Multi-head self attention module with dynamic position bias.

    Args:
        dim (int): Number of input channels.
        group_size (tuple[int]): The height and width of the group.
        num_heads (int): Number of attention heads.
        qkv_bias (bool, optional):  If True, add a learnable bias to query, key, value. Default: True
        qk_scale (float | None, optional): Override default qk scale of head_dim ** -0.5 if set
        attn_drop (float, optional): Dropout ratio of attention weight. Default: 0.0
        proj_drop (float, optional): Dropout ratio of output. Default: 0.0
    """

    def __init__(self, dim, group_size, num_heads, qkv_bias=True, qk_scale=None, attn_drop=0., proj_drop=0.,
                 position_bias=True):

        super().__init__()
        self.dim = dim
        self.group_size = group_size  # for SDA [7, 7] 所有的bottleneck的group size均相同
        self.num_heads = num_heads
        head_dim = dim // num_heads   # 每个head的embedding的dim, 每个bottleneck的head_dim相同为32
        self.scale = qk_scale or head_dim ** -0.5 # Q * K的归一化因子
        self.position_bias = position_bias

        if position_bias:
            self.pos = DynamicPosBias(self.dim // 4, self.num_heads, residual=False)

            # 生成DPB中的?xij以及?yij的取值范围[1-G, G-1],再生成GxG网格的坐标点 13*13个网格点
            position_bias_h = torch.arange(1 - self.group_size[0], self.group_size[0]) # [group-1]
            position_bias_w = torch.arange(1 - self.group_size[1], self.group_size[1]) # [group-1]
            biases = torch.stack(torch.meshgrid([position_bias_h, position_bias_w]))  # [2, 13, 13]
            biases = biases.flatten(1).transpose(0, 1).float() # [2, 13, 13] -> [169, 2]
            self.register_buffer("biases", biases)

            # get pair-wise relative position index for each token inside the group
            coords_h = torch.arange(self.group_size[0])
            coords_w = torch.arange(self.group_size[1])
            coords = torch.stack(torch.meshgrid([coords_h, coords_w]))  # [2,7,7]
            coords_flatten = torch.flatten(coords, 1)  # [2, 49]
            relative_coords = coords_flatten[:, :, None] - coords_flatten[:, None, :]  # [2,49,49]
            relative_coords = relative_coords.permute(1, 2, 0).contiguous() # [49,49,2]
            relative_coords[:, :, 0] += self.group_size[0] - 1  # shift to start from 0
            relative_coords[:, :, 1] += self.group_size[1] - 1
            relative_coords[:, :, 0] *= 2 * self.group_size[1] - 1
            relative_position_index = relative_coords.sum(-1)  # [49, 49]
            self.register_buffer("relative_position_index", relative_position_index)
        # 使用[dim, dim*3]的线性映射,可以一次性得到Q,K以及V三个矩阵
        self.qkv = nn.Linear(dim, dim * 3, bias=qkv_bias)
        self.attn_drop = nn.Dropout(attn_drop)
        self.proj = nn.Linear(dim, dim)
        self.proj_drop = nn.Dropout(proj_drop)

        self.softmax = nn.Softmax(dim=-1)

    def forward(self, x, mask=None):
        """
        Args:
            x: input features with shape of (num_groups*B, N, C)
            mask: (0/-inf) mask with shape of (num_groups, Wh*Ww, Wh*Ww) or None
        """ # qkv.shape = [3,num_groups*bs, num_heads, group_size*group_size, head_dim]
        B_, N, C = x.shape # batchsize*num_groups, group_size*group_size, embed_dim
        qkv = self.qkv(x).reshape(B_, N, 3, self.num_heads, C // self.num_heads).permute(2, 0, 3, 1, 4)
        q, k, v = qkv[0], qkv[1], qkv[2]  # make torchscript happy (cannot use tensor as tuple)

        q = q * self.scale
        attn = (q @ k.transpose(-2, -1)) # [num_groups*bs, num_heads, 7*7, 7*7]

        if self.position_bias:
            pos = self.pos(self.biases) # [169,2]->[169, num_heads]    bias经过3个线性映射得到
            # select position bias根据相对位置索引从pos中选取,并reshape成 [49*49, num_heads] -> [49, 49, num_heads]
            relative_position_bias = pos[self.relative_position_index.view(-1)].view(
                self.group_size[0] * self.group_size[1], self.group_size[0] * self.group_size[1], -1)  # Wh*Ww,Wh*Ww,nH
            relative_position_bias = relative_position_bias.permute(2, 0, 1).contiguous()  # [num_heads, 49, 49]
            attn = attn + relative_position_bias.unsqueeze(0) # QK^T/√d + Bias

        if mask is not None:
            nW = mask.shape[0]
            attn = attn.view(B_ // nW, nW, self.num_heads, N, N) + mask.unsqueeze(1).unsqueeze(0)
            attn = attn.view(-1, self.num_heads, N, N)
            attn = self.softmax(attn)
        else:
            attn = self.softmax(attn) # Softmax(QK^T/√d + Bias)

        attn = self.attn_drop(attn)
        # [num_groups*bs, num_heads, 49, head_dim] -> [num_groups*bs, 49, num_heads*head_dim]
        x = (attn @ v).transpose(1, 2).reshape(B_, N, C)
        x = self.proj(x)
        x = self.proj_drop(x)
        return x
代码中的DynamicPosBias即为论文中提出的MLP-DPB block,如下:
class DynamicPosBias(nn.Module):
    def __init__(self, dim, num_heads, residual):
        super().__init__()
        self.residual = residual
        self.num_heads = num_heads
        self.pos_dim = dim // 4 # 每个stage中的embedding dim / 4再除以4得到 e.g. 96/4 // 4 = 6
        self.pos_proj = nn.Linear(2, self.pos_dim) # [2, 6]
        self.pos1 = nn.Sequential(
            nn.LayerNorm(self.pos_dim),
            nn.ReLU(inplace=True),
            nn.Linear(self.pos_dim, self.pos_dim), # [6, 6]
        )
        self.pos2 = nn.Sequential(
            nn.LayerNorm(self.pos_dim),
            nn.ReLU(inplace=True),
            nn.Linear(self.pos_dim, self.pos_dim) # [6, 6]
        )
        self.pos3 = nn.Sequential(
            nn.LayerNorm(self.pos_dim),
            nn.ReLU(inplace=True),
            nn.Linear(self.pos_dim, self.num_heads) # [6, 3]
        )
    def forward(self, biases):
        if self.residual:
            pos = self.pos_proj(biases) # 2Wh-1 * 2Ww-1, heads
            pos = pos + self.pos1(pos)
            pos = pos + self.pos2(pos)
            pos = self.pos3(pos)
        else:
            pos = self.pos3(self.pos2(self.pos1(self.pos_proj(biases))))
        return pos
需要注意的是:这里的self.biases在初始化过程中就已经生成了,是不会改变的,由于使用的group size为7,那么对应的相对位置bias的范围在(2x7 - 1) * (2x7 - 1) = 13 x 13 = 169对相对位置索引,如下图:
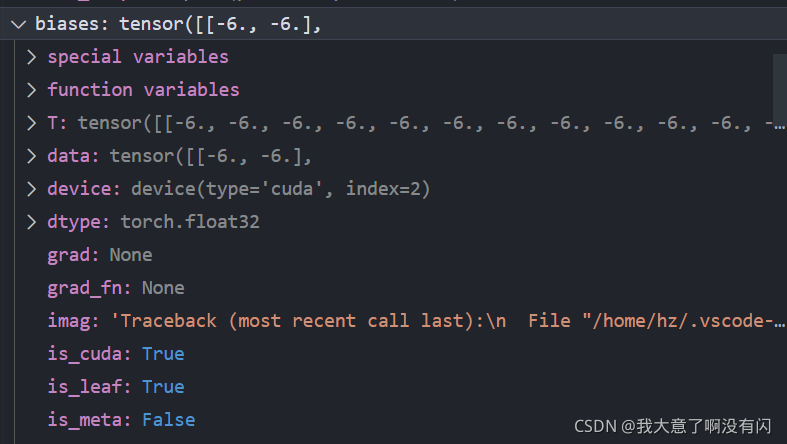
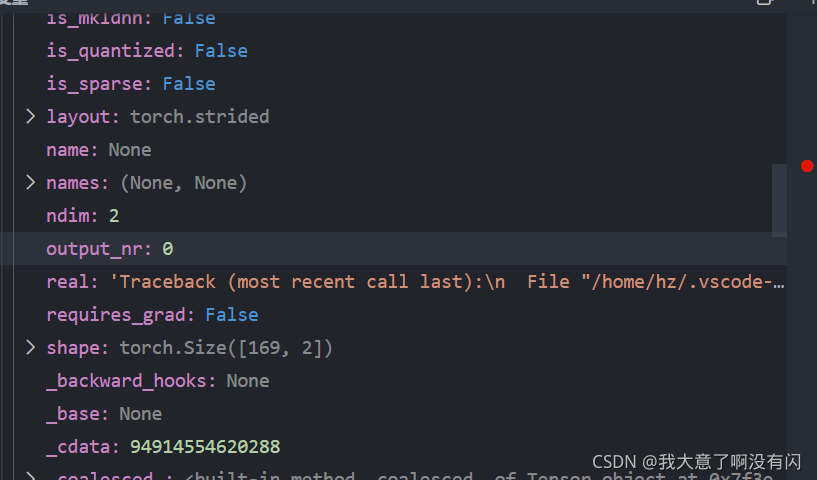
根据这个相对位置索引经过MLP block得到RPB,其shape为:【169, num_heads】,以第一个Stage为例,那么这里的RPB对应源码中的pos的shape为【169, 3】。然后将RPB + attn做softmax,与V相乘之后得到self-attention的输出,其实self-attention里面没有什么创新的地方,除了引进一个DPB之外,其余的都是常规操作。
Attention之后进行short cut + dropout,进入到MLP block(FC1 升维4倍,FC2 降维回来 ) -> Dropout -> short cut -> Layer norm。
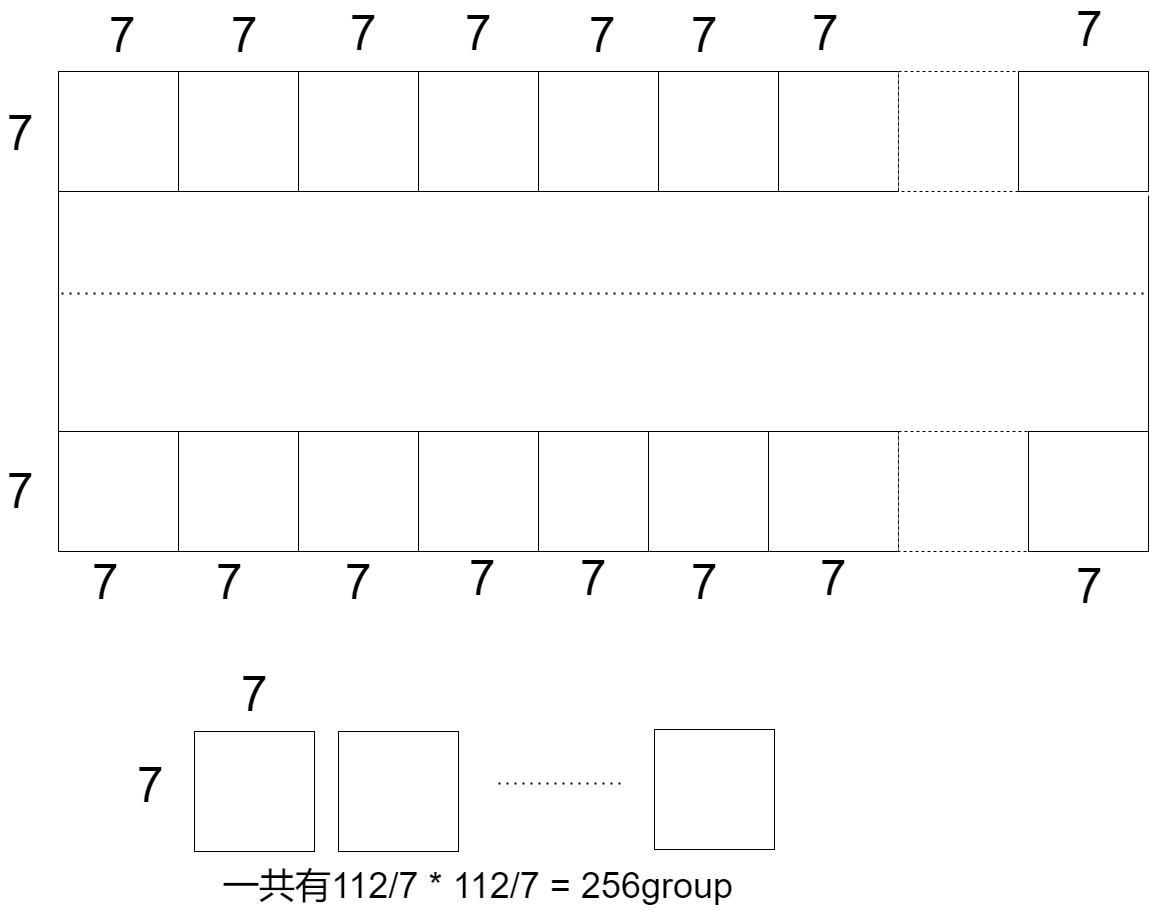
当来到第二个CrossFormer block时,lsda_flag参数为1,那么此时需要做LDA,不注意看,这里的reshape操作与上一次的SDA只是在H和W方向上换了位置而已,但不仅仅是更换了位置这么简单,为了说明,我画了两幅图,如下:
下面为了更好的解析,忽略掉embedding的维度信息,只针对于embedding的尺寸。
对于SDA,很好理解,这里输入的feature map大小为112x112,而group size为7,那么对于feature mao分组后,再将一个个group进行组内的self-attention,那么需要做256次不同的self-attention即【256, 49】。这就解释了为什么要将group数和batch size维度的值进行相乘。

对于LDA,将feature map划分成16x16的group大小,其shape为:【7,16, 7,16】总共有7x7=49个group,每个group的大小为16x16,再将feature map permute成【bsx16x16, 7x7】
对于一个batch下的图像,总共做了256次self-attention,并且每一次的self-attention的embedding其实是来自这49个不同的组的,每一个组提供一个embedding,就是上图中的红色的embedding组成一个group,做一次self-attention,而绿色的embedding组成一个group,做一次self-attention。那么总共有多少个不同的embedding呢?最初feature map将每个group划分为16x16大小的,那么每个group中可以提供256个不同的embedding,因此可以做256组self-attention。
综上,交替使用SDA和LDA,不仅可以做到组内的self-attention,而且可以做到跨组的self-attention,也可以降低传统的self-attention的计算代价。