TensorBoard
tensorboard可以当作用来生成图表的类, (后边训练神经网络时需要用来画图, 看loss函数的曲线
比如生成
y
=
x
2
y = x^2
y=x2曲线
from torch.utils.tensorboard import SummaryWriter

writer = SummaryWriter("logs")
for i in range(100):
    writer.add_scalar("y = x ^ 2", i ** 2, i)

writer.close()
查看日志文件
tensorboard --logdir=logs


看看add_scalar的源码, tag是图表名, scalar_value是y轴数值, global_step是x轴数值
    def add_scalar(self, tag, scalar_value, global_step=None, walltime=None):
        """Add scalar data to summary.

        Args:
            tag (string): Data identifier
            scalar_value (float or string/blobname): Value to save
            global_step (int): Global step value to record
            walltime (float): Optional override default walltime (time.time())
              with seconds after epoch of event

        Examples::

            from torch.utils.tensorboard import SummaryWriter
            writer = SummaryWriter()
            x = range(100)
            for i in x:
                writer.add_scalar('y=2x', i * 2, i)
            writer.close()

        Expected result:

        .. image:: _static/img/tensorboard/add_scalar.png
           :scale: 50 %

        """
处理图像
需要用add_image方法
查看add_image源码, img_tensor参数需要是torch.Tensor, 或者numpy.array, 或者string/blobname类型
    def add_image(self, tag, img_tensor, global_step=None, walltime=None, dataformats='CHW'):
        """Add image data to summary.

        Note that this requires the ``pillow`` package.

        Args:
            tag (string): Data identifier
            img_tensor (torch.Tensor, numpy.array, or string/blobname): Image data
            global_step (int): Global step value to record
            walltime (float): Optional override default walltime (time.time())
              seconds after epoch of event
        Shape:
            img_tensor: Default is :math:`(3, H, W)`. You can use ``torchvision.utils.make_grid()`` to
            convert a batch of tensor into 3xHxW format or call ``add_images`` and let us do the job.
            Tensor with :math:`(1, H, W)`, :math:`(H, W)`, :math:`(H, W, 3)` is also suitable as long as
            corresponding ``dataformats`` argument is passed, e.g. ``CHW``, ``HWC``, ``HW``.

        Examples::

            from torch.utils.tensorboard import SummaryWriter
            import numpy as np
            img = np.zeros((3, 100, 100))
            img[0] = np.arange(0, 10000).reshape(100, 100) / 10000
            img[1] = 1 - np.arange(0, 10000).reshape(100, 100) / 10000

            img_HWC = np.zeros((100, 100, 3))
            img_HWC[:, :, 0] = np.arange(0, 10000).reshape(100, 100) / 10000
            img_HWC[:, :, 1] = 1 - np.arange(0, 10000).reshape(100, 100) / 10000

            writer = SummaryWriter()
            writer.add_image('my_image', img, 0)

            # If you have non-default dimension setting, set the dataformats argument.
            writer.add_image('my_image_HWC', img_HWC, 0, dataformats='HWC')
            writer.close()

        Expected result:

        .. image:: _static/img/tensorboard/add_image.png
           :scale: 50 %

        """
一般有两种读取图片的方法
(1) opencv
(2) numpy
这里用numpy进行, 另外注意宽高通道的格式, 看上面注释的shape, 知道需要考虑高, 宽, 通道(channel)等因素, 用numpy.array.shape查看
from torch.utils.tensorboard import SummaryWriter
from PIL import Image
import numpy as np


writer = SummaryWriter("logs")
# for i in range(100):
#     writer.add_scalar("y = x ^ 2", i ** 2, i)

img_path1 = "dataset/hymenoptera_data/train/ants/0013035.jpg"
img_path2 = "dataset/hymenoptera_data/train/bees/16838648_415acd9e3f.jpg"
img_PIL1 = Image.open(img_path1)
img_array1 = np.array(img_PIL1)
img_PIL2 = Image.open(img_path2)
img_array2 = np.array(img_PIL2)
# print(img_array.shape)
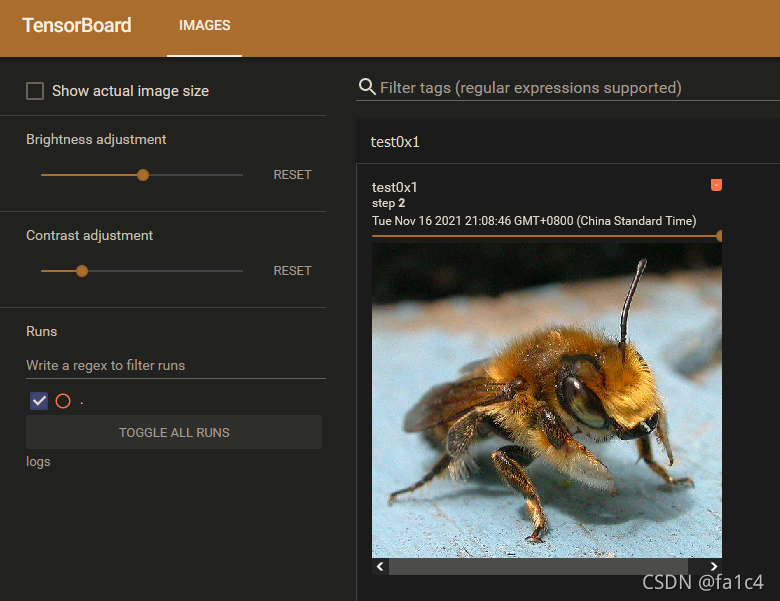
writer.add_image("test0x1", img_array1, 1, dataformats='HWC')
writer.add_image("test0x1", img_array2, 2, dataformats='HWC')

writer.close()
效果

小结
如果pytorch报错
  File "G:\Python\lib\site-packages\torch\utils\tensorboard\writer.py", line 542, in add_image
    from caffe2.python import workspace
  File "G:\Python\lib\site-packages\caffe2\python\workspace.py", line 15, in <module>
    from past.builtins import basestring
ModuleNotFoundError: No module named 'past'
则需要安装future包, 缺past则装future (xs
pip install future
参考https://blog.csdn.net/qq_40994260/article/details/104513497
transforms
重点来了, transforms是图像处理的常用包
先读一下源码
ToTensor类, 可以将PIL.Image, numpy.array转换为tensor类型
class ToTensor:
    """Convert a ``PIL Image`` or ``numpy.ndarray`` to tensor. This transform does not support torchscript.

    Converts a PIL Image or numpy.ndarray (H x W x C) in the range
    [0, 255] to a torch.FloatTensor of shape (C x H x W) in the range [0.0, 1.0]
    if the PIL Image belongs to one of the modes (L, LA, P, I, F, RGB, YCbCr, RGBA, CMYK, 1)
    or if the numpy.ndarray has dtype = np.uint8

    In the other cases, tensors are returned without scaling.

    .. note::
        Because the input image is scaled to [0.0, 1.0], this transformation should not be used when
        transforming target image masks. See the `references`_ for implementing the transforms for image masks.

    .. _references: https://github.com/pytorch/vision/tree/master/references/segmentation
    """

    def __call__(self, pic):
        """
        Args:
            pic (PIL Image or numpy.ndarray): Image to be converted to tensor.

        Returns:
            Tensor: Converted image.
        """
        return F.to_tensor(pic)

    def __repr__(self):
        return self.__class__.__name__ + '()'
可以结合上面的writer添加tensor类型的图片
from PIL import Image
from torchvision import transforms
from torch.utils.tensorboard import SummaryWriter

img_path = "dataset/hymenoptera_data/train/ants/0013035.jpg"
img = Image.open(img_path)
tensor_trans = transforms.ToTensor()
img_tensor = tensor_trans(img)

writer = SummaryWriter("logs")
writer.add_image("Tensor image", img_tensor)
writer.close()
标准化Normalize, 输入平均值mean和标准差standard deviation, 将每个channel的数据标准化
output[channel] = (input[channel] - mean[channel]) / std[channel]
class Normalize(torch.nn.Module):
    """Normalize a tensor image with mean and standard deviation.
    This transform does not support PIL Image.
    Given mean: ``(mean[1],...,mean[n])`` and std: ``(std[1],..,std[n])`` for ``n``
    channels, this transform will normalize each channel of the input
    ``torch.*Tensor`` i.e.,
    ``output[channel] = (input[channel] - mean[channel]) / std[channel]``

    .. note::
        This transform acts out of place, i.e., it does not mutate the input tensor.

    Args:
        mean (sequence): Sequence of means for each channel.
        std (sequence): Sequence of standard deviations for each channel.
        inplace(bool,optional): Bool to make this operation in-place.

    """

    def __init__(self, mean, std, inplace=False):
        super().__init__()
        self.mean = mean
        self.std = std
        self.inplace = inplace

    def forward(self, tensor: Tensor) -> Tensor:
        """
        Args:
            tensor (Tensor): Tensor image to be normalized.

        Returns:
            Tensor: Normalized Tensor image.
        """
        return F.normalize(tensor, self.mean, self.std, self.inplace)

    def __repr__(self):
        return self.__class__.__name__ + '(mean={0}, std={1})'.format(self.mean, self.std)
可以查看单个像素的处理
from PIL import Image
from torchvision import transforms
from torch.utils.tensorboard import SummaryWriter

img_path = "dataset/hymenoptera_data/train/ants/0013035.jpg"
img = Image.open(img_path)
tensor_trans = transforms.ToTensor()
img_tensor = tensor_trans(img)

print(img_tensor[0][0][0])
trans_norm = transforms.Normalize([0.5, 0.5, 0.5], [0.5, 0.5, 0.5])
img_norm = trans_norm(img_tensor)
print(img_norm[0][0][0])

writer = SummaryWriter("logs")
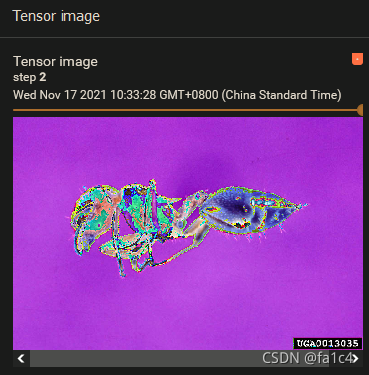
writer.add_image("Tensor image", img_tensor, 1)
writer.add_image("Tensor image", img_norm, 2)
writer.close()

'''
tensor(0.3137)
tensor(-0.3725)
'''
效果(图片是蚂蚁, 可能引起不适?)


Resize, 缩放图片
class Resize(torch.nn.Module):
    """Resize the input image to the given size.
    If the image is torch Tensor, it is expected
    to have [..., H, W] shape, where ... means an arbitrary number of leading dimensions

    Args:
        size (sequence or int): Desired output size. If size is a sequence like
            (h, w), output size will be matched to this. If size is an int,
            smaller edge of the image will be matched to this number.
            i.e, if height > width, then image will be rescaled to
            (size * height / width, size).
            In torchscript mode size as single int is not supported, use a sequence of length 1: ``[size, ]``.
        interpolation (InterpolationMode): Desired interpolation enum defined by
            :class:`torchvision.transforms.InterpolationMode`. Default is ``InterpolationMode.BILINEAR``.
            If input is Tensor, only ``InterpolationMode.NEAREST``, ``InterpolationMode.BILINEAR`` and
            ``InterpolationMode.BICUBIC`` are supported.
            For backward compatibility integer values (e.g. ``PIL.Image.NEAREST``) are still acceptable.

    """
Compose, 将一连串transforms的处理拼接起来, 得到一个连续transforms处理的类
class Compose:
    """Composes several transforms together. This transform does not support torchscript.
    Please, see the note below.

    Args:
        transforms (list of ``Transform`` objects): list of transforms to compose.

    Example:
        >>> transforms.Compose([
        >>>     transforms.CenterCrop(10),
        >>>     transforms.ToTensor(),
        >>> ])

    .. note::
        In order to script the transformations, please use ``torch.nn.Sequential`` as below.

        >>> transforms = torch.nn.Sequential(
        >>>     transforms.CenterCrop(10),
        >>>     transforms.Normalize((0.485, 0.456, 0.406), (0.229, 0.224, 0.225)),
        >>> )
        >>> scripted_transforms = torch.jit.script(transforms)

        Make sure to use only scriptable transformations, i.e. that work with ``torch.Tensor``, does not require
        `lambda` functions or ``PIL.Image``.

    """
下面演示用Compose, 将ToTensor结合Resize, 先实现totensor然后resize
上面的图片太丑了, 换一张二次元叭
from PIL import Image
from torchvision import transforms
from torch.utils.tensorboard import SummaryWriter

# img_path = "dataset/hymenoptera_data/train/ants/0013035.jpg"
img_path = "dataset/wallpaper/wallhaven-pkgevj.jpg"
img = Image.open(img_path)
trans_tensor = transforms.ToTensor()
# img_tensor = trans_tensor(img)
trans_resize = transforms.Resize((1080, 1920))
# img_resize = trans_resize(img)
trans_compose = transforms.Compose([trans_tensor, trans_resize])

img_tensor = trans_tensor(img)
img_totensor_resize = trans_compose(img)

writer = SummaryWriter("logs")
writer.add_image("original picture", img_tensor)
writer.add_image("compose example", img_totensor_resize)
writer.close()
效果

dataset transforms
接下来做点实际的操作
比如从pytorch官方下载常用数据集, 然后做transforms操作
官方地址https://pytorch.org/vision/stable/datasets.html#cifar
这里用CIFAR10数据集演示
import torchvision
from torch.utils.tensorboard import SummaryWriter


dataset_transform = torchvision.transforms.Compose([
    torchvision.transforms.ToTensor()
])

train_set = torchvision.datasets.CIFAR10(root="./dataset", train=True, transform=dataset_transform, download=True)
test_set = torchvision.datasets.CIFAR10(root="./dataset", train=False, transform=dataset_transform, download=True)

writer = SummaryWriter("p10")

for i in range (20):
    img, target = train_set[i]
    writer.add_image("train set of CIFAR10", img, i)

writer.close()
效果

其中
train_set = torchvision.datasets.CIFAR10(root="./dataset", train=True, transform=dataset_transform, download=True)
test_set = torchvision.datasets.CIFAR10(root="./dataset", train=False, transform=dataset_transform, download=True)
设置download=True可以自动从官方数据库中下载目标数据集
如下

总结
transforms就讲到这
主要记录一些常用的类, 其他类的用法需要用的时候直接看源码即可
下篇blog做个神经网络入门(