兄弟们,朋友们,为期两周的驻场生活结束了,没准说不定啥时候有要去,所以抓紧把YOLO篇搞定,驻场可是太累了,早6晚9,这和早9晚6可是一个天上一个地下啊,好了,废话不多说,今天进入YOLO中最难理解的部分。
2.dataset 数据准备和创建标签
先上代码吧,我们一点一点来讲
from torch.utils.data import Dataset, DataLoader
from torchvision.transforms import transforms
import torch

import os
import cv2
import xml.etree.ElementTree as ET
import numpy as np
import random

import config
import utils as ut
import data_agumentation as augmentation


class Yolo_Dataset(Dataset):
    def __init__(self, img_file_path, anno_file_path,data_augmentation):
        self.img_path = [os.path.join(img_file_path, x) for x in os.listdir(img_file_path)]
        self.anno_path = [os.path.join(anno_file_path, x.replace('.' + x.split('.')[-1], '.xml')) for x in
                          os.listdir(img_file_path)]
        self.tranform = transforms.Compose([transforms.ToTensor(), transforms.Normalize([0.5], [0.5])])
        self.data_augmentation = data_augmentation

    def __len__(self):
        return len(self.img_path)

    def __getitem__(self, index):
        # 图片resize后转换为tensor
        img = cv2.imread(self.img_path[index])
        ori_img_size = img.shape
        img = cv2.resize(img, (config.resize_image_size[1], config.resize_image_size[0]))
        img_tensor = self.tranform(img)

        # 图片对应的原始坐标转换成tensor 维度是[-1,5] [cls,xmin,ymin,xmax,ymax]
        ori_anno_data_tensor = torch.tensor(ut.read_xml(self.anno_path[index], config.class_name)).view(-1, 5)
        # 数据增强
        if self.data_augmentation == True:
            after_aug_img,after_aug_box = augmentation.draw_mask(img_tensor,ori_anno_data_tensor)
        # 转换成resize之后的坐标
        resize_anno_data_tensor = ut.convert(ori_anno_data_tensor, config.resize_image_size, ori_img_size)
        labels = ut.make_labels(config.resize_image_size, config.ANCHORS_GROUP, len(config.class_name),
                                resize_anno_data_tensor, config.ANCHORS_GROUP_AREA)

        return img_tensor, labels[32], labels[16], labels[8]


if __name__ == '__main__':
    img_file_path = r'D:\DATAS\face_mask\JPEGImages'
    anno_file_path = r'D:\DATAS\face_mask\Annotations'
    yolo_dataset = Yolo_Dataset(img_file_path, anno_file_path)
    train_loader = DataLoader(yolo_dataset, batch_size=1, shuffle=True, num_workers=0)
    for img, label_32, label_16, label_8 in train_loader:
        print(img.shape, label_32.shape, label_16.shape, label_8.shape)
        break
首先我们定义了一个Yolo_Dataset的类,初始化函数做的事就是得到所有训练图片的路径和所有标签(xml文件的路径)。
我们来看看数据集的图片和标签

Annotations里面就是标签文件了,也就是xml文件
JPEGImages里面就是对应的图片了,上图看看

 ?我们再打开一个xml文件看看里面都写了什么信息

?这个文件中其实对我们有用的信息是<name><xmin><ymin><xmax><ymax>,它代表的含义就是类别名称,和这个目标的在图片的坐标位置,<xmin><ymin>是左上角左边,<xmax><ymax>是右下角坐标,所以这个是一个矩形框。这就是我们需要从标签文件中得到的信息。至于我们是怎么去得到这个信息的,接下来我也会把代码公布出来,其实有很多种方法的。
2.1 __getitem__函数的讲解
    def __getitem__(self, index):
        # 图片resize后转换为tensor
        img = cv2.imread(self.img_path[index])
        ori_img_size = img.shape
        img = cv2.resize(img, (config.resize_image_size[1], config.resize_image_size[0]))
        img_tensor = self.tranform(img)

        # 图片对应的原始坐标转换成tensor 维度是[-1,5] [cls,xmin,ymin,xmax,ymax]
        ori_anno_data_tensor = torch.tensor(ut.read_xml(self.anno_path[index], config.class_name)).view(-1, 5)
        # 数据增强
        if self.data_augmentation == True:
            after_aug_img,after_aug_box = augmentation.draw_mask(img_tensor,ori_anno_data_tensor)
        # 转换成resize之后的坐标
        resize_anno_data_tensor = ut.convert(ori_anno_data_tensor, config.resize_image_size, ori_img_size)
        labels = ut.make_labels(config.resize_image_size, config.ANCHORS_GROUP, len(config.class_name),
                                resize_anno_data_tensor, config.ANCHORS_GROUP_AREA)

        return img_tensor, labels[32], labels[16], labels[8]
?首先就是读取图片,然后获取图片的H,W,C,然后将图片resize成你想要的大小,然后再把numpy个格式的数据变成pytorch需要的tensor。前四行代码就是在干这个事情。
第5行代码,就是在读取xml文件来获取标签了
ori_anno_data_tensor = torch.tensor(ut.read_xml(self.anno_path[index], config.class_name)).view(-1, 5)所以我们来看看ut.read_xml这个函数,ut是我自定义的一个py文件,不必大惊小怪。
import xml.etree.ElementTree as ET
import math
import torch


def read_xml(annotation_path, class_name):
    tree = ET.parse(annotation_path)
    root = tree.getroot()
    size = root.find('size')
    w = int(size.find('width').text)
    h = int(size.find('height').text)
    cls_box = []
    for obj in root.iter('object'):
        cls = obj.find('name').text
        cls_id = class_name.index(cls)
        xmlbox = obj.find('bndbox')
        b = (float(xmlbox.find('xmin').text), float(xmlbox.find('xmax').text), float(xmlbox.find('ymin').text),
             float(xmlbox.find('ymax').text))
        b1, b2, b3, b4 = b
        # 标注越界修正
        if b2 > w:
            b2 = w
        if b4 > h:
            b4 = h
        b = [cls_id, b1, b3, b2, b4]
        # (xmin,ymin,xmax,ymax)
        cls_box.extend(b)
    return cls_box
我这里导入了xml.etree.ElementTree这个库,这是用来读取xml文件,这个xml其实是VOC数据集的标注格式,相信大家也看出来了。这个函数执行完成后,我便可以得到要的信息[cls_id, b1, b3, b2, b4],分别就是[类别id,xmin,ymin,xmax,ymax],注意这里的类别id是id而不是类别名称。然后就是我们这部分数据再变成tensor。
第6行、第7行代码执行的是样本增强的功能,目前这部分我还没弄好,可以先不增强,因为我的数据集有7000+的图片,还算比较多。
第8行代码
resize_anno_data_tensor = ut.convert(ori_anno_data_tensor, config.resize_image_size, ori_img_size)又是我自定义的ut库,我们来看看我的convert在干什么,这个函数传入的参数分别是刚刚获取的类别坐标信息、resize的图片的高宽,原始图片的高宽。
def convert(ori_data, resize_img_size, ori_img_size):
    """
    :param ori_data: [-1,5] [cls,xmin,ymin,xmax,ymax]
    :param resize_img_size: [h,w] from config
    :param ori_img_size: [h,w]
    :return:
    """
    h_ratio = resize_img_size[0] / ori_img_size[0]
    w_ratio = resize_img_size[1] / ori_img_size[1]
    ori_data[:, 1] = ori_data[:, 1] * w_ratio
    ori_data[:, 2] = ori_data[:, 2] * h_ratio
    ori_data[:, 3] = ori_data[:, 3] * w_ratio
    ori_data[:, 4] = ori_data[:, 4] * h_ratio

    return ori_data
这部分的代码的做的是其实就是把原始坐标转换成resize之后的坐标,不好理解的话,我画一个图

这个函数就是求出(?,?,?,?)里的‘?’到底等于多少,也就是以个坐标的转换,很简单有没有。
好了到了最难理解的第9行的代码了
labels = ut.make_labels(config.resize_image_size, config.ANCHORS_GROUP, len(config.class_name),
                                resize_anno_data_tensor, config.ANCHORS_GROUP_AREA)
ut这个我就不再多说了,传入的参数分别是resize的高宽,anchor,类别的数量,刚刚转换之后的坐标信息,anchor的面积。
大家,休息休息,保持脑袋冷静。anchor这玩意出现了,这个玩意挺绕人的。
mae_labels这个函数代码我先放出来,然后我们慢慢理解一下。
def make_labels(resize_img_size, ANCHORS_GROUP, CLASS_NUM, boxes, ANCHORS_GROUP_AREA):
    labels = {}
    for feature_size, anchors in ANCHORS_GROUP.items():
        labels[feature_size] = torch.zeros(
            [int(resize_img_size[0] / feature_size), int(resize_img_size[1] / feature_size), 3, 5 + CLASS_NUM])

        for box in boxes:
            cls, xmin, ymin, xmax, ymax = box
            cx = (xmin + xmax) / 2
            cy = (ymin + ymax) / 2
            w = xmax - xmin
            h = ymax - ymin
            cx_offset, cx_index = math.modf(cx / feature_size)
            cy_offset, cy_index = math.modf(cy / feature_size)

            for i, anchor in enumerate(anchors):
                anchor_area = ANCHORS_GROUP_AREA[feature_size][i]
                p_w, p_h = w / anchor[0], h / anchor[1]
                conf = IOU(gt_box=[xmin, ymin, xmax, ymax],
                           anchor=[cx - (anchor[0] / 2), cy - (anchor[1] / 2), cx + (anchor[0] / 2),
                                   cy + (anchor[1] / 2)])
                labels[feature_size][int(cy_index), int(cx_index), i] = torch.tensor(
                    [conf, cx_offset, cy_offset, torch.log(p_w), torch.log(p_h), *one_hot(CLASS_NUM, int(cls))]
                )
    return labels
传入的参数中的anchor我也给大家看一看,是什么东西
with open('./my_anchors.txt') as f:
    content = f.readlines()
    anchor_32 = []
    anchor_16 = []
    anchor_8 = []
    for index, i in enumerate(content):
        wh = i.split('\n')[0]
        wh = list(map(int, wh.split(' ')))
        if index < 3:
            anchor_8.append(wh)
        elif 3 <= index and index <= 5:
            anchor_16.append(wh)
        else:
            anchor_32.append(wh)

ANCHORS_GROUP = {
    32: anchor_32,  # [w,h]
    16: anchor_16,
    8: anchor_8}

ANCHORS_GROUP_AREA = {
    32: [x * y for x, y in ANCHORS_GROUP[32]],
    16: [x * y for x, y in ANCHORS_GROUP[16]],
    8: [x * y for x, y in ANCHORS_GROUP[8]],
}
?my_anchors.txt长这个样子的,这个文件是怎么来的呢,是我用kmeans聚类得到的,kmeans这里我们先不说,免得节外生枝,反正就是得到了9行数据
 ?
?
每一行的第一个数是anchor的宽,第二数是anchor的高。
这里你可能就有很多问题了,比如我之前很疑惑的几个问题:
1.为什么有9行?
2.ANCHORS_GROUP 这个字典中的32,16,8这三个键是什么意思?
3.求面积干什么啊?
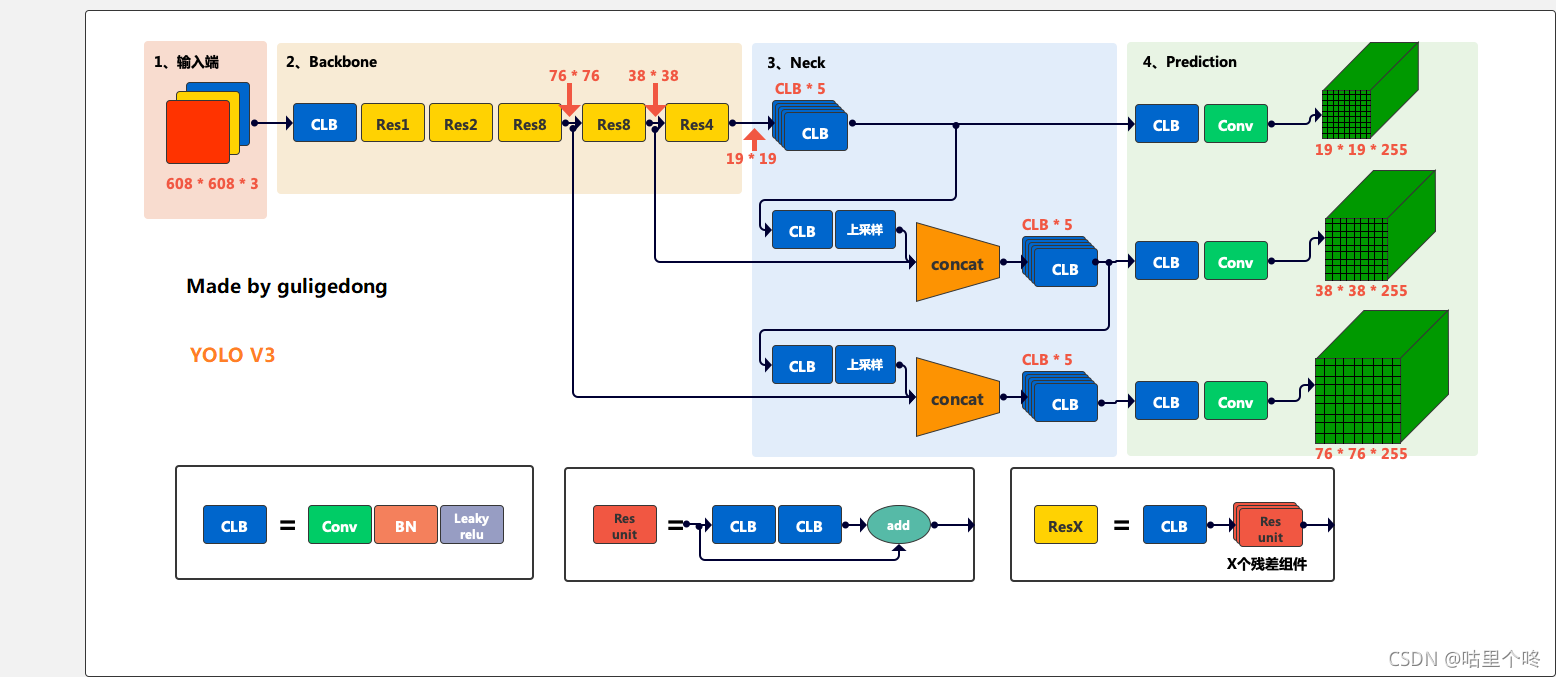
要明白这个问题,我们就需要再来看看yolov3的这个模型结构了,上图

看看prediction这个部分,一共有3个featuremap,每个featuremap有3个长宽不一样的anchor,所以,我们就有9行数据,
32,16,8分别是你下采样的倍数,下采样32倍得到的就是第一个featuremap,16倍的就是第二个featurmap,8倍的就是第三个featuremap。
面积是为了求后面给自信度赋值用的。
那我再提一个问题,我们可以看到每个featuremap最后一个channel维度都是255,请问这个255是怎么来的?
好了,这个make_labels的函数我们下期再来更新
至此,敬礼,salute!!!!
老规矩,上咩咩图
?
?
?