语义分割样本制作
1 labelme
直接使用labelme进行样本的制作
1.1 进行数据增强,得到预处理好要识别的影像
1.2 确定解译标注
1.3 envi软件裁剪出样本
1、打开ENVI Classic,读取无人机影像影像。然后进行RGB通道显示,分别对应band1,band2,and3。这里一定要注意,不要弄错了。

2、设置enviCLASS的默认显示,Zoom Window要设置为640*640大小
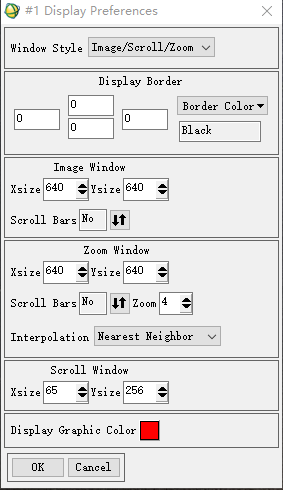
3、点击左小角的减号,设置Zoom窗口左上角为1×
4、找到有枯死木的区域(颜色不是绿色,并且是树),右击Zoom窗口,出现Save Zoom As进行保存。输出为jpg格式,标记好名字,fx加上一个数字就行。
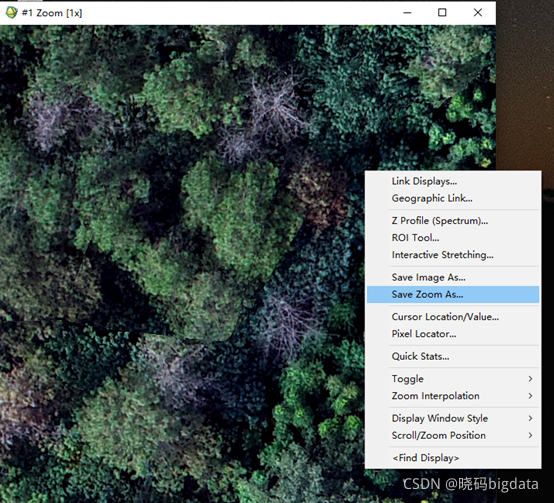

5 、一共裁剪150张图像。
1.4 在labelme软件里进行标注
(33条消息) 语义分割标注工具——labelme_xiaotiig的博客-CSDN博客_语义分割软件
https://blog.csdn.net/xiaotiig/article/details/110082670
2 利用arcgis进行遥感影像语义分割标注
参考:利用Arcgis制作遥感图像深度学习语义分割标签 - 知乎
https://zhuanlan.zhihu.com/p/163353715
和上面唯一不同的就是面转栅格用的是arcgis的面转栅格工具,没用要素转栅格工具。这两个工具试试,应该都一样。
使用labelme构建样本会遇到各种问题,比价麻烦,尝试使用arcgis进行样本的构建。共包括6大步骤:
(1)加载影像,进行图像增强等预处理
(2)创建shp矢量面图层
(3)变色木的标注
(4)添加属性字段
(5)面转栅格
(6)样本裁剪
2.1 影像数据增强

2.2 创建shp矢量面图层


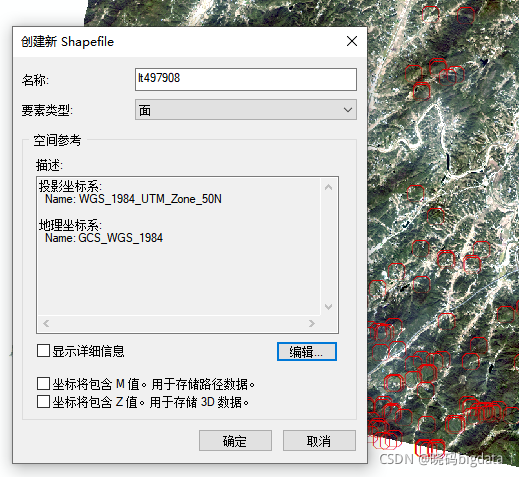
直接在上方工具栏右击,添加编辑器

2.3 直接进行矢量化标注
创建要素

注意保存

2.4 添加属性字段
勾完以后:字段赋值为255

2.5 面转栅格
直接用面转栅格工具或者要素转栅格工具,转为矢量
我们需要利用工具箱里的【Conversion Tools】->【To Raster】->【Feature to Raster】工具
2.6 进行样本的裁剪
这个通过代码进行
如果将图像直接输入到深度学习网络中,会导致内存溢出,因此需要将图像裁剪成图像块输入到网络中。裁剪方法包括规则格网裁剪和滑动窗口裁剪以及随机裁剪。
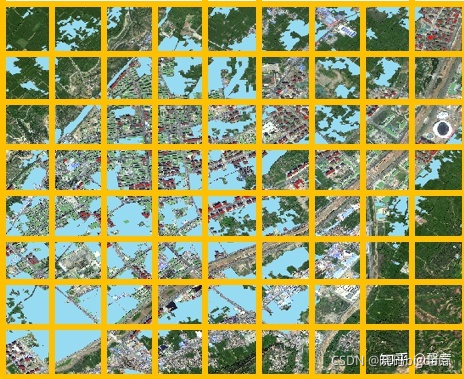
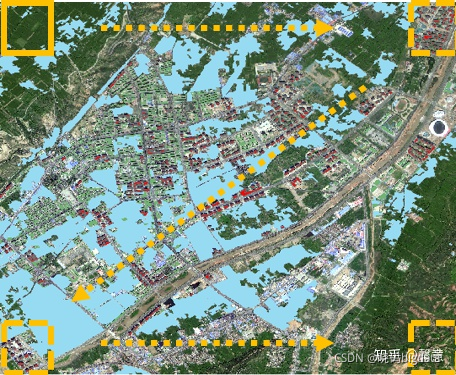

规则格网裁剪属于重复率为0的滑动窗口裁剪,滑动窗口裁剪代码为:
import os
import gdal
import numpy as np

#  读取tif数据集
def readTif(fileName):
    dataset = gdal.Open(fileName)
    if dataset == None:
        print(fileName + "文件无法打开")
    return dataset

#  保存tif文件函数
def writeTiff(im_data, im_geotrans, im_proj, path):
    if 'int8' in im_data.dtype.name:
        datatype = gdal.GDT_Byte
    elif 'int16' in im_data.dtype.name:
        datatype = gdal.GDT_UInt16
    else:
        datatype = gdal.GDT_Float32
    if len(im_data.shape) == 3:
        im_bands, im_height, im_width = im_data.shape
    elif len(im_data.shape) == 2:
        im_data = np.array([im_data])
        im_bands, im_height, im_width = im_data.shape
    #创建文件
    driver = gdal.GetDriverByName("GTiff")
    dataset = driver.Create(path, int(im_width), int(im_height), int(im_bands), datatype)
    if(dataset!= None):
        dataset.SetGeoTransform(im_geotrans) #写入仿射变换参数
        dataset.SetProjection(im_proj) #写入投影
    for i in range(im_bands):
        dataset.GetRasterBand(i + 1).WriteArray(im_data[i])
    del dataset


'''
滑动窗口裁剪函数
TifPath 影像路径
SavePath 裁剪后保存目录
CropSize 裁剪尺寸
RepetitionRate 重复率
'''
def TifCrop(TifPath, SavePath, CropSize, RepetitionRate):
    dataset_img = readTif(TifPath)
    width = dataset_img.RasterXSize
    height = dataset_img.RasterYSize
    proj = dataset_img.GetProjection()
    geotrans = dataset_img.GetGeoTransform()
    img = dataset_img.ReadAsArray(0, 0, width, height)#获取数据

    #  获取当前文件夹的文件个数len,并以len+1命名即将裁剪得到的图像
    new_name = len(os.listdir(SavePath)) + 1
    #  裁剪图片,重复率为RepetitionRate

    for i in range(int((height - CropSize * RepetitionRate) / (CropSize * (1 - RepetitionRate)))):
        for j in range(int((width - CropSize * RepetitionRate) / (CropSize * (1 - RepetitionRate)))):
            #  如果图像是单波段
            if(len(img.shape) == 2):
                cropped = img[int(i * CropSize * (1 - RepetitionRate)) : int(i * CropSize * (1 - RepetitionRate)) + CropSize,
                              int(j * CropSize * (1 - RepetitionRate)) : int(j * CropSize * (1 - RepetitionRate)) + CropSize]
            #  如果图像是多波段
            else:
                cropped = img[:,
                              int(i * CropSize * (1 - RepetitionRate)) : int(i * CropSize * (1 - RepetitionRate)) + CropSize,
                              int(j * CropSize * (1 - RepetitionRate)) : int(j * CropSize * (1 - RepetitionRate)) + CropSize]
            #  写图像
            writeTiff(cropped, geotrans, proj, SavePath + "/%d.tif"%new_name)
            #  文件名 + 1
            new_name = new_name + 1
    #  向前裁剪最后一列
    for i in range(int((height-CropSize*RepetitionRate)/(CropSize*(1-RepetitionRate)))):
        if(len(img.shape) == 2):
            cropped = img[int(i * CropSize * (1 - RepetitionRate)) : int(i * CropSize * (1 - RepetitionRate)) + CropSize,
                          (width - CropSize) : width]
        else:
            cropped = img[:,
                          int(i * CropSize * (1 - RepetitionRate)) : int(i * CropSize * (1 - RepetitionRate)) + CropSize,
                          (width - CropSize) : width]
        #  写图像
        writeTiff(cropped, geotrans, proj, SavePath + "/%d.tif"%new_name)
        new_name = new_name + 1
    #  向前裁剪最后一行
    for j in range(int((width - CropSize * RepetitionRate) / (CropSize * (1 - RepetitionRate)))):
        if(len(img.shape) == 2):
            cropped = img[(height - CropSize) : height,
                          int(j * CropSize * (1 - RepetitionRate)) : int(j * CropSize * (1 - RepetitionRate)) + CropSize]
        else:
            cropped = img[:,
                          (height - CropSize) : height,
                          int(j * CropSize * (1 - RepetitionRate)) : int(j * CropSize * (1 - RepetitionRate)) + CropSize]
        writeTiff(cropped, geotrans, proj, SavePath + "/%d.tif"%new_name)
        #  文件名 + 1
        new_name = new_name + 1
    #  裁剪右下角
    if(len(img.shape) == 2):
        cropped = img[(height - CropSize) : height,
                      (width - CropSize) : width]
    else:
        cropped = img[:,
                      (height - CropSize) : height,
                      (width - CropSize) : width]
    writeTiff(cropped, geotrans, proj, SavePath + "/%d.tif"%new_name)
    new_name = new_name + 1

#  将影像1裁剪为重复率为0.1的256×256的数据集
TifCrop(r"Data\data2\tif\data2.tif",
        r"Data\train\image1", 256, 0.1)
TifCrop(r"Data\data2\label\label.tif",
        r"data\train\label1", 256, 0.1)
随机裁剪,只需要随机生成裁剪图像的左上角坐标,然后以此为基准取特定大小的矩阵块就可以了。代码:
import random
import gdal
import numpy as np
import os

#  读取tif数据集
def readTif(fileName):
    dataset = gdal.Open(fileName)
    if dataset == None:
        print(fileName + "文件无法打开")
    return dataset

#  保存tif文件函数
def writeTiff(im_data, im_geotrans, im_proj, path):
    if 'int8' in im_data.dtype.name:
        datatype = gdal.GDT_Byte
    elif 'int16' in im_data.dtype.name:
        datatype = gdal.GDT_UInt16
    else:
        datatype = gdal.GDT_Float32
    if len(im_data.shape) == 3:
        im_bands, im_height, im_width = im_data.shape
    elif len(im_data.shape) == 2:
        im_data = np.array([im_data])
        im_bands, im_height, im_width = im_data.shape
    #创建文件
    driver = gdal.GetDriverByName("GTiff")
    dataset = driver.Create(path, int(im_width), int(im_height), int(im_bands), datatype)
    if(dataset!= None):
        dataset.SetGeoTransform(im_geotrans) #写入仿射变换参数
        dataset.SetProjection(im_proj) #写入投影
    for i in range(im_bands):
        dataset.GetRasterBand(i + 1).WriteArray(im_data[i])
    del dataset

'''
随机裁剪函数
ImagePath 原始影像路径
LabelPath 标签影像路径
IamgeSavePath 原始影像裁剪后保存目录
LabelSavePath 标签影像裁剪后保存目录
CropSize 裁剪尺寸
CutNum 裁剪数量
'''
def RandomCrop(ImagePath, LabelPath, IamgeSavePath, LabelSavePath, CropSize, CutNum):
    dataset_img = readTif(ImagePath)
    width = dataset_img.RasterXSize
    height = dataset_img.RasterYSize
    proj = dataset_img.GetProjection()
    geotrans = dataset_img.GetGeoTransform()
    img = dataset_img.ReadAsArray(0,0,width,height)#获取哟昂数据
    dataset_label = readTif(LabelPath)
    label = dataset_label.ReadAsArray(0,0,width,height)#获取标签数据

    #  获取当前文件夹的文件个数len,并以len+1命名即将裁剪得到的图像
    fileNum = len(os.listdir(IamgeSavePath))
    new_name = fileNum + 1
    while(new_name < CutNum + fileNum + 1):
        #  生成剪切图像的左上角XY坐标
        UpperLeftX = random.randint(0, height - CropSize)
        UpperLeftY = random.randint(0, width - CropSize)
        if(len(img.shape) == 2):
            imgCrop = img[UpperLeftX : UpperLeftX + CropSize,
                          UpperLeftY : UpperLeftY + CropSize]
        else:
            imgCrop = img[:,
                          UpperLeftX : UpperLeftX + CropSize,
                          UpperLeftY : UpperLeftY + CropSize]
        if(len(label.shape) == 2):
            labelCrop = label[UpperLeftX : UpperLeftX + CropSize,
                              UpperLeftY : UpperLeftY + CropSize]
        else:
            labelCrop = label[:,
                              UpperLeftX : UpperLeftX + CropSize,
                              UpperLeftY : UpperLeftY + CropSize]
        writeTiff(imgCrop, geotrans, proj, IamgeSavePath + "/%d.tif"%new_name)
        writeTiff(labelCrop, geotrans, proj, LabelSavePath + "/%d.tif"%new_name)
        new_name = new_name + 1

#  裁剪得到300张256*256大小的训练集
RandomCrop(r"Data\data2\tif\data2.tif",
           r"Data\data2\label\label.tif",
           r"Data\train\image1",
           r"Data\train\label1",
           256,300)