opencv3
图像基本操作6-图像阈值
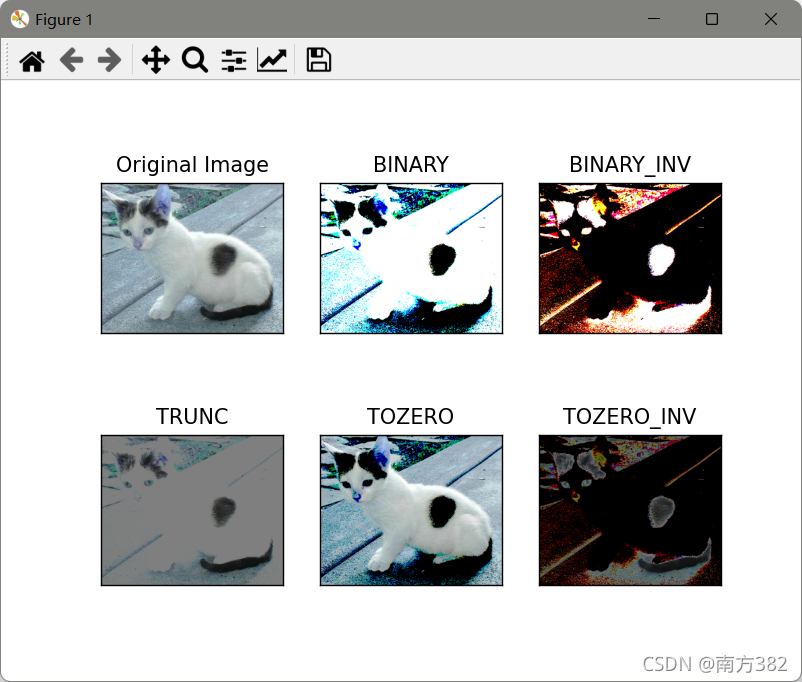
cat=cv2.imread('picture/cat.jpg')
ret,thresh1=cv2.threshold(cat,127,255,cv2.THRESH_BINARY)
ret,thresh2=cv2.threshold(cat,127,255,cv2.THRESH_BINARY_INV)
ret,thresh3=cv2.threshold(cat,127,255,cv2.THRESH_TRUNC)
ret,thresh4=cv2.threshold(cat,127,255,cv2.THRESH_TOZERO)
ret,thresh5=cv2.threshold(cat,127,255,cv2.THRESH_TOZERO_INV)
titles=['Original Image','BINARY','BINARY_INV','TRUNC','TOZERO','TOZERO_INV']
images=[cat,thresh1,thresh2,thresh3,thresh4,thresh5]
for i in range(6):
    plt.subplot(2,3,i+1),plt.imshow(images[i],'gray')
    plt.title(titles[i])
    plt.xticks([]),plt.yticks([])
plt.show()

第二个参数就是阈值,即超过这个值就怎么操作,第四个值就是选择什么方法来做这件事
Cv2.THRESH_BINARY超过阈值部分取maxval(最大值),否则取O
cv2.THRESH_BINARY_INV THRESH_BINARY的反转
cv2.THRESH_TRUNC大于阈值部分设为阈值,否则不变
cv2.THRESH_TOZERO大于阈值部分不改变,否则设为O.cv2.THRESH_TOZERO_INV THRESH_TOZERO的反转
图像平滑处理(滤波处理)
# #图像平滑处理(滤波处理)
img=cv2.imread('picture/lenaNoise.png')
# # 均值滤波,平均卷积操作
blur=cv2.blur(img,(3,3))
# 方框滤波,基本和均值一样,可以选择归一化(-1表示一致,normalize表示归一化)
# 如果False就会进行如果大于255就取255(白色)
box=cv2.boxFilter(img,-1,(3,3),normalize=False)
#高斯滤波
# 高斯模糊的卷积核里的数值是满足高斯分布,相当于更重视中间的
aussian=cv2.GaussianBlur(img,(5,5),1)
# 中值滤波 中值替代
median=cv2.medianBlur(img,5)
# 展示所有的
res=np.hstack((blur,aussian,median))
cv_show('median vs averge',res)

形态学
形态学-腐蚀操作
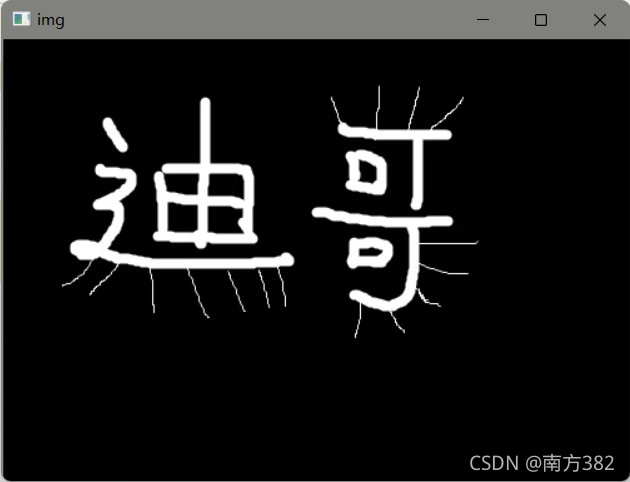
img=cv2.imread('dige.png')
cv_show('img',img)
kernel=np.ones((5,5),np.uint8)
erosion=cv2.erode(img,kernel,iterations=1)
cv_show('erosion',erosion)
pie=cv2.imread('pie.png')
cv_show('pie',pie)
kernel=np.ones((30,30),np.uint8)
erosion_1=cv2.erode(pie,kernel,iterations=1)
erosion_2=cv2.erode(pie,kernel,iterations=2)
erosion_3=cv2.erode(pie,kernel,iterations=3)
res=np.hstack((erosion_1,erosion_2,erosion_3))
cv_show('res',res)


可以发现把小刺都给删掉了,下面的腐蚀操作是把圆给腐蚀的小了很多
形态学-膨胀操作
会把轮廓都变大
kernel=np.ones((3,3),np.uint8)
dige_dilate=cv2.dilate(img,kernel,iterations=1)
cv_show('dilate',dige_dilate)

kernel=np.ones((30,30),np.uint8)
dilate_1=cv2.dilate(pie,kernel,iterations=1)
dilate_2=cv2.dilate(pie,kernel,iterations=2)
dilate_3=cv2.dilate(pie,kernel,iterations=5)
res=np.hstack((dilate_1,dilate_2,dilate_3))
cv_show('res',res)
ps:iterations是指迭代次数


开运算与闭运算
#开运算(先腐蚀再膨胀)
kernel=np.ones((5,5),np.uint8)
opening=cv2.morphologyEx(img,cv2.MORPH_OPEN,kernel)
cv_show('opening',opening)

#与闭运算(先膨胀再腐蚀)
closing=cv2.morphologyEx(img,cv2.MORPH_CLOSE,kernel)
cv_show('closing',closing)
梯度运算
梯度定义
梯度=膨胀-腐蚀
pie=cv2.imread('pie.png')
kernel=np.ones((7,7),np.uint8)
dilate=cv2.dilate(pie,kernel,iterations=5)
erosion=cv2.erode(pie,kernel,iterations=6)
res=np.hstack((dilate,erosion))
cv_show('res',res)
#减法(得到边界信息)
gradient=cv2.morphologyEx(pie,cv2.MORPH_GRADIENT,kernel)
cv_show('gradient',gradient)


礼帽与黑帽
#礼帽=原始输入-开运算结果
tophat=cv2.morphologyEx(img,cv2.MORPH_TOPHAT,kernel)
cv_show('tophat',tophat)

# 黑帽=闭运算-原始输入
blackhat=cv2.morphologyEx(img,cv2.MORPH_BLACKHAT,kernel)
cv_show('blackhat',blackhat)
图像梯度-Sobel算子
(p5=p3+2p6+p9-p1-2p4-p7)
dst = cv2.Sobel(src, ddepth, dx, dy,ksize)
ddepth:图像的深度
dx和dy分别表示水平和竖直方向
ksize是Sobel算子的大小
img=cv2.imread('pie.png',cv2.IMREAD_GRAYSCALE)
cv_show('img',img)
sobelx=cv2.Sobel(img,cv2.CV_64F,1,0,ksize=3)
sobelx=cv2.convertScaleAbs(sobelx)#右边的边缘显示为黑的,对称过去将右边显示成白色的
cv_show('sobelx',sobelx)
sobely=cv2.Sobel(img,cv2.CV_64F,0,1,ksize=3)
sobely=cv2.convertScaleAbs(sobely)
cv_show('sobely',sobely)
# 分别计算x和y,再求和
sobelxy=cv2.addWeighted(sobelx,0.5,sobely,0.5,0)
cv_show('sobelxy',sobelxy)


对带有噪点的lena图片进行操作
img=cv2.imread('picture/lenaNoise.png',cv2.IMREAD_GRAYSCALE)
cv_show('img',img)
sobelx=cv2.Sobel(img,cv2.CV_64F,1,0,ksize=3)
sobelx=cv2.convertScaleAbs(sobelx)
sobely=cv2.Sobel(img,cv2.CV_64F,0,1,ksize=3)
sobely=cv2.convertScaleAbs(sobely)
sobelxy=cv2.addWeighted(sobelx,0.5,sobely,0.5,0)
cv_show('sobelxy',sobelxy)
图像梯度-Scharr算子(比Sobel算子更敏感一点)
(p5=3p3+10p6+3p9-3p1-10p4-3p7)
图像梯度-laplacian算子(对噪音点比较敏感)
(p5=p2+p4+p6+p8-4*p5)
cv_show('img',img)
Scharrx=cv2.Scharr(img,cv2.CV_64F,1,0)
Scharrx=cv2.convertScaleAbs(Scharrx)
Scharry=cv2.Scharr(img,cv2.CV_64F,0,1)
Scharry=cv2.convertScaleAbs(Scharry)
Scharrxy=cv2.addWeighted(Scharrx,0.5,Scharry,0.5,0)
# cv_show('sobelxy',sobelxy)
laplacian=cv2.Laplacian(img,cv2.CV_64F)
laplacian=cv2.convertScaleAbs(laplacian)

res=np.hstack((sobelxy,Scharrxy,laplacian))
cv_show('res',res)

边缘检测
Canny边缘检测步骤
1)使用高斯滤波器,以平滑图像,滤除噪声。
2)计算图像中每个像素点的梯度强度和方向。
3)应用非极大值(Non-Maximum Suppression)抑制,以消除边缘检测带来的杂散响应。。4)应用双阈值(Double-Threshold)检测来确定真实的和潜在的边缘。
5)通过抑制孤立的弱边缘最终完成边缘检测。
v1=cv2.Canny(img,80,150)
v2=cv2.Canny(img,50,100)
res=np.hstack((img,v1,v2))
cv_show('res',res)

金字塔
高斯金字塔
(向下采样,图像变小,向上采样,图像变大)
img=cv2.imread('AM.png')
img=cv2.resize(img,(334,440))
cv_show('img',img)
print(img.shape)
up=cv2.pyrUp(img)
cv_show('up',up)
print(up.shape)
down=cv2.pyrDown(img)
cv_show('down',down)
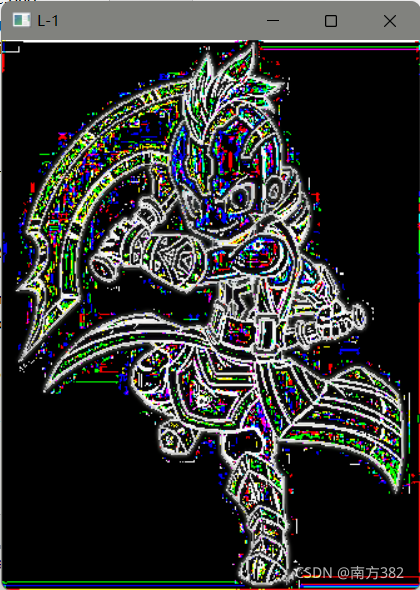
拉普拉斯金字塔
img=cv2.imread('AM.png')
img=cv2.resize(img,(334,440))
down=cv2.pyrDown(img)
down_up=cv2.pyrUp(down)
l_1=img-down_up
print(img.shape,down_up.shape)
cv_show('L-1',l_1)

图像轮廓
cv2.findContours(img,mode,method)
mode:轮廓检索模式
RETR_EXTERNAL:只检索最外面的轮廓;
RETR_LIST:检索所有的轮廓,并将其保存到一条链表当中;
RETR_CCOMP:检索所有的轮廓,并将他们组织为两层:顶层是各部分的外部边界,第二层是空洞的边界;·RETR_TREE:检索所有的轮廓,并重构嵌套轮廓的整个层次;
method:轮廓逼近方法
CHAIN_APPROx_NONE:以Freeman链码的方式输出轮廓,所有其他方法输出多边形(顶点的序列)。.
CHAIN_APPRox_SIMPLE:压缩水平的、垂直的和斜的部分,也就是,函数只保留他们的终点部分。
img=cv2.imread('car.png')
#转换成灰度图
gray=cv2.cvtColor(img,cv2.COLOR_BGR2GRAY)
#阈值,二值处理
ret,thresh=cv2.threshold(gray,127,255,cv2.THRESH_BINARY)

cv_show('thresh',thresh)
#m轮廓信息,层级结构
contours,hierarchy=cv2.findContours(thresh,cv2.RETR_TREE,cv2.CHAIN_APPROX_NONE)

draw_img=img.copy()
res=cv2.drawContours(draw_img,contours,-1,(0,0,255),2)
cv_show('res',res)
res=cv2.drawContours(draw_img,contours,0,(0,0,255),2)
cv_show('res',res)
#轮廓特征:
cnt=contours[0]
#面积
print(cv2.contourArea(cnt))
#周长,True表示闭合的
print(cv2.arcLength(cnt, True))

轮廓的近似
img=cv2.imread('picture/contours.png')
gray=cv2.cvtColor(img,cv2.COLOR_BGR2GRAY)
ret,thresh=cv2.threshold(gray,127,255,cv2.THRESH_BINARY)
contours,hierarchy=cv2.findContours(thresh,cv2.RETR_TREE,cv2.CHAIN_APPROX_NONE)
cnt=contours[0]

draw_img=img.copy()
res=cv2.drawContours(draw_img,[cnt],-1,(0,0,255),2)
cv_show('res',res)

epsilon=0.1*cv2.arcLength(cnt,True)
approx=cv2.approxPolyDP(cnt,epsilon,True)
draw_img=img.copy()
res=cv2.drawContours(draw_img,[approx],-1,(0,0,255),2)
cv_show('res',res)


边界矩形
img=cv2.imread('picture/contours.png')
gray=cv2.cvtColor(img,cv2.COLOR_BGR2GRAY)
ret,thresh=cv2.threshold(gray,127,255,cv2.THRESH_BINARY)
contours,hierarchy=cv2.findContours(thresh,cv2.RETR_TREE,cv2.CHAIN_APPROX_NONE)
cnt=contours[0]
x,y,w,h=cv2.boundingRect(cnt)
img=cv2.rectangle(img,(x,y),(x+w,y+h),(0,255,0),2)
cv_show('img',img)

area=cv2.contourArea(cnt)
x,y,w,h=cv2.boundingRect(cnt)
rect_area=w*h
extent=float(area)/rect_area
print('轮廓面积与边界矩形比',extent)

外接圆
img=cv2.imread('picture/contours.png')
gray=cv2.cvtColor(img,cv2.COLOR_BGR2GRAY)
ret,thresh=cv2.threshold(gray,127,255,cv2.THRESH_BINARY)
contours,hierarchy=cv2.findContours(thresh,cv2.RETR_TREE,cv2.CHAIN_APPROX_NONE)
cnt=contours[0]
(x,y),radius=cv2.minEnclosingCircle(cnt)
center=(int(x),int(y))
radius=int(radius)
img=cv2.circle(img,center,radius,(0,255,0),2)
cv_show('img',img)

模板匹配
# 模板匹配
img=cv2.imread('picture/lena.jpg',0)
template=cv2.imread('picture/face.jpg',0)
h,w=template.shape[:2]
# print(img.shape,template.shape)
methods=['cv2.TM_CCOEFF','cv2.TM_CCOEFF_NORMED','cv2.TM_CCORR','cv2.TM_CCORR_NORMED','cv2.TM_SQDIFF','cv2.TM_SQDIFF_NORMED']
res=cv2.matchTemplate(img,template,1)
# print(res.shape)
min_val,max_val,min_loc,max_loc=cv2.minMaxLoc(res)
# print(min_val,max_val,min_loc,max_loc)
for method in methods:
    img2=img.copy()
    method=eval(method)
    print(method)
    res=cv2.matchTemplate(img,template,method)
    min_val, max_val, min_loc, max_loc = cv2.minMaxLoc(res)
    if method in ['cv2.TM_SQDIFF','cv2.TM_SQDIFF_NORMED']:
        top_left=min_loc
    else:
        top_left=max_loc
    bottom_right=(top_left[0]+w,top_left[1]+h)

    #画矩形
    cv2.rectangle(img2,top_left,bottom_right,255,2)
    plt.subplot(121),plt.imshow(res,cmap='gray')
    plt.xticks([]),plt.yticks([])#隐藏坐标轴
    plt.subplot(122),plt.imshow(img2,cmap='gray')
    plt.xticks([]),plt.yticks([])
    plt.suptitle(method)
    plt.show()


可见归一化操作过后匹配效果明显更好(_NORMED)
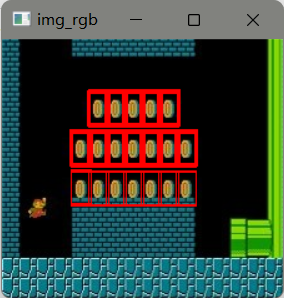
匹配多个对象
img_rgb=cv2.imread('picture/mario.jpg')
img_gray=cv2.cvtColor(img_rgb,cv2.COLOR_BGR2GRAY)
template=cv2.imread('picture/mario_coin.jpg',0)
h,w=template.shape[:2]
res=cv2.matchTemplate(img_gray,template,cv2.TM_CCOEFF_NORMED)
threshold=0.8#取匹配值大于80%的坐标
loc=np.where(res>=threshold)
for pt in zip(*loc[::-1]):#*号表示可选参数
    bottom_right=(pt[0]+w,pt[1]+h)
    cv2.rectangle(img_rgb,pt,bottom_right,(0,0,255),1)
cv_show('img_rgb',img_rgb)

直方图
cv2.calcHist(images.channels,mask,histSize,ranges)
images:原图像图像格式为uint8或float32。当传入函数时应用中括号括来例如[img]
channels:同样用中括号括来它会告函数我们统幅图像的直方图。如果入图像是灰度图它的值就是[如果是彩色图像的传入的参数可以是[[1]2]它们分别对应着BGR。
mask:掩模图像。统整幅图像的直方图就把它为None。但是如果你想统图像某一分的直方图的你就制作一个掩模图像并使用它。. histSize:BIN的数目。也应用中括号括来
ranges:像素值范围常为[0256]
img=cv2.imread('picture/cat.jpg')
hist=cv2.calcHist([img],[0],None,[256],[0,256])
print(hist.shape)
plt.hist(img.ravel(),256)
plt.show()

color=('b','g','r')
for i,col in enumerate(color):
    histr=cv2.calcHist([img],[i],None,[256],[0,256])
    plt.plot(histr,color=col)
    plt.xlim([0,256])
plt.show()


mask操作
mask=np.zeros(img.shape[:2],np.uint8)
print(mask.shape)
mask[100:300,100:400]=255
cv_show('mask',mask)
img=cv2.imread('picture/cat.jpg',0)
cv_show('img',img)
masked_img=cv2.bitwise_and(img,img,mask=mask)
cv_show('masked_img',masked_img)
hist_full=cv2.calcHist([img],[0],None,[256],[0,256])
hist_mask=cv2.calcHist([img],[0],mask,[256],[0,256])
plt.subplot(221),plt.imshow(img,'gray')
plt.subplot(222),plt.imshow(mask,'gray')
plt.subplot(223),plt.imshow(masked_img,'gray')
plt.subplot(224),plt.plot(hist_full),plt.plot(hist_mask)
plt.xlim([0,256])
plt.show()

直方图均衡化
#直方图均衡化
img=cv2.imread('picture/cat.jpg',0)
img=cv2.imread('picture/clahe.jpg',0)
plt.hist(img.ravel(),256)
plt.show()
#均衡化函数
equ=cv2.equalizeHist(img)
plt.hist(equ.ravel(),256)
plt.show()
res=np.hstack((img,equ))
cv_show('res',res)
#自适应直方图均衡化
clahe=cv2.createCLAHE(clipLimit=2.0,tileGridSize=(8,8))
res_clahe=clahe.apply(img)
res=np.hstack((img,equ,res_clahe))
cv_show('res',res)


