[TOC](Tensorflow + Keras + Kaggle)
序言
事实上,我也是刚刚接触Python Deep Learning and Neural Networks,作为一个Rookie,我觉的我有必要将自己的所有流程和心得体会以这样的方式记录下来。正所谓“是故学然后知不足,教然后知困。知不足然后能自反也,知困然后能自强也。故曰:‘教学相长’也。”
本人环境安装的配置为:Windows10 + conda 4.10.3(配置了虚拟环境) + GPU + 谷歌必备插件(狗头)
需要在Jupyter Notebook 中完成代码的实现
因为本人水平的原因,可能无法完全了解每一行代码的含义和作用,所以这个教程是为那些不急于理论学习,先要跑通流程的Rookie准备的。如果有大牛可以提出建议和指出错误,在下感激不尽。
我在跑流程的时候遇到的很多的Bug(很多),有网上解决的,也有网上没有解决的。 我这里有一个视频的链接.,虽然繁琐,但是代码还是敲得明明白白的。大家要是有问题的话,可以看这个视频找到报错的原因。
Tensorflow的环境安装(虚拟环境下)
因为官方推荐使用Tensorflow2.0 所以以下都是准对Tensor flow2.0的教程
在系统上安装 Python 开发环境(本过程并非重点,我附上相应的代码和最终结果)
pip3 --version

上图就是有完整的Python环境的标志,如果你满足了上图的条件,那么恭喜你已经完成了第一步。
创建虚拟环境前
pip install virtualenv --upgrade
conda create -n PC_2 python=3.7 anaconda
如果没有报错,那么输入完成之后就意味着创建了一个名为PC_2的虚拟环境,后面的python版本就根据自己的情况和需要进行选择
因为本次的主角为Tensor flow 所以我们也可以针对的创建一个名为Tensorflow的虚拟环境,因为如果这方面的环境被我们玩崩了,那么找到这个虚拟环境之后,直接暴力删除就可以推倒重来,不必担心把系统文件删除。
conda create -n tensorflowenv python=3.7 anaconda
跟着cmd的指示走,就可以成功创建了一个名为 tensorflowenv 的虚拟环境,以这种方式创建的好处是,它和Anaconda可以很好的联动,而并非只是一个单纯的文件夹环境
- 好处如下
- 我们在开始菜单中的Anaconda一栏中会发现我们新创建的虚拟环境
- 可以在Anaconda的用户界面里直接点击切换

- 安装Tenwsorflow和Keras
pip install tensorflow #  安装tensorflow
pip install keras  #安装Keras
activate tensorflowenv  #从base下启动虚拟环境
deactivate #关闭虚拟环境

import tensorflow as tf
print(tf.__version__)

import keras
print(keras.__version__) #测试Tensorflow 和 Keras的代码
- 如果你已经到达了这里那么就代表我们要开始我们的重头戏了
配置jupyter notebook 和 从Kaggle上下载数据集(需要来自西方的神秘力量)
- 然后右键从文件夹中打开

- 打开 属性
把这里最后的那个路径改为自己存放文件的路径即可(例如我的是E:\ForKeras)

链接: Kaggle.(这个网站有大量的数据集,但是请合理每一个数据集,毕竟数据无价)
本次的使用的数据集链接: Dogs&Cats.
如果无法借助这种力量,那么我把这次的文件上传在百度云里
链接:https://pan.baidu.com/s/1fGw3siDZDIVOAGH0Mt76mw
提取码:6dyj
我们下载好文件之后,里面会是这样子的排列

其中test_set是我们的测试集,training_set是我们的训练集。
开始准备训练数据集
import os  ##使用os
base_dir = 'E:\ForKeras\Blog'  #自己的数据集存放的位置

train_dir = os.path.join(base_dir,'training_set', 'training_set')
validation_dir = os.path.join(base_dir,'test_set', 'test_set') ##这个数据集有两层文件夹 一定要注意

train_cats_dir = os.path.join(train_dir, 'cats')  ## 类别的命名 本别为cats & dogs
train_dogs_dir = os.path.join(train_dir, 'dogs')

test_cats_dir = os.path.join(validation_dir, 'cats')  ## 类别的命名 本别为cats & dogs
test_dogs_dir = os.path.join(validation_dir, 'dogs')
train_cat_fnames = os.listdir( train_cats_dir )
train_dog_fnames = os.listdir( train_dogs_dir )

print(train_cat_fnames[:20])
print(train_dog_fnames[:20])	#看看训练集导入成功没有
如果导入成功则会显示不同类别数据集内容的文件名称

print('total training cat images :', len(os.listdir(train_cats_dir)))
print('total training dog images :', len(os.listdir(train_dogs_dir)))#查看训练集中图像的个数

print('total test cat images :', len(os.listdir(test_cats_dir)))
print('total test dog images :', len(os.listdir(test_dogs_dir)))#查看验证集中图像的个数
个数显示如下

%matplotlib inline

import matplotlib.image as mpimg
import matplotlib.pyplot as plt

nrows = 4
ncols = 4

pic_index = 0

fig = plt.gcf()
fig.set_size_inches(ncols*4, nrows*4)

pic_index+=8

next_cat_pix = [os.path.join(train_cats_dir, fname)
                for fname in train_cat_fnames[ pic_index-8:pic_index]
               ]

next_dog_pix = [os.path.join(train_dogs_dir, fname)
                for fname in train_dog_fnames[ pic_index-8:pic_index]
               ]

for i, img_path in enumerate(next_cat_pix+next_dog_pix):
  sp = plt.subplot(nrows, ncols, i + 1)
  sp.axis('Off')
  img = mpimg.imread(img_path)
  plt.imshow(img)

plt.show() ##查看我们数据集中的部分照片

以上就是准备数据集的全过程,我们已经完全打好了地基,准备开始 卷积神经网络CNN 的网络搭建
卷积神经网络CNN网络搭建
** 快速开发基准模型:在这个任务中,我们需要计算机快速的验证和学习,不断的迭代下去,所以开发基准模型通常需要快速,模型能跑起来,效果比随机猜测好一些就行,不用太在意细节。在后期的工作中对于这个模型进行更多的优化来达到更理想的效果 **
让我们看看 维基百科 是怎么介绍这个网络的:
** 在深度学习中,卷积神经网络(CNN或ConvNet)是一类深度神经网络,最常用于分析视觉图像。
CNN使用多层感知器的变体设计,需要最少的预处理。它们也被称为移位不变或空间不变人工神经网络(SIANN),基于它们的共享权重架构和平移不变性特征。卷积网络被启发由生物工艺在之间的连接图案的神经元类似于动物的组织视觉皮层。个体皮层神经元仅在被称为感受野的视野的受限区域中对刺激作出反应。不同神经元的感受野部分重叠,使得它们覆盖整个视野。
与其他图像分类算法相比,CNN使用相对较少的预处理。这意味着网络学习传统算法中手工设计的过滤器。这种与特征设计中的先前知识和人力的独立性是一个主要优点。
它们可用于图像和视频识别,推荐系统,图像分类,医学图像分析和自然语言处理**
import tensorflow as tf
model = tf.keras.models.Sequential([
    tf.keras.layers.Conv2D(16, (3,3), activation='relu', input_shape=(150, 150, 3)),
    tf.keras.layers.MaxPooling2D(2,2),
    tf.keras.layers.Conv2D(32, (3,3), activation='relu'),
    tf.keras.layers.MaxPooling2D(2,2),
    tf.keras.layers.Conv2D(64, (3,3), activation='relu'),
    tf.keras.layers.MaxPooling2D(2,2),
    tf.keras.layers.Flatten(),
    tf.keras.layers.Dense(512, activation='relu'),
    tf.keras.layers.Dense(1, activation='sigmoid')
])
model.summary()#观察Neural Networks
的参数

从图像生成器读取文件中数据
from tensorflow.keras.optimizers import RMSprop
from tensorflow.keras.preprocessing.image import ImageDataGenerator

model.compile(optimizer=RMSprop(learning_rate=0.001), #model.compile() 优化器(loss:计算损失,这里用的是交叉熵损失,metrics: 列表,包含评估模型在训练和测试时的性能的指标)
              loss='binary_crossentropy',
              metrics = ['acc'])

#标准化到[0,1]
train_datagen = ImageDataGenerator( rescale = 1.0/255. )
test_datagen  = ImageDataGenerator( rescale = 1.0/255. )
#ImageDataGenerator就像一个把文件中图像转换成所需格式的转接头,通常先定制一个转接头train_datagen,它可以根据需要对图像进行各种变换,然后再把它怼到文件中(flow方法是怼到array中),约定好出来数据的格式(比如图像的大小、每次出来多少样本、样本标签的格式等等)。这里出来的train_generator是个(X,y)元组,X的shape为(20,150,150,3),y的shape为(20,)
train_generator = train_datagen.flow_from_directory(train_dir,  #所有图片(2000张)重设尺寸大小为150x150大小
                                                    batch_size=20,
                                                    class_mode='binary',
                                                    target_size=(150, 150))
test_generator =  test_datagen.flow_from_directory(test_dir,
                                                         batch_size=20,
                                                         class_mode  = 'binary',
                                                         target_size = (150, 150))

那么到这里,我们就已经搭建好了模型。于此同时,我们的工作也完成了一大半,接下来就是把所有准备工作调用起来的时刻!
这里分享一个关于卷积神经网络CNN的网站,这个网站的内容比较生动的讲解了关于卷积神经网络CNN大部分的知识。在我读下来之后,大概对于 卷积神经网络CNN 有了一个初步概念的搭建,对有意愿深入了解的朋友来说,这是一个不错的开始.
开始训练
直接上代码
history = model.fit_generator(train_generator, #我们让所有可用图像训练30次,并在所有测试图像上进行验证。
                              validation_data=validation_generator,
                              steps_per_epoch=100,
                              epochs=30,
                              validation_steps=50,
                              verbose=2)
我们会看到这样的情况
我们不用担心,正如Warning所显示的Model.fit_generatoris deprecated and will be
removed in a future version. Please useModel.fit, which supports
generators. 但是目前我们还是可以用它来跑通我们的流程的,至于新函数Model.fit我们在会在以后的学习中用到它。
训练结束之后会显示如下数据

那么在这些数据中:
loss 损失函数值,与你定义的损失函数值相关
acc 准确率
mean_absolute_error 平均绝对误差
Loss 和 Accuracy 是训练进度的一个很好的指标。 它对训练数据的分类进行猜测,然后根据训练好的模型对其进行计算结果。 准确度是正确猜测的部分。 验证准确度是对未在训练中使用的数据进行的计算。 那么这里有个比较好玩且通俗易懂的解释,反正我觉的挺厉害的
结束训练
之后我们对我们的模型进行保存就可以了
model.save('Cats_and_Dogs.h5') #名字倒是可以随便取,但是还是要考虑以后的查找
我文件保存的位置是在ForKeras里 E:\ForKeras 也就是我们一开始所选放置数据集的位置。

将结果可视化
import tkinter as tk
from tkinter import filedialog
import numpy as np
from keras.preprocessing import image
root = tk.Tk()
root.withdraw()
Filepath = filedialog.askopenfilename()

path=Filepath
img=image.load_img(path,target_size=(150, 150))

x=image.img_to_array(img)
x=np.expand_dims(x, axis=0)
images = np.vstack([x])

classes = model.predict(images, batch_size=10)
print(classes[0])

if classes[0]>0:
    print("This is a dog")
else:
    print("This is a cat")
输入以上代码之后会打开一个本地文件夹,你可以从中选择出你想要验证的图片,也可以直接从网上下载保存到本地之后再来验证,结果是猫是狗会显示在代码的下方,但是这个选择权,我们把它交到你手里。
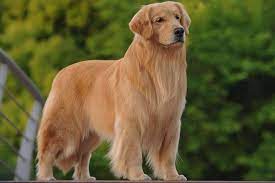
比如说我随便从网上找了一个金毛

然后我们运行代码,先弹出来的窗口中选择这个图片

检测的结果如下

成功!
import matplotlib.pyplot as plt

acc = history.history['acc']
val_acc = history.history['val_acc']
loss = history.history['loss']
val_loss = history.history['val_loss']

epochs = range(len(acc))

plt.plot(epochs, acc, 'bo', label='Training acc')
plt.plot(epochs, val_acc, 'b', label='Validation acc')
plt.title('Training and validation accuracy')
plt.legend()

plt.figure()

plt.plot(epochs, loss, 'bo', label='Training loss')
plt.plot(epochs, val_loss, 'b', label='Validation loss')
plt.title('Training and validation loss')
plt.legend()

plt.show()

训练结果如下图所示,很明显模型上来就过拟合了,主要原因是数据不够,或者说相对于数据量,模型过复杂(训练损失在第30个epoch就降为0了)。
datagen = ImageDataGenerator(
      rotation_range=40,
      width_shift_range=0.2,
      height_shift_range=0.2,
      shear_range=0.2,
      zoom_range=0.2,
      horizontal_flip=True,
      fill_mode='nearest')
# This is module with image preprocessing utilities
from keras.preprocessing import image

fnames = [os.path.join(train_cats_dir, fname) for fname in os.listdir(train_cats_dir)]

# We pick one image to "augment"
img_path = fnames[3]

# Read the image and resize it
img = image.load_img(img_path, target_size=(150, 150))

# Convert it to a Numpy array with shape (150, 150, 3)
x = image.img_to_array(img)

# Reshape it to (1, 150, 150, 3)
x = x.reshape((1,) + x.shape)

# The .flow() command below generates batches of randomly transformed images.
# It will loop indefinitely, so we need to `break` the loop at some point!
i = 0
for batch in datagen.flow(x, batch_size=1):
    plt.figure(i)
    imgplot = plt.imshow(image.array_to_img(batch[0]))
    i += 1
    if i % 4 == 0:
        break

plt.show()
这个其实就是对照片进行了不统一化的处理,这样增加机器处理的多样性,可以更好的增强训练的效果。

我Chrome的深色模式把横纵坐标搞得有点不清楚,但是影响不是很大,我们只要可以看到图像处理之后的结果就可以了。
import numpy as np
import random
from   tensorflow.keras.preprocessing.image import img_to_array, load_img

#输入层
successive_outputs = [layer.output for layer in model.layers[:8]] #layer_outputs:提取前8层的输出
#可视化模型
visualization_model = tf.keras.models.Model(inputs = model.input, outputs = successive_outputs) #activation_model:创建一个模型,给定模型的输入,可以返回这些输出
#随机选择一张猫或狗的图片
cat_img_files = [os.path.join(train_cats_dir, f) for f in train_cat_fnames]
dog_img_files = [os.path.join(train_dogs_dir, f) for f in train_dog_fnames]

img_path = random.choice(cat_img_files + dog_img_files)
img = load_img(img_path, target_size=(150, 150))
x   = img_to_array(img)                           #转换为150*150*3的数组
x   = x.reshape((1,) + x.shape)                   #转换为1*150*150*3的数组

#标准化
x /= 255.0

successive_feature_maps = visualization_model.predict(x)

layer_names = [layer.name for layer in model.layers]

for layer_name, feature_map in zip(layer_names, successive_feature_maps):

  if len(feature_map.shape) == 4:
    n_features = feature_map.shape[-1]
    size       = feature_map.shape[ 1]

    display_grid = np.zeros((size, size * n_features))

    for i in range(n_features):
      x  = feature_map[0, :, :, i]
      x -= x.mean()
      x /= x.std ()
      x *=  64
      x += 128
      x  = np.clip(x, 0, 255).astype('uint8')
      display_grid[:, i * size : (i + 1) * size] = x

    scale = 20. / n_features
    plt.figure( figsize=(scale * n_features, scale) )
    plt.title ( layer_name )
    plt.grid  ( False )
    plt.imshow( display_grid, aspect='auto', cmap='viridis' )
结果如下图:

acc      = history.history[     'acc' ]
val_acc  = history.history[ 'val_acc' ]
loss     = history.history[    'loss' ]
val_loss = history.history['val_loss' ]

epochs   = range(len(acc))

plt.plot  ( epochs,     acc ,label='acc')
plt.plot  ( epochs, val_acc ,label='val_acc')
plt.legend(loc='best')
plt.title ('Training and validation accuracy')
plt.figure()
plt.plot  ( epochs,     loss ,label='loss')
plt.plot  ( epochs, val_loss ,label='val_loss')
plt.legend(loc='best')
plt.title ('Training and validation loss')
所示结果(为了看数据还是把DarkMod关了):

那么其实我们是可以清晰的看到,图线发现出现了过拟合的现象,我们的训练准确度几乎就是 100%,但是我们的的验证的准确率只有80%的准确率(而且峰值也有10%之差)。
在統計學中,過適(英語:overfitting,或稱擬合過度)是指過於緊密或精確地匹配特定資料集,以致於無法良好地拟合其他資料或預測未來的觀察結果的現象。 过拟合模型指的是相较有限的数据而言,参数过多或者结构过于复杂的统计模型。 发生过拟合时,模型的偏差小而方差大。
那么我们该如何解决过拟合呢?
广大的网友给了我们一些思路:
欠拟合基本上都会发生在训练刚开始的时候,经过不断训练之后欠拟合应该不怎么考虑了。但是如果真的还是存在的话,可以通过增加网络复杂度或者在模型中增加特征,这些都是很好解决欠拟合的方法。
结束语
那么到这里,我所知道的所有流程就到此位置了,很高兴你能看到这里,在语言组织方面还有一定的欠缺,所以感谢您的耐心。因为在我自学的过程中常常会因为庞大且臃肿的理论知识而吓怕,心态常发生一些小小的变化。我希望这篇文章能够带给所有初学者Positive feedback在入门时。
单是说不行,要紧的是做。 —— 鲁迅

