Inception Net
引入的Inception 结构块
在同一层网络内 使用了 不同尺寸的卷积核,提升了模型感知力。
使用了 批标准化,缓解梯度消失问题。
其 核心 为 其 基本单元 inception结构块。
inception v1 又称为googlenet
inception v2
inception v3
inception v5
inception 在同一层网络中,使用了不同尺寸的卷积核,提取不同尺寸的特征。
1x1的卷积核: 作用 输入特征图 每个像素点。
设定少于输入特征图 的 1x1 卷积核: 减少输出特征图深度。 目的是降维。
从而减少参数量,计算量。
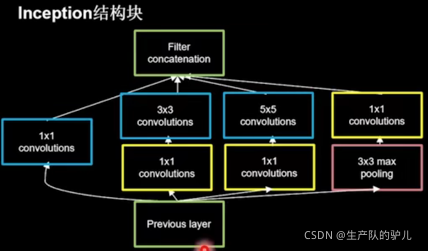
inception 结构块
如下图
是一个inception 的 结构块
一共四个分支

四个分支:
1x1 卷积核 输入到卷积连接器 concatenation
1x1卷积核 1x3卷积核 输入到卷积连接器 concatenation
1x1卷积核 5x5 卷积核 输入到卷积连接器 concatenation
3x3最大池化 1x1卷积核 输入到卷积连接器 concatenation
四个分支输出一样,那么 3x3 5x5 都进行了全零填充
第三个分支5x5,应该是填充了两个0(横纵方向都有)
输入到卷积连接器 concatenation
将收到的四路特征数据 按 深度方向拼接
形成 inception 输出的

小tips:
这里本人比较困惑1x1卷积核
查阅了一些资料:
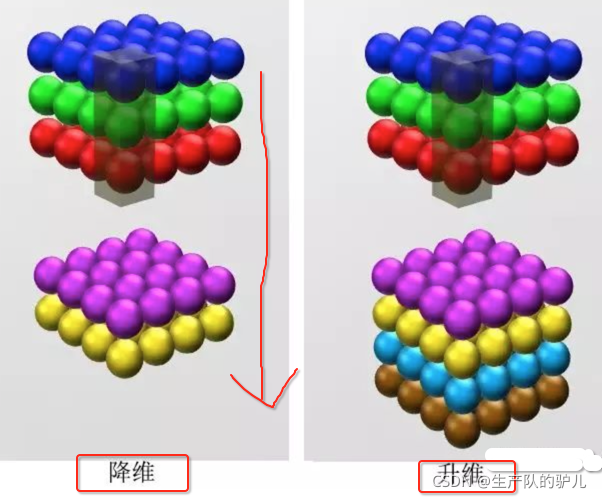
1x1 卷积核 作用: 降维 or 提升维度

为什么非要用 1x1 来增加深度呢?
在不增加感受野的情况下,让网络加深,为的就是引入更多的非线性。
卷积核是 1x1 ,跨度也是 1,那么生成后的图像大小就并没有变化。
举例子:
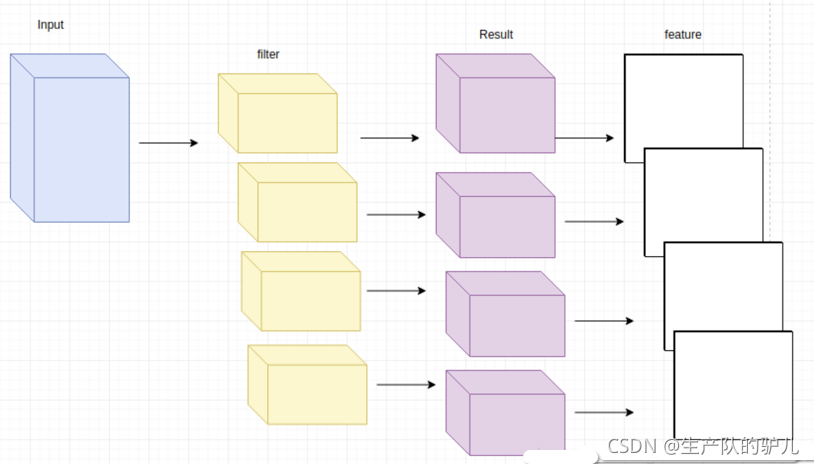
如果输入图片通道是 3,卷积核的数量是 6 ,那么生成的 feature map 通道就是 6,这就是升维,如果卷积核的数量是 1,那么生成的 feature map 只有 1 个通道,这就是降维度。

incepotion 结构块 CBAPD 描述图

可以看出 卷积都是使用全零填充
激活函数都是 relu
基本都是CPA的结构,没有PD
把CPA部分写出来封装一下
方便以后 复用
定义为一个新的·类 ConvBNRelu
搭建CPA重复部分
# 搭建网络的积木
class ConvBNRelu(Model):
	def __init__(self, ch, kernelsz=3,strides=3,padding='same'):
	super(ConvBNRelu,self).__init__()
	self.model = tf.keras.models.Sequential([
	Conv2D(ch, kernelsz, strides = strides, padding = padding),
	BatchNormalization(),
	Activation('relu')
	)]
# 将积木拼接到一起
def call(self,x):
	x = self.model(x)
	return x
搭建Inception模块
class InceptionBlk(Model):
	def __init__(self,ch,strides=1):
		super(InceptionBlk,self).__init__()
		self.ch = ch
		self.strides = strides
		# 第一个分支
		self.c1 = ConvBNRelu(ch, kernelsz=1,strides=strides)
		# 第二个分支
		self.c2_1 = ConvBNRelu(ch, kernelsz=1,strides=strides)
		self.c2_2 = ConvBNRelu(ch, kernelsz=3,strides=strides)
		# 第三个分支
		self.c3_1 = ConvBNRelu(ch, kernelsz=1,strides=strides)
		self.c3_2 = ConvBNRelu(ch, kernelsz=5,strides=strides)
		# 第四个分支
		self.p4_1 = MaxPool2D(3,strides=2, padding='same')
		self.c4_2 = ConvBNRelu(ch, kernelsz=1,strides=strides)

	def call(self,x):
		x1 = self.c1(x)
		x2_1 = self.c2_1(x)
		x2_1 = self.c2_2(x2_1)
		x3_1 = self.c3_1(x)
		x3_2 = self.c3_2(x3_1)
		x4_1 = self.p4_1(x)
		x4_1 = self.c4_2(x4_1)
	# concat along axis = channel
	# 堆叠四个分支
	x = tf.concat([x1,x2_2,x3_3,x4_2],axis=3)
	return x
搭建 InceptionNet网络

四个 inception 结构块 相连
每两个inception 结构块 组成一个block,一共两个block
第一个block结构块,卷积步长为2
第一个结构块,输出特征图尺寸减半,但是输出特征图深度加深
目的是为了保持抽取的信息一致
第二个block结构块,卷积步长为1
第一个block输出通道数为16
四个分支,输出深度 为4
总共为 4x16 = 64
第二个block输出通道数是第一个二倍,为32
四个分支,输出深度 为4
总共为 4x32 = 128
128个通道 进行 平均池化
送入十分类全链接
class Inception10(Model):
		#init_ch=16 默认输出深度为16
    def __init__(self, num_blocks, num_classes, init_ch=16, **kwargs):
        super(Inception10, self).__init__(**kwargs)
        self.in_channels = init_ch
        self.out_channels = init_ch
        self.num_blocks = num_blocks
        self.init_ch = init_ch
        self.c1 = ConvBNRelu(init_ch) # 调用上面写好的CBA类,默认卷积核3,全零填充,步长1
        self.blocks = tf.keras.models.Sequential()
        for block_id in range(num_blocks):
            for layer_id in range(2):
                if layer_id == 0:
                    block = InceptionBlk(self.out_channels, strides=2) # 第一个block,默认步长为2
                else:
                    block = InceptionBlk(self.out_channels, strides=1) # 第二个block,默认步长为2
                self.blocks.add(block)
            # enlarger out_channels per block
            self.out_channels *= 2 # 通道数范翻倍,由16变为32
        self.p1 = GlobalAveragePooling2D()
        self.f1 = Dense(num_classes, activation='softmax')

    def call(self, x):
        x = self.c1(x)
        x = self.blocks(x)
        x = self.p1(x)
        y = self.f1(x)
        return y

# 实例化inception10的类,指定inception的block数为2,输出为10分类
model = Inception10(num_blocks=2, num_classes=10)
给模型配置参数
model.compile(optimizer='adam',
              loss=tf.keras.losses.SparseCategoricalCrossentropy(from_logits=False),
              metrics=['sparse_categorical_accuracy'])
设置模型保存,和读取路径,方便断开后,继续进行训练
checkpoint_save_path = "./checkpoint/Inception10.ckpt"
if os.path.exists(checkpoint_save_path + '.index'):
    print('-------------load the model-----------------')
    model.load_weights(checkpoint_save_path)

cp_callback = tf.keras.callbacks.ModelCheckpoint(filepath=checkpoint_save_path,
                                                 save_weights_only=True,
                                                 save_best_only=True)
训练模型
history = model.fit(x_train, y_train, batch_size=128, epochs=5, validation_data=(x_test, y_test), validation_freq=1,
                    callbacks=[cp_callback])
查看网络结构
model.summary()
将参数保存到txt中
file = open('./weights.txt', 'w')
for v in model.trainable_variables:
    file.write(str(v.name) + '\n')
    file.write(str(v.shape) + '\n')
    file.write(str(v.numpy()) + '\n')
file.close()
绘制loss和acc的曲线
acc = history.history['sparse_categorical_accuracy']
val_acc = history.history['val_sparse_categorical_accuracy']
loss = history.history['loss']
val_loss = history.history['val_loss']

plt.subplot(1, 2, 1)
plt.plot(acc, label='Training Accuracy')
plt.plot(val_acc, label='Validation Accuracy')
plt.title('Training and Validation Accuracy')
plt.legend()

plt.subplot(1, 2, 2)
plt.plot(loss, label='Training Loss')
plt.plot(val_loss, label='Validation Loss')
plt.title('Training and Validation Loss')
plt.legend()
plt.show()
