介绍
OpenCV 是最流行的计算机视觉任务库,它是用于机器学习、图像处理等的跨平台开源库,用于开发实时计算机视觉应用程序。
CVzone 是一个计算机视觉包,它使用 OpenCV 和 Media Pipe 库作为其核心,使我们易于运行,例如手部跟踪、人脸检测、面部标志检测、姿势估计等,以及图像处理和其他计算机视觉相关的应用程序。
使用 OpenCV 实现虚拟键盘
让我们创建一个虚拟键盘。
首先,让我们安装所需的模块。
pip?install?numpy

pip?install?opencv-python

pip?install?cvzone

pip?install?pynput
使用 OpenCV 为虚拟键盘导入库
现在让我们导入所需的模块
import?cv2
import?cvzone
from?cvzone.HandTrackingModule?import?HandDetector
from?time?import?sleep
import?numpy?as?np
from?pynput.keyboard?import?Controller
这里我们从 cvzone.HandTrackingModule 导入 HandDetector 模块,然后为了使虚拟键盘工作,我们需要从 pynput.keyboard 导入Controller。
cap?=?cv2.VideoCapture(0,?cv2.CAP_DSHOW)
cap.set(3,?1280)
cap.set(4,?720)
现在让我们从 cv2.Videocapture 获取实时输入
detector?=?HandDetector(detectionCon=0.8)
keyboard_keys?=?[["Q",?"W",?"E",?"R",?"T",?"Y",?"U",?"I",?"O",?"P"],
??????????????????["A",?"S",?"D",?"F",?"G",?"H",?"J",?"K",?"L",?";"],
??????????????????["Z",?"X",?"C",?"V",?"B",?"N",?"M",?",",?".",?"/"]]final_text?=?""我们以 0.8 的检测置信度初始化 HandDetector 并将其分配给检测器。
然后我们根据键盘的布局创建一个列表数组,并定义一个空字符串来存储键入的键。
定义绘制函数
keyboard?=?Controller()def?draw(img,?buttonList):
????for?button?in?buttonList:
????????x,?y?=?button.pos
????????w,?h?=?button.size
????????cvzone.cornerRect(img,?(button.pos[0],?button.pos[1],
???????????????????????????????????????????????????button.size[0],button.size[0]),?20?,rt=0)
????????cv2.rectangle(img,?button.pos,?(int(x?+?w),?int(y?+?h)),?(255,?144,?30),?cv2.FILLED)
????????cv2.putText(img,?button.text,?(x?+?20,?y?+?65),
????????????????????cv2.FONT_HERSHEY_PLAIN,?4,?(0,?0,?0),?4)
????return?img初始化键盘控制器,并定义一个名为draw()的函数,它接受两个参数,即图像和按钮列表并返回图像。在draw()函数内部,我们使用 cvzone 的cornerRect函数在每个键的角落绘制矩形边缘。这是为了让我们的键盘布局看起来更好看。就像下面的图片。

你也可以尝试更改不同的颜色。
class?Button():
????def?__init__(self,?pos,?text,?size=[85,?85]):
????????self.pos?=?pos
????????self.size?=?size
????????self.text?=?text然后我们定义一个名为 Button() 的类,并提供位置、文本和大小作为输入,以便我们可以按照明确定义的顺序排列键盘按键。
buttonList?=?[]
#?mybutton?=?Button([100,?100],?"Q")
for?k?in?range(len(keyboard_keys)):
????for?x,?key?in?enumerate(keyboard_keys[k]):
????????buttonList.append(Button([100?*?x?+?25,?100?*?k?+?50],?key))上面的循环将遍历键盘按键和 Button 对象,我们在其中给出位置和文本作为输入附加在一个名为 button list 的列表中。稍后我们可以将这个列表传递给 draw 函数以在我们的实时框架之上进行绘制。
使用 OpenCV 的虚拟键盘主程序
重要的部分来了。
while?True:
????success,?img?=?cap.read()
????img?=?detector.findHands(img)
????lmList,?bboxInfo?=?detector.findPosition(img)
????img?=?draw(img,?buttonList)??#?change?the?draw?funtion?to?transparent_layout?for?transparent?keys
????if?lmList:
????????for?button?in?buttonList:
????????????x,?y?=?button.pos
????????????w,?h?=?button.size
if?x?<?lmList[8][0]<x+w?and?y?<?lmList[8][1]?<?y+h:
cv2.rectangle(img,?button.pos,?(x?+?w,?y?+?h),
(0,?255,?255),?cv2.FILLED)
cv2.putText(img,?button.text,?(x?+?20,?y?+?65),
cv2.FONT_HERSHEY_PLAIN,?4,?(0,?0,?0),?4)
l,?_,?_?=?detector.findDistance(8,12,?img,?draw=False)
print(l)
if?l?<?25:
keyboard.press(button.text)
cv2.rectangle(img,?button.pos,?(x?+?w,?y?+?h),
(0,?255,?0),?cv2.FILLED)
cv2.putText(img,?button.text,?(x?+?20,?y?+?65),
cv2.FONT_HERSHEY_PLAIN,?4,?(0,?0,?0),?4)
final_text?+=?button.text
sleep(0.20)
cv2.rectangle(img,?(25,350),?(700,?450),
(255,?255,?255),?cv2.FILLED)
cv2.putText(img,?final_text,?(60,?425),
cv2.FONT_HERSHEY_PLAIN,?4,?(0,?0,?0),?4)
#?cv2.rectangle(img,?(100,100),?(200,200),
#?(100,?255,?0),?cv2.FILLED)
#?cv2.putText(img,?'Q',?(120,180),?cv2.FONT_HERSHEY_PLAIN,?5,
#?(0,?0,?0),?5)
#?img?=?mybutton.draw(img)
cv2.imshow("output",?img)
cv2.waitKey(1)在 while 循环中,首先我们读取实时输入帧并将其存储在一个名为img的变量中。然后我们将该图像传递给*检测器.findHands()*以便在帧中找到手。然后在该图像中,我们需要找到检测到的手的位置和边界框信息。
在这里我们可以找到我们的食指和中指的顶点之间的距离,如果两者之间的距离小于某个阈值,那么我们就可以输入我们所指示的字母。
一旦我们获得了位置,我们就会遍历整个位置列表。从该列表中,我们找到按钮位置和按钮大小,然后根据明确定义的方式将其绘制在框架上。
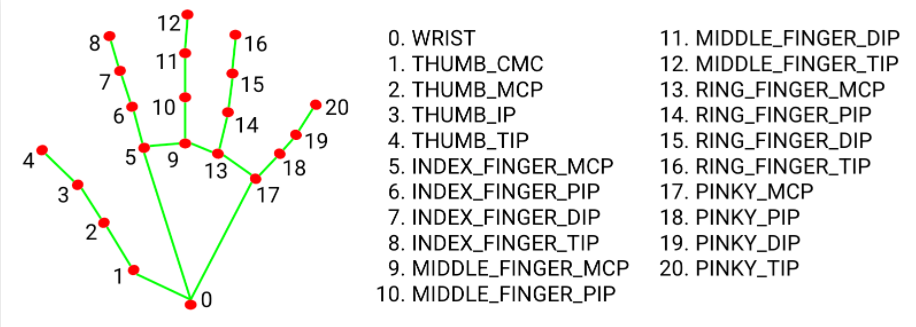
图 1:手地标模型
之后,我们需要找到食指和中指的顶点之间的距离。在上图中,你可以看到我们需要的最高点是点 8 和点 12。因此,我们需要在距离查找函数中传递 8, 12 以获得它们之间的距离。
在上面的代码中,你可以看到 detector.findDistance(),我们通过了 8、12 和图像来查找距离,并将绘制标志设置为 false,这样我们就不需要两点之间的任何线。
如果点之间的距离非常小,我们将使用 press() 函数来按下按键。在上面的代码keyboard.press() 中,我们传递button.text以显示按下的键。最后,我们在键盘布局下方绘制一个小的白色矩形框,以显示按下的键。
一旦你执行了整个代码,它看起来像这样。
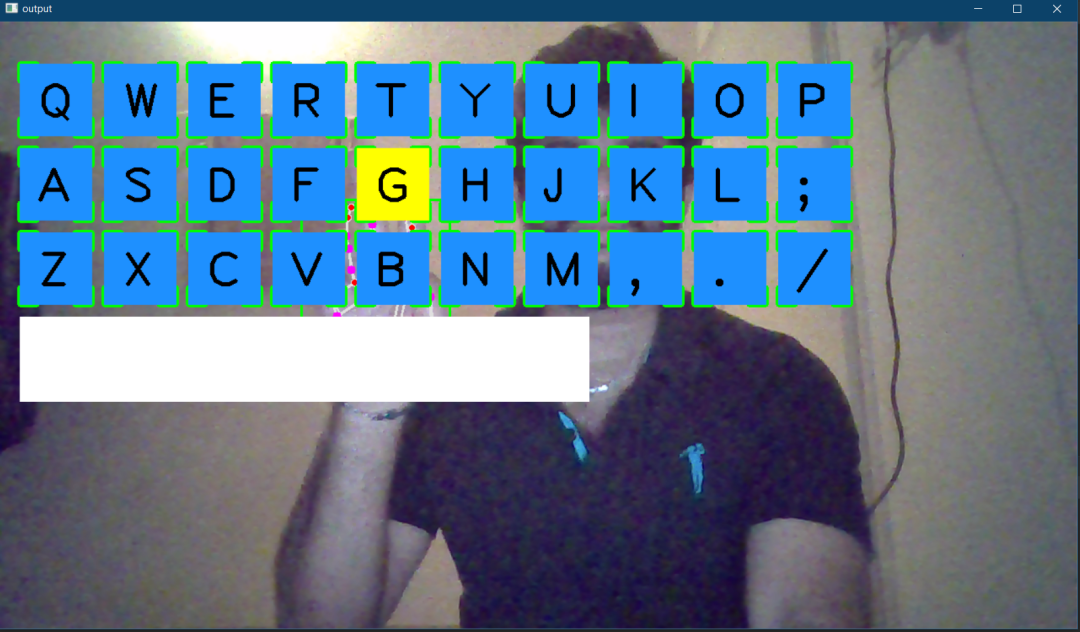
将食指和中指靠近特定字母的顶部后,你可以键入该字母。
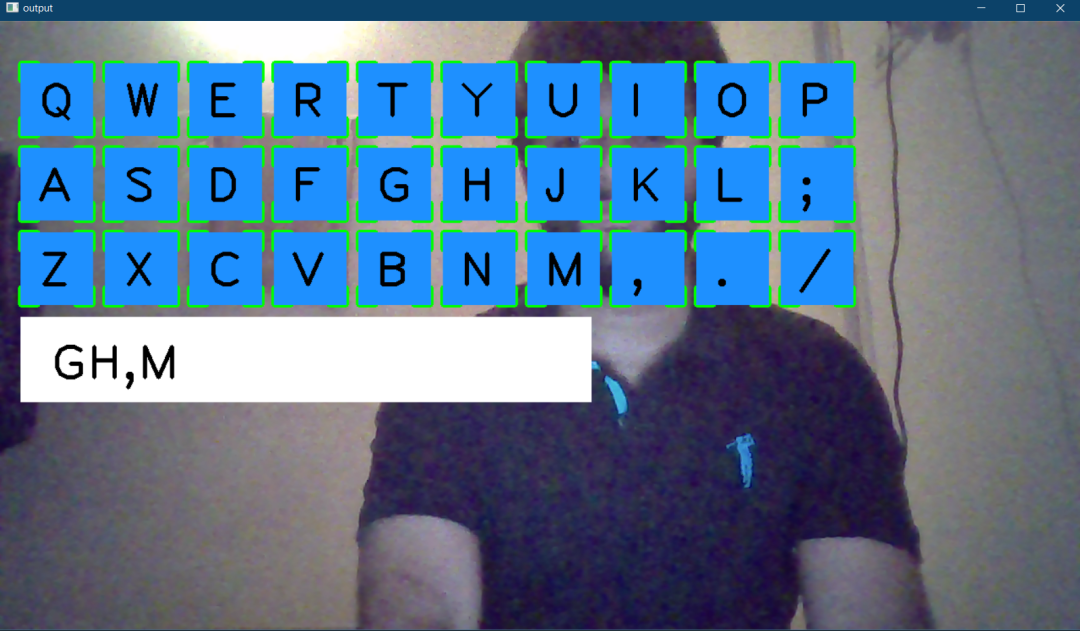
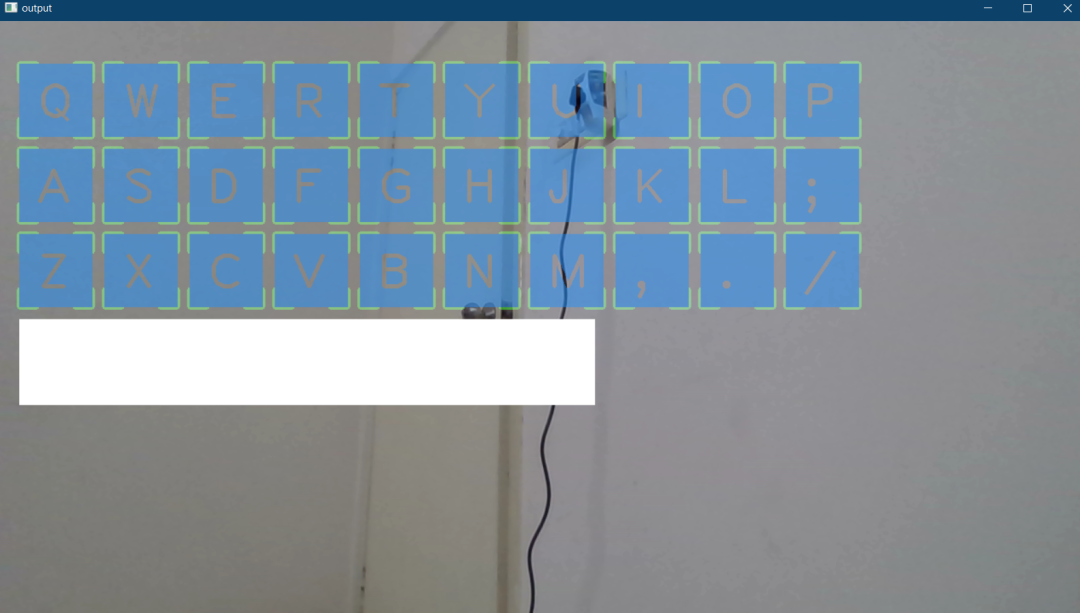
如果你需要更自定义的键盘布局,我们可以使键盘布局透明。我们只需要添加一个透明布局函数并将*draw()函数替换为transparent_layout()*函数即可。
让我们定义transparent_layout()函数。下面是函数的代码,它采用与draw()函数相同的输入。在这里,我们将 numpy 的zero_like()函数分配给 名为imgNew的变量,并对其执行所需的操作,例如获得角矩形、为每个键创建矩形框并将文本放入框内。之后,我们将该图像复制到一个新变量并创建一个imgNew掩码,然后我们使用 OpenCV 的*addWeighted()*函数将掩码放置在实际图像的顶部。因此,这使键盘布局透明。
自定义键盘
def?transparent_layout(img,?buttonList):
????imgNew?=?np.zeros_like(img,?np.uint8)
????for?button?in?buttonList:
????????x,?y?=?button.pos
????????cvzone.cornerRect(imgNew,?(button.pos[0],?button.pos[1],
???????????????????????????????????????????????????button.size[0],button.size[0]),?20?,rt=0)
????????cv2.rectangle(imgNew,?button.pos,?(x?+?button.size[0],?y?+?button.size[1]),
???????????????????????????????????(255,?144,?30),?cv2.FILLED)
????????cv2.putText(imgNew,?button.text,?(x?+?20,?y?+?65),
????????????????????cv2.FONT_HERSHEY_PLAIN,?4,?(0,?0,?0),?4)
????????out?=?img.copy()
????????alpaha?=?0.5
????????mask?=?imgNew.astype(bool)
????????print(mask.shape)
????????out[mask]?=?cv2.addWeighted(img,?alpaha,?imgNew,?1-alpaha,?0)[mask]?
????????return?out一旦将while 循环中的*draw()函数替换为transparent_layout()*函数,它将如下所示。(下图)
使用 OpenCV 的虚拟键盘的完整代码
下面是完整的代码
import?cv2
import?cvzone
from?cvzone.HandTrackingModule?import?HandDetector
from?time?import?sleep
import?numpy?as?np
from?pynput.keyboard?import?Controller
cap?=?cv2.VideoCapture(0,?cv2.CAP_DSHOW)
cap.set(3,?1280)
cap.set(4,?720)
detector?=?HandDetector(detectionCon=0.8)
keyboard_keys?=?[["Q",?"W",?"E",?"R",?"T",?"Y",?"U",?"I",?"O",?"P"],
??????????????????["A",?"S",?"D",?"F",?"G",?"H",?"J",?"K",?"L",?";"],
??????????????????["Z",?"X",?"C",?"V",?"B",?"N",?"M",?",",?".",?"/"]]
final_text?=?""
keyboard?=?Controller()
def?draw(img,?buttonList):
????for?button?in?buttonList:
????????x,?y?=?button.pos
????????w,?h?=?button.size
????????cvzone.cornerRect(img,?(button.pos[0],?button.pos[1],
???????????????????????????????????????????????????button.size[0],button.size[0]),?20?,rt=0)
????????cv2.rectangle(img,?button.pos,?(int(x?+?w),?int(y?+?h)),?(255,?144,?30),?cv2.FILLED)
????????cv2.putText(img,?button.text,?(x?+?20,?y?+?65),
????????????????????cv2.FONT_HERSHEY_PLAIN,?4,?(0,?0,?0),?4)
????return?img
def?transparent_layout(img,?buttonList):
????imgNew?=?np.zeros_like(img,?np.uint8)
????for?button?in?buttonList:
????????x,?y?=?button.pos
????????cvzone.cornerRect(imgNew,?(button.pos[0],?button.pos[1],
???????????????????????????????????????????????????button.size[0],button.size[0]),?20?,rt=0)
????????cv2.rectangle(imgNew,?button.pos,?(x?+?button.size[0],?y?+?button.size[1]),
???????????????????????????????????(255,?144,?30),?cv2.FILLED)
????????cv2.putText(imgNew,?button.text,?(x?+?20,?y?+?65),
????????????????????cv2.FONT_HERSHEY_PLAIN,?4,?(0,?0,?0),?4)
????out?=?img.copy()
????alpaha?=?0.5
????mask?=?imgNew.astype(bool)
????print(mask.shape)
????out[mask]?=?cv2.addWeighted(img,?alpaha,?imgNew,?1-alpaha,?0)[mask]
????return?out
class?Button():
????def?__init__(self,?pos,?text,?size=[85,?85]):
????????self.pos?=?pos
????????self.size?=?size
????????self.text?=?text
buttonList?=?[]
#?mybutton?=?Button([100,?100],?"Q")
for?k?in?range(len(keyboard_keys)):
????for?x,?key?in?enumerate(keyboard_keys[k]):
????????buttonList.append(Button([100?*?x?+?25,?100?*?k?+?50],?key))
while?True:
????success,?img?=?cap.read()
????img?=?detector.findHands(img)
????lmList,?bboxInfo?=?detector.findPosition(img)
????img?=?draw(img,?buttonList)??#?change?the?draw?funtion?to?transparent_layout?for?transparent?keys
????if?lmList:
????????for?button?in?buttonList:
????????????x,?y?=?button.pos
????????????w,?h?=?button.size
????????????if?x?<?lmList[8][0]<x+w?and?y?<?lmList[8][1]?<?y+h:
????????????????cv2.rectangle(img,?button.pos,?(x?+?w,?y?+?h),
??????????????????????????????(0,?255,?255),?cv2.FILLED)
????????????????cv2.putText(img,?button.text,?(x?+?20,?y?+?65),
????????????????????????????cv2.FONT_HERSHEY_PLAIN,?4,?(0,?0,?0),?4)
????????????????l,?_,?_?=?detector.findDistance(8,12,?img,?draw=False)
????????????????print(l)
????????????????if?l?<?25:
????????????????????keyboard.press(button.text)
????????????????????cv2.rectangle(img,?button.pos,?(x?+?w,?y?+?h),
??????????????????????????????????(0,?255,?0),?cv2.FILLED)
????????????????????cv2.putText(img,?button.text,?(x?+?20,?y?+?65),
????????????????????????????????cv2.FONT_HERSHEY_PLAIN,?4,?(0,?0,?0),?4)
????????????????????final_text?+=?button.text
????????????????????sleep(0.20)
????cv2.rectangle(img,?(25,350),?(700,?450),
??????????????????(255,?255,?255),?cv2.FILLED)
????cv2.putText(img,?final_text,?(60,?425),
????????????????cv2.FONT_HERSHEY_PLAIN,?4,?(0,?0,?0),?4)
????#?cv2.rectangle(img,?(100,100),?(200,200),
????#???????????????(100,?255,?0),?cv2.FILLED)
????#?cv2.putText(img,?'Q',?(120,180),?cv2.FONT_HERSHEY_PLAIN,?5,
????#?????????????(0,?0,?0),?5)
????#?img?=?mybutton.draw(img)
????cv2.imshow("output",?img)
????cv2.waitKey(1)结论
这是虚拟键盘的实现,如果你想完善它,你也可以试着添加按键声音,然后我们还可以让键盘布局在框架内移动。
☆ END ☆
如果看到这里,说明你喜欢这篇文章,请转发、点赞。微信搜索「uncle_pn」,欢迎添加小编微信「 woshicver」,每日朋友圈更新一篇高质量博文。
↓扫描二维码添加小编↓
