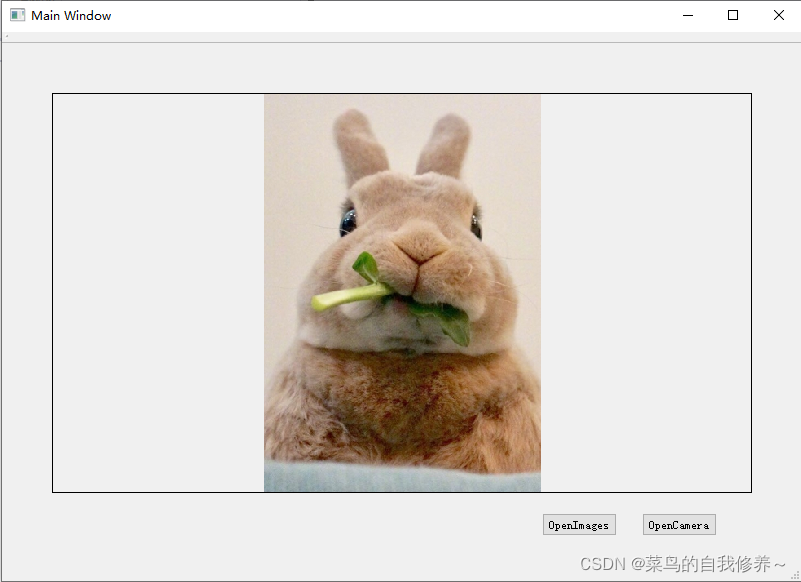
在这里演示了做一个打开图片和采用opencv打开摄像头的界面的例子。
我的环境是:Qt 5.12 + Opencv 4.5.3 + vs2017
界面效果
代码
代码还是比较简单清晰的,就直接贴上了。
MainWindow.h
#ifndef MAINWINDOW_H
#define MAINWINDOW_H

#include <QMainWindow>
#include <QApplication>
#include <QTimer>
#include <QFileDialog>
#include <QMessageBox>
#include <qlabel.h>

#include <opencv2/opencv.hpp>
#include <opencv2/core/core.hpp>
#include <opencv2/highgui/highgui.hpp>
#include <opencv2/imgproc/imgproc.hpp>
#include <opencv2/imgproc/types_c.h>

#include "ui_MainWindow.h"

using namespace cv;
using namespace std;

namespace Ui {
	class myMainWindow;
}

class myMainWindow : public QMainWindow
{
	Q_OBJECT

public:
	myMainWindow(QWidget *parent = Q_NULLPTR);
	//Mat?QLabel
	QImage MatImageToQt(const Mat &src);
	~myMainWindow();

private slots:
	void readFrame();
	void on_OpenImageBtn_clicked();
	void on_OpenCameraBtn_clicked();

private:
    Ui::myMainWindowClass ui;

	Mat src;
	QImage img;
	QString img_name;

	VideoCapture cap;
	Mat src_image;
	QTimer *timer;
	QImage *image;
};

#endif
这里注意.h文件中的代码不要一下子全复制粘贴过去,最好是把每部分对应的粘贴过去,原本新建工程之后就有的代码就不要改了,不然Ui::myMainWindowClass ui;这句代码容易报错。
MainWindow.cpp
#include "MainWindow.h"
#include "ui_MainWindow.h"

using namespace cv;

myMainWindow::myMainWindow(QWidget *parent):
	QMainWindow(parent)
{
	ui.setupUi(this);

	setWindowTitle(tr("Main Window"));

	timer = new QTimer(this);
	image = new QImage();
	connect(timer, SIGNAL(timeout()), this, SLOT(readFrame()));
}

myMainWindow::~myMainWindow() {

}

void myMainWindow::on_OpenImageBtn_clicked() {

	QString fileName = QFileDialog::getOpenFileName(this,
		tr("open Image"),
		"./images",
		tr("Image File(*.png *.bmp *.jpg *.jpeg)"));

	if (fileName.isEmpty())
	{
		return;
	}

	//toLatin1转QString到QByteArray,data转QByteArray到char*
	Mat srcImage = imread(fileName.toUtf8().data());

	//qt中对图像的颜色格式存储是RGB格式,而opencv中是BG格式
	//要想显示,我们要把BGR转RGB
	cv::cvtColor(srcImage, srcImage, CV_BGR2RGB);

	//QT中图片是使用QImage对,而opencv中Mat对象是图片,其中真正数据是存放在Mat的data属性,所以要转化srcImage为disImage
	QImage disImage = QImage((const unsigned char*)srcImage.data,
		srcImage.cols, srcImage.rows, QImage::Format_RGB888);//888是三通道

	ui.label->setPixmap(QPixmap::fromImage(disImage.scaled(ui.label->size(),//使得图片匹配为label的大小
		Qt::KeepAspectRatio//使得图片保存高宽比
	)));
}

void myMainWindow::on_OpenCameraBtn_clicked(){
	cap.open(0);
	timer->start(33);
}

void myMainWindow::readFrame() {
	cap.read(src_image);

	QImage imag = MatImageToQt(src_image);
	ui.label->setPixmap(QPixmap::fromImage(imag));
}

//Mat转成QImage
QImage myMainWindow::MatImageToQt(const Mat &src)
{
	if (src.type() == CV_8UC1)
	{
		QImage qImage(src.cols, src.rows, QImage::Format_Indexed8);
		qImage.setColorCount(256);
		for (int i = 0; i < 256; i++)
		{
			qImage.setColor(i, qRgb(i, i, i));
		}
		uchar *pSrc = src.data;
		for (int row = 0; row < src.rows; row++)
		{
			uchar *pDest = qImage.scanLine(row);
			memcmp(pDest, pSrc, src.cols);
			pSrc += src.step;
		}
		return qImage;
	}
	else if (src.type() == CV_8UC3)
	{
		const uchar *pSrc = (const uchar*)src.data;
		QImage qImage(pSrc, src.cols, src.rows, src.step, QImage::Format_RGB888);
		return qImage.rgbSwapped();
	}
	else if (src.type() == CV_8UC4)
	{
		const uchar *pSrc = (const uchar*)src.data;
		QImage qImage(pSrc, src.cols, src.rows, src.step, QImage::Format_ARGB32);
		//返回图像的子区域作为一个新图像
		return qImage.copy();
	}
	else
	{
		return QImage();
	}
}
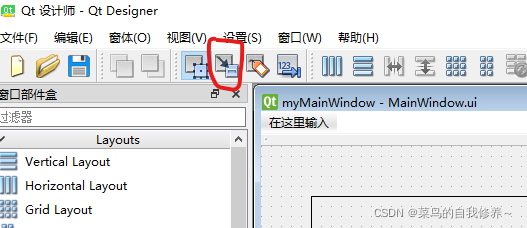
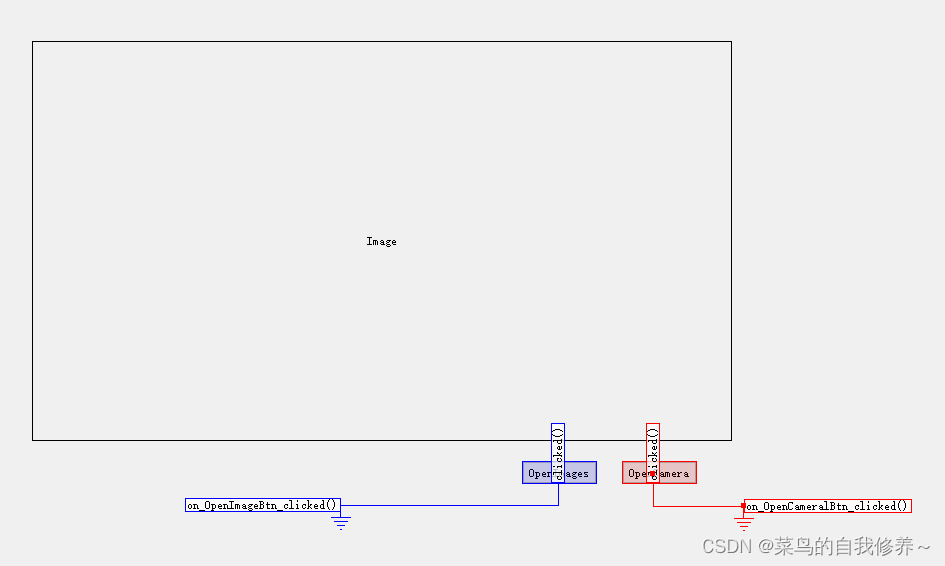
编辑完代码后,需要进行如下操作,将按钮与槽函数(on_OpenImageBtn_clicked()和on_OpenCameraBtn_clicked())关联起来。
1.打开.ui文件,点击这个按钮编辑信号与槽
2.按住按钮往空白地方拖动,会自动弹出这个界面。
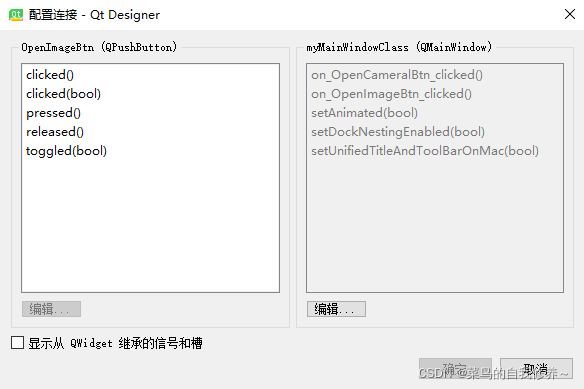
3.先点击左边的clicked(),然后点击右边的编辑,在弹出的对话框的槽的下面点击加号。

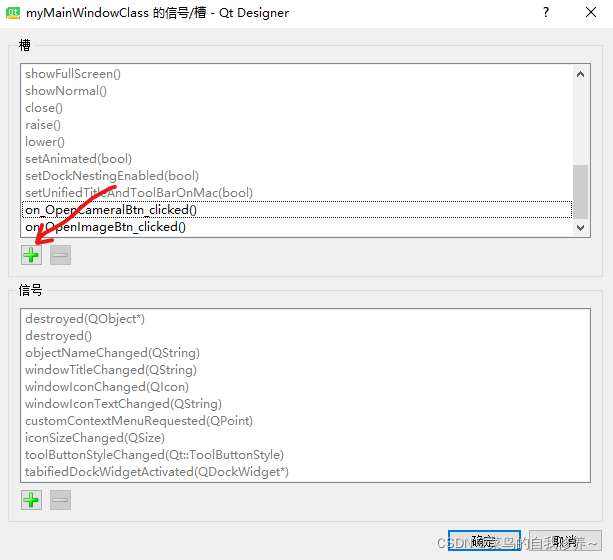
4.把对应的函数名字写上之后点确定,然后在右边选择你添加的对应的函数,点确定。

5.把两个按钮都分别与对应的函数关联起来就可以了,不要忘记保存。
到这里结束就可以运行看结果啦~