参考与前言
- 课程链接:跟李沐学AI的个人空间_哔哩哔哩_bilibili
- 课程主页:https://zh-v2.d2l.ai/chapter_multilayer-perceptrons/kaggle-house-price.html
- 相关代码参考:https://www.kaggle.com/alexandreazhang/using-dl-to-predict-housing-prices/notebook
本部分主要用于记录自己做第一次作业的一些感受 主要是emmm 也是第一次看这么仔细,虽然最后还是不如沐神的十行代码 hhhh 但是还是总结一下较好,本来是想弄一弄懂注意力那个算法是咋个计算方式 还有最近看的GRU那几个点,但是沐神太吸引人了 hhh 所以就实战了一下 基本上也算是做了一天左右 emmm
首先遇到的问题:
- one hot后太多feature了
- learning_rate 一开始直接成0了
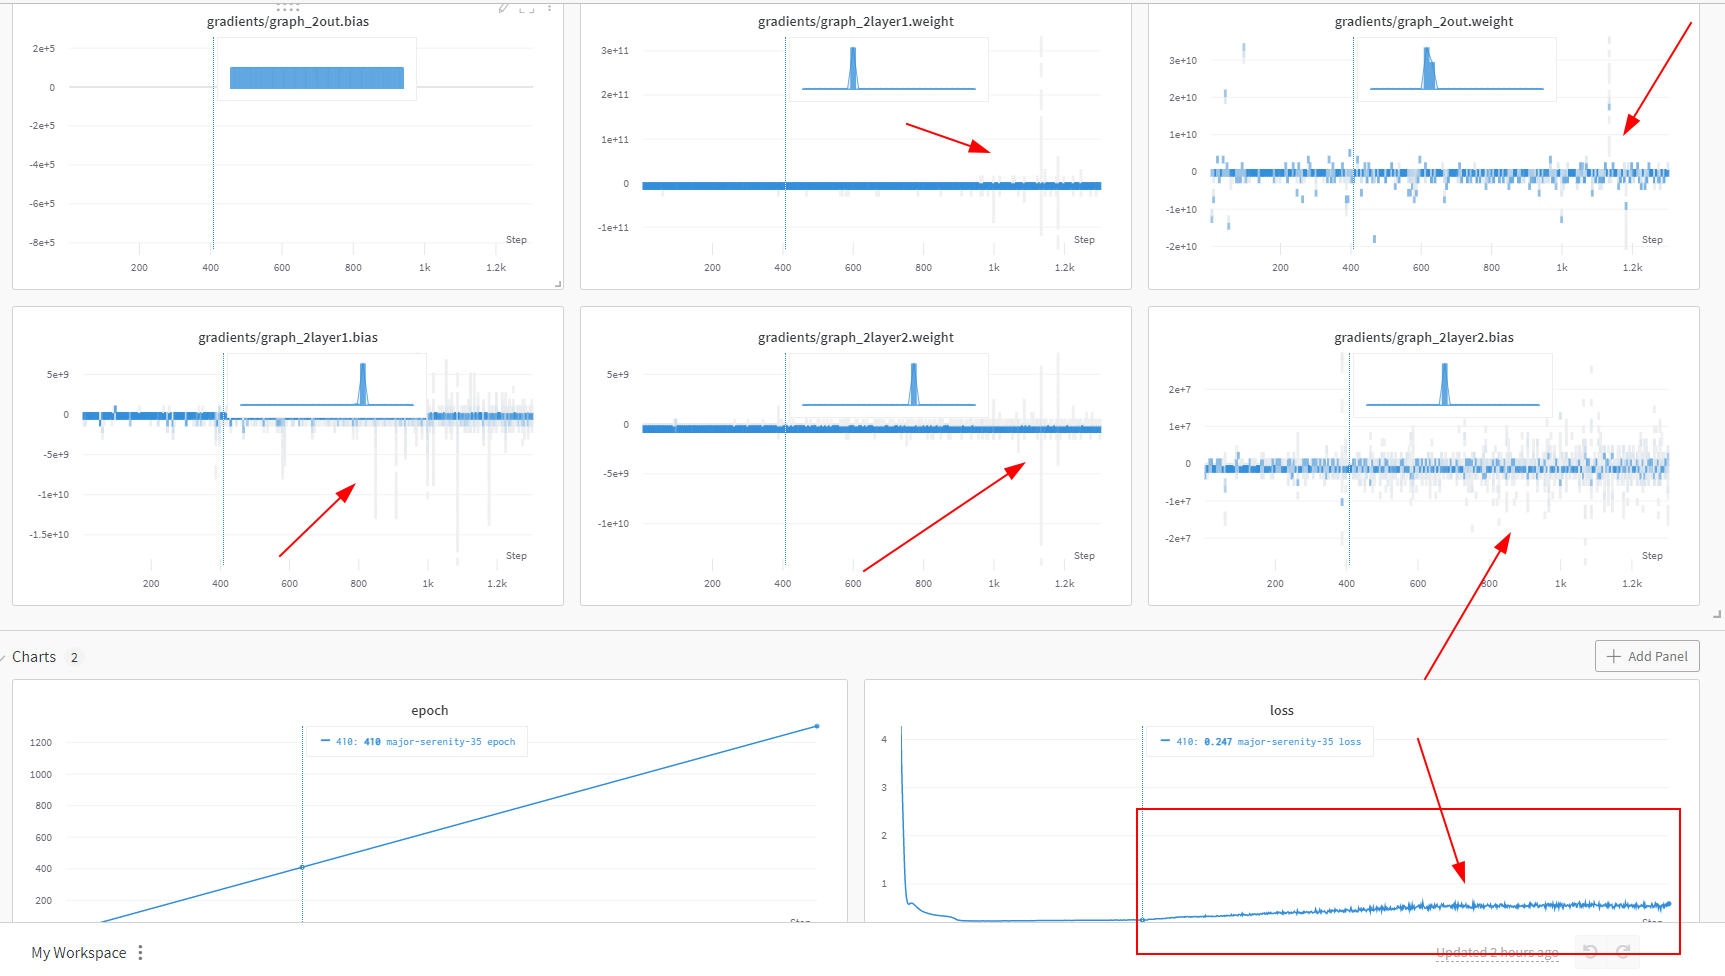
- 后面有遇到梯度爆炸情况,虽然有weight_decay 但是emm 好像哪里不太对
放张图感受一下 内心一起爆炸

提醒用了wandb 非常好用的一个好东西,这是最后比较好的结果,大概几分钟就训完了,大概就是上面那个爆炸前 因为我设了中间保存模型的点,大概是350处的模型进行评估的:

1. 模型
MLP简单版
import torch
import pandas as pd
import torch.nn as nn
from torch.nn import functional as F
from tqdm import tqdm
import numpy as np
from torch.utils import data
import wandb

class MLP(nn.Module):
    def __init__(self, in_features):
        super().__init__()
        self.layer1 = nn.Linear(in_features,256)
        self.layer2 = nn.Linear(256,64)
        self.out = nn.Linear(64,1)

    def forward(self, X):
        X = F.relu(self.layer1(X))
        X = F.relu(self.layer2(X))
        return self.out(X)
device = torch.device("cuda:0" if torch.cuda.is_available() else "cpu")
注意因为我大概看了我的in_features 最后470多 512不太合适 所以就256了
其他就是forward里面加relu,说实话我最近才意识到 原来激活函数是非线性化的,而relu是其中一个计算开销最小的激活函数。恕我之前都是 直接用就完事了 resnet yyds 😂
Loss选取
和ppt选的一样 但是自己看的时候以kaggle上面说的rmse来看的哈
criterion = nn.MSELoss()
def load_array(data_arrays, batch_size, is_train=True):  #@save
    """Construct a PyTorch data iterator."""
    dataset = data.TensorDataset(*data_arrays)
    return data.DataLoader(dataset, batch_size, shuffle=is_train)

def log_rmse(net, features, labels):
    # 为了在取对数时进一步稳定该值,将小于1的值设置为1
    clipped_preds = torch.clamp(net(features), 1, float('inf'))
    rmse = torch.sqrt(criterion(torch.log(clipped_preds),
                           torch.log(labels)))
    return rmse.item()
2. 数据处理
导入数据
test_data = pd.read_csv('test.csv')
train_data = pd.read_csv('train.csv')
print("train_data and test_data shape",train_data.shape,test_data.shape)
这一步没啥好讲的 emmm 就是这样 read_csv一下就行了
预处理
# 去掉冗余数据
redundant_cols = ['Address', 'Summary', 'City', 'State']
for c in redundant_cols:
    del test_data[c], train_data[c]

# 数据预处理
large_vel_cols = ['Lot', 'Total interior livable area', 'Tax assessed value', 'Annual tax amount', 'Listed Price', 'Last Sold Price']
for c in large_vel_cols:
    train_data[c] = np.log(train_data[c]+1)
    test_data[c] = np.log(test_data[c]+1)
预处理是因为有些数字比较大 所以需要取一下log进行数据处理,虽然我并没有对最终的Sold Price进行处理 因为好像试了一下效果不好?
# 查询数字列 ->缺失数据赋0 -> 归一化
numeric_features = all_features.dtypes[all_features.dtypes == 'float64'].index
all_features = all_features.fillna(method='bfill', axis=0).fillna(0)
all_features[numeric_features] = all_features[numeric_features].apply(lambda x: (x - x.mean()) / (x.std()))
首先在one-hot之前,我们需要看一下非数字的object都有哪些并且他们大概有多少个不同的类别:
for in_object in all_features.dtypes[all_features.dtypes=='object'].index:
    print(in_object.ljust(20),len(all_features[in_object].unique()))
输出为:
Type                 174
Heating              2660
Cooling              911
Parking              9913
Bedrooms             278
Region               1259
Elementary School    3568
Middle School        809
High School          922
Flooring             1740
Heating features     1763
Cooling features     596
Appliances included  11290
Laundry features     3031
Parking features     9695
所以呢,我大概就只选了前两个个
features = list(numeric_features)
# 加上类别数相对较少的Type
features.extend(['Type','Bedrooms'])
all_features = all_features[features]
one-hot
这样进入one-hot后的feature也不会让内存爆炸了,是的… 我一开始只顾着删除地址和summary,其他我以为都可以one-hot,直到看到参考的链接才发现噢 原来有这么多类型 emmm:
print('before one hot code',all_features.shape)
all_features = pd.get_dummies(all_features,dummy_na=True)
print('after one hot code',all_features.shape)

n_train = train_data.shape[0]
train_features = torch.tensor(all_features[:n_train].values, dtype=torch.float)
print('train feature shape:', train_features.shape)
test_features = torch.tensor(all_features[n_train:].values, dtype=torch.float)
print('test feature shape:', test_features.shape)
train_labels = torch.tensor(train_data['Sold Price'].values.reshape(-1, 1), dtype=torch.float)
print('train label shape:', train_labels.shape)
输出:
before one hot code (79065, 19)
after one hot code (79065, 470)
train feature shape: torch.Size([47439, 470])
test feature shape: torch.Size([31626, 470])
train label shape: torch.Size([47439, 1])
3. 训练步骤
train function
in_features = train_features.shape[1]
net = MLP(in_features).to(device)

def train(net, train_features, train_labels, test_features, test_labels,
          num_epochs, learning_rate, weight_decay, batch_size):
    wandb.watch(net)
    train_ls, test_ls = [], []
    train_iter = load_array((train_features, train_labels), batch_size)
    # 这里使用的是Adam优化算法
    optimizer = torch.optim.Adam(net.parameters(), lr = learning_rate, weight_decay = weight_decay)
    for epoch in tqdm(range(num_epochs)):
        for X, y in train_iter:
            X, y = X.to(device), y.to(device)
            optimizer.zero_grad()
            outputs = net(X)
            loss = criterion(outputs, y)
            loss.backward()
            optimizer.step()
        record_loss = log_rmse(net.to('cpu'), train_features, train_labels)
        wandb.log({'loss': record_loss,'epoch': epoch})
        train_ls.append(record_loss)
        if (epoch%NUM_SAVE==0 and epoch!=0) or (epoch==num_epochs-1):
            torch.save(net.state_dict(),'checkpoint_'+str(epoch))
            print('save checkpoints on:', epoch, 'rmse loss value is:', record_loss)
        del X, y
        net.to(device)
    wandb.finish()
    return train_ls, test_ls

# 初始化wandb 进行记录
num_epochs, lr, weight_decay, batch_size = 500, 0.005, 0.05, 256
wandb.init(project="kaggle_predict",
           config={ "learning_rate": lr,
                    "weight_decay": weight_decay,
                    "batch_size": batch_size,
                    "total_run": num_epochs,
                    "network": net_list}
          )
print("network:",net)
train
train_ls, valid_ls = train(net, train_features,train_labels,None,None, num_epochs, lr, weight_decay, batch_size)

# 使用现有训练好的net
net.to('cpu')
# 将网络应用于测试集。
preds = net(test_features).detach().numpy()

# 将其重新格式化以导出到Kaggle
test_data['Sold Price'] = pd.Series(preds.reshape(1, -1)[0])
submission = pd.concat([test_data['Id'], test_data['Sold Price']], axis=1)
submission.to_csv('submission.csv', index=False)
4. 结果

正如一开始的图那样,可以看到在400之前 一切都还挺正常,而直接使用 350处的模型文件进行predict,比如这样:就可以大概得到差不多的
# 读取网络参数应用于测试集
net = []
net = MLP(test_features.shape[1])
net.load_state_dict(torch.load('checkpoint_350'))
net.to('cpu')
preds = net(test_features).detach().numpy()
# 将其重新格式化以导出到Kaggle
test_data['Sold Price'] = pd.Series(preds.reshape(1, -1)[0])
submission = pd.concat([test_data['Id'], test_data['Sold Price']], axis=1)
submission.to_csv('submission.csv', index=False)
提交kaggle submission file后即:

碎碎念
虽然并没有超过… 沐神十行代码的 但是 我觉得是因为沐神用了AutoML 都不用调参,真就啥啥不需要,详情见:10行代码战胜90%数据科学家?_哔哩哔哩_bilibili
不过我感觉差不多就这样了 后面也MLP 也就是再多搞点特征进来,或者融一下transfomer进行解读文本信息等 emmm