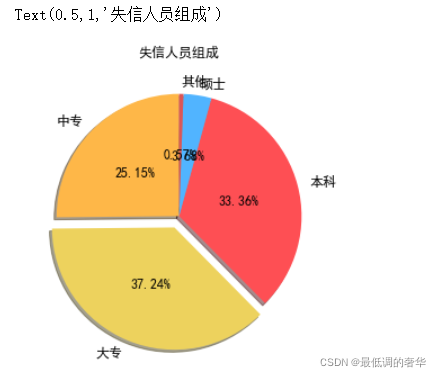
1.饼图
plt.rcParams['font.sans-serif'] = ['SimHei'] # 指定默认字体
# 设置绘画的主题风格
# plt.style.use('ggplot')
plt.figure(figsize=(10,5))
# 构造数据
edu = [0.2515,0.3724,0.3336,0.0368,0.0057]
labels = ['中专','大专','本科','硕士','其他']

explode = [0,0.1,0,0,0]  # 用于突出大专
colors=['#FEB748','#EDD25D','#FE4F54','#51B4FF','#dd5555'] # 自定义颜色

plt.axes(aspect='equal')  # 保证饼图是圆  不是默认的椭圆
plt.pie(x=edu,  # 数据
        labels=labels,   # 标签名称
        autopct='%.2f%%',  # 设置百分比格式  保留几位小数
        colors=colors,  # 使用自定义颜色
        radius = 1,   # 设置饼图半径
#         center = (80,80),  # 设置圆点
        labeldistance = 1.1, # 设置教育水平标签与圆心的距离
        startangle =90, # 设置饼图的初始角度  逆时针
        textprops = {'fontsize':12, 'color':'k'}, # 设置文本标签的属性值
        explode=explode, # 突出显示大专人群
        pctdistance=0.5,   # 占比和图距离
        shadow=True   # 阴影
       )
plt.title('失信人员组成')
2.直方图
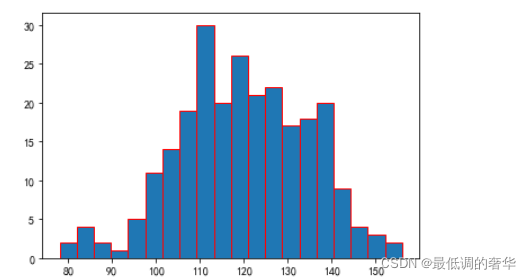
durations = [131,  98, 125, 131, 124, 139, 131, 117, 128, 108, 135, 138, 131, 102, 107, 114, 119, 128, 121, 142, 127, 130, 124, 101, 110, 116, 117, 110, 128, 128, 115,  99, 136, 126, 134,  95, 138, 117, 111,78, 132, 124, 113, 150, 110, 117,  86,  95, 144, 105, 126, 130,126, 130, 126, 116, 123, 106, 112, 138, 123,  86, 101,  99, 136,123, 117, 119, 105, 137, 123, 128, 125, 104, 109, 134, 125, 127,105, 120, 107, 129, 116, 108, 132, 103, 136, 118, 102, 120, 114,105, 115, 132, 145, 119, 121, 112, 139, 125, 138, 109, 132, 134,156, 106, 117, 127, 144, 139, 139, 119, 140,  83, 110, 102,123,107, 143, 115, 136, 118, 139, 123, 112, 118, 125, 109, 119, 133,112, 114, 122, 109, 106, 123, 116, 131, 127, 115, 118, 112, 135,115, 146, 137, 116, 103, 144,  83, 123, 111, 110, 111, 100, 154,136, 100, 118, 119, 133, 134, 106, 129, 126, 110, 111, 109, 141,120, 117, 106, 149, 122, 122, 110, 118, 127, 121, 114, 125, 126,114, 140, 103, 130, 141, 117, 106, 114, 121, 114, 133, 137,  92,121, 112, 146,  97, 137, 105,  98, 117, 112,  81,  97, 139, 113,134, 106, 144, 110, 137, 137, 111, 104, 117, 100, 111, 101, 110,105, 129, 137, 112, 120, 113, 133, 112,  83,  94, 146, 133, 101,131, 116, 111,  84, 137, 115, 122, 106, 144, 109, 123, 116, 111,111, 133, 150]
# plt.figure(figsize=(15,5))
# nums 每个区间值出现的个数
# bins 区间的值
# patches 每根柱子的对象
nums,bins,patches = plt.hist(durations,bins=20,edgecolor='r')
# plt.xticks(bins,bins)
# for num,bin in zip(nums,bins):
#     print(num,bin)
#     plt.annotate(num,xy=(bin,num),xytext=(bin+1.5,num+0.5))
# plt.xticks(bins,bins)
plt.show()
3.箱线图
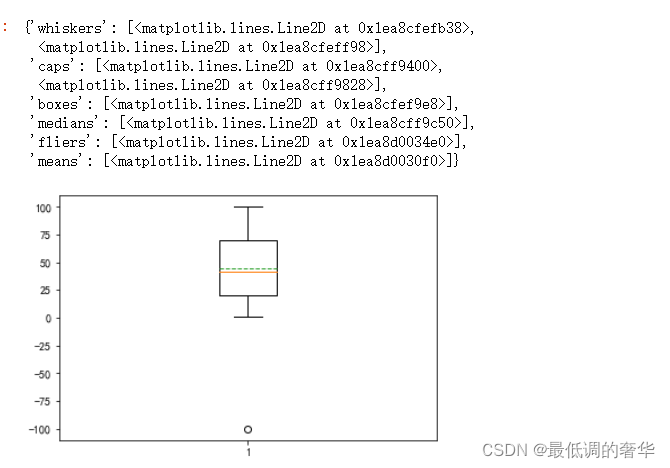
data = np.random.rand(100)*100
# print(data)
data = np.append(data,np.array([-100,100]))
print(data)
plt.boxplot(data,meanline=True,showmeans=True)
4.散点图
x = np.random.rand(20)
y = np.random.rand(20)
# 随机的大小
# s = (30*np.random.rand(10))**2
x1 = np.random.rand(10)
y1 = np.random.rand(10)
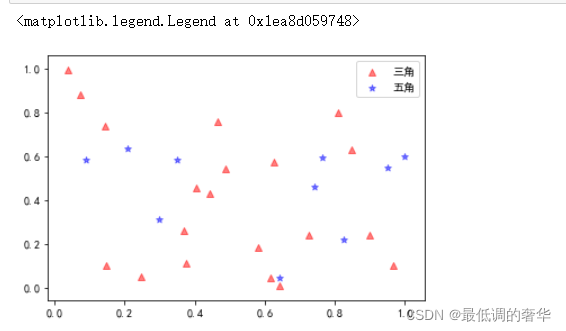
plt.scatter(x,y,alpha=0.5,marker='^',c='r',label="三角")
plt.scatter(x1,y1,alpha=0.5,marker='*',c='b',label="五角")
# 图例
plt.legend()
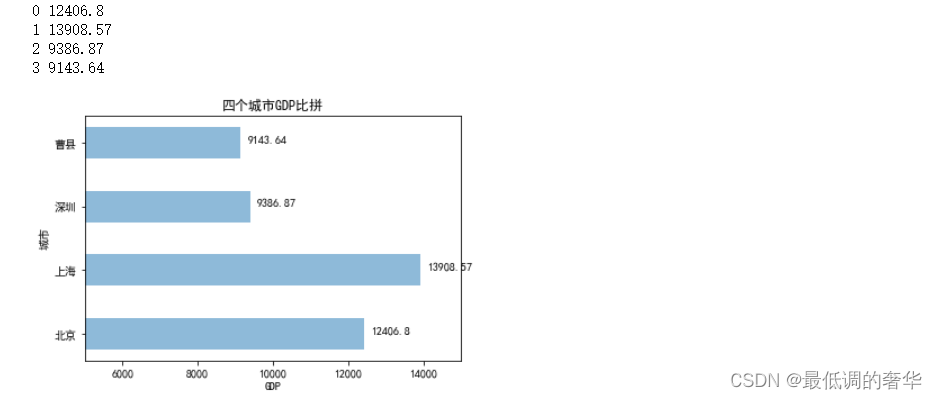
5.条形图
# 构造数据
GDP = [12406.8,13908.57,9386.87,9143.64]
# 绘图
plt.bar(range(4),GDP,width=0.5,alpha=0.5)
# 标签
plt.xlabel('城市')
plt.ylabel('GDP')

plt.title('四个城市GDP比拼')

# 刻度设置
plt.xticks(range(4),['北京','上海','深圳','曹县'])
# y刻度范围
plt.ylim([5000,15000])
# 为每个条形增加对应数据标签
for x,y in enumerate(GDP):
    print(x,y)
    plt.text(x,y+200,'%s'%(y),ha='center')

# 构造数据
GDP = [12406.8,13908.57,9386.87,9143.64]
# 绘图
plt.barh(range(4),GDP,height=0.5,alpha=0.5)
# 标签
plt.ylabel('城市')
plt.xlabel('GDP')

plt.title('四个城市GDP比拼')

# 刻度设置
plt.yticks(range(4),['北京','上海','深圳','曹县'])
# y刻度范围
plt.xlim([5000,15000])
# 为每个条形增加对应数据标签
for x,y in enumerate(GDP):
    print(x,y)
    plt.text(y+200,x,'%s'%(y))
6.注释图表
x = np.arange(0.0,5.0,0.01)
y = np.arange(0.0,5.0,0.01)
plt.plot(x,y)
plt.annotate('the max',xy=(5,5),xytext=(6,4),arrowprops=dict(facecolor='r',shrink=0.1))  # 0 - 1

# 风格设置
plt.style.use('seaborn-dark')
plt.figure(figsize=(20,8),dpi=80)  # 图表尺寸比例  dpi
x = np.linspace(0,20)
y = np.sin(x)
plt.plot(x,y,marker='o',markersize=-10)
plt.grid()

# 保存
plt.savefig('demo.png')
在这里插入图片描述