一、
image.shape 图片形状 为 [h, w, c] 高, 宽, 通道
img.shape图片取反思路:遍历图片,每一个像素都被255减,代码如下
    image = cv.imread('img.jpg')    #读取图片
    print(image.shape)              #查看图片形状
    hight = image.shape[0]          #提取图片的高度
    width = image.shape[1]          #提取图片的宽度
    channels = image.shape[2]       #提取图片的通道数量
    print("height : %s,width : %s,channels : %s"%(hight, width, channels))    # %s打印各个变量
    for row in range(hight):            #循环每个像素,像素很多,CPU反应慢"""
        for col in range(width):
            for c in  range(channels):
                pv = image[row, col, c]        #使用PV保存
                image[row, col, c] = 255-pv    #取反
    cv.imshow("pixels_demo", image)            #显示
这是一个很好的思路,但是这么做的话,取反几千张图片的时候CPU反应会很慢,所有opencv提供了一个取反的API,直接把图片放入即可,也可以添加mask(这里不举例了)
 dst = cv.bitwise_not(image)
    cv.imshow("pixels_demo", dst)
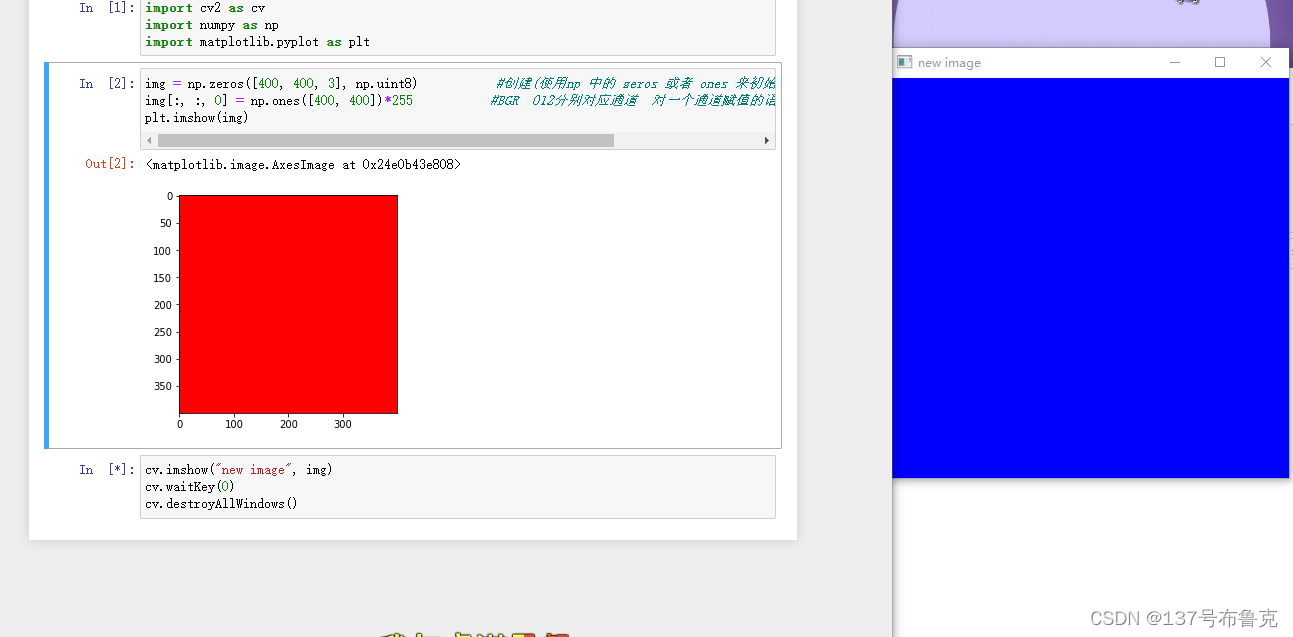
二、使用np创建图片,代码如下:
  img = np.zeros([400, 400, 3], np.uint8)  #创建高400 宽400 3通道,数据类型为 np.uint8图片
    img[:, :, 0] = np.ones([400, 400])*255     #给高400,宽400 通道0赋值255
    cv.imshow("new image", img)               #显示
注意:在cv中三通道排序为BGR,在plt中为RGB,请看演示(红色为plt所画的,蓝色为cv所显示的)
?
三、cv定时器:
cv.getTickCount()
t1 = cv.getTickCount()  #获取到目前为止的cpu时钟的总数,相当于程序运行到这的时间
creat_image()
t2 = cv.getTickCount()  #t2程序运行到这的时间
time = (t2-t1)/cv.getTickFrequency()
四、全部代码
#创建空白图像,定义数组,图片取反

import cv2 as cv
import numpy as np        #numpy为科学计数,数组,矩阵,计算等专用库

#定义宽高以及通道数目函数
def access_pixels(image):
    print(image.shape)
    hight = image.shape[0]
    width = image.shape[1]
    channels = image.shape[2]
    print("height : %s,width : %s,channels : %s"%(hight, width, channels))    # %s打印变量
    for row in range(hight):            #循环每个像素,像素很多,CPU反应慢"""
        for col in range(width):
            for c in  range(channels):
                pv = image[row, col, c]
                image[row, col, c] = 255-pv    #取反
    cv.imshow("pixels_demo", image)

def inverse(image):                #此函数功能和access_pixels一样,都是取反
    dst = cv.bitwise_not(image)
    cv.imshow("pixels_demo", dst)


def creat_image():
    """""
    img = np.zeros([400, 400, 3], np.uint8)           #创建(使用np 中的 zeros 或者 ones 来初始化)一张图片(数组)   多通道
    img[:, :, 0] = np.ones([400, 400])*255           #BGR  012分别对应通道  对一个通道赋值的语法
    cv.imshow("new image", img)

    img = np.zeros([400, 400, 1], np.uint8)         #创建单通道图片
    img[:, :, 0] = np.ones([400, 400])*50           #只能是通道0,50这个数值可修改
     cv.imshow("new image", img)
    #或者上面三句改为img = np.ones([400, 400, 1], np.uint8)
                 #img = img * 50

    cv.imwrite("D:/newpiture.png", img)
    """""
    m3 = np.array([[1, 2, 3], [4, 5, 6]], np.uint8)       #array定义了2行3列数组,可以用fill填充  不过最好使用ones与zeros定义数组
    m3.fill(9)
    print(m3)

    m1 = np.ones ([3, 3], np.float32)           #定义浮点型数组, 可定多种数据类型  np.ones[宽, 高, 通道]
    m1.fill(128.388)                         #fill 为填充给数组数据
    print(m1)

    m2 = m1.reshape([1, 9])
    print(m2)

img = cv.imread('1.jpg')
cv.imshow('img', img)
t1 = cv.getTickCount()  #获取到目前为止的cpu时钟的总数,相当于程序运行到这的时间
creat_image()
t2 = cv.getTickCount()  #t2程序运行到这的时间
time = (t2-t1)/cv.getTickFrequency()
print("time : %s  ms"%(time*1000))
cv.waitKey(0)

cv.destroyAllWindows()