图片增广(增强) image-augmentation
图像增强即通过一系列的随机变化生成大量“新的样本”,从而减低过拟合的可能。现在在深度卷积神经网络训练中,图像增强是必不可少的一部分。
常用增广方法
图像增广方法一般分为两类:一是对图片做变形,二是对图片做颜色变化
图像增广的一般方法的代码和实现见以下链接,我们不再阐述。
深度学习图像数据增广方法总结
下面我们实现两种图像增强的高级方法:Cutout、Mixup和CutMix。

Mixup方法
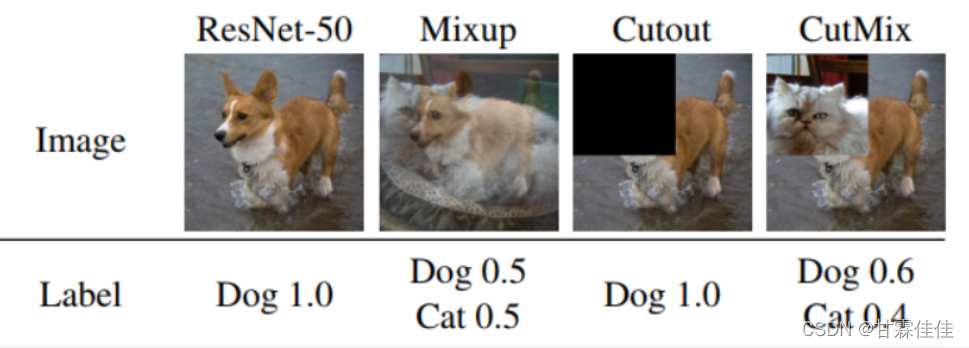
Mixup is 是一个普遍通用的数据增强原则。本质上,mixup训练神经网络的凸组合的例子和他们的标签。通过这样做,mixup正则化了神经网络,以支持训练示例之间的简单线性行为。
如图所示,Mixup将两个图像根据透明度混淆在一起,使得机器更好的学习。
代码实现
# mixup function
def mixup_data(x, y, alpha=1.0, use_cuda=True):
    '''Returns mixed inputs, pairs of targets, and lambda'''
    if alpha > 0:
        lam = np.random.beta(alpha, alpha) # bata分布随机数
    else:
        lam = 1

    batch_size = x.size()[0]
    if use_cuda:
        index = torch.randperm(batch_size).cuda() # 返回一个[0, batch_size-1]的随机数组
    else:
        index = torch.randperm(batch_size)

    mixed_x = lam * x + (1 - lam) * x[index, :]
    y_a, y_b = y, y[index]
    return mixed_x, y_a, y_b, lam
Cutout方法
Cutout是一种简单的卷积神经网络正则化方法,它包括在训练过程中屏蔽输入图像的随机部分。这种技术模拟闭塞的例子,鼓励模型在做决策时考虑更多次要的特性,而不是依赖于几个主要特性的存在。
如图所示,Cutout方法是随机选取图像上一个或者多个正方形区域将其抠除。
代码实现
import torch
import numpy as np
class Cutout(object):
    """Randomly mask out one or more patches from an image.
    #
    Args:
        n_holes (int): Number of patches to cut out of each image.
        length (int): The length (in pixels) of each square patch.
    """
    def __init__(self, n_holes, length):
        self.n_holes = n_holes
        self.length = length

    def __call__(self, img):
        """
        Args:
            img (Tensor): Tensor image of size (C, H, W).
        Returns:
            Tensor: Image with n_holes of dimension length x length cut out of it.
        """
        h = img.size(1) #32图片的高
        w = img.size(2) #32图片的宽

        mask = np.ones((h, w), np.float32) #32*32w*h的全1矩阵

        for n in range(self.n_holes): #n_holes=2,length=4 选择2个区域;每个区域的边长为4
            y = np.random.randint(h) #0~31随机选择一个数 y=4
            x = np.random.randint(w) #0~31随机选择一个数 x=24

            y1 = np.clip(y - self.length // 2, 0, h) #2,0,32 ->2
            y2 = np.clip(y + self.length // 2, 0, h) #6,0,32 ->6
            x1 = np.clip(x - self.length // 2, 0, w) #24-2,0,32 ->22
            x2 = np.clip(x + self.length // 2, 0, w) #24+2,0,32 ->26

            mask[y1: y2, x1: x2] = 0. #将这一小块区域去除

        mask = torch.from_numpy(mask)
        mask = mask.expand_as(img)
        # expand_as()函数与expand()函数类似,功能都是用来扩展张量中某维数据的尺寸,区别是它括号内的输入参数是另一个张量,作用是将输入tensor的维度扩展为与指定tensor相同的size。
        img = img * mask
        return img
帮助理解代码的链接:
python中numpy模块下的np.clip()的用法
pytorch中的expand()和expand_as()函数
CutMix
CutMix的所选取的正方形区域在训练图像之间剪切和粘贴,真实标签值也按patches的面积比例混合。通过有效利用训练像素,并保留区域dropout的正则化效果,CutMix在CIFAR分类任务上的表现始终优于最先进的增强策略。
代码实现
def rand_bbox(size, lam):
    W = size[2]
    H = size[3]
    cut_rat = np.sqrt(1. - lam)
    cut_w = np.int(W * cut_rat)
    cut_h = np.int(H * cut_rat)

    # uniform
    cx = np.random.randint(W)
    cy = np.random.randint(H)

    bbx1 = np.clip(cx - cut_w // 2, 0, W)
    bby1 = np.clip(cy - cut_h // 2, 0, H)
    bbx2 = np.clip(cx + cut_w // 2, 0, W)
    bby2 = np.clip(cy + cut_h // 2, 0, H)

    return bbx1, bby1, bbx2, bby2
# generate mixed sample
lam = np.random.beta(args.beta, args.beta)
rand_index = torch.randperm(images.size()[0]).cuda()
labels_a = labels
labels_b = labels[rand_index]
bbx1, bby1, bbx2, bby2 = rand_bbox(images.size(), lam)
images[:, :, bbx1:bbx2, bby1:bby2] = images[rand_index, :, bbx1:bbx2, bby1:bby2]
# adjust lambda to exactly match pixel ratio
lam = 1 - ((bbx2 - bbx1) * (bby2 - bby1) / (images.size()[-1] * images.size()[-2]))