BAM: Bottleneck Attention Module
Given a 3D feature map, BAM produces a 3D attention feature map to emphasize important elements.
We place our module at each bottleneck of models where the downsampling of feature maps occurs.
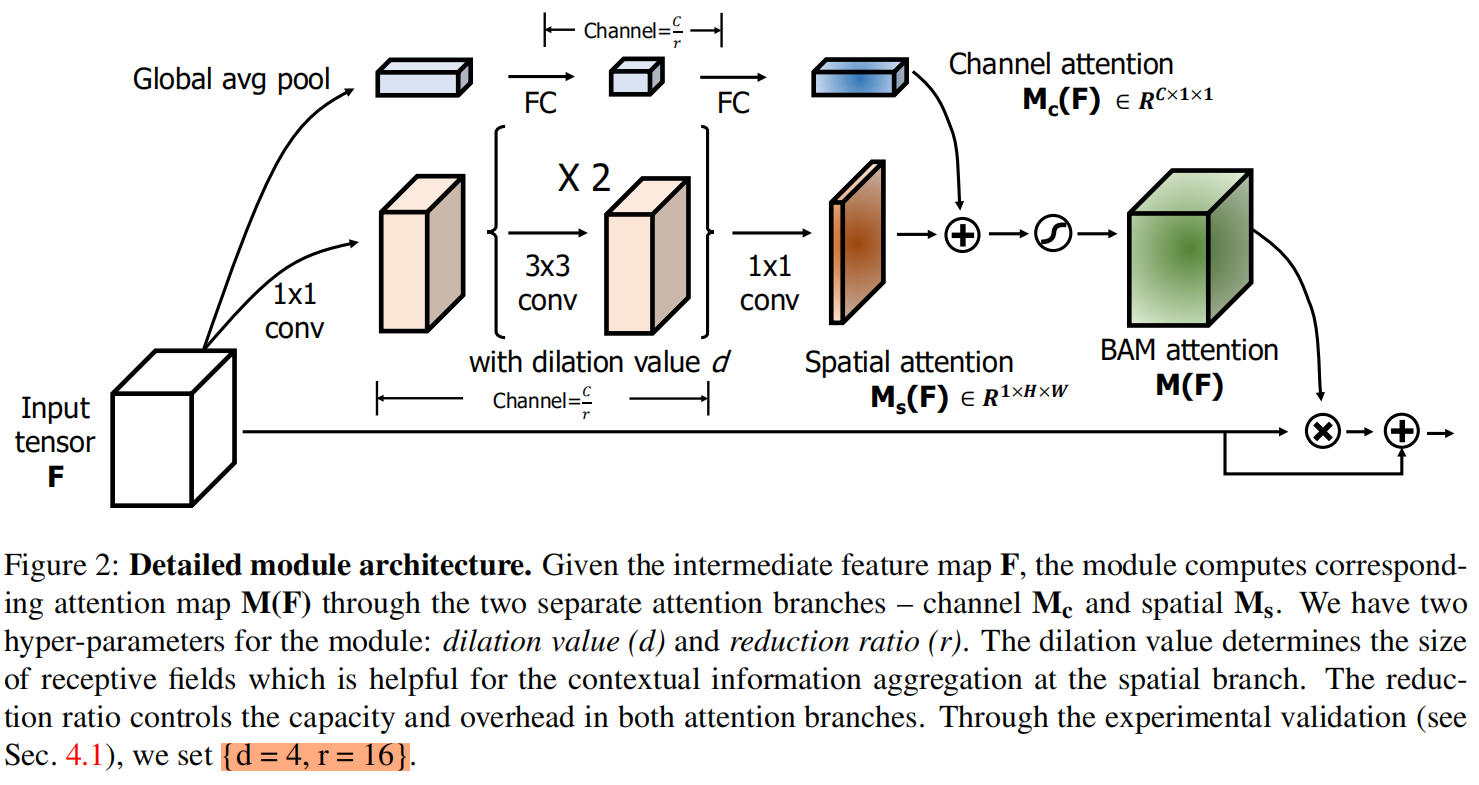 给定输入特征图
,BAM得到一个3D attention map?
,经过改进后的特征图
通过下式得到
![]()
其中表示element-wise mulplication。首先通过两个不同的分支分别计算通道注意力
和空间注意力
,然后通过下式计算最终的attention map?
![]()
其中是sigmoid函数。注意,两个分支的输出需要先resize成
,然后再进行相加。
通道分支的计算方法
对于输入特征图,首先是通过全局平均池化得到向量
,文中提到:"This vector softly encodes global information in each channel?"。然后接含一层隐藏层的MLP,即两层全连接层,为了减少额外的参数开销,隐藏层的size设置为
,r是reduction ratio,第二个FC再还原回去,这里和SElayer是一样的操作。最后再接一个BN层。
空间分支的计算方法
![]()
空间分支得到一个spatial attention map??to emphasize or suppress features in different spatial locations. 具体步骤为:input feature map?
,首先经过1×1卷积映射到一个低维空间
,这里的r和通道分支的相同;然后经过两层3×3卷积,注意为了增大感受野这里的3×3卷积采用了膨胀卷积dilated convolution;然后再使用1×1卷积映射到
;最后再接一个BN层。
合并两个分支的结果
然后需要融合两个分支的结果,在融合之前需要先将两个分支的结果都expand成,这里融合采用的是element-wise summation,然后接sigmoid函数得到最终的attention map
。然后将
与输入
进行element-wise mulplication,再与
相加就得到了最终结果refined feature map?
。这里借鉴了residual的shortcut结构。
CIFAR-100消融实验
Dilation value and Reduction ratio
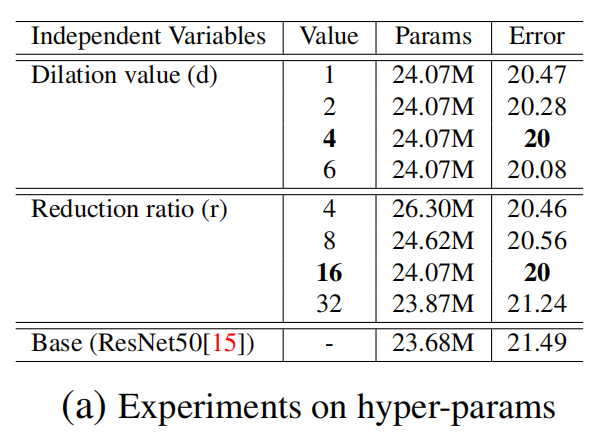
论文最终采用dilation value=4, reduction value=16的配置。
Separate or Combined branches
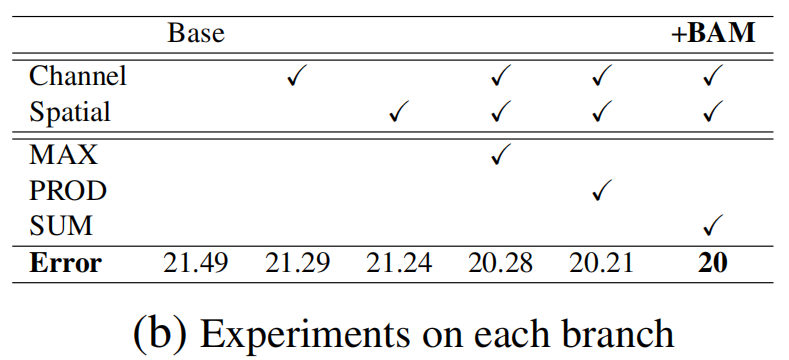
虽然channel和spatial分支都可以提升模型的效果,但结合起来后效果的提升幅度更大。
Combining methods
同样是表(b)中的结果,可以看到,sum的效果最好
Comparison with placing orginal convblocks
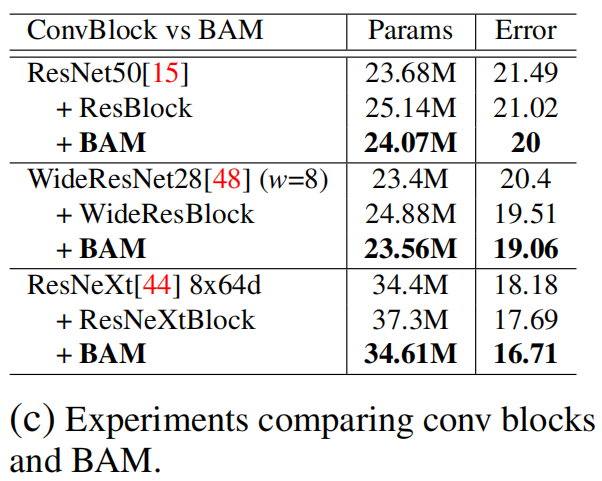
作者为了证明BAM带来的效果提升并不是添加了额外的层导致模型更深的作用,因此作者把添加的BAM换成模型原本的block,然后比较两者的效果,从表中结果可以看出,BAM的效果更好。因此得到结论:BAM带来的效果提升并不是因为模型深度的增加,而是BAM本身的结构和注意力机制带来的。
Bottleneck: The efficient point to place BAM
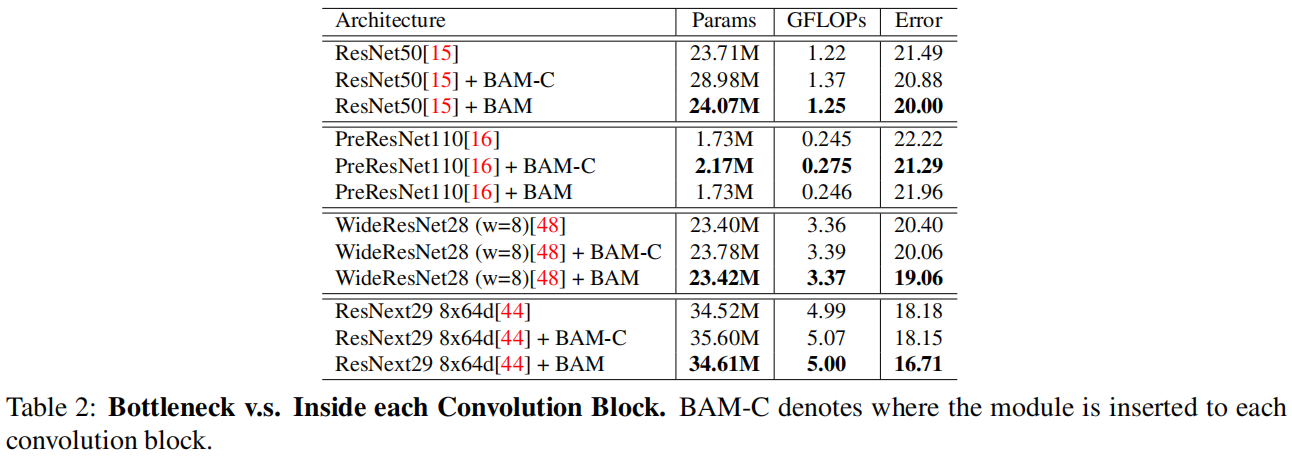
这个实验比较了放置BAM的不同位置,bottlenecks or convolution blocks,结果证明,将BAM放在bottleneck位置可以带来更好的效果并且更少的参数。
官方代码
import torch
import torch.nn as nn
import torch.nn.functional as F


class Flatten(nn.Module):
    def forward(self, x):
        return x.view(x.size(0), -1)


class ChannelGate(nn.Module):
    def __init__(self, gate_channel, reduction_ratio=16):
        super(ChannelGate, self).__init__()
        self.gate_c = nn.Sequential()
        self.gate_c.add_module('flatten', Flatten())

        self.gate_c.add_module('gate_c_fc_0', nn.Linear(gate_channel, gate_channel // reduction_ratio))
        self.gate_c.add_module('gate_c_bn_1', nn.BatchNorm1d(gate_channel // reduction_ratio))
        self.gate_c.add_module('gate_c_relu_1', nn.ReLU())
        self.gate_c.add_module('gate_c_fc_final', nn.Linear(gate_channel // reduction_ratio, gate_channel))

    def forward(self, in_tensor):
        avg_pool = F.avg_pool2d(in_tensor, in_tensor.size(2), stride=in_tensor.size(2))
        return self.gate_c(avg_pool).unsqueeze(2).unsqueeze(3).expand_as(in_tensor)


class SpatialGate(nn.Module):
    def __init__(self, gate_channel, reduction_ratio=16, dilation_conv_num=2, dilation_val=4):
        super(SpatialGate, self).__init__()
        self.gate_s = nn.Sequential()
        self.gate_s.add_module('gate_s_conv_reduce0',
                               nn.Conv2d(gate_channel, gate_channel // reduction_ratio, kernel_size=1))
        self.gate_s.add_module('gate_s_bn_reduce0', nn.BatchNorm2d(gate_channel // reduction_ratio))
        self.gate_s.add_module('gate_s_relu_reduce0', nn.ReLU())
        for i in range(dilation_conv_num):
            self.gate_s.add_module('gate_s_conv_di_%d' % i,
                                   nn.Conv2d(gate_channel // reduction_ratio,
                                             gate_channel // reduction_ratio,
                                             kernel_size=3,
                                             padding=dilation_val,
                                             dilation=dilation_val))
            self.gate_s.add_module('gate_s_bn_di_%d' % i, nn.BatchNorm2d(gate_channel // reduction_ratio))
            self.gate_s.add_module('gate_s_relu_di_%d' % i, nn.ReLU())
        self.gate_s.add_module('gate_s_conv_final', nn.Conv2d(gate_channel // reduction_ratio, 1, kernel_size=1))

    def forward(self, in_tensor):
        return self.gate_s(in_tensor).expand_as(in_tensor)


class BAM(nn.Module):
    def __init__(self, gate_channel):
        super(BAM, self).__init__()
        self.channel_att = ChannelGate(gate_channel)
        self.spatial_att = SpatialGate(gate_channel)

    def forward(self, in_tensor):
        att = 1 + F.sigmoid(self.channel_att(in_tensor) * self.spatial_att(in_tensor))
        return att * in_tensor
注意论文中是在每个分支的最终输出加上BN,而在代码中是中间的每一层卷积或是全连接层后都添加BN+ReLU,而最后一层BN和ReLU都不加。