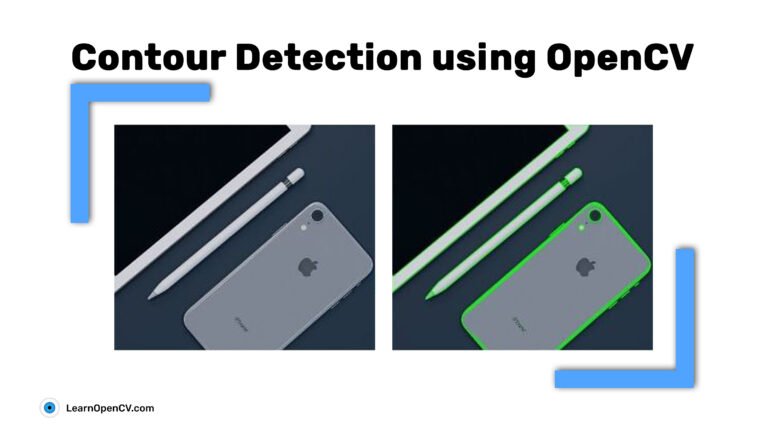
利用轮廓检测,我们可以检测出目标的边界,并容易地定位。它通常是许多有趣应用,如图像前景提取,简单图像分割,检测和识别。
轮廓线在计算机视觉中的应用
一些非常酷的应用程序已经建立,使用轮廓进行运动检测或分割。下面是一些例子:
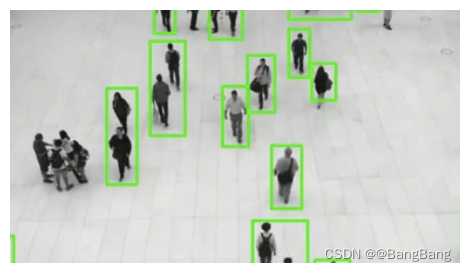
- 运动检测: 在监控视频中,运动检测技术的应用非常广泛,包括室内外安全环境、交通控制、体育活动中的行为检测、无人值守物体检测,甚至视频压缩等。在下面的图中,可以看到在视频流中检测人的运动在监控应用程序中是如何有用的。注意,静止在图像左侧的一组人是如何不被检测到的。只有行动中的人才会被抓住。请参阅本文详细研究这一方法。
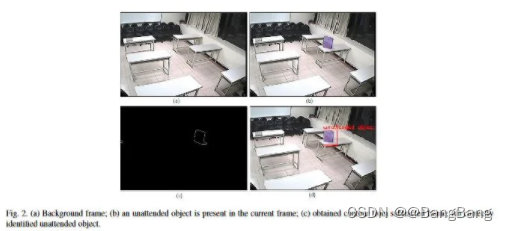
- 无人值守的物体检测: 公共场所任何无人值守的物体一般都被认为是可疑物体。一种有效且安全的方法是:(利用背景减法进行轮廓形成的无人值机目标检测)。
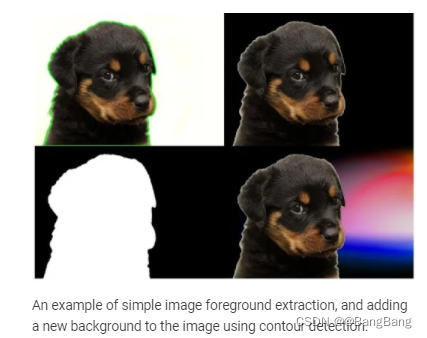
- 背景/前景分割:要将一幅图像的背景替换为另一幅图像,需要进行图像-前景提取(类似于图像分割)。轮廓检测是一种可以用来执行分割的方法。更多细节请参考这篇文章。下面的图片展示了这样一个应用程序的简单示例
轮廓是什么?
当我们把物体边界上的所有点连接起来时,就得到了一条轮廓线。通常,特定的轮廓是指具有相同颜色和强度的边界像素。OpenCV使得在图像中查找和绘制轮廓非常容易。它提供了两个简单的函数
- 1.findContours()
- 2.drawContours()
轮廓检测有两种不同的算法:
- 1.CHAIN_APPROX_SIMPLE
- 2.CHAIN_APPROX_NONE
我们将在下面的例子中详细讨论这些问题。下图展示了这些算法如何检测简单物体的轮廓。

OpenCV中轮廓检测和绘制的步骤
OpenCV使这成为一个相当简单的任务。只需遵循以下步骤:
1.读取图像并将其转换为灰度格式
读取图像并将图像转换为灰度格式。将图像转换为灰度是非常重要的,因为它为下一步的图像做准备。将图像转换为单通道灰度图像对于阈值化至关重要,而阈值化又对轮廓检测算法的正常工作至关重要。
2. 应用二值阈值
在寻找轮廓时,首先要对灰度图像进行二值阈值或Canny边缘检测。这里,我们将应用二进制阈值。
这将图像转换为黑白,突出感兴趣的物体,使轮廓检测算法更容易。阈值化使图像中对象的边界完全变成白色,所有像素具有相同的强度。该算法现在可以从这些白色像素中检测出物体的边界。
注:黑色像素值为0,被视为背景像素而忽略。
在这一点上,一个问题可能会出现。如果我们使用像R(红色)、G(绿色)或B(蓝色)这样的单一通道,而不是灰度(阈值)图像呢?在这种情况下,轮廓检测算法将不能很好地工作。正如我们之前讨论过的,该算法寻找边界和相似强度的像素来检测轮廓。二值图像比单一(RGB)彩色通道图像更能提供这种信息。在本博客的后面部分中,我们将得到仅使用单个图像的结果图像
3. 查找轮廓
使用findContours()函数检测图像中的轮廓
4. 在原始的RGB图像上绘制轮廓
一旦轮廓被确定,使用drawContours()函数将轮廓覆盖在原始RGB图像上。
使用OpenCV检测和绘制轮廓
首先导入OpenCV,然后读取输入的图像。
Python
import cv2

# read the image
image = cv2.imread('input/image_1.jpg')
C++
#include<opencv2/opencv.hpp>
#include <iostream>

using namespace std;
using namespace cv;

int main() {
   // read the image
   Mat image = imread("input/image_1.jpg");
接下来,使用cvtColor()函数将原始的RGB图像转换为灰度图像。
Python
# convert the image to grayscale format
img_gray = cv2.cvtColor(image, cv2.COLOR_BGR2GRAY)
C++
// convert the image to grayscale format
Mat img_gray;
cvtColor(image, img_gray, COLOR_BGR2GRAY);
现在,使用threshold()函数对图像应用二值化阈值。任何值大于150的像素将被设置为255(白色)。图像中的所有剩余像素将被设置为0(黑色)。阈值150是一个可调参数,因此您可以使用它进行试验。
Python
# apply binary thresholding
ret, thresh = cv2.threshold(img_gray, 150, 255, cv2.THRESH_BINARY)
# visualize the binary image
cv2.imshow('Binary image', thresh)
cv2.waitKey(0)
cv2.imwrite('image_thres1.jpg', thresh)
cv2.destroyAllWindows()
C++
// apply binary thresholding
Mat thresh;
threshold(img_gray, thresh, 150, 255, THRESH_BINARY);
imshow("Binary mage", thresh);
waitKey(0);
imwrite("image_thres1.jpg", thresh);
destroyAllWindows();
看看下面的图片!它是原始RGB图像的二进制表示。你可以清楚地看到笔、平板电脑和手机的边框都是白色的。轮廓算法将这些作为目标,并找到这些白色物体边界周围的轮廓点。
请注意,背景是完全黑色的,包括手机的背面。这样的区域会被算法忽略。该算法将每个物体周围的白色像素作为相似度像素,根据相似度度量将它们连接起来形成轮廓。

使用CHAIN_APPROX_NONE绘制轮廓
现在,让我们找到并绘制轮廓,使用CHAIN_APPROX_NONE方法。
从findContours()函数开始。它有三个必需的参数,如下所示。关于可选参数,请参考此处的文档页。
- image:上一步得到的二进输入图像。
- mode::这是轮廓检索模式。我们使用
RETR_TREE模式,这意味着算法将从二值图像中检索所有可能的轮廓。更多的轮廓检索模式是可用的,我们也将讨论它们。您可以在这里了解这些选项的更多细节。 - method:定义了等值线近似方法。在这个例子中,我们将使用CHAIN_APPROX_NONE。虽然略慢于CHAIN_APPROX_SIMPLE,我们将使用这个方法来存储所有的轮廓点。
这里值得强调的是,mode是指要检索的轮廓类型,method是指在轮廓中存储的点。我们将在下面更详细地讨论这两个问题。
在同一幅图像上,很容易看到和理解不同方法得到的结果。
接下来,使用drawContours()函数覆盖RGB图像上的轮廓。这个函数有四个必需参数和几个可选参数。下面的前四个参数是必需的。关于可选参数,请参考此处的文档页。
- image:这是你想要绘制轮廓的输入RGB图像。
- contours:表示从findContours()函数获得的轮廓。
- contourIdx: 需要绘制的轮廓id号。使用此参数,您可以指定该轮廓列表的索引位置,确切地指出要绘制的等高线点。提供一个负值将画出所有的等高线点。
- color:表示要绘制的等高线点的颜色。我们用绿色表示这些点。
- thickness: 这是轮廓点的厚度。
Python
# detect the contours on the binary image using cv2.CHAIN_APPROX_NONE
contours, hierarchy = cv2.findContours(image=thresh, mode=cv2.RETR_TREE, method=cv2.CHAIN_APPROX_NONE)

# draw contours on the original image
image_copy = image.copy()
cv2.drawContours(image=image_copy, contours=contours, contourIdx=-1, color=(0, 255, 0), thickness=2, lineType=cv2.LINE_AA)

# see the results
cv2.imshow('None approximation', image_copy)
cv2.waitKey(0)
cv2.imwrite('contours_none_image1.jpg', image_copy)
cv2.destroyAllWindows()
C++
// detect the contours on the binary image using cv2.CHAIN_APPROX_NONE
vector<vector<Point>> contours;
vector<Vec4i> hierarchy;
findContours(thresh, contours, hierarchy, RETR_TREE, CHAIN_APPROX_NONE);
// draw contours on the original image
Mat image_copy = image.clone();
drawContours(image_copy, contours, -1, Scalar(0, 255, 0), 2);
imshow("None approximation", image_copy);
waitKey(0);
imwrite("contours_none_image1.jpg", image_copy);
destroyAllWindows();
执行上述代码将生成并显示如下所示的图像。我们还将映像保存到磁盘。

下图显示了原始图像(左侧),以及原始图像的轮廓覆盖(右侧)。

正如你在上图中看到的,由算法产生的轮廓在识别每个物体的边界方面做得很好。然而,如果你仔细看手机,你会发现它包含不止一个轮廓。与相机镜头和光线相关的圆形区域已经确定了单独的轮廓。还有“次要”轮廓,沿着手机边缘的部分。
请记住,轮廓算法的准确性和质量在很大程度上依赖于所提供的二值图像的质量。一些应用需要高质量的轮廓。在这种情况下,在创建二值图像时,可以尝试使用不同的阈值,看看这样是否能改善生成的轮廓。
在轮廓生成之前,还有其他方法可以用来消除二进制图中不需要的轮廓。你也可以使用与轮廓算法相关的更高级的特征,我们将在这里讨论。
使用单通道:红色、绿色或蓝色
Python
import cv2

# read the image
image = cv2.imread('input/image_1.jpg')

# B, G, R channel splitting
blue, green, red = cv2.split(image)

# detect contours using blue channel and without thresholding
contours1, hierarchy1 = cv2.findContours(image=blue, mode=cv2.RETR_TREE, method=cv2.CHAIN_APPROX_NONE)

# draw contours on the original image
image_contour_blue = image.copy()
cv2.drawContours(image=image_contour_blue, contours=contours1, contourIdx=-1, color=(0, 255, 0), thickness=2, lineType=cv2.LINE_AA)
# see the results
cv2.imshow('Contour detection using blue channels only', image_contour_blue)
cv2.waitKey(0)
cv2.imwrite('blue_channel.jpg', image_contour_blue)
cv2.destroyAllWindows()

# detect contours using green channel and without thresholding
contours2, hierarchy2 = cv2.findContours(image=green, mode=cv2.RETR_TREE, method=cv2.CHAIN_APPROX_NONE)
# draw contours on the original image
image_contour_green = image.copy()
cv2.drawContours(image=image_contour_green, contours=contours2, contourIdx=-1, color=(0, 255, 0), thickness=2, lineType=cv2.LINE_AA)
# see the results
cv2.imshow('Contour detection using green channels only', image_contour_green)
cv2.waitKey(0)
cv2.imwrite('green_channel.jpg', image_contour_green)
cv2.destroyAllWindows()

# detect contours using red channel and without thresholding
contours3, hierarchy3 = cv2.findContours(image=red, mode=cv2.RETR_TREE, method=cv2.CHAIN_APPROX_NONE)
# draw contours on the original image
image_contour_red = image.copy()
cv2.drawContours(image=image_contour_red, contours=contours3, contourIdx=-1, color=(0, 255, 0), thickness=2, lineType=cv2.LINE_AA)
# see the results
cv2.imshow('Contour detection using red channels only', image_contour_red)
cv2.waitKey(0)
cv2.imwrite('red_channel.jpg', image_contour_red)
cv2.destroyAllWindows()
C++
#include<opencv2/opencv.hpp>
#include <iostream>

using namespace std;
using namespace cv;

int main() {
   // read the image
   Mat image = imread("input/image_1.jpg");

   // B, G, R channel splitting
   Mat channels[3];
   split(image, channels);

   // detect contours using blue channel and without thresholding
   vector<vector<Point>> contours1;
   vector<Vec4i> hierarchy1;
   findContours(channels[0], contours1, hierarchy1, RETR_TREE, CHAIN_APPROX_NONE);
   // draw contours on the original image
   Mat image_contour_blue = image.clone();
   drawContours(image_contour_blue, contours1, -1, Scalar(0, 255, 0), 2);
   imshow("Contour detection using blue channels only", image_contour_blue);
   waitKey(0);
   imwrite("blue_channel.jpg", image_contour_blue);
   destroyAllWindows();

   // detect contours using green channel and without thresholding
   vector<vector<Point>> contours2;
   vector<Vec4i> hierarchy2;
   findContours(channels[1], contours2, hierarchy2, RETR_TREE, CHAIN_APPROX_NONE);
   // draw contours on the original image
   Mat image_contour_green = image.clone();
   drawContours(image_contour_green, contours2, -1, Scalar(0, 255, 0), 2);
   imshow("Contour detection using green channels only", image_contour_green);
   waitKey(0);
   imwrite("green_channel.jpg", image_contour_green);
   destroyAllWindows();

   // detect contours using red channel and without thresholding
   vector<vector<Point>> contours3;
   vector<Vec4i> hierarchy3;
   findContours(channels[2], contours3, hierarchy3, RETR_TREE, CHAIN_APPROX_NONE);
   // draw contours on the original image
   Mat image_contour_red = image.clone();
   drawContours(image_contour_red, contours3, -1, Scalar(0, 255, 0), 2);
   imshow("Contour detection using red channels only", image_contour_red);
   waitKey(0);
   imwrite("red_channel.jpg", image_contour_red);
   destroyAllWindows();
}
下图显示了三个独立颜色通道的轮廓检测结果。

廓检测结果时采用蓝、绿、红单通道代替灰度、阈值图像。
在上面的图像中,我们可以看到轮廓检测算法不能正确地找到轮廓。这是因为它不能正确地检测对象的边界,像素之间的强度差也没有很好地定义。这就是为什么我们更喜欢使用灰度和二值阈值图像来检测轮廓。
使用CHAIN_APPROX_SIMPLE绘制轮廓
现在让我们来看看CHAIN_APPROX_SIMPLE算法是如何工作的,以及它与CHAIN_APPROX_NONE算法的不同之处。
下面是它的代码:
Python:
"""
Now let's try with `cv2.CHAIN_APPROX_SIMPLE`
"""
# detect the contours on the binary image using cv2.ChAIN_APPROX_SIMPLE
contours1, hierarchy1 = cv2.findContours(thresh, cv2.RETR_TREE, cv2.CHAIN_APPROX_SIMPLE)
# draw contours on the original image for `CHAIN_APPROX_SIMPLE`
image_copy1 = image.copy()
cv2.drawContours(image_copy1, contours1, -1, (0, 255, 0), 2, cv2.LINE_AA)
# see the results
cv2.imshow('Simple approximation', image_copy1)
cv2.waitKey(0)
cv2.imwrite('contours_simple_image1.jpg', image_copy1)
cv2.destroyAllWindows()
C++:
// Now let us try with CHAIN_APPROX_SIMPLE`
// detect the contours on the binary image using cv2.CHAIN_APPROX_NONE
vector<vector<Point>> contours1;
vector<Vec4i> hierarchy1;
findContours(thresh, contours1, hierarchy1, RETR_TREE, CHAIN_APPROX_SIMPLE);
// draw contours on the original image
Mat image_copy1 = image.clone();
drawContours(image_copy1, contours1, -1, Scalar(0, 255, 0), 2);
imshow("Simple approximation", image_copy1);
waitKey(0);
imwrite("contours_simple_image1.jpg", image_copy1);
destroyAllWindows();
这里唯一的区别是,我们将findContours()的方法指定为CHAIN_APPROX_SIMPLE而不是CHAIN_APPROX_NONE。
CHAIN_APPROX_SIMPLE算法沿着轮廓压缩水平、垂直和对角线段,只留下它们的端点。这意味着沿着直线路径的任何点都将被忽略,只剩下端点。例如,考虑一条沿矩形的轮廓线。除四个角点外的所有等高线点将被消去。这个方法比CHAIN_APPROX_NONE更快,因为算法不存储所有的点,使用更少的内存,因此执行时间更短。
下图显示了结果。

如果仔细观察,CHAIN_APPROX_NONE和CHAIN_APPROX_SIMPLE的输出几乎没有区别。
为什么呢?
尽管CHAIN_APPROX_SIMPLE方法通常会得到更少的点,drawContours()函数会自动连接相邻的点,即使它们不在contours列表中也会连接它们。
那么,我们如何确认CHAIN_APPROX_SIMPLE算法实际上在工作呢?
最直接的方法是手动遍历轮廓点,并使用OpenCV在检测到的轮廓坐标上画一个圆。
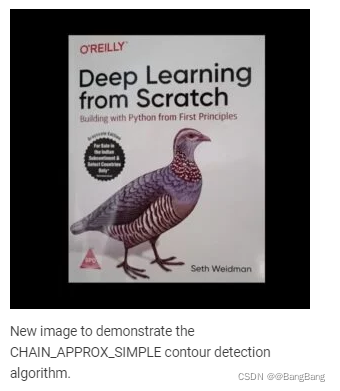
另外,我们使用了一个不同的图像,这将帮助我们可视化算法的结果。
Python:
# to actually visualize the effect of `CHAIN_APPROX_SIMPLE`, we need a proper image
image1 = cv2.imread('input/image_2.jpg')
img_gray1 = cv2.cvtColor(image1, cv2.COLOR_BGR2GRAY)

ret, thresh1 = cv2.threshold(img_gray1, 150, 255, cv2.THRESH_BINARY)
contours2, hierarchy2 = cv2.findContours(thresh1, cv2.RETR_TREE,
                                               cv2.CHAIN_APPROX_SIMPLE)
image_copy2 = image1.copy()
cv2.drawContours(image_copy2, contours2, -1, (0, 255, 0), 2, cv2.LINE_AA)
cv2.imshow('SIMPLE Approximation contours', image_copy2)
cv2.waitKey(0)
image_copy3 = image1.copy()
for i, contour in enumerate(contours2): # loop over one contour area
   for j, contour_point in enumerate(contour): # loop over the points
       # draw a circle on the current contour coordinate
       cv2.circle(image_copy3, ((contour_point[0][0], contour_point[0][1])), 2, (0, 255, 0), 2, cv2.LINE_AA)
# see the results
cv2.imshow('CHAIN_APPROX_SIMPLE Point only', image_copy3)
cv2.waitKey(0)
cv2.imwrite('contour_point_simple.jpg', image_copy3)
cv2.destroyAllWindows()
C++:
// using a proper image for visualizing CHAIN_APPROX_SIMPLE
Mat image1 = imread("input/image_2.jpg");
Mat img_gray1;
cvtColor(image1, img_gray1, COLOR_BGR2GRAY);
Mat thresh1;
threshold(img_gray1, thresh1, 150, 255, THRESH_BINARY);
vector<vector<Point>> contours2;
vector<Vec4i> hierarchy2;
findContours(thresh1, contours2, hierarchy2, RETR_TREE, CHAIN_APPROX_NONE);
Mat image_copy2 = image1.clone();
drawContours(image_copy2, contours2, -1, Scalar(0, 255, 0), 2);
imshow("None approximation", image_copy2);
waitKey(0);
imwrite("contours_none_image1.jpg", image_copy2);
destroyAllWindows();
Mat image_copy3 = image1.clone();
for(int i=0; i<contours2.size(); i=i+1){
   for (int j=0; j<contours2[i].size(); j=j+1){
       circle(image_copy3, (contours2[i][0], contours2[i][1]), 2, Scalar(0, 255, 0), 2);
       }
   }
   imshow("CHAIN_APPROX_SIMPLE Point only", image_copy3);
   waitKey(0);
   imwrite("contour_point_simple.jpg", image_copy3);
   destroyAllWindows();
执行上面的代码,会产生如下结果:

观察到使用CHAIN_APPROX_SIMPLE进行轮廓检测时,书的四个角上只有四个轮廓点。书中垂直和水平的直线完全被忽略了。
观察输出图像,在上图的右边。请注意,这本书的垂直和水平两面只有四个角。还要注意,字母和鸟是用离散的点而不是线段表示的。
Contour Hierarchies(轮廓层次结构)
层次表示等高线之间的父子关系。您将看到每种轮廓检索模式如何影响图像中的轮廓检测,并产生分层结果。
父子关系
在一幅图像中,轮廓检测算法检测到的对象可以是:
- 分散在图像中的单个物体(如第一个例子),或者
- 内部穿插的物体和形状
在大多数情况下,当一个形状包含更多的形状时,我们可以确定外部形状是内部形状的父形状。
看一下下图,它包含了几个简单的形状,将有助于演示轮廓层次结构。
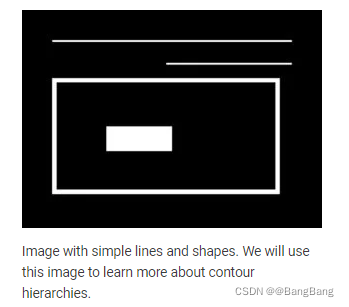
现在请看下图,其中与图10中每个形状相关联的轮廓已经被识别出来。图11中的每个数字都有意义。
- 根据等高线层次结构和亲子关系,所有个体数字1、2、3、4均为独立对象。
- 我们可以说3a是3的子结点。注意3a表示等高线3的内部部分。
- 轮廓1、2和4都是父形状,没有任何关联的子形状,因此它们的编号是任意的。换句话说,等高线2可以被标记为1,反之亦然。

轮廓的关系表示
您已经看到findContours()函数返回两个输出:contours list和hierarchy。现在让我们详细了解等高线层次结构的输出。
hierarchy表示为一个数组,该数组又包含四个值的数组。表示为:
[Next, Previous, First_Child, Parent]
**Next:**表示图像中的下一个轮廓,该轮廓处于同一层次。所以,
- 对于轮廓1,同一层次上的下一个轮廓为2。这里,下一个是2。
- 因此,轮廓3没有与自身具有相同层次的轮廓。所以,它的下一个值是-1。
Previous:表示同一层次上的前一层轮廓。这意味着轮廓1的前一个值总是-1。
First_Child:表示我们当前正在考虑的轮廓的第一个子轮廓。
轮廓线1和轮廓线2根本没有子轮廓。因此,它们的First_Child的索引值将是-1。
但是contour 3有个孩子。因此,对于等高线3,First_Child的位置值将是索引位置3a。
Parent:表示当前轮廓的父轮廓的索引位置。
- 轮廓线1和2,很明显,没有任何父轮廓线。
- 对于3a线,它的父线是3线
- 对于轮廓4,父轮廓是轮廓3a
但是我们如何实际可视化这些层次结构数组呢?最好的方法是:
- 使用一个简单的图像,线条和形状像前面的图像
- 使用不同的检索模式检测轮廓和层次结构
- 然后打印这些值以显示它们
不同轮廓线检索技术
到目前为止,我们使用了一种特定的检索技术——RETR_TREE来查找和绘制轮廓,但是在OpenCV中还有另外三种轮廓检索技术,即RETR_LIST、RETR_EXTERNAL和RETR_CCOMP。
因此,现在让我们使用图10中的图像来回顾这四个方法中的每一个,以及它们的相关代码来获得轮廓线。
下面的代码从磁盘读取图像,将其转换为灰度,并应用二进制阈值。
Python
"""
Contour detection and drawing using different extraction modes to complement
the understanding of hierarchies
"""
image2 = cv2.imread('input/custom_colors.jpg')
img_gray2 = cv2.cvtColor(image2, cv2.COLOR_BGR2GRAY)
ret, thresh2 = cv2.threshold(img_gray2, 150, 255, cv2.THRESH_BINARY)
C++
/*
Contour detection and drawing using different extraction modes to complement the understanding of hierarchies
*/
Mat image2 = imread("input/custom_colors.jpg");
Mat img_gray2;
cvtColor(image2, img_gray2, COLOR_BGR2GRAY);
Mat thresh2;
threshold(img_gray2, thresh2, 150, 255, THRESH_BINARY);
RETR_LIST
RETR_LIST轮廓检索方法不会在提取的轮廓之间创建任何父-子关系。因此,对于检测到的所有等高线区域,First_Child和Parent索引位置值总是-1。
Python
contours3, hierarchy3 = cv2.findContours(thresh2, cv2.RETR_LIST, cv2.CHAIN_APPROX_NONE)
image_copy4 = image2.copy()
cv2.drawContours(image_copy4, contours3, -1, (0, 255, 0), 2, cv2.LINE_AA)
# see the results
cv2.imshow('LIST', image_copy4)
print(f"LIST: {hierarchy3}")
cv2.waitKey(0)
cv2.imwrite('contours_retr_list.jpg', image_copy4)
cv2.destroyAllWindows()
C++
vector<vector<Point>> contours3;
vector<Vec4i> hierarchy3;
findContours(thresh2, contours3, hierarchy3, RETR_LIST, CHAIN_APPROX_NONE);
Mat image_copy4 = image2.clone();
drawContours(image_copy4, contours3, -1, Scalar(0, 255, 0), 2);
imshow("LIST", image_copy4);
waitKey(0);
imwrite("contours_retr_list.jpg", image_copy4);
destroyAllWindows();
执行上述代码产生以下输出:
LIST: [[[ 1 -1 -1 -1]
[ 2 0 -1 -1]
[ 3 1 -1 -1]
[ 4 2 -1 -1]
[-1 3 -1 -1]]]
RETR_EXTERNAL
RETR_EXTERNAL轮廓检索方法是一种非常有趣的方法。它只检测父轮廓线,而忽略任何子轮廓线。所有像3a和4这样的内轮廓上都没有点。
Python:
contours4, hierarchy4 = cv2.findContours(thresh2, cv2.RETR_EXTERNAL, cv2.CHAIN_APPROX_NONE)
image_copy5 = image2.copy()
cv2.drawContours(image_copy5, contours4, -1, (0, 255, 0), 2, cv2.LINE_AA)
# see the results
cv2.imshow('EXTERNAL', image_copy5)
print(f"EXTERNAL: {hierarchy4}")
cv2.waitKey(0)
cv2.imwrite('contours_retr_external.jpg', image_copy5)
cv2.destroyAllWindows()
C++
vector<vector<Point>> contours4;
vector<Vec4i> hierarchy4;
findContours(thresh2, contours4, hierarchy4, RETR_EXTERNAL, CHAIN_APPROX_NONE);
Mat image_copy5 = image2.clone();
drawContours(image_copy5, contours4, -1, Scalar(0, 255, 0), 2);
imshow("EXTERNAL", image_copy5);
waitKey(0);
imwrite("contours_retr_external.jpg", image_copy4);
destroyAllWindows();
上面的代码产生如下输出:
EXTERNAL: [[[ 1 -1 -1 -1]
[ 2 0 -1 -1]
[-1 1 -1 -1]]]

上面的输出图像只显示了绘制在等高线1、2和3上的点。等高线3a和4被省略,因为它们是子等高线
RETR_CCOMP
与RETR_EXTERNAL不同,RETR_CCOMP检索图像中的所有轮廓。除此之外,它还对图像中的所有形状或对象应用了2级层次结构。
这意味着:
- 所有的外部轮廓将有等级1
- 所有的内部轮廓将有等级2
在下面的图片中,轮廓已经根据它们的层次等级编号,如上所述。

上面的图像显示层次结构级别为HL-1或HL-2的级别1和2。现在,让我们看看代码和输出层次结构数组。
Python
contours5, hierarchy5 = cv2.findContours(thresh2, cv2.RETR_CCOMP, cv2.CHAIN_APPROX_NONE)
image_copy6 = image2.copy()
cv2.drawContours(image_copy6, contours5, -1, (0, 255, 0), 2, cv2.LINE_AA)

# see the results
cv2.imshow('CCOMP', image_copy6)
print(f"CCOMP: {hierarchy5}")
cv2.waitKey(0)
cv2.imwrite('contours_retr_ccomp.jpg', image_copy6)
cv2.destroyAllWindows()
C++
vector<vector<Point>> contours5;
vector<Vec4i> hierarchy5;
findContours(thresh2, contours5, hierarchy5, RETR_CCOMP, CHAIN_APPROX_NONE);
Mat image_copy6 = image2.clone();
drawContours(image_copy6, contours5, -1, Scalar(0, 255, 0), 2);
imshow("EXTERNAL", image_copy6);
// cout << "EXTERNAL:" << hierarchy5;
waitKey(0);
imwrite("contours_retr_ccomp.jpg", image_copy6);
destroyAllWindows();
执行上述代码产生以下输出:
CCOMP: [[[ 1 -1 -1 -1]
[ 3  0  2 -1]
[-1 -1 -1  1]
[ 4  1 -1 -1]
[-1  3 -1 -1]]]
在这里,我们看到所有的Next、Previous、First_Child和Parent关系都根据轮廓检索方法被维护,因为所有的轮廓都被检测到。如所料,第一个等高线区域的Previous为-1。没有父结点的等高线的值也是-1
RETR_TREE
就像RETR_CCOMP一样,RETR_TREE也检索所有的轮廓。它还创建了一个完整的层次结构,级别不局限于1或2。每个轮廓都可以有自己的层次结构,与它所在的级别一致,并具有相应的父子关系。

从上图可以清楚地看出:
- 等高线1、2和3在同一水平面上,也就是水平0。
- 等高线3a位于等高线1级,因为它是等高线3的子等高线。
- 等高线4是一个新的等高线区域,因此它的层次等级为2。
下面的代码使用RETR_TREE模式检索轮廓。
Python:
contours6, hierarchy6 = cv2.findContours(thresh2, cv2.RETR_TREE, cv2.CHAIN_APPROX_NONE)
image_copy7 = image2.copy()
cv2.drawContours(image_copy7, contours6, -1, (0, 255, 0), 2, cv2.LINE_AA)
# see the results
cv2.imshow('TREE', image_copy7)
print(f"TREE: {hierarchy6}")
cv2.waitKey(0)
cv2.imwrite('contours_retr_tree.jpg', image_copy7)
cv2.destroyAllWindows()
C++
vector<vector<Point>> contours6;
vector<Vec4i> hierarchy6;
findContours(thresh2, contours6, hierarchy6, RETR_TREE, CHAIN_APPROX_NONE);
Mat image_copy7 = image2.clone();
drawContours(image_copy7, contours6, -1, Scalar(0, 255, 0), 2);
imshow("EXTERNAL", image_copy7);
// cout << "EXTERNAL:" << hierarchy6;
waitKey(0);
imwrite("contours_retr_tree.jpg", image_copy7);
destroyAllWindows();
执行上述代码产生以下输出:
TREE: [[[ 3 -1  1 -1]
[-1 -1  2  0]
[-1 -1 -1  1]
[ 4  0 -1 -1]
[-1  3 -1 -1]]]
最后,让我们看看使用RETR_TREE模式绘制的所有轮廓的完整图像。

所有的等高线均按预期绘制,等高线区域清晰可见。您还可以推断出,等高线3和3a是两条分开的等高线,因为它们有不同的等高线边界和面积。同时,很明显3a线是3线的子线。
现在,您已经熟悉了OpenCV中可用的所有轮廓算法,以及它们各自的输入参数和配置,接下来进行实验,亲眼看看它们是如何工作的。
不同轮廓检索方法的运行时间比较
仅仅知道轮廓检索方法是不够的。您还应该知道它们的相对处理时间。下表比较了上面讨论的每种方法的运行时间。

比较不同推理方法的推理速度
从上表中可以得出一些有趣的结论:
- RETR_LIST和RETR_EXTERNAL的执行时间最短,因为RETR_LIST没有定义任何层次结构,而RETR_EXTERNAL只检索父轮廓
- RETR_CCOMP的执行时间排第二。它检索所有的轮廓,并定义一个两层的层次结构。
- RETR_TREE的执行时间最长,它检索所有的轮廓,并为每个父子关系定义独立的层次结构级别。
虽然上述时间可能看起来不太重要,但对于可能需要大量轮廓处理的应用程序来说,认识到这些差异是很重要的。同样值得注意的是,这个处理时间可能会有所不同,这取决于它们提取的轮廓和它们定义的层次结构级别的程度。
限制
到目前为止,我们研究的所有例子都很有趣,结果也令人鼓舞。然而,在某些情况下,轮廓算法可能无法提供有意义和有用的结果。让我们也考虑这样一个例子。
当图像中的物体与其背景形成强烈对比时,你可以清楚地识别出与每个物体相关的轮廓。但是如果您有一个图像,如下面的图16。它不仅有一个明亮的物体(小狗),而且有一个与感兴趣的物体(小狗)相同的值(亮度)杂乱的背景。你会发现右边图像中的轮廓甚至不完整。此外,在背景区域有多个不需要的轮廓。
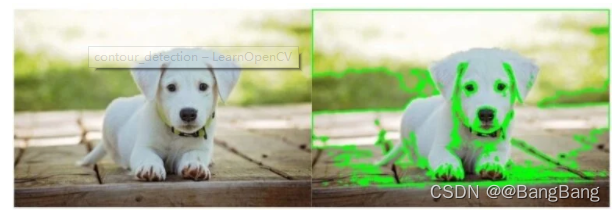
左输入图像,有一只白色的小狗和许多其他的边缘和背景颜色。右-轮廓检测结果叠加。观察轮廓是如何不完整的,以及由于背景中的杂波而检测出多重或不正确的轮廓。
参考
https://learnopencv.com/contour-detection-using-opencv-python-c/