缺 陷 检 测 解 决 策 略 之 三 : 频 域 + 空 域 缺陷检测解决策略之三: 频域+空域 缺陷检测解决策略之三:频域+空域
1.傅里叶变换:从空间域转到频域
2.设计滤波,获得所需频段(在频域处理后,将目标和背景的区别度提高,再返回空间域去提出缺陷目标)
3.反傅里叶变换:从频域转到空间域
频域的作用:
1.去噪声
2.增强对比度,方便检测缺陷
3…
常用辅助缺陷检测算子
texture_laws (ImageReduced, ImageTexture, ‘el’, 2, 5)
calculate_lines_gauss_parameters (17, [25,3], Sigma, Low, High)
lines_gauss (ImageReduced, Lines, Sigma, Low, High, ‘dark’, ‘true’, ‘gaussian’, ‘true’)
cooc_feature_image (Basins, ImageMedian, 6, 0, Energy, Correlation, Homogeneity, Contrast)
频域变换:傅里叶变换、小波变换等
要懂得空间域的哪一个部分对应了什么频谱,就能比较好的掌握其应用
傅里叶变换的性质:
1.对称性
2.平移性
3.共轭性
4.周期性
频谱表示的灰度变化情况,就是梯度
如果频谱离中心越远,越亮,说明在这个方向上,变化越剧烈,即梯度越高
(频谱四周)高频的:变化剧烈的地方,往往是细节部分
(频谱中心部分)低频的:灰度值几乎不变的地方,往往是背景
傅里叶变换具有对称性,所以频谱图像一般是以图像中心为原点左上右下对称,右上左下对称
频谱一般是四个角,但是为了方便,放在了中心
频率图像中心一般是低频成分,从中心往外,频率逐渐增加。每一点亮度值越高表示这个频率特征很突出,亮点越多越亮表示该频率成分越多,一般都是吧图像中心设置成低频。
亮带越宽,表示涵盖的频谱越丰富,即变化的宽度范围大
滤波器
1.低通滤波器,中间低频过,四周高频过滤。反傅里叶变换以后,图像就会变的模糊,细节减少了
2.高通滤波器,中间低频过滤,四周高频过。反傅里叶变换以后,图像边缘被强化。(gen_highpass)
3.带通滤波器
4.高斯滤波器
* 高通滤波器,0.1表示大小,越大会让图像越锐利
gen_highpass (ImageHighpass, 0.1, 'none', 'dc_center', 512, 512)```

* 示例1
read_image (Image1, 'C:/Users/29939/Desktop/企业微信截图_16433303918073.png')
rgb1_to_gray (Image1, GrayImage)
zoom_image_size (GrayImage, ImageZoom, 512, 512, 'constant')
fft_generic (ImageZoom, ImageFFT1, 'to_freq', -1, 'sqrt', 'dc_center', 'complex')
gen_highpass (ImageHighpass, 0.1, 'none', 'dc_center', 512, 512)
convol_fft (ImageFFT1, ImageHighpass, ImageConvol)
fft_image_inv (ImageConvol, ImageFFTInv)
* 示例2
read_image (Image1, 'C:/Users/29939/Desktop/企业微信截图_16433303918073.png')
rgb1_to_gray (Image1, GrayImage)
zoom_image_size (GrayImage, ImageZoom, 512, 512, 'constant')
fft_generic (ImageZoom, ImageFFT1, 'to_freq', -1, 'sqrt', 'dc_center', 'complex')
gen_highpass (ImageHighpass, 0.1, 'none', 'dc_center', 512, 512)
convol_fft (ImageFFT1, ImageHighpass, ImageConvol)
fft_generic (ImageConvol, ImageFFT2, 'from_freq', 1, 'sqrt', 'dc_center', 'complex')
* 低通滤波器,0.1表示大小,越大会让图像模糊。和中值滤波一样的效果
gen_lowpass (ImageLowpass, 0.1, 'none', 'dc_center', 512, 512)
* 示例1:
read_image (Image1, 'C:/Users/29939/Desktop/企业微信截图_16433303918073.png')
rgb1_to_gray (Image1, GrayImage)
zoom_image_size (GrayImage, ImageZoom, 512, 512, 'constant')
fft_generic (ImageZoom, ImageFFT1, 'to_freq', -1, 'sqrt', 'dc_center', 'complex')
gen_lowpass (ImageLowpass, 0.1, 'none', 'dc_center', 512, 512)
convol_fft (ImageFFT1, ImageLowpass, ImageConvol)
fft_generic (ImageConvol, ImageFFT2, 'from_freq', 1, 'sqrt', 'dc_center', 'complex')
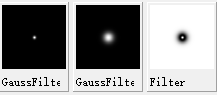
高斯滤波器
Sigma1 := 10.0
gen_gauss_filter (GaussFilter1, Sigma1, Sigma1, 0.0, 'none', 'dc_center', Width, Height)
Sigma1 := 10.0
Sigma2 := 3.0
gen_gauss_filter (GaussFilter1, Sigma1, Sigma1, 0.0, 'none', 'dc_center', Width, Height)
gen_gauss_filter (GaussFilter2, Sigma2, Sigma2, 0.0, 'none', 'dc_center', Width, Height)
sub_image (GaussFilter1, GaussFilter2, Filter, 1, 0)
* 带通滤波器
gen_sin_bandpass (ImageBandpass, 0.4, 'none', 'rft', Width, Height)
频谱看法:
一看方向,表示在什么方向上发送变化
二看亮带的宽窄,越宽,表示变化的范围越光。
三看亮度,越亮表示变化越剧烈
三种频谱处理手法
1.draw/gen手画区域
paint_region:涂黑(区域到图像)
2.转成功率谱(power_real (ImageFFT2, ImageResult1))
3.滤波器
1.draw/gen手画区域
示例1:
* step1
read_image (Image, 'test7.png')
* step2
rgb1_to_gray (Image, GrayImage)
* step3
fft_image (GrayImage, ImageFFT4)
* step4
gen_rectangle1 (ROI_0, 8.28752, 3.48559, 156.42, 152.66)
gen_rectangle1 (TMP_Region, 7.65984, 164.617, 154.537, 313.223)
union2 (ROI_0, TMP_Region, ROI_0)
gen_rectangle1 (TMP_Region, 167.091, 2.91622, 320.245, 152.091)
union2 (ROI_0, TMP_Region, ROI_0)
gen_rectangle1 (TMP_Region, 168.974, 169.172, 318.989, 314.931)
union2 (ROI_0, TMP_Region, ROI_0)
* step5
paint_region (ROI_0, ImageFFT4, ImageResult, 0, 'fill')
* step6
fft_image_inv (ImageResult, ImageFFTInv)
示例2:(频域+空域)来检测特征
dev_get_window (WindowHandle)
read_image (Image1, 'C:/Users/29939/Desktop/企业微信截图_16433303918073.png')
rgb1_to_gray (Image1, GrayImage)
fft_image (GrayImage, ImageFFT)
gen_rectangle1 (ROI_0, 27.4359, 25.9474, 190.912, 261.505)
gen_rectangle1 (TMP_Region, 210.916, 276.316, 368.874, 522.453)
union2 (ROI_0, TMP_Region, ROI_0)
* step5
paint_region (ROI_0, ImageFFT, ImageResult, 0, 'fill')
* step6
fft_image_inv (ImageResult, ImageFFTInv)

dev_display (ImageFFTInv)


* 傅里叶变换
fft_image (Image1, ImageFFT)
* 快速傅里叶变换
* dc_center:将频谱放在中心
* to_freq :空间域到频域
fft_generic (Image4, ImageFFT3, 'to_freq', -1, 'sqrt', 'dc_center', 'complex')
示例1
* This program demonstrates how to detect small texture
* defects on the surface of plastic items by using the fast
* fourier transform (FFT).
* First, we construct a suitable filter using Gaussian
* filters. Then, the images and the filter are convolved
* by using fast fourier transforms. Finally, the defects
* are detected in the filtered images by using
* morphology operators.
*
* Initializations
dev_update_off ()
dev_close_window ()
read_image (Image, 'plastics/plastics_01')
get_image_size (Image, Width, Height)
dev_open_window (0, 0, Width, Height, 'black', WindowHandle)
set_display_font (WindowHandle, 14, 'mono', 'true', 'false')
dev_set_draw ('margin')
dev_set_line_width (3)
dev_set_color ('red')
*
* Optimize the fft speed for the specific image size
optimize_rft_speed (Width, Height, 'standard')
*
* Construct a suitable filter by combining two gaussian
* filters
Sigma1 := 10.0
Sigma2 := 3.0
gen_gauss_filter (GaussFilter1, Sigma1, Sigma1, 0.0, 'none', 'rft', Width, Height)
gen_gauss_filter (GaussFilter2, Sigma2, Sigma2, 0.0, 'none', 'rft', Width, Height)
sub_image (GaussFilter1, GaussFilter2, Filter, 1, 0)
*
* Process the images iteratively
NumImages := 11
for Index := 1 to NumImages by 1
*
* Read an image and convert it to gray values
read_image (Image, 'plastics/plastics_' + Index$'02')
rgb1_to_gray (Image, Image)
* Perform the convolution in the frequency domain
rft_generic (Image, ImageFFT, 'to_freq', 'none', 'complex', Width)
convol_fft (ImageFFT, Filter, ImageConvol)
rft_generic (ImageConvol, ImageFiltered, 'from_freq', 'n', 'real', Width)
*
* Process the filtered image
gray_range_rect (ImageFiltered, ImageResult, 10, 10)
min_max_gray (ImageResult, ImageResult, 0, Min, Max, Range)
threshold (ImageResult, RegionDynThresh, max([5.55,Max * 0.8]), 255)
connection (RegionDynThresh, ConnectedRegions)
select_shape (ConnectedRegions, SelectedRegions, 'area', 'and', 4, 99999)
union1 (SelectedRegions, RegionUnion)
closing_circle (RegionUnion, RegionClosing, 10)
connection (RegionClosing, ConnectedRegions1)
select_shape (ConnectedRegions1, SelectedRegions1, 'area', 'and', 10, 99999)
area_center (SelectedRegions1, Area, Row, Column)
*
* Display the results
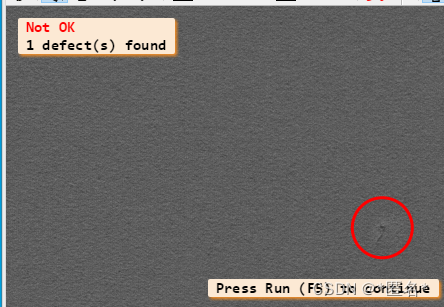
dev_display (Image)
Number := |Area|
if (Number)
gen_circle_contour_xld (ContCircle, Row, Column, gen_tuple_const(Number,30), gen_tuple_const(Number,0), gen_tuple_const(Number,rad(360)), 'positive', 1)
ResultMessage := ['Not OK',Number + ' defect(s) found']
Color := ['red','black']
dev_display (ContCircle)
else
ResultMessage := 'OK'
Color := 'forest green'
endif
disp_message (WindowHandle, ResultMessage, 'window', 12, 12, Color, 'true')
if (Index != NumImages)
disp_continue_message (WindowHandle, 'black', 'true')
stop ()
endif
endfor
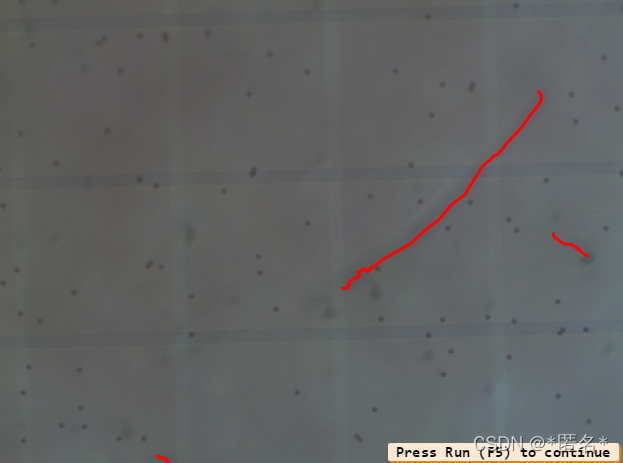
示例2:频域+空域+差分
* this example shows how to detect mura defects
* in blurred images
*
dev_close_window ()
dev_update_off ()
Path := 'lcd/mura_defects_blur_'
read_image (Image, Path + '01')
get_image_size (Image, Width, Height)
dev_open_window_fit_size (0, 0, Width, Height, 640, 480, WindowHandle)
set_display_font (WindowHandle, 14, 'mono', 'true', 'false')
dev_set_draw ('margin')
dev_set_line_width (3)
dev_set_color ('red')
ScaleFactor := 0.4
calculate_lines_gauss_parameters (17, [25,3], Sigma, Low, High)
for f := 1 to 3 by 1
    read_image (Image, Path + f$'.2i')
    decompose3 (Image, R, G, B)
    * correct side illumination
    rft_generic (B, ImageFFT, 'to_freq', 'none', 'complex', Width)
    gen_gauss_filter (ImageGauss, 100, 100, 0, 'n', 'rft', Width, Height)
    convol_fft (ImageFFT, ImageGauss, ImageConvol)
    rft_generic (ImageConvol, ImageFFT1, 'from_freq', 'none', 'byte', Width)
    sub_image (B, ImageFFT1, ImageSub, 2, 100)
    * perform the actual inspection
    zoom_image_factor (ImageSub, ImageZoomed, ScaleFactor, ScaleFactor, 'constant')
    * avoid border effects when using lines_gauss()
    get_domain (ImageZoomed, Domain)
    erosion_rectangle1 (Domain, RegionErosion, 7, 7)
    reduce_domain (ImageZoomed, RegionErosion, ImageReduced)
    lines_gauss (ImageReduced, Lines, Sigma, Low, High, 'dark', 'true', 'gaussian', 'true')
    hom_mat2d_identity (HomMat2DIdentity)
    hom_mat2d_scale_local (HomMat2DIdentity, 1 / ScaleFactor, 1 / ScaleFactor, HomMat2DScale)
    affine_trans_contour_xld (Lines, Defects, HomMat2DScale)
    *
    dev_display (Image)
    dev_display (Defects)
    if (f < 3)
        disp_continue_message (WindowHandle, 'black', 'true')
        stop ()
    endif
endfor
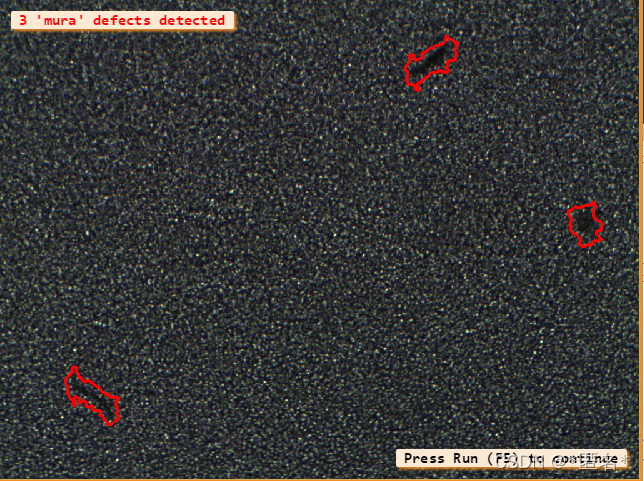
示例3: 频域+差分+空域(blob分析+特征)
* This example shows how to detect mura defects
* in highly textured images
*
dev_close_window ()
dev_update_off ()
Path := 'lcd/mura_defects_texture_'
read_image (Image, Path + '01')
get_image_size (Image, Width, Height)
dev_open_window (0, 0, 640, 480, 'black', WindowHandle)
set_display_font (WindowHandle, 14, 'mono', 'true', 'false')
dev_set_draw ('margin')
dev_set_line_width (3)
dev_set_color ('red')
for F := 1 to 2 by 1
    read_image (Image, Path + F$'.2i')
    decompose3 (Image, R, G, B)
    * Defects are characterized by dark patches. Hence, by substracting the
    * estimated background illumination from the original image the
    * defects become more apparent.
    estimate_background_illumination (B, ImageFFT1)
    sub_image (B, ImageFFT1, ImageSub, 2, 100)
    * Median filter smoothes out the fine texture, simplifying the following
    * segmentation and final detection of defects.
    median_image (ImageSub, ImageMedian, 'circle', 9, 'mirrored')
    watersheds_threshold (ImageMedian, Basins, 20)
    * Dark patches corresponding to defects have a very low energy.
    cooc_feature_image (Basins, ImageMedian, 6, 0, Energy, Correlation, Homogeneity, Contrast)
    Mask := Energy [<=] 0.05
    select_mask_obj (Basins, Defects, Mask)
    *
    dev_display (Image)
    dev_display (Defects)
    count_obj (Defects, NDefects)
    disp_message (WindowHandle, NDefects + ' \'mura\' defects detected', 'window', 12, 12, 'red', 'true')
    if (F < 2)
        disp_continue_message (WindowHandle, 'black', 'true')
        stop ()
    endif
endfor
纯空间域的做一个对比
mean_image (Image, ImageMean, 7, 7)
dyn_threshold (Image, ImageMean, DarkPixels, 5, 'dark')
* This programm shows the extraction of surface scratches via
* local thresholding and morphological post-processing
*
dev_update_off ()
dev_close_window ()
*
* Step 1: Acquire image
*
read_image (Image, 'surface_scratch')
get_image_size (Image, Width, Height)
dev_open_window_fit_image (Image, 0, 0, Width, Width, WindowID)
set_display_font (WindowID, 16, 'mono', 'true', 'false')
dev_set_draw ('margin')
dev_set_line_width (4)
dev_display (Image)
Message := 'This program shows the extraction of'
Message[1] := 'surface scratches via local thresholding'
Message[2] := 'and morphological post-processing'
disp_message (WindowID, Message, 'window', 12, 12, 'black', 'true')
disp_continue_message (WindowID, 'black', 'true')
stop ()
*
* Step 2: Segment image
*
* Using a local threshold
mean_image (Image, ImageMean, 7, 7)
dyn_threshold (Image, ImageMean, DarkPixels, 5, 'dark')
*
* Extract connected components
connection (DarkPixels, ConnectedRegions)
dev_set_colored (12)
dev_display (Image)
dev_display (ConnectedRegions)
Message := 'Connected components after image segmentation'
Message[1] := 'using a local threshold.'
disp_message (WindowID, Message, 'window', 12, 12, 'black', 'true')
disp_continue_message (WindowID, 'black', 'true')
stop ()
*
* Step 3: Process regions
*
* Select large regions
select_shape (ConnectedRegions, SelectedRegions, 'area', 'and', 10, 1000)
dev_display (Image)
dev_display (SelectedRegions)
disp_message (WindowID, 'Large Regions', 'window', 12, 12, 'black', 'true')
disp_continue_message (WindowID, 'black', 'true')
stop ()
*
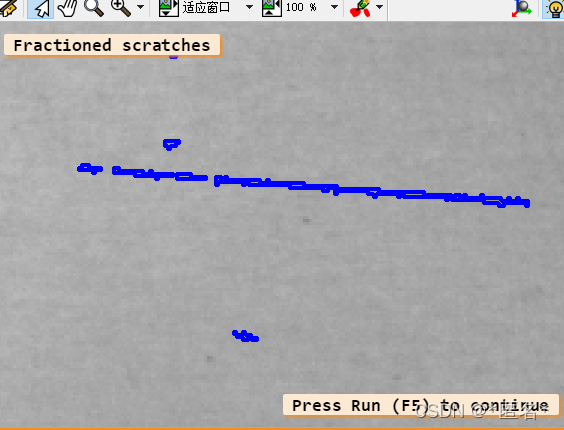
* Visualize fractioned scratch
open_zoom_window (0, round(Width / 2), 2, 303, 137, 496, 3, WindowHandleZoom)
dev_set_color ('blue')
dev_display (Image)
dev_display (SelectedRegions)
set_display_font (WindowHandleZoom, 16, 'mono', 'true', 'false')
disp_message (WindowHandleZoom, 'Fractioned scratches', 'window', 12, 12, 'black', 'true')
disp_continue_message (WindowHandleZoom, 'black', 'true')
stop ()
*
* Merge fractioned scratches via morphology
union1 (SelectedRegions, RegionUnion)
dilation_circle (RegionUnion, RegionDilation, 3.5)
dev_display (Image)
dev_display (RegionDilation)
Message := 'Region of the scratches after dilation'
disp_message (WindowHandleZoom, Message, 'window', 12, 12, 'black', 'true')
disp_continue_message (WindowHandleZoom, 'black', 'true')
stop ()
skeleton (RegionDilation, Skeleton)
connection (Skeleton, Errors)
dev_set_colored (12)
dev_display (Image)
dev_display (Errors)
Message := 'Fractioned scratches merged via morphology'
disp_message (WindowHandleZoom, Message, 'window', 12, 12, 'black', 'true')
disp_continue_message (WindowHandleZoom, 'black', 'true')
stop ()
*
* Distinguish small and large scratches
close_zoom_window (WindowHandleZoom, Width, Height)
select_shape (Errors, Scratches, 'area', 'and', 50, 10000)
select_shape (Errors, Dots, 'area', 'and', 1, 50)
dev_display (Image)
dev_set_color ('red')
dev_display (Scratches)
dev_set_color ('blue')
dev_display (Dots)
Message := 'Extracted surface scratches'
Message[1] := 'Not categorized as scratches'
disp_message (WindowID, Message, 'window', 440, 310, ['red','blue'], 'true')
示例4:频域+空域
* This program shows how to detect defects (scratches) in
* an inhomogeneously illuminated surface by filtering in
* the frequency domain.
* First, a suitable bandpass filter is created. Then, the
* input image is fourier transformed and filtered in the
* frequency domain, so that high frequency information is
* enhanced. Finally, it is transformed back to the
* spatial domain and the enhanced defects are post-processed
* by morphology.
*
dev_update_off ()
dev_close_window ()
read_image (Image, 'surface_scratch')
invert_image (Image, ImageInverted)
get_image_size (Image, Width, Height)
dev_open_window (0, 0, Width, Height, 'black', WindowHandle)
set_display_font (WindowHandle, 16, 'mono', 'true', 'false')
dev_display (Image)
*
* Optimize the speed of the fast fourier transform
* Message := 'Optimize the speed of the fast fourier transform.'
* Message[1] := 'Please wait...'
* disp_message (WindowHandle, Message, 'window', 12, 12, 'black', 'true')
* optimize_rft_speed (Width, Height, 'standard')
* disp_continue_message (WindowHandle, 'black', 'true')
* stop ()
*
* Enhance the scratches by filtering in the frequency domain
gen_sin_bandpass (ImageBandpass, 0.4, 'none', 'rft', Width, Height)
rft_generic (ImageInverted, ImageFFT, 'to_freq', 'none', 'complex', Width)
convol_fft (ImageFFT, ImageBandpass, ImageConvol)
rft_generic (ImageConvol, Lines, 'from_freq', 'n', 'byte', Width)
*
* Segment the scratches by using morphology
threshold (Lines, Region, 5, 255)
connection (Region, ConnectedRegions)
select_shape (ConnectedRegions, SelectedRegions, 'area', 'and', 5, 5000)
dilation_circle (SelectedRegions, RegionDilation, 5.5)
union1 (RegionDilation, RegionUnion)
reduce_domain (Image, RegionUnion, ImageReduced)
lines_gauss (ImageReduced, LinesXLD, 0.8, 3, 5, 'dark', 'false', 'bar-shaped', 'false')
union_collinear_contours_xld (LinesXLD, UnionContours, 40, 3, 3, 0.2, 'attr_keep')
select_shape_xld (UnionContours, SelectedXLD, 'contlength', 'and', 15, 1000)
gen_region_contour_xld (SelectedXLD, RegionXLD, 'filled')
union1 (RegionXLD, RegionUnion)
dilation_circle (RegionUnion, RegionScratches, 10.5)
*
* Display the results
dev_set_draw ('margin')
dev_set_line_width (3)
dev_set_colored (12)
dev_display (Image)
dev_display (RegionScratches)
