Keras学习及官方实例运行 2022.2.24
- 1、Keras简介
- 2、Keras官方示例测试运行
- 2.1 所用软硬件环境
- 2.2 六个实例运行
- 2.2.1 Simple MNIST convnet(MNIST数字分类)
- 2.2.2 Timeseries forecasting for weather prediction(基于时间序列预报数据进行天气预测)
- 2.2.3 Neural style transfer(使用梯度下降将参考图像的风格转移到目标图像 )
- 2.2.4 OCR model for reading Captchas(光学字符识别模型用于读取图片验证码)
- 2.2.5 Graph attention network (GAT) for node classification(图注意力网络用于节点分类)
- 2.2.6 Collaborative Filtering for Movie Recommendations(基于协同过滤的电影推荐)
- 3、总结
1、Keras简介
????????Keras是一个用Python编写的深度学习API,运行在机器学习平台TensorFlow 之上。 它的开发重点是实现快速实验,能够尽快将想法转化为结果是做好研究的关键。

1.1 Keras的特点
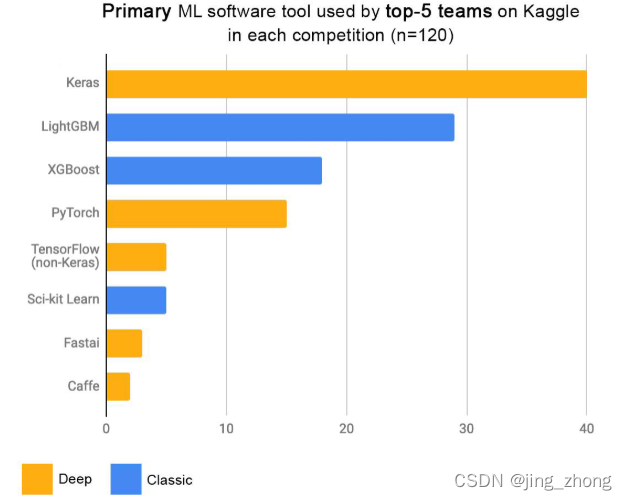
????????Keras具有以下三个特点:
- 简单——但不简单。
Keras减少了开发人员的认知负担,让用户可以专注于真正重要的问题部分。 - 灵活——
Keras采用逐步披露复杂性的原则:简单的工作流应该快速简单,而任意高级的工作流应该通过建立在已经学过的基础上的清晰路径成为可能。 - 功能强大——
Keras提供行业实力的性能和可扩展性:它被包括NASA、YouTube或Waymo在内的组织和公司使用。
1.2 Keras与Tensorflow的关系
????????TensorFlow 2 是一个端到端的开源机器学习平台,可以将其视为可微分编程的基础设施层。它结合了四种关键能力:
- 在
CPU、GPU或TPU上高效执行低级张量操作; - 计算任意可微表达式的梯度;
- 将计算扩展到许多设备,例如数百个 GPU 的集群;
- 将程序(图表)导出到外部运行时,例如服务器、浏览器、移动和嵌入式设备.
????????Keras 是 TensorFlow 2 的高级 API:一个用于解决机器学习问题的实用、高效的接口,专注于现代深度学习。它为开发和交付具有高迭代速度的机器学习解决方案提供了必要的抽象和构建块。
????????Keras 使工程师和研究人员能够充分利用 TensorFlow 2 的可扩展性和跨平台功能:用户可以在 TPU 或大型 GPU 集群上运行 Keras,并且可以导出 Keras 模型以在浏览器或移动设备上运行设备。 然而,Keras 也是一个高度灵活的框架,适合迭代最先进的研究理念。 Keras 遵循逐步披露复杂性的原则:它使入门变得容易,但它可以处理任意高级用例,只需要在每个步骤中进行增量学习。
1.3 Keras安装
????????Keras 与 TensorFlow 2 一起打包为 tensorflow.keras。Keras/TensorFlow兼容的计算机操作系统有Ubuntu 16.04 or later、Windows 7 or later和macOS 10.12.6 (Sierra) or later,支持的Python版本有Python 3.6–3.9。 如果要开始使用 Keras,只需安装 TensorFlow 2,可根据自己电脑硬件配置适当选择并参考Windows 7搭建TensorFlow深度学习框架实战。


1.4 Keras帮助
????????如果开发人员想进一步学习或者研究Keras的API函数,可以利用Keras官网自带示例进行实战,搭建环境运行代码,进行相关开发或者研究。


2、Keras官方示例测试运行
2.1 所用软硬件环境
????????软件:Win11 64位+Python 3.6+tensorflow-gpu 2.3.1
????????硬件:NVIDIA GTX1050TI显卡、运行内存8GB
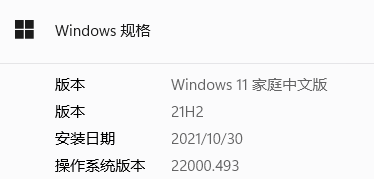
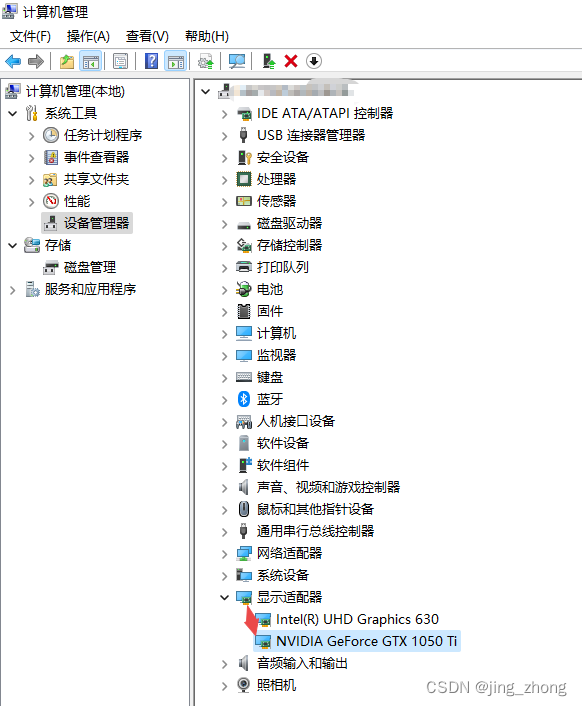


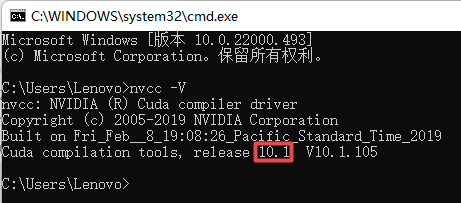
????????电脑配置了GTX 1050Ti显卡,在安装Microsoft Visual C++ Redistributable 2015-2019后又安装了CUDA 10.1的驱动程序和Cudnn 7.6.5,建议使用Anaconda创建Python虚拟环境,在虚拟环境中利用pip安装依赖包。


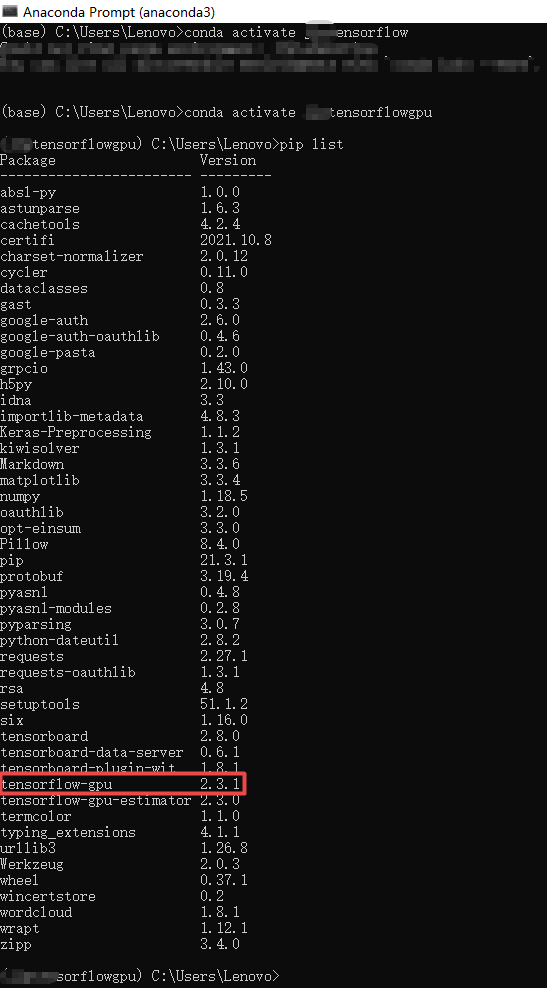
????????Python3.6环境(tensorflowgpu)中通过pip安装的依赖包如下:
absl-py==1.0.0
astunparse==1.6.3
cachetools==4.2.4
certifi==2021.10.8
charset-normalizer==2.0.12
cycler==0.11.0
dataclasses==0.8
gast==0.3.3
google-auth==2.6.0
google-auth-oauthlib==0.4.6
google-pasta==0.2.0
grpcio==1.43.0
h5py==2.10.0
idna==3.3
importlib-metadata==4.8.3
Keras-Preprocessing==1.1.2
kiwisolver==1.3.1
Markdown==3.3.6
matplotlib==3.3.4
numpy==1.18.5
oauthlib==3.2.0
opt-einsum==3.3.0
pandas==1.1.5
Pillow==8.4.0
protobuf==3.19.4
pyasn1==0.4.8
pyasn1-modules==0.2.8
pyparsing==3.0.7
python-dateutil==2.8.2
pytz==2021.3
requests==2.27.1
requests-oauthlib==1.3.1
rsa==4.8
scipy==1.2.1
six==1.16.0
tensorboard==2.8.0
tensorboard-data-server==0.6.1
tensorboard-plugin-wit==1.8.1
tensorflow-addons==0.14.0
tensorflow-gpu==2.3.1
tensorflow-gpu-estimator==2.3.0
termcolor==1.1.0
typeguard==2.13.3
typing_extensions==4.1.1
urllib3==1.26.8
Werkzeug==2.0.3
wincertstore==0.2
wordcloud==1.8.1
wrapt==1.12.1
zipp==3.4.0
2.2 六个实例运行
????????本文基于官网介绍的Keras示例,从中挑选了以下六个实例并运行了对应的Python代码,基于tensorflow-gpu 2.3.1版本来使用keras:from tensorflow import keras
2.2.1 Simple MNIST convnet(MNIST数字分类)
????????在MNIST网站可以看到MNIST数据集的简介,此实例实现了一个简单的卷积网络模型,在 MNIST 上达到了约 99% 的测试准确度,下载的数据mnist.npz如下图所示。

训练代码及运行结果(MyTestMNIST.py)
import numpy as np
import matplotlib.pyplot as plt
from tensorflow import keras
from tensorflow.keras import layers

num_classes = 10 # All digits are 10 classes.
input_shape = (28, 28, 1)

path = 'mnist.npz'# https://storage.googleapis.com/tensorflow/tf-keras-datasets/mnist.npz
f = np.load(path, allow_pickle=True)
x_train, y_train = f['x_train'], f['y_train']
x_test, y_test = f['x_test'], f['y_test'] # the data, split between train and test sets

# plot 4 images as gray scale
plt.subplot(331)
plt.imshow(x_train[0], cmap=plt.get_cmap('gray'))
plt.subplot(332)
plt.imshow(x_train[1], cmap=plt.get_cmap('gray'))
plt.subplot(333)
plt.imshow(x_train[2], cmap=plt.get_cmap('gray'))
plt.subplot(334)
plt.imshow(x_train[3], cmap=plt.get_cmap('gray'))
plt.subplot(335)
plt.imshow(x_train[4], cmap=plt.get_cmap('gray'))
plt.subplot(336)
plt.imshow(x_train[5], cmap=plt.get_cmap('gray'))
plt.subplot(337)
plt.imshow(x_test[6], cmap=plt.get_cmap('gray'))
plt.subplot(338)
plt.imshow(x_test[7], cmap=plt.get_cmap('gray'))
plt.subplot(339)
plt.imshow(x_test[8], cmap=plt.get_cmap('gray'))#imshow函数的官方文档:https://matplotlib.org/api/_as_gen/matplotlib.pyplot.imshow.html#matplotlib.pyplot.imshow
# show the plot
plt.show()

# Scale images to the [0, 1] range
x_train = x_train.astype("float32") / 255
x_test = x_test.astype("float32") / 255
# Make sure images have shape (28, 28, 1)
x_train = np.expand_dims(x_train, -1)
x_test = np.expand_dims(x_test, -1)
print("x_train shape:", x_train.shape)
print("x_test shape:", x_test.shape)
print(x_train.shape[0], "train samples")
print(x_test.shape[0], "test samples")
y_train = keras.utils.to_categorical(y_train, num_classes)# convert class vectors to binary class matrices
y_test = keras.utils.to_categorical(y_test, num_classes)#将类别标签转换为onehot编码,onehot编码是一种方便计算机处理的二元编码

model = keras.Sequential(
    [
        keras.Input(shape=input_shape),
        layers.Conv2D(32, kernel_size=(3, 3), activation="relu"),
        layers.MaxPooling2D(pool_size=(2, 2)),
        layers.Conv2D(64, kernel_size=(3, 3), activation="relu"),
        layers.MaxPooling2D(pool_size=(2, 2)),
        layers.Flatten(),
        layers.Dropout(0.5),
        layers.Dense(num_classes, activation="softmax"),
    ]
)
model.summary()

batch_size = 128
epochs = 15
model.compile(loss="categorical_crossentropy", optimizer="adam", metrics=["accuracy"]) #binary_crossentropy 二进制交叉熵用于二分类问题中,categorical_crossentropy分类交叉熵适用于多分类问题
model.fit(x_train, y_train, batch_size=batch_size, epochs=epochs, validation_split=0.1)

score = model.evaluate(x_test, y_test, verbose=0)
print("Test loss:", score[0])
print("Test accuracy:", score[1])

model.save('mnist_Model.h5')


预测代码及运行结果 (PredictMNIST.py)
from tensorflow.keras.models import load_model
import numpy as np
import matplotlib.pyplot as plt

mnist_model = load_model('mnist_Model.h5')# load the trained mnist_model
path = 'mnist.npz'# http://yann.lecun.com/exdb/mnist/mnist.npz
f = np.load(path, allow_pickle=True)
x_train, y_train = f['x_train'], f['y_train']
x_test, y_test = f['x_test'], f['y_test'] # Get the train and test sets data
X_Train99,Y_Train99 = x_train[99],y_train[99]# Select one from train data sets
X_Test999,Y_Test999 = x_test[999],y_test[999]# Select one from test data sets

print(X_Train99.shape)
X_Train99.shape=(1,28,28,1)
predict_Y_Train99 = mnist_model.predict(X_Train99)
print(predict_Y_Train99)
print('Train data set 99th picture:' + '\noriginal:'+str(Y_Train99) + '\npredicted:'+str(np.argmax(predict_Y_Train99)))
X_Train99.shape=(28,28)
plt.imshow(X_Train99,cmap='gray')
plt.title('Train data set 99th picture:' + '\noriginal:'+str(Y_Train99) + '\npredicted:'+str(np.argmax(predict_Y_Train99)))
plt.show()

print(X_Test999.shape)
X_Test999.shape=(1,28,28,1)
predict_Y_Test999 = mnist_model.predict(X_Test999)
print(predict_Y_Test999)
print('Test data set 999th picture:' +'\noriginal:'+str(Y_Test999)+'\npredicted:'+str(np.argmax(predict_Y_Test999)))
X_Test999.shape=(28,28)
plt.imshow(X_Test999,cmap='gray')
plt.title('Test data set 999th picture:' +'\noriginal:'+str(Y_Test999)+'\npredicted:'+str(np.argmax(predict_Y_Test999)))
plt.show()


2.2.2 Timeseries forecasting for weather prediction(基于时间序列预报数据进行天气预测)
????????此实例使用马克斯普朗克生物地球化学研究所记录的耶拿气候数据集。 该数据集由 14 个特征组成,例如温度、压力、湿度等,每 10 分钟记录一次。
- 地点:德国耶拿马克斯普朗克生物地球化学研究所气象站
- 考虑的时间范围:
2009 年 1 月 10 日 - 2016 年 12 月 31 日
????????下表显示了列名、它们的值格式以及描述:

代码及运行结果(timeseries_weather_forecasting.py)
import pandas as pd
import matplotlib.pyplot as plt
import tensorflow as tf
from tensorflow import keras

csv_path = "jena_climate_2009_2016.csv"
df = pd.read_csv(csv_path)

titles = [
    "Pressure",
    "Temperature",
    "Temperature in Kelvin",
    "Temperature (dew point)",
    "Relative Humidity",
    "Saturation vapor pressure",
    "Vapor pressure",
    "Vapor pressure deficit",
    "Specific humidity",
    "Water vapor concentration",
    "Airtight",
    "Wind speed",
    "Maximum wind speed",
    "Wind direction in degrees",
]

feature_keys = [
    "p (mbar)",
    "T (degC)",
    "Tpot (K)",
    "Tdew (degC)",
    "rh (%)",
    "VPmax (mbar)",
    "VPact (mbar)",
    "VPdef (mbar)",
    "sh (g/kg)",
    "H2OC (mmol/mol)",
    "rho (g/m**3)",
    "wv (m/s)",
    "max. wv (m/s)",
    "wd (deg)",
]

colors = [
    "blue",
    "orange",
    "green",
    "red",
    "purple",
    "brown",
    "pink",
    "gray",
    "olive",
    "cyan",
]

date_time_key = "Date Time"


def show_raw_visualization(data):
    time_data = data[date_time_key]
    fig, axes = plt.subplots(
        nrows=7, ncols=2, figsize=(15, 20), dpi=80, facecolor="w", edgecolor="k"
    )
    for i in range(len(feature_keys)):
        key = feature_keys[i]
        c = colors[i % (len(colors))]
        t_data = data[key]
        t_data.index = time_data
        t_data.head()
        ax = t_data.plot(
            ax=axes[i // 2, i % 2],
            color=c,
            title="{} - {}".format(titles[i], key),
            rot=25,
        )
        ax.legend([titles[i]])
    plt.tight_layout()


# show_raw_visualization(df)

def show_heatmap(data):
    plt.matshow(data.corr())
    plt.xticks(range(data.shape[1]), data.columns, fontsize=14, rotation=90)
    plt.gca().xaxis.tick_bottom()
    plt.yticks(range(data.shape[1]), data.columns, fontsize=14)

    cb = plt.colorbar()
    cb.ax.tick_params(labelsize=14)
    plt.title("Feature Correlation Heatmap", fontsize=14)
    plt.show()


# show_heatmap(df)

split_fraction = 0.715
train_split = int(split_fraction * int(df.shape[0]))
step = 6

past = 720
future = 72
learning_rate = 0.001
batch_size = 256
epochs = 10


def normalize(data, train_split):
    data_mean = data[:train_split].mean(axis=0)
    data_std = data[:train_split].std(axis=0)
    return (data - data_mean) / data_std

print(
    "The selected parameters are:",
    ", ".join([titles[i] for i in [0, 1, 5, 7, 8, 10, 11]]),
)
selected_features = [feature_keys[i] for i in [0, 1, 5, 7, 8, 10, 11]]
features = df[selected_features]
features.index = df[date_time_key]
features.head()

features = normalize(features.values, train_split)
features = pd.DataFrame(features)
features.head()

train_data = features.loc[0 : train_split - 1]
val_data = features.loc[train_split:]

start = past + future
end = start + train_split

x_train = train_data[[i for i in range(7)]].values
y_train = features.iloc[start:end][[1]]

sequence_length = int(past / step)

dataset_train = keras.preprocessing.timeseries_dataset_from_array(
    x_train,
    y_train,
    sequence_length=sequence_length,
    sampling_rate=step,
    batch_size=batch_size,
)

x_end = len(val_data) - past - future

label_start = train_split + past + future

x_val = val_data.iloc[:x_end][[i for i in range(7)]].values
y_val = features.iloc[label_start:][[1]]

dataset_val = keras.preprocessing.timeseries_dataset_from_array(
    x_val,
    y_val,
    sequence_length=sequence_length,
    sampling_rate=step,
    batch_size=batch_size,
)


for batch in dataset_train.take(1):
    inputs, targets = batch

print("Input shape:", inputs.numpy().shape)
print("Target shape:", targets.numpy().shape)

inputs = keras.layers.Input(shape=(inputs.shape[1], inputs.shape[2]))
lstm_out = keras.layers.LSTM(32)(inputs)
outputs = keras.layers.Dense(1)(lstm_out)

model = keras.Model(inputs=inputs, outputs=outputs)
model.compile(optimizer=keras.optimizers.Adam(learning_rate=learning_rate), loss="mse")
model.summary()

path_checkpoint = "model_checkpoint.h5"
es_callback = keras.callbacks.EarlyStopping(monitor="val_loss", min_delta=0, patience=5)

modelckpt_callback = keras.callbacks.ModelCheckpoint(
    monitor="val_loss",
    filepath=path_checkpoint,
    verbose=1,
    save_weights_only=True,
    save_best_only=True,
)

history = model.fit(
    dataset_train,
    epochs=epochs,
    validation_data=dataset_val,
    callbacks=[es_callback, modelckpt_callback],
)

def visualize_loss(history, title):
    loss = history.history["loss"]
    val_loss = history.history["val_loss"]
    epochs = range(len(loss))
    plt.figure()
    plt.plot(epochs, loss, "b", label="Training loss")
    plt.plot(epochs, val_loss, "r", label="Validation loss")
    plt.title(title)
    plt.xlabel("Epochs")
    plt.ylabel("Loss")
    plt.legend()
    plt.show()


visualize_loss(history, "Training and Validation Loss")

def show_plot(plot_data, delta, title):
    labels = ["History", "True Future", "Model Prediction"]
    marker = [".-", "rx", "go"]
    time_steps = list(range(-(plot_data[0].shape[0]), 0))
    if delta:
        future = delta
    else:
        future = 0

    plt.title(title)
    for i, val in enumerate(plot_data):
        if i:
            plt.plot(future, plot_data[i], marker[i], markersize=10, label=labels[i])
        else:
            plt.plot(time_steps, plot_data[i].flatten(), marker[i], label=labels[i])
    plt.legend()
    plt.xlim([time_steps[0], (future + 5) * 2])
    plt.xlabel("Time-Step")
    plt.show()
    return


for x, y in dataset_val.take(5):
    show_plot(
        [x[0][:, 1].numpy(), y[0].numpy(), model.predict(x)[0]],
        12,
        "Single Step Prediction",
    )

 |  |
 |  |
 |  |

2.2.3 Neural style transfer(使用梯度下降将参考图像的风格转移到目标图像 )
????????风格迁移包括生成与基本图像具有相同“内容”的图像,但具有不同图片的“风格”(通常是艺术)。这是通过优化具有 3 个组件的损失函数来实现的:“样式损失”、“内容损失”和“总变化损失”:总变化损失在组合图像的像素之间施加局部空间连续性,使其具有视觉连贯性。风格损失是深度学习保留的地方——它是使用深度卷积神经网络定义的。准确地说,它包含从卷积网络(在 ImageNet 上训练)的不同层中提取的基本图像和样式参考图像表示的 Gram 矩阵之间的 L2 距离总和。一般的想法是在不同的空间尺度(相当大的尺度——由所考虑的层的深度定义)捕获颜色/纹理信息。内容损失是基础图像的特征(从深层提取)与组合图像的特征之间的 L2 距离,使生成的图像与原始图像足够接近。 原始的两张图片如下。
 |  |
代码及运行结果(neural_style_transfer.py)
import numpy as np
import tensorflow as tf
from tensorflow import keras
from tensorflow.keras.applications import vgg19

base_image_path = 'paris.jpg'
style_reference_image_path = 'starry_night.jpg'
result_prefix = "paris_generated"

# Weights of the different loss components
total_variation_weight = 1e-6
style_weight = 1e-6
content_weight = 2.5e-8

# Dimensions of the generated picture.
width, height = keras.preprocessing.image.load_img(base_image_path).size
img_nrows = 400
img_ncols = int(width * img_nrows / height)


from PIL import Image
import matplotlib.pyplot as plt

plt.figure('paris.jpg')
plt.imshow(Image.open(base_image_path))
plt.axis('on')
plt.title('paris')
plt.show()

plt.figure('starry_night.jpg')
plt.imshow(Image.open(style_reference_image_path))
plt.axis('on')
plt.title('starry_night')
plt.show()

def preprocess_image(image_path):
    # Util function to open, resize and format pictures into appropriate tensors
    img = keras.preprocessing.image.load_img(
        image_path, target_size=(img_nrows, img_ncols)
    )
    img = keras.preprocessing.image.img_to_array(img)
    img = np.expand_dims(img, axis=0)
    img = vgg19.preprocess_input(img)
    return tf.convert_to_tensor(img)


def deprocess_image(x):
    # Util function to convert a tensor into a valid image
    x = x.reshape((img_nrows, img_ncols, 3))
    # Remove zero-center by mean pixel
    x[:, :, 0] += 103.939
    x[:, :, 1] += 116.779
    x[:, :, 2] += 123.68
    # 'BGR'->'RGB'
    x = x[:, :, ::-1]
    x = np.clip(x, 0, 255).astype("uint8")
    return x

# The gram matrix of an image tensor (feature-wise outer product)


def gram_matrix(x):
    x = tf.transpose(x, (2, 0, 1))
    features = tf.reshape(x, (tf.shape(x)[0], -1))
    gram = tf.matmul(features, tf.transpose(features))
    return gram


# The "style loss" is designed to maintain
# the style of the reference image in the generated image.
# It is based on the gram matrices (which capture style) of
# feature maps from the style reference image
# and from the generated image


def style_loss(style, combination):
    S = gram_matrix(style)
    C = gram_matrix(combination)
    channels = 3
    size = img_nrows * img_ncols
    return tf.reduce_sum(tf.square(S - C)) / (4.0 * (channels ** 2) * (size ** 2))


# An auxiliary loss function
# designed to maintain the "content" of the
# base image in the generated image


def content_loss(base, combination):
    return tf.reduce_sum(tf.square(combination - base))


# The 3rd loss function, total variation loss,
# designed to keep the generated image locally coherent


def total_variation_loss(x):
    a = tf.square(
        x[:, : img_nrows - 1, : img_ncols - 1, :] - x[:, 1:, : img_ncols - 1, :]
    )
    b = tf.square(
        x[:, : img_nrows - 1, : img_ncols - 1, :] - x[:, : img_nrows - 1, 1:, :]
    )
    return tf.reduce_sum(tf.pow(a + b, 1.25))

# Build a VGG19 model loaded with pre-trained ImageNet weights
model = vgg19.VGG19(weights="imagenet", include_top=False)

# Get the symbolic outputs of each "key" layer (we gave them unique names).
outputs_dict = dict([(layer.name, layer.output) for layer in model.layers])

# Set up a model that returns the activation values for every layer in
# VGG19 (as a dict).
feature_extractor = keras.Model(inputs=model.inputs, outputs=outputs_dict)

# List of layers to use for the style loss.
style_layer_names = [
    "block1_conv1",
    "block2_conv1",
    "block3_conv1",
    "block4_conv1",
    "block5_conv1",
]
# The layer to use for the content loss.
content_layer_name = "block5_conv2"


def compute_loss(combination_image, base_image, style_reference_image):
    input_tensor = tf.concat(
        [base_image, style_reference_image, combination_image], axis=0
    )
    features = feature_extractor(input_tensor)

    # Initialize the loss
    loss = tf.zeros(shape=())

    # Add content loss
    layer_features = features[content_layer_name]
    base_image_features = layer_features[0, :, :, :]
    combination_features = layer_features[2, :, :, :]
    loss = loss + content_weight * content_loss(
        base_image_features, combination_features
    )
    # Add style loss
    for layer_name in style_layer_names:
        layer_features = features[layer_name]
        style_reference_features = layer_features[1, :, :, :]
        combination_features = layer_features[2, :, :, :]
        sl = style_loss(style_reference_features, combination_features)
        loss += (style_weight / len(style_layer_names)) * sl

    # Add total variation loss
    loss += total_variation_weight * total_variation_loss(combination_image)
    return loss

@tf.function
def compute_loss_and_grads(combination_image, base_image, style_reference_image):
    with tf.GradientTape() as tape:
        loss = compute_loss(combination_image, base_image, style_reference_image)
    grads = tape.gradient(loss, combination_image)
    return loss, grads

optimizer = keras.optimizers.SGD(
    keras.optimizers.schedules.ExponentialDecay(
        initial_learning_rate=100.0, decay_steps=100, decay_rate=0.96
    )
)

base_image = preprocess_image(base_image_path)
style_reference_image = preprocess_image(style_reference_image_path)
combination_image = tf.Variable(preprocess_image(base_image_path))

iterations = 4000
for i in range(1, iterations + 1):
    loss, grads = compute_loss_and_grads(
        combination_image, base_image, style_reference_image
    )
    optimizer.apply_gradients([(grads, combination_image)])
    if i % 100 == 0:
        print("Iteration %d: loss=%.2f" % (i, loss))
        img = deprocess_image(combination_image.numpy())
        fname = result_prefix + "_at_iteration_%d.png" % i
        keras.preprocessing.image.save_img(fname, img)

plt.figure('_at_iteration_4000.png')
plt.imshow(Image.open(result_prefix + "_at_iteration_4000.png"))
plt.axis('on')
plt.title('_at_iteration_4000')
plt.show()


2.2.4 OCR model for reading Captchas(光学字符识别模型用于读取图片验证码)
????????此示例构建了一个简单 OCR 模型用于识别图片中的验证码文字。 除了结合 CNN 和 RNN 之外,它还说明了如何实例化一个新层并将其用作实现 CTC 损失的“端点层”。

代码及运行结果(captcha_ocr.py)
import os
import numpy as np
import matplotlib.pyplot as plt

from pathlib import Path
from collections import Counter

import tensorflow as tf
from tensorflow import keras
from tensorflow.keras import layers

data_dir = Path("./captcha_images_v2/")

# Get list of all the images
images = sorted(list(map(str, list(data_dir.glob("*.png")))))
labels = [img.split(os.path.sep)[-1].split(".png")[0] for img in images]
characters = set(char for label in labels for char in label)

print("Number of images found: ", len(images))
print("Number of labels found: ", len(labels))
print("Number of unique characters: ", len(characters))
print("Characters present: ", characters)

# Batch size for training and validation
batch_size = 16

# Desired image dimensions
img_width = 200
img_height = 50

# Factor by which the image is going to be downsampled
# by the convolutional blocks. We will be using two
# convolution blocks and each block will have
# a pooling layer which downsample the features by a factor of 2.
# Hence total downsampling factor would be 4.
downsample_factor = 4

# Maximum length of any captcha in the dataset
max_length = max([len(label) for label in labels])

# Mapping characters to integers
char_to_num = layers.experimental.preprocessing.StringLookup(
    vocabulary=list(characters), mask_token=None
)

# Mapping integers back to original characters

num_to_char = layers.experimental.preprocessing.StringLookup(
    vocabulary=char_to_num.get_vocabulary(), mask_token=None, invert=True
)


def split_data(images, labels, train_size=0.9, shuffle=True):
    # 1. Get the total size of the dataset
    size = len(images)
    # 2. Make an indices array and shuffle it, if required
    indices = np.arange(size)
    if shuffle:
        np.random.shuffle(indices)
    # 3. Get the size of training samples
    train_samples = int(size * train_size)
    # 4. Split data into training and validation sets
    x_train, y_train = images[indices[:train_samples]], labels[indices[:train_samples]]
    x_valid, y_valid = images[indices[train_samples:]], labels[indices[train_samples:]]
    return x_train, x_valid, y_train, y_valid


# Splitting data into training and validation sets
x_train, x_valid, y_train, y_valid = split_data(np.array(images), np.array(labels))


def encode_single_sample(img_path, label):
    # 1. Read image
    img = tf.io.read_file(img_path)
    # 2. Decode and convert to grayscale
    img = tf.io.decode_png(img, channels=1)
    # 3. Convert to float32 in [0, 1] range
    img = tf.image.convert_image_dtype(img, tf.float32)
    # 4. Resize to the desired size
    img = tf.image.resize(img, [img_height, img_width])
    # 5. Transpose the image because we want the time
    # dimension to correspond to the width of the image.
    img = tf.transpose(img, perm=[1, 0, 2])
    # 6. Map the characters in label to numbers
    label = char_to_num(tf.strings.unicode_split(label, input_encoding="UTF-8"))
    # 7. Return a dict as our model is expecting two inputs
    return {"image": img, "label": label}

train_dataset = tf.data.Dataset.from_tensor_slices((x_train, y_train))
train_dataset = (
    train_dataset.map(
        encode_single_sample, num_parallel_calls=tf.data.experimental.AUTOTUNE
    )
    .batch(batch_size)
    .prefetch(buffer_size=tf.data.experimental.AUTOTUNE)
)

validation_dataset = tf.data.Dataset.from_tensor_slices((x_valid, y_valid))
validation_dataset = (
    validation_dataset.map(
        encode_single_sample, num_parallel_calls=tf.data.experimental.AUTOTUNE
    )
    .batch(batch_size)
    .prefetch(buffer_size=tf.data.experimental.AUTOTUNE)
)

_, ax = plt.subplots(4, 4, figsize=(10, 5))
for batch in train_dataset.take(1):
    images = batch["image"]
    labels = batch["label"]
    for i in range(16):
        img = (images[i] * 255).numpy().astype("uint8")
        label = tf.strings.reduce_join(num_to_char(labels[i])).numpy().decode("utf-8")
        ax[i // 4, i % 4].imshow(img[:, :, 0].T, cmap="gray")
        ax[i // 4, i % 4].set_title(label)
        ax[i // 4, i % 4].axis("off")
plt.show()

class CTCLayer(layers.Layer):
    def __init__(self, name=None):
        super().__init__(name=name)
        self.loss_fn = keras.backend.ctc_batch_cost

    def call(self, y_true, y_pred):
        # Compute the training-time loss value and add it
        # to the layer using `self.add_loss()`.
        batch_len = tf.cast(tf.shape(y_true)[0], dtype="int64")
        input_length = tf.cast(tf.shape(y_pred)[1], dtype="int64")
        label_length = tf.cast(tf.shape(y_true)[1], dtype="int64")

        input_length = input_length * tf.ones(shape=(batch_len, 1), dtype="int64")
        label_length = label_length * tf.ones(shape=(batch_len, 1), dtype="int64")

        loss = self.loss_fn(y_true, y_pred, input_length, label_length)
        self.add_loss(loss)

        # At test time, just return the computed predictions
        return y_pred


def build_model():
    # Inputs to the model
    input_img = layers.Input(
        shape=(img_width, img_height, 1), name="image", dtype="float32"
    )
    labels = layers.Input(name="label", shape=(None,), dtype="float32")

    # First conv block
    x = layers.Conv2D(
        32,
        (3, 3),
        activation="relu",
        kernel_initializer="he_normal",
        padding="same",
        name="Conv1",
    )(input_img)
    x = layers.MaxPooling2D((2, 2), name="pool1")(x)

    # Second conv block
    x = layers.Conv2D(
        64,
        (3, 3),
        activation="relu",
        kernel_initializer="he_normal",
        padding="same",
        name="Conv2",
    )(x)
    x = layers.MaxPooling2D((2, 2), name="pool2")(x)

    # We have used two max pool with pool size and strides 2.
    # Hence, downsampled feature maps are 4x smaller. The number of
    # filters in the last layer is 64. Reshape accordingly before
    # passing the output to the RNN part of the model
    new_shape = ((img_width // 4), (img_height // 4) * 64)
    x = layers.Reshape(target_shape=new_shape, name="reshape")(x)
    x = layers.Dense(64, activation="relu", name="dense1")(x)
    x = layers.Dropout(0.2)(x)

    # RNNs
    x = layers.Bidirectional(layers.LSTM(128, return_sequences=True, dropout=0.25))(x)
    x = layers.Bidirectional(layers.LSTM(64, return_sequences=True, dropout=0.25))(x)

    # Output layer
    x = layers.Dense(
        len(char_to_num.get_vocabulary()) + 1, activation="softmax", name="dense2"
    )(x)

    # Add CTC layer for calculating CTC loss at each step
    output = CTCLayer(name="ctc_loss")(labels, x)

    # Define the model
    model = keras.models.Model(
        inputs=[input_img, labels], outputs=output, name="ocr_model_v1"
    )
    # Optimizer
    opt = keras.optimizers.Adam()
    # Compile the model and return
    model.compile(optimizer=opt)
    return model


# Get the model
model = build_model()
model.summary()

epochs = 100
early_stopping_patience = 10
# Add early stopping
early_stopping = keras.callbacks.EarlyStopping(
    monitor="val_loss", patience=early_stopping_patience, restore_best_weights=True
)

# Train the model
history = model.fit(
    train_dataset,
    validation_data=validation_dataset,
    epochs=epochs,
    callbacks=[early_stopping],
)

# Get the prediction model by extracting layers till the output layer
prediction_model = keras.models.Model(
    model.get_layer(name="image").input, model.get_layer(name="dense2").output
)
prediction_model.summary()

# A utility function to decode the output of the network
def decode_batch_predictions(pred):
    input_len = np.ones(pred.shape[0]) * pred.shape[1]
    # Use greedy search. For complex tasks, you can use beam search
    results = keras.backend.ctc_decode(pred, input_length=input_len, greedy=True)[0][0][
        :, :max_length
    ]
    # Iterate over the results and get back the text
    output_text = []
    for res in results:
        res = tf.strings.reduce_join(num_to_char(res)).numpy().decode("utf-8")
        output_text.append(res)
    return output_text


#  Let's check results on some validation samples
for batch in validation_dataset.take(1):
    batch_images = batch["image"]
    batch_labels = batch["label"]

    preds = prediction_model.predict(batch_images)
    pred_texts = decode_batch_predictions(preds)

    orig_texts = []
    for label in batch_labels:
        label = tf.strings.reduce_join(num_to_char(label)).numpy().decode("utf-8")
        orig_texts.append(label)

    _, ax = plt.subplots(4, 4, figsize=(15, 5))
    for i in range(len(pred_texts)):
        img = (batch_images[i, :, :, 0] * 255).numpy().astype(np.uint8)
        img = img.T
        title = f"Prediction: {pred_texts[i]}"
        ax[i // 4, i % 4].imshow(img, cmap="gray")
        ax[i // 4, i % 4].set_title(title)
        ax[i // 4, i % 4].axis("off")
plt.show()


2.2.5 Graph attention network (GAT) for node classification(图注意力网络用于节点分类)
????????图神经网络是首选的神经网络架构,用于处理结构化为图的数据(例如,社交网络或分子结构),比全连接网络或卷积网络产生更好的结果。此示例将实现一个特定的图神经网络,称为图注意力网络 (GAT),以根据引用的论文类型(使用 Cora 数据集)预测科学论文的标签。 Cora数据集下载及解压后如下图所示。


代码及运行结果(gat_node_classification.py)
import tensorflow as tf
from tensorflow import keras
from tensorflow.keras import layers
import numpy as np
import pandas as pd
import os
import warnings

warnings.filterwarnings("ignore")
pd.set_option("display.max_columns", 6)
pd.set_option("display.max_rows", 6)
np.random.seed(2)


data_dir = 'D:\\搜狗高速下载\\cora\\cora'

citations = pd.read_csv(
    os.path.join(data_dir, "cora.cites"),
    sep="\t",
    header=None,
    names=["target", "source"],
)

papers = pd.read_csv(
    os.path.join(data_dir, "cora.content"),
    sep="\t",
    header=None,
    names=["paper_id"] + [f"term_{idx}" for idx in range(1433)] + ["subject"],
)

class_values = sorted(papers["subject"].unique())
class_idx = {name: id for id, name in enumerate(class_values)}
paper_idx = {name: idx for idx, name in enumerate(sorted(papers["paper_id"].unique()))}

papers["paper_id"] = papers["paper_id"].apply(lambda name: paper_idx[name])
citations["source"] = citations["source"].apply(lambda name: paper_idx[name])
citations["target"] = citations["target"].apply(lambda name: paper_idx[name])
papers["subject"] = papers["subject"].apply(lambda value: class_idx[value])

print(citations)
print(papers)

# Obtain random indices
random_indices = np.random.permutation(range(papers.shape[0]))

# 50/50 split
train_data = papers.iloc[random_indices[: len(random_indices) // 2]]
test_data = papers.iloc[random_indices[len(random_indices) // 2 :]]

# Obtain paper indices which will be used to gather node states
# from the graph later on when training the model
train_indices = train_data["paper_id"].to_numpy()
test_indices = test_data["paper_id"].to_numpy()

# Obtain ground truth labels corresponding to each paper_id
train_labels = train_data["subject"].to_numpy()
test_labels = test_data["subject"].to_numpy()

# Define graph, namely an edge tensor and a node feature tensor
edges = tf.convert_to_tensor(citations[["target", "source"]])
node_states = tf.convert_to_tensor(papers.sort_values("paper_id").iloc[:, 1:-1])

# Print shapes of the graph
print("Edges shape:\t\t", edges.shape)
print("Node features shape:", node_states.shape)

class GraphAttention(layers.Layer):
    def __init__(
        self,
        units,
        kernel_initializer="glorot_uniform",
        kernel_regularizer=None,
        **kwargs,
    ):
        super().__init__(**kwargs)
        self.units = units
        self.kernel_initializer = keras.initializers.get(kernel_initializer)
        self.kernel_regularizer = keras.regularizers.get(kernel_regularizer)

    def build(self, input_shape):

        self.kernel = self.add_weight(
            shape=(input_shape[0][-1], self.units),
            trainable=True,
            initializer=self.kernel_initializer,
            regularizer=self.kernel_regularizer,
            name="kernel",
        )
        self.kernel_attention = self.add_weight(
            shape=(self.units * 2, 1),
            trainable=True,
            initializer=self.kernel_initializer,
            regularizer=self.kernel_regularizer,
            name="kernel_attention",
        )
        self.built = True

    def call(self, inputs):
        node_states, edges = inputs

        # Linearly transform node states
        node_states_transformed = tf.matmul(node_states, self.kernel)

        # (1) Compute pair-wise attention scores
        node_states_expanded = tf.gather(node_states_transformed, edges)
        node_states_expanded = tf.reshape(
            node_states_expanded, (tf.shape(edges)[0], -1)
        )
        attention_scores = tf.nn.leaky_relu(
            tf.matmul(node_states_expanded, self.kernel_attention)
        )
        attention_scores = tf.squeeze(attention_scores, -1)

        # (2) Normalize attention scores
        attention_scores = tf.math.exp(tf.clip_by_value(attention_scores, -2, 2))
        attention_scores_sum = tf.math.unsorted_segment_sum(
            data=attention_scores,
            segment_ids=edges[:, 0],
            num_segments=tf.reduce_max(edges[:, 0]) + 1,
        )
        attention_scores_sum = tf.repeat(
            attention_scores_sum, tf.math.bincount(tf.cast(edges[:, 0], "int32"))
        )
        attention_scores_norm = attention_scores / attention_scores_sum

        # (3) Gather node states of neighbors, apply attention scores and aggregate
        node_states_neighbors = tf.gather(node_states_transformed, edges[:, 1])
        out = tf.math.unsorted_segment_sum(
            data=node_states_neighbors * attention_scores_norm[:, tf.newaxis],
            segment_ids=edges[:, 0],
            num_segments=tf.shape(node_states)[0],
        )
        return out


class MultiHeadGraphAttention(layers.Layer):
    def __init__(self, units, num_heads=8, merge_type="concat", **kwargs):
        super().__init__(**kwargs)
        self.num_heads = num_heads
        self.merge_type = merge_type
        self.attention_layers = [GraphAttention(units) for _ in range(num_heads)]

    def call(self, inputs):
        atom_features, pair_indices = inputs

        # Obtain outputs from each attention head
        outputs = [
            attention_layer([atom_features, pair_indices])
            for attention_layer in self.attention_layers
        ]
        # Concatenate or average the node states from each head
        if self.merge_type == "concat":
            outputs = tf.concat(outputs, axis=-1)
        else:
            outputs = tf.reduce_mean(tf.stack(outputs, axis=-1), axis=-1)
        # Activate and return node states
        return tf.nn.relu(outputs)

class GraphAttentionNetwork(keras.Model):
    def __init__(
        self,
        node_states,
        edges,
        hidden_units,
        num_heads,
        num_layers,
        output_dim,
        **kwargs,
    ):
        super().__init__(**kwargs)
        self.node_states = node_states
        self.edges = edges
        self.preprocess = layers.Dense(hidden_units * num_heads, activation="relu")
        self.attention_layers = [
            MultiHeadGraphAttention(hidden_units, num_heads) for _ in range(num_layers)
        ]
        self.output_layer = layers.Dense(output_dim)

    def call(self, inputs):
        node_states, edges = inputs
        x = self.preprocess(node_states)
        for attention_layer in self.attention_layers:
            x = attention_layer([x, edges]) + x
        outputs = self.output_layer(x)
        return outputs

    def train_step(self, data):
        indices, labels = data

        with tf.GradientTape() as tape:
            # Forward pass
            outputs = self([self.node_states, self.edges])
            # Compute loss
            loss = self.compiled_loss(labels, tf.gather(outputs, indices))
        # Compute gradients
        grads = tape.gradient(loss, self.trainable_weights)
        # Apply gradients (update weights)
        optimizer.apply_gradients(zip(grads, self.trainable_weights))
        # Update metric(s)
        self.compiled_metrics.update_state(labels, tf.gather(outputs, indices))

        return {m.name: m.result() for m in self.metrics}

    def predict_step(self, data):
        indices = data
        # Forward pass
        outputs = self([self.node_states, self.edges])
        # Compute probabilities
        return tf.nn.softmax(tf.gather(outputs, indices))

    def test_step(self, data):
        indices, labels = data
        # Forward pass
        outputs = self([self.node_states, self.edges])
        # Compute loss
        loss = self.compiled_loss(labels, tf.gather(outputs, indices))
        # Update metric(s)
        self.compiled_metrics.update_state(labels, tf.gather(outputs, indices))

        return {m.name: m.result() for m in self.metrics}

# Define hyper-parameters
HIDDEN_UNITS = 100
NUM_HEADS = 8
NUM_LAYERS = 3
OUTPUT_DIM = len(class_values)

NUM_EPOCHS = 100
BATCH_SIZE = 256
VALIDATION_SPLIT = 0.1
LEARNING_RATE = 3e-1
MOMENTUM = 0.9

loss_fn = keras.losses.SparseCategoricalCrossentropy(from_logits=True)
optimizer = keras.optimizers.SGD(LEARNING_RATE, momentum=MOMENTUM)
accuracy_fn = keras.metrics.SparseCategoricalAccuracy(name="acc")
early_stopping = keras.callbacks.EarlyStopping(
    monitor="val_acc", min_delta=1e-5, patience=5, restore_best_weights=True
)

# Build model
gat_model = GraphAttentionNetwork(
    node_states, edges, HIDDEN_UNITS, NUM_HEADS, NUM_LAYERS, OUTPUT_DIM
)

# Compile model
gat_model.compile(loss=loss_fn, optimizer=optimizer, metrics=[accuracy_fn])

gat_model.fit(
    x=train_indices,
    y=train_labels,
    validation_split=VALIDATION_SPLIT,
    batch_size=BATCH_SIZE,
    epochs=NUM_EPOCHS,
    callbacks=[early_stopping],
    verbose=2,
)

_, test_accuracy = gat_model.evaluate(x=test_indices, y=test_labels, verbose=0)

print("--" * 38 + f"\nTest Accuracy {test_accuracy*100:.1f}%")

test_probs = gat_model.predict(x=test_indices)

mapping = {v: k for (k, v) in class_idx.items()}

for i, (probs, label) in enumerate(zip(test_probs[:10], test_labels[:10])):
    print(f"Example {i+1}: {mapping[label]}")
    for j, c in zip(probs, class_idx.keys()):
        print(f"\tProbability of {c: <24} = {j*100:7.3f}%")
    print("---" * 20)

2.2.6 Collaborative Filtering for Movie Recommendations(基于协同过滤的电影推荐)
????????该示例演示了使用 Movielens 数据集基于协同过滤的方法向用户推荐电影, 此评分数据集列出了一组用户对一组电影的评分。目标是能够预测用户尚未观看的电影的评分,然后可以向用户推荐具有最高预测评级的电影。下载的数据集ml-latest-small.zip解压后如下图所示。


代码及运行结果(collaborative_filtering_movielens.py)
import pandas as pd
import numpy as np
from zipfile import ZipFile
import tensorflow as tf
from tensorflow import keras
from tensorflow.keras import layers
from pathlib import Path
import matplotlib.pyplot as plt

# Download the actual data from http://files.grouplens.org/datasets/movielens/ml-latest-small.zip"
# Use the ratings.csv file
movielens_dir = "D:\\迅雷下载\\ml-latest-small\\ml-latest-small\\"

ratings_file = movielens_dir + "ratings.csv"
df = pd.read_csv(ratings_file)

user_ids = df["userId"].unique().tolist()
user2user_encoded = {x: i for i, x in enumerate(user_ids)}
userencoded2user = {i: x for i, x in enumerate(user_ids)}
movie_ids = df["movieId"].unique().tolist()
movie2movie_encoded = {x: i for i, x in enumerate(movie_ids)}
movie_encoded2movie = {i: x for i, x in enumerate(movie_ids)}
df["user"] = df["userId"].map(user2user_encoded)
df["movie"] = df["movieId"].map(movie2movie_encoded)

num_users = len(user2user_encoded)
num_movies = len(movie_encoded2movie)
df["rating"] = df["rating"].values.astype(np.float32)
# min and max ratings will be used to normalize the ratings later
min_rating = min(df["rating"])
max_rating = max(df["rating"])

print(
    "Number of users: {}, Number of Movies: {}, Min rating: {}, Max rating: {}".format(
        num_users, num_movies, min_rating, max_rating
    )
)

df = df.sample(frac=1, random_state=42)
x = df[["user", "movie"]].values
# Normalize the targets between 0 and 1. Makes it easy to train.
y = df["rating"].apply(lambda x: (x - min_rating) / (max_rating - min_rating)).values
# Assuming training on 90% of the data and validating on 10%.
train_indices = int(0.9 * df.shape[0])
x_train, x_val, y_train, y_val = (
    x[:train_indices],
    x[train_indices:],
    y[:train_indices],
    y[train_indices:],
)

EMBEDDING_SIZE = 50


class RecommenderNet(keras.Model):
    def __init__(self, num_users, num_movies, embedding_size, **kwargs):
        super(RecommenderNet, self).__init__(**kwargs)
        self.num_users = num_users
        self.num_movies = num_movies
        self.embedding_size = embedding_size
        self.user_embedding = layers.Embedding(
            num_users,
            embedding_size,
            embeddings_initializer="he_normal",
            embeddings_regularizer=keras.regularizers.l2(1e-6),
        )
        self.user_bias = layers.Embedding(num_users, 1)
        self.movie_embedding = layers.Embedding(
            num_movies,
            embedding_size,
            embeddings_initializer="he_normal",
            embeddings_regularizer=keras.regularizers.l2(1e-6),
        )
        self.movie_bias = layers.Embedding(num_movies, 1)

    def call(self, inputs):
        user_vector = self.user_embedding(inputs[:, 0])
        user_bias = self.user_bias(inputs[:, 0])
        movie_vector = self.movie_embedding(inputs[:, 1])
        movie_bias = self.movie_bias(inputs[:, 1])
        dot_user_movie = tf.tensordot(user_vector, movie_vector, 2)
        # Add all the components (including bias)
        x = dot_user_movie + user_bias + movie_bias
        # The sigmoid activation forces the rating to between 0 and 1
        return tf.nn.sigmoid(x)


model = RecommenderNet(num_users, num_movies, EMBEDDING_SIZE)
model.compile(
    loss=tf.keras.losses.BinaryCrossentropy(), optimizer=keras.optimizers.Adam(lr=0.001)
)

history = model.fit(
    x=x_train,
    y=y_train,
    batch_size=64,
    epochs=5,
    verbose=1,
    validation_data=(x_val, y_val),
)

plt.plot(history.history["loss"])
plt.plot(history.history["val_loss"])
plt.title("model loss")
plt.ylabel("loss")
plt.xlabel("epoch")
plt.legend(["train", "test"], loc="upper left")
plt.show()

movie_df = pd.read_csv(movielens_dir + "movies.csv")

# Let us get a user and see the top recommendations.
user_id = df.userId.sample(1).iloc[0]
movies_watched_by_user = df[df.userId == user_id]
movies_not_watched = movie_df[
    ~movie_df["movieId"].isin(movies_watched_by_user.movieId.values)
]["movieId"]
movies_not_watched = list(
    set(movies_not_watched).intersection(set(movie2movie_encoded.keys()))
)
movies_not_watched = [[movie2movie_encoded.get(x)] for x in movies_not_watched]
user_encoder = user2user_encoded.get(user_id)
user_movie_array = np.hstack(
    ([[user_encoder]] * len(movies_not_watched), movies_not_watched)
)
ratings = model.predict(user_movie_array).flatten()
top_ratings_indices = ratings.argsort()[-10:][::-1]
recommended_movie_ids = [
    movie_encoded2movie.get(movies_not_watched[x][0]) for x in top_ratings_indices
]

print("Showing recommendations for user: {}".format(user_id))
print("====" * 9)
print("Movies with high ratings from user")
print("----" * 8)
top_movies_user = (
    movies_watched_by_user.sort_values(by="rating", ascending=False)
    .head(5)
    .movieId.values
)
movie_df_rows = movie_df[movie_df["movieId"].isin(top_movies_user)]
for row in movie_df_rows.itertuples():
    print(row.title, ":", row.genres)

print("----" * 8)
print("Top 10 movie recommendations")
print("----" * 8)
recommended_movies = movie_df[movie_df["movieId"].isin(recommended_movie_ids)]
for row in recommended_movies.itertuples():
    print(row.title, ":", row.genres)


3、总结

????????Keras作为一种流行的深度学习框架,可广泛应用于计算机视觉、自然语言处理、结构化数据处理、时间序列数据预测、音频数据分析、生成式深度学习、强化学习、图数据处理等研究领域。无论是研究人员、数据科学家,还是工程师或学习爱好者,都可利用该框架构建模型并训练预测,完成自己的任务。