本文需要预先引入ML包:
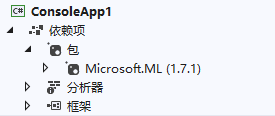
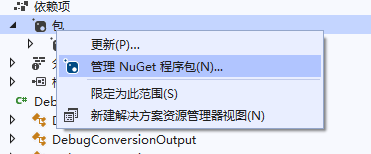
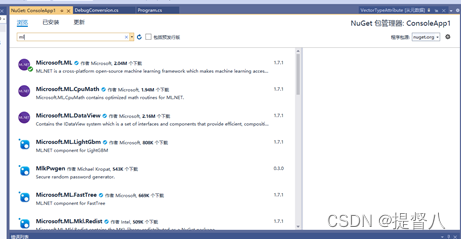
直接使用NuGet程序包管理添加引入
还需要提前准备预处理好的灰度图片,读取各像素点灰度值后进行标记(本次采用8*8图片):
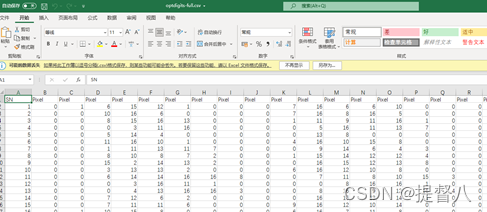
其中第SN列是序号(不参与运算)、Pixel列是像素值、Label列是结果。
具体流程如下:
首先需要加载数据,本次通过列信息加载:
// STEP 1: 准备数据
            var fulldata = mlContext.Data.LoadFromTextFile(path: TrainDataPath,
                    columns: new[]
                    {
                        new TextLoader.Column("Serial", DataKind.Single, 0),            //序号
                        new TextLoader.Column("PixelValues", DataKind.Single, 1, 64),   //特征值
                        new TextLoader.Column("Number", DataKind.Single, 65)            //标签值
                    },
                    hasHeader: true,
                    separatorChar: ','
                    );
之后配置训练通道:
 // STEP 2: 配置数据处理管道
            //var dataProcessPipeline = mlContext.Transforms.Conversion.MapValueToKey("Label", "Number", keyOrdinality: ValueToKeyMappingEstimator.KeyOrdinality.ByValue);
            var dataProcessPipeline = mlContext.Transforms.CustomMapping(new DebugConversion().GetMapping(), contractName: "DebugConversionAction")
                .Append(mlContext.Transforms.Conversion.MapValueToKey("Label", "Number", keyOrdinality: ValueToKeyMappingEstimator.KeyOrdinality.ByValue))
                .Append(mlContext.Transforms.Concatenate("Features", new string[] { "PixelValues", "DebugFeature" }));//DebugFeature输出固定为1.0F 用于输出

            // STEP 3: 配置训练算法
            //var trainer = mlContext.MulticlassClassification.Trainers.SdcaMaximumEntropy(labelColumnName: "Label", featureColumnName: "PixelValues");
            var trainer = mlContext.MulticlassClassification.Trainers.SdcaMaximumEntropy(labelColumnName: "Label", featureColumnName: "Features");
            var trainingPipeline = dataProcessPipeline.Append(trainer)
              .Append(mlContext.Transforms.Conversion.MapKeyToValue("Number", "Label"));
关于MapValueToKey:
MapValueToKey方法将Number值转换为Key类型,多元分类算法要求标签值必须是这种类型(类似枚举类型,二元分类要求标签为BOOL类型)。
MapValueToKey功能是将(字符串)值类型转换为KeyTpye类型。
有时候某些输入字段用来表示类型(类别特征),但本身并没有特别的含义,比如编号、电话号码、行政区域名称或编码等,这里需要把这些类型转换为1到一个整数如1-300来进行重新编号。
MapKeyToValue和MapValueToKey相反,它把将键类型转换回其原始值(字符串)。就是说标签是文本格式,在运算前已经被转换为数字枚举类型了,此时预测结果为数字,通过MapKeyToValue将其结果转换为对应文本。
MapValueToKey一般是对标签值进行编码,一般不用于特征值,如果是特征值为字符串类型的,建议采用独热编码。独热编码即 One-Hot 编码,又称一位有效编码,其方法是使用N位状态寄存器来对N个状态进行编码,每个状态都由他独立的寄存器位,并且在任意时候,其中只有一位有效。例如:
自然状态码为:0,1,2,3,4,5
独热编码为:000001,000010,000100,001000,010000,100000
MapKeyToValue可以把字符串转换为数字,但是这里需要才用独热编码呢?简单来说,假设把地域名称转换为1到10几个数字,在欧氏几何中1到3的欧拉距离和1到9的欧拉距离是不等的,但经过独热编码后,任意两点间的欧拉距离都是相等的,而我们这里的地域特征仅仅是想表达分类关系,彼此之间没有其他逻辑关系,所以应该采用独热编码。

之后执行训练即可:
// STEP 4: 训练模型使其与数据集拟合
            Console.WriteLine("=============== 训练模型使其与数据集拟合 ===============");

            Stopwatch stopWatch = new Stopwatch();
            stopWatch.Start();

            ITransformer trainedModel = trainingPipeline.Fit(trainData);

            stopWatch.Stop();
            Console.WriteLine("");
            Console.WriteLine($"花费时间 : {stopWatch.Elapsed}");

            // STEP 5:评估模型的准确性
            Console.WriteLine("===== 自测试 =====");
            var predictions = trainedModel.Transform(testData);
            var metrics = mlContext.MulticlassClassification.Evaluate(data: predictions, labelColumnName: "Number", scoreColumnName: "Score");
            Console.WriteLine($"************************************************************");
            Console.WriteLine($"*    {trainer.ToString()}多类分类模型模式   ");
            Console.WriteLine($"*-----------------------------------------------------------");
            Console.WriteLine($"    准确率     = {metrics.MacroAccuracy:0.####}, 值介于0和1之间,越接近1越好");
            Console.WriteLine($"    损失函数   = {metrics.LogLoss:0.####}, 越接近0越好");//损失函数就是用来表现预测与实际数据的差距程度
            Console.WriteLine($"    损失函数 1 = {metrics.PerClassLogLoss[0]:0.####}, 越接近0越好");
            Console.WriteLine($"    损失函数 2 = {metrics.PerClassLogLoss[1]:0.####}, 越接近0越好");
            Console.WriteLine($"    损失函数 3 = {metrics.PerClassLogLoss[2]:0.####}, 越接近0越好");
            Console.WriteLine($"************************************************************");

            var loadedModelOutputColumnNames = predictions.Schema.Where(col => !col.IsHidden).Select(col => col.Name);
            foreach (string column in loadedModelOutputColumnNames)
            {
                Console.WriteLine($"加载的模型输出列名称:{ column }");
            }

            // STEP 6:保存模型
            mlContext.ComponentCatalog.RegisterAssembly(typeof(DebugConversion).Assembly);
            mlContext.Model.Save(trainedModel, trainData.Schema, ModelPath);
            Console.WriteLine("保存模型于{0}", ModelPath);
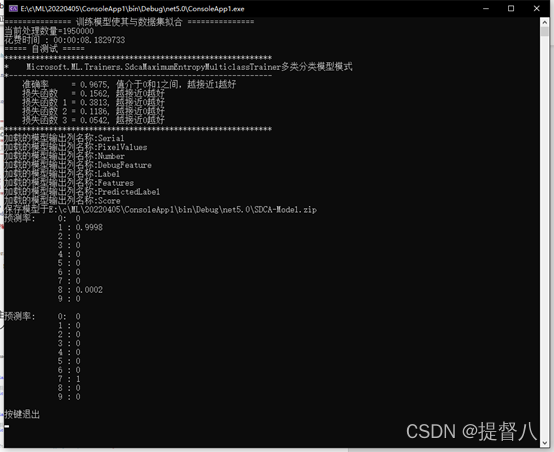
调用后执行结果如下图:
注:关于配置训练通道中注释掉的部分:
GetMapping方法为新增一个自定义数据处理通道,这个通道不做具体事情,就打印调试信息。
using Microsoft.ML.Transforms;
using System;

namespace ConsoleApp1
{

    public class DebugConversionInput
    {
        public float Serial { get; set; }
    }

    public class DebugConversionOutput
    {
        public float DebugFeature { get; set; }
    }

    [Microsoft.ML.Transforms.CustomMappingFactoryAttribute("DebugConversionAction")]
    public class DebugConversion : CustomMappingFactory<DebugConversionInput, DebugConversionOutput>
    {
        static long Count = 0;
        static long TotalCount = 0;

        public void CustomAction(DebugConversionInput input, DebugConversionOutput output)
        {
            output.DebugFeature = 1.0f;//不影响运算结果,数据处理通道的输出值固定为1.0f
            Count++;
            if (Count / 10000 > TotalCount)
            {
                TotalCount = Count / 10000;
                Console.Write(string.Format("\r{0}", "".PadLeft(Console.CursorLeft, ' ')));
                Console.Write(string.Format("\r{0}", $"当前处理数量={TotalCount}0000"));
            }
        }

        public override Action<DebugConversionInput, DebugConversionOutput> GetMapping()
              => CustomAction;
    }

}
完整代码如下:
using Microsoft.ML;
using Microsoft.ML.Data;
using Microsoft.ML.Transforms;
using System;
using System.Diagnostics;
using System.IO;
using System.Linq;

namespace ConsoleApp1
{
    class Program
    {

        static readonly string TrainDataPath = Path.Combine(Environment.CurrentDirectory, "optdigits-full.csv");
        static readonly string ModelPath = Path.Combine(Environment.CurrentDirectory, "SDCA-Model.zip");

        static void Main(string[] args)
        {
            MLContext mlContext = new MLContext(seed: 1);//seed:随机数种子
            TrainAndSaveModel(mlContext);
            TestSomePredictions(mlContext);

            Console.WriteLine("按键退出");
            Console.ReadKey();
        }


        //生成
        public static void TrainAndSaveModel(MLContext mlContext)
        {
            // STEP 1: 准备数据
            var fulldata = mlContext.Data.LoadFromTextFile(path: TrainDataPath,
                    columns: new[]
                    {
                        new TextLoader.Column("Serial", DataKind.Single, 0),            //序号
                        new TextLoader.Column("PixelValues", DataKind.Single, 1, 64),   //特征值
                        new TextLoader.Column("Number", DataKind.Single, 65)            //标签值
                    },
                    hasHeader: true,
                    separatorChar: ','
                    );

            var trainTestData = mlContext.Data.TrainTestSplit(fulldata, testFraction: 0.1);  //0.2的数据用作验证
            var trainData = trainTestData.TrainSet;
            var testData = trainTestData.TestSet;

            // STEP 2: 配置数据处理管道
            //var dataProcessPipeline = mlContext.Transforms.Conversion.MapValueToKey("Label", "Number", keyOrdinality: ValueToKeyMappingEstimator.KeyOrdinality.ByValue);
            var dataProcessPipeline = mlContext.Transforms.CustomMapping(new DebugConversion().GetMapping(), contractName: "DebugConversionAction")
                .Append(mlContext.Transforms.Conversion.MapValueToKey("Label", "Number", keyOrdinality: ValueToKeyMappingEstimator.KeyOrdinality.ByValue))
                .Append(mlContext.Transforms.Concatenate("Features", new string[] { "PixelValues", "DebugFeature" }));//DebugFeature输出固定为1.0F 用于输出

            // STEP 3: 配置训练算法
            //var trainer = mlContext.MulticlassClassification.Trainers.SdcaMaximumEntropy(labelColumnName: "Label", featureColumnName: "PixelValues");
            var trainer = mlContext.MulticlassClassification.Trainers.SdcaMaximumEntropy(labelColumnName: "Label", featureColumnName: "Features");
            var trainingPipeline = dataProcessPipeline.Append(trainer)
              .Append(mlContext.Transforms.Conversion.MapKeyToValue("Number", "Label"));

            // STEP 4: 训练模型使其与数据集拟合
            Console.WriteLine("=============== 训练模型使其与数据集拟合 ===============");

            Stopwatch stopWatch = new Stopwatch();
            stopWatch.Start();

            ITransformer trainedModel = trainingPipeline.Fit(trainData);

            stopWatch.Stop();
            Console.WriteLine("");
            Console.WriteLine($"花费时间 : {stopWatch.Elapsed}");

            // STEP 5:评估模型的准确性
            Console.WriteLine("===== 自测试 =====");
            var predictions = trainedModel.Transform(testData);
            var metrics = mlContext.MulticlassClassification.Evaluate(data: predictions, labelColumnName: "Number", scoreColumnName: "Score");
            Console.WriteLine($"************************************************************");
            Console.WriteLine($"*    {trainer.ToString()}多类分类模型模式   ");
            Console.WriteLine($"*-----------------------------------------------------------");
            Console.WriteLine($"    准确率     = {metrics.MacroAccuracy:0.####}, 值介于0和1之间,越接近1越好");
            Console.WriteLine($"    损失函数   = {metrics.LogLoss:0.####}, 越接近0越好");//损失函数就是用来表现预测与实际数据的差距程度
            Console.WriteLine($"    损失函数 1 = {metrics.PerClassLogLoss[0]:0.####}, 越接近0越好");
            Console.WriteLine($"    损失函数 2 = {metrics.PerClassLogLoss[1]:0.####}, 越接近0越好");
            Console.WriteLine($"    损失函数 3 = {metrics.PerClassLogLoss[2]:0.####}, 越接近0越好");
            Console.WriteLine($"************************************************************");

            var loadedModelOutputColumnNames = predictions.Schema.Where(col => !col.IsHidden).Select(col => col.Name);
            foreach (string column in loadedModelOutputColumnNames)
            {
                Console.WriteLine($"加载的模型输出列名称:{ column }");
            }

            // STEP 6:保存模型
            mlContext.ComponentCatalog.RegisterAssembly(typeof(DebugConversion).Assembly);
            mlContext.Model.Save(trainedModel, trainData.Schema, ModelPath);
            Console.WriteLine("保存模型于{0}", ModelPath);
        }

        //运行
        private static void TestSomePredictions(MLContext mlContext)
        {
            // 加载模型
            ITransformer trainedModel = mlContext.Model.Load(ModelPath, out var modelInputSchema);

            // 创建
            var predEngine = mlContext.Model.CreatePredictionEngine<InputData, OutPutData>(trainedModel);

            //num 1
            InputData MNIST1 = new InputData()
            {
                PixelValues = new float[64] { 0, 0, 0, 0, 14, 13, 1, 0, 0, 0, 0, 5, 16, 16, 2, 0, 0, 0, 0, 14, 16, 12, 0, 0, 0, 1, 10, 16, 16, 12, 0, 0, 0, 3, 12, 14, 16, 9, 0, 0, 0, 0, 0, 5, 16, 15, 0, 0, 0, 0, 0, 4, 16, 14, 0, 0, 0, 0, 0, 1, 13, 16, 1, 0 }
            };
            var resultprediction1 = predEngine.Predict(MNIST1);
            resultprediction1.PrintToConsole();

            //num 7
            InputData MNIST2 = new InputData()
            {
                PixelValues = new float[64] { 0, 0, 1, 8, 15, 10, 0, 0, 0, 3, 13, 15, 14, 14, 0, 0, 0, 5, 10, 0, 10, 12, 0, 0, 0, 0, 3, 5, 15, 10, 2, 0, 0, 0, 16, 16, 16, 16, 12, 0, 0, 1, 8, 12, 14, 8, 3, 0, 0, 0, 0, 10, 13, 0, 0, 0, 0, 0, 0, 11, 9, 0, 0, 0 }
            };
            var resultprediction2 = predEngine.Predict(MNIST2);
            resultprediction2.PrintToConsole();
        }


        class InputData
        {
            public float Serial;
            [VectorType(64)]
            public float[] PixelValues;
            public float Number;
        }

        class OutPutData : InputData
        {
            public float[] Score;

            public void PrintToConsole()
            {
                Console.WriteLine($"预测率:     0:  {Score[0]:0.####}");
                Console.WriteLine($"            1 : {Score[1]:0.####}");
                Console.WriteLine($"            2 : {Score[2]:0.####}");
                Console.WriteLine($"            3 : {Score[3]:0.####}");
                Console.WriteLine($"            4 : {Score[4]:0.####}");
                Console.WriteLine($"            5 : {Score[5]:0.####}");
                Console.WriteLine($"            6 : {Score[6]:0.####}");
                Console.WriteLine($"            7 : {Score[7]:0.####}");
                Console.WriteLine($"            8 : {Score[8]:0.####}");
                Console.WriteLine($"            9 : {Score[9]:0.####}");
                Console.WriteLine("");
            }
        }
    }
}